background image


MARTINA - SIVIGLIA - VALERY - ALESSIA - VANESSA 


STUFE A PELLET


Pag. 


MANUALE DI INSTALLAZIONE,  
USO E MANUTENZIONE


POÊLES À PELLET


Page 
33


MANUEL D'INSTALLATION,  
UTILISATION ET MAINTENACE


PELLET STOVES


Page 
63


INSTALLATION, USE AND 
MAINTENANCE HANDBOOK 

Summary of Contents for Martina

Page 1: ...LERY ALESSIA VANESSA STUFE A PELLET Pag 2 MANUALE DI INSTALLAZIONE USO E MANUTENZIONE PO LES PELLET Page 33 MANUEL D INSTALLATION UTILISATION ET MAINTENACE PELLET STOVES Page 63 INSTALLATION USE AND M...

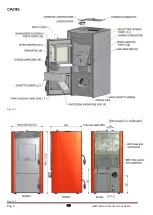
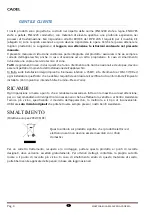
Page 2: ...Pag 2 MARTINA SOLARIS ALESSIA VANESSA Figura 1 Figura 2...

Page 3: ...16 5 9 SPEGNIMENTO 16 5 10 ATTENZIONE 16 5 11 SPEGNERE IL FUOCO 16 5 12 RIFORNIMENTO PELLETS 16 5 13 IMPOSTARE OROLOGIO 16 5 14 PROGRAMMAZIONE SETTIMANALE 17 5 15 TELECOMANDO OPTIONAL 18 6 DISPOSITIVI...

Page 4: ...ni degli impianti a biomassa inferiori a 35KW si fa riferimento al D M 37 08 ed ogni installatore qualificato che ne abbia i requisiti deve rilasciare il certificato di conformit dell impianto install...

Page 5: ...itutivo delle norme vigenti delle quali il costruttore qualificato deve essere in possesso Verificate dalle autorit locali se vi sono delle normative restrittive che riguardano la presa d aria combure...

Page 6: ...mino deve essere nello stesso locale in cui installato l apparecchio o tutt al pi nel locale attiguo e avere al disotto dell imbocco una camera di raccolta di solidi e condense accessibile tramite spo...

Page 7: ...veste una funzione importante per il buon funzionamento dell apparecchio riscaldante si consiglia un comignolo di tipo antivento A vedi Figura 5 Figura 5 L area dei fori per l evacuazione fumi deve es...

Page 8: ...i 4 0Pa Se necessario aumentare la presa d aria la quale deve essere realizzata ad una quota prossima al pavimento con griglia di protezione esterna antivolatili e in modo tale da non essere ostruita...

Page 9: ...itudine sopra i 1200 metri s l m NO Obbligatorio Per i canali da fumo usare tubo in lamiera specifico ad uso fumisteria di 80mm o 100mm a seconda della tipologia dell impianto con guarnizioni siliconi...

Page 10: ...ccomanda di verificare col produttore della canna fumaria le distanze di sicurezza da rispettare e l adeguata tipologia di materiale isolante da utilizzare Le precedenti regole valgono anche per fori...

Page 11: ...combustibile pellets provocando un innalzamento della fiamma o abbassamento con possibile spegnimento alle potenze pi basse Consigliamo la taratura dei parametri affidando il compito a un Centro Assis...

Page 12: ...o costituito da materiale combustibile deve essere realizzata una protezione piastra acciaio refrattario marmo in materiale incombustibile per le dimensioni vedi Figura 10 Figura 10 L apparecchio deve...

Page 13: ...l installazione corretta e la canna fumaria efficiente L operazione si effettua come segue svuotare e pulire il braciere verificare che ci sia pellets a sufficienza nel serbatoio ricordiamo che se vi...

Page 14: ...i allarmi ed uscita da programmazione Tasti P5 e P6 Aumenta e diminuisce la potenza calorifica da 1 a 5 Led 1 Programmazione oraria attiva Led 2 Se acceso Coclea attiva Led 3 Ricezione dati dal teleco...

Page 15: ...ifficile l accensione con il formarsi di un fumo bianco e denso che nuoce alla salute e pu determinare esplosioni nella camera di combustione Si rende perci necessario non sostare davanti alla stufa i...

Page 16: ...ente Tenere sempre chiuso il serbatoio con il suo coperchio Se il tubo risulta sporco procedere alla pulizia vedi paragrafo 7 5 a pag 20 5 10 ATTENZIONE Durante il funzionamento la stufa raggiunge tem...

Page 17: ...n Off Selezionare il giorno della settimana da Day1 corrispondente al luned a Day7 domenica Se il parametro UT01 impostato con il giorno corrente per esempio Day2 cio marted possibile selezionare il g...

Page 18: ...fino al raffreddamento Resettare l errore tramite tasto ON OFF Verificare il tipo di guasto come da pag 26 Dopo aver rimosso la causa pulire il braciere e avviare la stufa tramite tasto ON OFF 6 3 ALL...

Page 19: ...d espellere i residui di fumo per 20 minuti avviando la fase di spegnimento Resettare l errore tramite tasto ON OFF A raffreddamento avvenuto verificare il tipo di guasto come da pag 25 Dopo aver rimo...

Page 20: ...mediabilmente la vernice 7 3 PULIZIA MAIOLICHE Alcuni modelli di stufe hanno un rivestimento esterno in maiolica Esse sono di fattura artigianale e come tali possono presentare inevitabilmente cavilla...

Page 21: ...erchio a tenuta lo stesso contenitore non deve mai venire in contatto con materiali combustibili per esempio appoggiato sopra un pavimento in legno poich la cenere all interno mantiene a lungo la brac...

Page 22: ...zia delle pale Dopo la pulizia ripetere l operazione inversa verificando l integrit e l efficienza della guarnizione se necessario provvedere alla sua sostituzione 7 8 PULIZIA MENSILE CANALE DA FUMO O...

Page 23: ...ione deve essere eseguita almeno una volta all anno 7 10 PULIZIA DEI VENTILATORI Pulire annualmente il ventilatore ambiente e il ventilatore fumi da cenere o polvere le quali causano uno sbilanciament...

Page 24: ...do Il pellets deve essere stivato in un locale asciutto verificare La sonda termica si bloccata Sostituire la sonda fumi Chiamare tecnico specializzato Scheda elettronica difettosa Sostituire scheda e...

Page 25: ...la stufa si raffreddata Sonda temperatura fumi difettosa Sostituire la sonda fumi Chiamare tecnico specializzato Scheda elettronica difettosa Sostituire scheda elettronica Chiamare tecnico specializza...

Page 26: ...norme vedi capitolo 2 a pagg 5 e seguenti consultando un fumista esperto Condizioni meteo sfavorevoli In caso di forte vento vi pu essere una pressione negativa al camino Verificare e riaccendere la s...

Page 27: ...Togliere il filtro posteriore la griglia di protezione interna e il pannello d ispezione vedi Figura 15 pag 29 Per il rimontaggio fare attenzione all incastro inferiore della griglia Dopo queste oper...

Page 28: ...ICO 295x295 16 VAN0690 CROGIOLO BRACIERE 17 VAN0495 CASSETTO CENERE 18 COM0244 GUARNIZIONE SILICONICA PORTA FUOCO 19 SOL0206 PERNO GIREVOLE PER MANIGLIA 20 VAN0429 FIANCO METALLO ALESSIA 970x476 21 VA...

Page 29: ...MARTINA SOLARIS ALESSIA VANESSA Pag 29 Figura 15...

Page 30: ...io di CO al 13 O2 Min Max mg Nm3 306 205 mg Nm3 306 205 mg Nm3 306 205 mg Nm3 306 205 mg Nm3 306 205 CONTENUTO medio di POLVERI al 13 O2 Max mg Nm3 18 mg Nm3 18 mg Nm3 18 mg Nm3 18 mg Nm3 18 DEPRESSIO...

Page 31: ...porti che compensano eventuali laschi del pannello in metallo e o maiolica c Inserire dall alto i fianchi in metallo sulle apposite guide facendoli scendere lentamente fino in fondo d Inserire dall al...

Page 32: ...Pag 32 MARTINA SOLARIS ALESSIA VANESSA NOTES...

Page 33: ...MARTINA SOLARIS ALESSIA VANESSA Pag 33 Image 1...

Page 34: ...43 3 1 COMBUSTIBLE 43 4 INSTALLATION 43 4 1 PR AMBULES 43 4 2 INSTALLATION 44 4 3 BRANCHEMENT LECTRIQUE 44 4 4 BRANCHEMENT DU THERMOSTAT EXTERNE 45 4 5 VENTILATION 45 5 UTILISATION 45 5 1 AVANT PROPOS...

Page 35: ...7 5 NETTOYAGE CREUSET BRASERO TIROIR A CENDRE ET TUYAU CHUTE PELLET 52 7 6 NETTOYAGE DE LA CHAMBRE DE COMBUSTION 53 7 7 NETTOYAGE DE LA CHAMBRE DE FUMEE 53 7 8 MENSUEL NETTOYAGE DU CONDUIT DE FUMEE 54...

Page 36: ...ions biomasse inf rieures 35KW on se rapportera au D M 37 08 et chaque installateur agr devra d livrer le certificat de conformit de l installation mont e Par installation nous entendons Po le Chemin...

Page 37: ...nts qualifi s doivent tre en possession V rifier aupr s des autorit s locales l existence ventuelle de normes restrictives relatives la prise d air comburant au syst me d vacuation des fum es au condu...

Page 38: ...uver dans la pi ce o l appareil a t install ou tout au plus dans une pi ce contigu et avoir au dessous de l entr e une chambre de collecte des solides et de la condensation accessible via un clapet m...

Page 39: ...pot de chemin e rev t une fonction importante pour le bon fonctionnement de l appareil chauffant il est conseill d en utiliser un anti vent A voir Image 5 Image 5 L aire des per ages pour vacuer la f...

Page 40: ...rise d air qui sera mont e proximit du pavement avec un grillage de protection externe contre les volatiles et qui ne devra en aucun cas tre bouch e 2 10 PRISE D AIR COMBURANT Image 8 Il est conseill...

Page 41: ...nstallation d altitude au dessus de 1200 m tres snm NO Obligatoire Pour les conduits de fum e utiliser un tuyau en t le sp cifique pour le ramonage d un diam tre de 80 mm ou 100 mm selon le type de l...

Page 42: ...r une ad quate isolante Vous devez v rifier avec le fabricant de la chemin e les distances de s curit respecter et le type de mat riau isolant pour tre utilis Ces m me r gles doivent tre appliqu es po...

Page 43: ...ssent des tests de certification rigoureux en laboratoire mais malgr cela sur les pi ces qui assument le flux des pellets vis d alimentation sans fin il pourrait y avoir de tr s l g res variations dan...

Page 44: ...distances des objets inflammables ou sensibles la chaleur divans meubles rev tements en bois etc comme ceci est mentionn sur la Image 10 En cas d objets extr mement inflammables rideaux moquettes etc...

Page 45: ...e conduit de fum e est efficient Marche suivre vider et nettoyer le brasero v rifier qu il y ait assez de pellets dans le r servoir rappelons que quand on allume le po le pour la premi re fois il faud...

Page 46: ...t sortie de la programmation Touches P5 et P6 Pour augmenter ou diminuer la puissance calorifique de 1 5 Led 1 Programmation horaire active Led 2 Si elle est allum e la Vis d Archim de est active Led...

Page 47: ...poser sur ces derniers un cube d allume feu ATTENTION apr s un allumage rat VIDER le bras ro avant de faire d marrer de nouveau la po le Trop de pellets dans le brasero ou des pellets humide ou un bra...

Page 48: ...de fum e une fois que le po le est teint ces r sidus peuvent former des petites braises qui en remontant long le tube peuvent atteindre les granul es du r servoir et les carboniser ce qui porterait l...

Page 49: ...lectionner le jour de la semaine de Day1 correspondant au Lundi Day7 qui correspond au dimanche Si le param tre UT01 est programm sur le jour courant par exemple Day2 savoir mardi il est possible de s...

Page 50: ...l aide de la touche ON OFF V rifier le type d avarie selon la page 57 Apr s avoir limin la cause nettoyer nouveau le brasero et remettre le po le en marche au moyen de la touche ON OFF 6 3 ALARME SON...

Page 51: ...avoir neutralis la cause r armer d vissez le bouchon noir presser le petit bouton noir et revisser le capuchon de protection voir Image 15 page 60 D tail 6 R armement Manuel Nettoyer le brasero et re...

Page 52: ...tiroir a cendre Ouvrir la porte quand le po le est teint ter le brasero D tail 16 de son logement en le soulevant et vider la cendre Si besoin est nettoyer l aide d un objet pointu les trous obstru s...

Page 53: ...chambre de combustion 7 7 NETTOYAGE DE LA CHAMBRE DE FUMEE Toutes les 2 semaines nettoyer la chambre de fum e voir Image 1 page 33 Ouvrir la porte quand le po le est teint D visser les deux vis du bo...

Page 54: ...conduit de la fum e le conduit collecteur et le pot de chemin e l aide de brosses par un technicien sp cialis qui en v rifiera galement le bon fonctionnement 7 10 NETTOYAGE DES VENTILATEURS Chaque an...

Page 55: ...sonde thermique s est bloqu e Remplacer la sonde fum e Contacter un technicien expert Carte lectronique d faillante Remplacer la carte lectronique Contacter un technicien expert Les pellets n arrivent...

Page 56: ...er m me quand le po le est froid Sonde temp rature fum e d faillante Remplacer la sonde fum e Appeler un technicien expert Carte lectronique d faillante Remplacer la carte lectronique Appeler un techn...

Page 57: ...it conforme aux normes voir Chapitre 2 pages 37 et suivantes avec un ramoneur expert Conditions m t o d favorables Quand il y a beaucoup de vent la chemin e pourrait subir une pression n gative V rifi...

Page 58: ...62 Enlever le filtre post rieur la grille de protection et le panneau de visite voir Image 15 page 60 Pour le remontage faire attention l encastrement inferieur de la grille Apres ces op rations on pe...

Page 59: ...IQUE 295x295 16 VAN0690 CREUSET BRASERO 17 VAN0495 TIROIR A CENDRE 18 COM0244 GARNITURE SIL PORTE A FEU 19 SOL0206 CHEVILLE PIVOTANT POUR POIGNEE 20 VAN0429 C TE METALLIQUE ALESSIA 970x476 21 VAN0898...

Page 60: ...Pag 60 MARTINA SOLARIS ALESSIA VANESSA Image 15...

Page 61: ...13 O2 Min Max mg Nm3 306 205 mg Nm3 306 205 mg Nm3 306 205 mg Nm3 306 205 mg Nm3 306 205 TENEUR moyenne de POUSSI RES 13 O2 Max mg Nm3 18 mg Nm3 18 mg Nm3 18 mg Nm3 18 mg Nm3 18 D PRESSION CHEMIN E Mi...

Page 62: ...compensent d ventuels mous du panneau en m tal et ou en fa ence c Introduire par le haut les c t s en m tal sur les glissi res en les faisant descendre lentement jusqu au fond d Introduire par le haut...

Page 63: ...MARTINA SOLARIS ALESSIA VANESSA Pag 63 Picture 1 Picture 2...

Page 64: ...FUMES TEMPERATURE 77 5 9 TURNING OFF 77 5 10 ATTENTION 77 5 11 EXTINGUISHING FIRES 77 5 12 PELLET SUPPLY 77 5 13 SETTING THE CLOCK 77 5 14 PROGR SETT weekly setting 78 5 15 REMOTE CONTROL OPTIONAL 79...

Page 65: ...ust be observed when installing the appliance In Italy installation of biomass systems below 35KW refers to Ministerial Decree 37 08 and all qualified fitters who have the requisites must issue a cert...

Page 66: ...e in a workmanlike manner but it absolutely cannot replace the current regulations that every professional fitter must know and apply Check with your local authority for any restrictions regarding the...

Page 67: ...must be in the same place as the stove or in the next room Under the flue inlet there must be a chamber for collecting solids and condensation to which access can be gained by means of a watertight me...

Page 68: ...not cleaned may be unsafe 2 7 CHIMNEY The chimney is important for proper operation of the heater we recommend a windproof one A see Picture 5 Picture 5 The area of the fumes outlet holes must be two...

Page 69: ...nlet which must be placed close to the floor with an external bird proof grid to avoid obstructions 2 10 COMBUSTION AIR INLET Picture 8 It is advisable to take the air needed for combustion directly f...

Page 70: ...above sea level NO Compulsory For stovepipes we recommend to use special sheet metal pipes for stoves with a diameter of 80mm or 100mm according to the type of system with silicone gaskets or sealed t...

Page 71: ...and slab a proper insulation We recommend to verify with flue manufacturer dimensions to respect for safety and the proper typology of insulation to use These rules are to be applied to holes also ma...

Page 72: ...ng to an authorized after sales service 4 INSTALLATION 4 1 FOREWORD The assembly position must be chosen according to the space exhaust pipe and flue Check with your local authority for any restrictio...

Page 73: ...TRICAL CONNECTION IMPORTANT THE APPLIANCE MUST BE INSTALLED BY A SPECIALIZED FITTER The electrical connection is by cable with a plug suitable for the specific load and voltage of each model as shown...

Page 74: ...pellets in the pot Check the door is closed properly ATTENTION do not use inflammable liquids for ignition alcohol benzene oil petroleum etc Important at first ignition it is better to keep the fire...

Page 75: ...eases any alarms and quits programming Buttons P5 and P6 Increase and decrease the power from 1 to 5 Led 1 Hours programming on Led 2 If on auger activated Led 3 Receives data from the remote control...

Page 76: ...pellets in the burn pot damp pellets or a dirty burn pot make ignition difficult and cause dense white smoke to form which can be harmful to health and cause explosions in the combustion chamber It i...

Page 77: ...nto the room Keep the lid on the hopper at all times If the pipe is dirty clean it according to the instructions in paragraph 7 5 page 81 5 10 ATTENTION When in operation the stove gets very hot keep...

Page 78: ...is used to enter the weekly program in Day or exclude it if in Off Select the day of the week from Day1 which corresponds to Monday to Day7 which is Sunday If the UT01 parameter is set with current d...

Page 79: ...t the error pushing ON OFF button Check the type of fault as shown on page 87 After removing the cause of the fault clean the burn pot and start the stove with the ON OFF button 6 3 FUMES THERMOCOUPLE...

Page 80: ...e for 20 minutes and start the turning off process Reset the error pushing ON OFF button When the stove is cool check the type of fault as shown on page 86 After removing the cause of the fault clean...

Page 81: ...r benzene which would damage the paint irreparably 7 3 CLEANING CERAMIC PARTS Some models have external ceramic cladding Because these are hand crafted they will inevitably have crazing popping or sha...

Page 82: ...id Never let the container come into contact with combustible material e g on a wooden floor because the ash stays hot for a long time Only when the ash has gone out completely throw it in with organi...

Page 83: ...an blades After cleaning repeat the operation in reverse order checking the state and efficiency of the gasket replace if necessary 7 8 MONTHLY CLEANING OF STOVEPIPE Clean the exhaust pipes every mont...

Page 84: ...ANING Once a year clean the room fan and fumes fan to remove ash or dust which unbalance the blades and make them noisier see Picture 15 page 90 As this is a very delicate operation have it done by an...

Page 85: ...an expert External temperature too low Start stove again Damp pellets Pellets must be stored in a dry place check Heat probe blocked Replace fumes probe Call an expert Faulty electronic circuit board...

Page 86: ...when stove has cooled Faulty fumes temperature probe Replace fumes probe Call an expert Faulty electronic circuit board Replace electronic circuit board Call an expert Ash around stove Door gasket fau...

Page 87: ...board Call an expert Chimney too long Have an expert check that the exhaust pipe complies with standards see chapter 2 page 66 and following Bad weather conditions Strong winds may cause negative pre...

Page 88: ...aragraph 9 5 page 92 Remove the rear filter the internal protection grille and the inspection panel see Picture 15 page 90 For re assembly remember the lower grille slot in After these operations the...

Page 89: ...15 VAN0210 VITROCERAMIC 295x295 16 VAN0690 BURN POT 17 VAN0495 ASH PAN 18 COM0244 FIRE DOOR SILICONE GASKET 19 SOL0206 SWIVEL PIN FOR HANDLE 20 VAN0429 METAL SIDE ALESSIA 970x476 21 VAN0898 CURVED MET...

Page 90: ...Pag 90 MARTINA SOLARIS ALESSIA VANESSA Picture 15...

Page 91: ...AGE CONTENT of CO at 13 O2 Min Max mg Nm3 306 205 mg Nm3 306 205 mg Nm3 306 205 mg Nm3 306 205 mg Nm3 306 205 AVERAGE DUST CONTENT at 13 O2 Max mg Nm3 18 mg Nm3 18 mg Nm3 18 mg Nm3 18 mg Nm3 18 CHIMNE...

Page 92: ...in order for them to compensate any movement in the metal and or majolica panels c Insert side metal panels from the top by sliding through dedicated rails and lower them to the bottom d Insert side...

Page 93: ...NOTE...

Page 94: ...NOTE...

Page 95: ...NOTE...

Page 96: ...OIS CUISINI RES BOIS THERMOPO LES PELLET STOVES WOOD STOVES WOOD COOKING STOVES THERMOSTOVES FreePoint by CADEL srl 31025 S Lucia di Piave TV Via Foresto Sud 7 ITALY Tel 39 0438 738669 Fax 39 0438 733...

Reviews: