EN - INSTALLATION
ASSEMBLING YOUR FLOOR LAMP
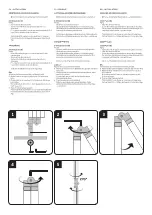
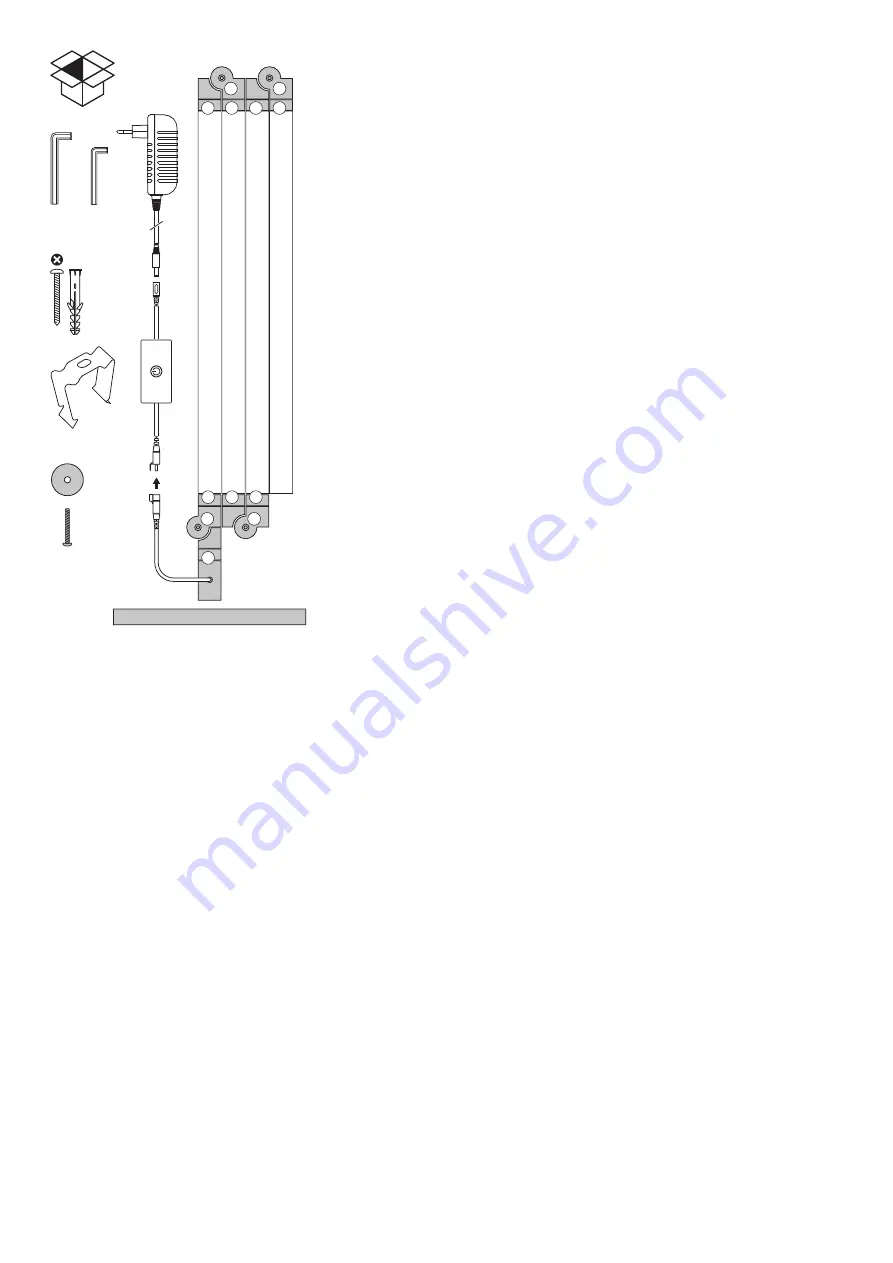
1)
Fix the base plate to the floor lamp using hex key 1
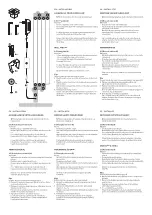
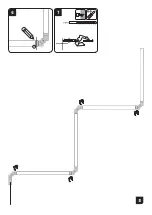
2-5) Swing joints (A)
Important:
- Do not completely screw out the screws.
- Do not adjust the angle of the swing joints without loosening
the screws
To adjust the angle, loosen the screw using hex key 2 (2-3
turns). Set the angle, and tighten the screw.
Connect the cable to the controller and the controller to the
adapter. Proceed with C1 to add the floor lamp to the Calex
Smart App.
WALL MOUNT
2-5) Swing joints (A)
Important:
- Check which plugs are best suited for the intended surface.
- Do not completely screw out the screws.
- Do not adjust the angle of the swing joints without
loosening the screws
To adjust the angle, loosen the screw using hex key 2 (2-3
turns). Set the angle, and tighten the screw.
Ensure the power cables can reach a wall socket.
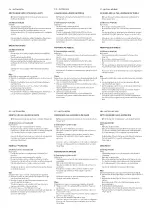
Clips
The size of the clips match the size of joint B.
6. Mark the centre of each joint (B) on the surface. Do this for 4
joints.
7. Mark the centre of each line to determine where you need to
drill the holes.
Drill the holes using an 5mm drill. Insert the plugs and screw
the clips in place.
8. Gently press the lamp in place.
Connect the cable to the controller and the controller to the
adapter. Proceed with C1 to add the floor lamp to the Calex
Smart App.
NL - INSTALLATIE
MONTAGE VAN UW VLOERLAMP
1)
Bevestig de basisplaat aan de vloerlamp met inbussleutel 1
2-5) Draaischarnieren (A)
Belangrijk:
- Draai de schroeven niet helemaal uit.
- Pas de hoek van de draaischarnieren niet aan zonder de
schroeven los te draaien
Om de hoek aan te passen, draait u de schroef los met
inbussleutel 2 (2-3 slagen). Stel de hoek in en draai de
schroef vast.
Sluit de kabel aan op de controller en de controller op de
adapter. Ga verder met C1 om de vloerlamp toe te voegen
aan de Calex Smart App.
WANDMONTAGE
2-5) Draaischarnieren (A)
Belangrijk:
- Kijk welke pluggen het meest geschikt zijn voor de beoogde
ondergrond.
- Draai de schroeven niet helemaal uit.
- Pas de hoek van de draaischarnieren niet aan zonder de
schroeven los te draaien
Om de hoek aan te passen, draait u de schroef los met
inbussleutel 2 (2-3 slagen). Stel de hoek in en draai de
schroef vast.
Zorg ervoor dat de stroomkabels een stopcontact kunnen
bereiken.
Clips
De maat van de clips komt overeen met de maat van gewricht B.
6. Markeer het midden van elke verbinding (B) op het
oppervlak. Doe dit voor 4 gewrichten.
7. Markeer het midden van elke lijn om te bepalen waar u de
gaten moet boren.
Boor de gaten met een boor van 5 mm. Plaats de pluggen en
schroef de clips op hun plaats.
8. Druk de lamp voorzichtig op zijn plaats.
Sluit de kabel aan op de controller en de controller op de
adapter. Ga verder met C1 om de vloerlamp toe te voegen
aan de Calex Smart App.
FR - INSTALLATION
ASSEMBLAGE DE VOTRE LAMPADAIRE
1)
Fixez la plaque de base au lampadaire à l'aide de la clé
hexagonale 1
2-5) Articulations pivotantes (A)
Important:
- Ne dévissez pas complètement les vis.
- Ne pas régler l'angle des joints oscillants sans desserrer les
vis
Pour régler l'angle, desserrez la vis à l'aide de la clé
hexagonale 2 (2-3 tours). Réglez l'angle et serrez la vis.
Connectez le câble au contrôleur et le contrôleur à
l'adaptateur. Passez à C1 pour ajouter le lampadaire à
l'application Calex Smart.
MONTAGE MURAL
2-5) Articulations pivotantes (A)
Important:
- Vérifiez quelles chevilles sont les mieux adaptées à la surface
prévue.
- Ne dévissez pas complètement les vis.
- Ne pas régler l'angle des joints oscillants sans desserrer les
vis
Pour régler l'angle, desserrez la vis à l'aide de la clé
hexagonale 2 (2-3 tours). Réglez l'angle et serrez la vis.
Assurez-vous que les câbles d'alimentation peuvent
atteindre une prise murale.
Clips
La taille des clips correspond à la taille du joint B.
6. Marquez le centre de chaque joint (B) sur la surface. Faites
ceci pour 4 articulations.
7. Marquez le centre de chaque ligne pour déterminer où vous
devez percer les trous.
Percez les trous à l'aide d'un foret de 5 mm. Insérez les
chevilles et vissez les clips en place.
8. Appuyez doucement sur la lampe en place.
Connectez le câble au contrôleur et le contrôleur à
l'adaptateur. Passez à C1 pour ajouter le lampadaire à
l'application Calex Smart.
CZ - INSTALACE
SESTAVENÍ VAŠÍ STOJACÍ LAMPY
1)
Upevněte základní desku ke stojací lampě pomocí
šestihranného klíče 1
2-5) Kyvné klouby (A)
Důležité:
- Šrouby úplně nevyšroubujte.
- Nenastavujte úhel otočných kloubů bez povolení šroubů
Pro nastavení úhlu povolte šroub pomocí šestihranného klíče
2 (2-3 otáčky). Nastavte úhel a utáhněte šroub.
Připojte kabel k ovladači a ovladač k adaptéru. Pokračujte
pomocí C1 a přidejte stojací lampu do aplikace Calex Smart.
MONTÁŽ NA STĚNU
2-5) Kyvné klouby (A)
Důležité:
- Zkontrolujte, které zátky jsou nejvhodnější pro zamýšlený
povrch.
- Šrouby úplně nevyšroubujte.
- Nenastavujte úhel otočných kloubů bez povolení šroubů
Pro nastavení úhlu povolte šroub pomocí šestihranného klíče
2 (2-3 otáčky). Nastavte úhel a utáhněte šroub.
Ujistěte se, že napájecí kabely mohou dosáhnout do
zásuvky.
Klipy
Velikost klipů odpovídá velikosti spoje B.
6. Označte střed každého spoje (B) na povrchu. Udělejte to pro
4 klouby.
7. Označte střed každé čáry, abyste určili, kde potřebujete
vyvrtat otvory.
Vyvrtejte otvory pomocí vrtáku 5 mm. Vložte zátky a
přišroubujte spony na místo.
8. Jemně zatlačte lampu na místo.
Připojte kabel k ovladači a ovladač k adaptéru. Pokračujte
pomocí C1 a přidejte stojací lampu do aplikace Calex Smart.
PL - INSTALACJA
MONTAŻ LAMPY PODŁOGOWEJ
1)
Przymocuj podstawę do lampy podłogowej za pomocą
klucza sześciokątnego 1
2-5) Przeguby obrotowe (A)
Ważny:
- Nie wykręcaj całkowicie śrub.
- Nie regulować kąta przegubów obrotowych bez poluzowania
śrub
Aby wyregulować kąt, poluzuj śrubę kluczem sześciokątnym
2 (2-3 obroty). Ustaw kąt i dokręć śrubę.
Podłącz kabel do kontrolera, a kontroler do adaptera.
Przejdź do C1, aby dodać lampę podłogową do aplikacji
Calex Smart.
MOCOWANIE ŚCIENNE
2-5) Przeguby obrotowe (A)
Ważny:
- Sprawdź, które korki najlepiej pasują do planowanej
powierzchni.
- Nie wykręcaj całkowicie śrub.
- Nie regulować kąta przegubów obrotowych bez poluzowania
śrub
Aby wyregulować kąt, poluzuj śrubę kluczem sześciokątnym
2 (2-3 obroty). Ustaw kąt i dokręć śrubę.
Upewnij się, że kable zasilające sięgają do gniazdka
ściennego.
Klipy
Rozmiar klipsów odpowiada rozmiarowi złącza B.
6. Zaznacz środek każdego złącza (B) na powierzchni. Zrób to
dla 4 stawów.
7. Zaznacz środek każdej linii, aby określić, gdzie należy
wywiercić otwory.
Wywierć otwory wiertłem 5mm. Włóż kołki i przykręć zaciski
na miejscu.
8. Delikatnie wciśnij lampę na miejsce.
Podłącz kabel do kontrolera, a kontroler do adaptera.
Przejdź do C1, aby dodać lampę podłogową do aplikacji
Calex Smart.
A
A
B
B
B
B
B
B
B
B
A
A
4x
4x
1x
1x
1
2
Summary of Contents for SMART OUTDOOR
Page 4: ...B 5mm 6 7 8...