background image

MANUALE D’USO

OPERATION MANUAL

MANUEL D'INSTRUCTIONS

操作マニュアル

BEDIENUNGSANLEITUNG

MANUAL DE USO

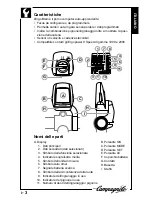
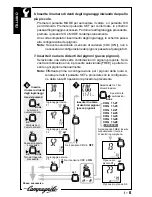
Per l’installazione dell’ErgoBrain sulla bicicletta fate riferimento

al manuale d’installazione.

Please refer to the Installation Manual for  how to assemble the

system on the bicycle.

Pour l'installation d'ErgoBrain sur votre vélo, consulter le Manuel

d'Installation

自転車への取付けは取付マニュアルをご覧ください

Für die Installation des ErgoBrain am Fahrrad verweisen wir auf die Installations-

anleitung.

Para instalar el Ergobrain en la bicicleta, tomar como referencia el Manual

de Instalación

Rev. 1.3-07/2000

Summary of Contents for ErgoBrain

Page 1: ...llazione Please refer to the Installation Manual for how to assemble the system on the bicycle Pour l installation d ErgoBrain sur votre v lo consulter le Manuel d Installation F r die Installation de...

Page 2: ......

Page 3: ...gli ingranaggi Pag 6 Inserimento del numero di denti dei pignoni Pag 6 Sincronizzazione della deragliata Pag 7 Funzioni principali Pag 8 Display Pag 8 Utilizzo dei pulsanti Pag 8 Visualizzazione Auto...

Page 4: ...ostacoli etc Tenete tutte le batterie fuori dalla portata dei bambini In caso di ingerimento di una batteria contattate immediatamente un medico Conservate questo apparecchio fuori dalla portata dei...

Page 5: ...aggio in uso 10 Indicatore del pignone in uso 11 Numero di denti dell ingranaggio pignone B Pulsante S S C Pulsante MODE D Pulsante SET E Pulsante AC F Coperchio batteria G Contatti H Basetta I Staffa...

Page 6: ...ate il pulsante AC Sul display appaiono tutte le indicazioni per un secondo dopodich appare la schermata di selezione dell unit di misura Rilasciate il pul sante SET Con questa operazione si cancellan...

Page 7: ...remete il pulsante SET per confermare MODE S S Sposta tra A e B Aumenta valore Diminuisce valore 3 Passo successivo SET SET 2sec 4 SET MODE 4 Selezionate cadenza on off Se utilizzate il sensore di cad...

Page 8: ...ate FREE e potrete in serire ogni pignone manualmente Nota Effettuate prima la configurazione per i pignoni della ruota A tenete premuto il pulsante SET e procedete con la configurazio ne della ruota...

Page 9: ...o regolare Il pulsante S S deve essere premuto quando la catena passata completamente sull ingranaggio successivo Portate il deragliatore sul secondo ingranaggio Premete il pulsante S S Portate il der...

Page 10: ...si accende Le schermate AT e STW hanno conteggi indipendenti Mentre una visualizzata il conteggio avviene contemporaneamente sull altra nascosta L ErgoBrain offre due modi di misurazione l Auto Timer...

Page 11: ...cit Max STW DST Dist Percorsa RESET RESET RESET RESET RESET RESET RESET RESET Per avviare il cronometro premete il pulsante S S e per arrestarlo preme te S S nuovamente Per azzerare premete i pulsanti...

Page 12: ...u effettuare nelle funzioni TM DST AV MX Tutti i dati della visualizzazione AT saranno cancellati senza per influire sui dati della visualizzazione STW TM AV DST G D CDC SPD VISUALIZZAZIONE AUTO TIMER...

Page 13: ...dicatore della velocit lam peggia E possibile avviare arrestare la misurazione STW in qualsiasi fun zione vi troviate Azzeramento Potete effettuare l azzeramento da qualsiasi funzione STW Tutti i dati...

Page 14: ...la funzione secondaria ODO in visualizzazione Auto Timer Verr visualizzata la circonferenza della ruota corrente Ulteriori pressioni dei due pulsanti provocano l alternanza tra ruota A e B Modifica de...

Page 15: ...nto pu co minciare con la catena in qualsiasi posizione ma assicuratevi che sia ben salda che non salti e che la guarnitura possa ruotare stabilmente In qual siasi modo di misurazione tenete premuto i...

Page 16: ...ole Tenete l unit all ombra I dati non vengono alterati Il display risponde lentamente La temperatura ambientale troppo bassa inferiore ai 0 C 32 F Ritorna alla normalit con l aumentare della temperat...

Page 17: ...25 590 pollici 0 01 m 1 pollice Orologio 0 00 00 23 59 59 1 00 00 12 59 59 0 003 Cadenza 0 20 0 299 0 rpm 1 rpm sotto i 199rpm Cronometro STW 0 00 00 0 99 59 59 0 003 STW Velocit media STW AV 0 0 110...

Page 18: ......

Page 19: ...t sprocket s cog set s number of teeth Pag 6 Set chainring s shift timing Pag 7 Basic Operation Displays Pag 8 Button Operation Pag 8 Auto Timer Screen Pag 10 Stopwatch Screen Pag 11 Setting Clock Tim...

Page 20: ...yed Maintain your focus on the road traffic conditions obstacles etc Keep all batteries out of the reach of children In the event a battery is swallowed contact a doctor immediately Keep this device o...

Page 21: ...ndicator 11 Number of teeth of chainring sprocket B S S button C MODE button D SET button E AC button F Battery cover G Contacts H Bracket I Arm Features The ErgoBrain is the first self learning compu...

Page 22: ...ing down SET button press and release AC button All display goes on for one second and then it changes to the scale selection screen Then release SET button With this operation all the data are erased...

Page 23: ...on Push SET button to fix MODE S S Switches between A and B Increases digits Decreases digits 3 To the next step SET SET 2sec 4 SET MODE 4 Select cadence on off If you use the cadence sensor on your b...

Page 24: ...t FREE and you can input all the sprockets manually Note Sprocket setting should be done individually for wheel A and wheel B First input wheel A s sprocket and hold down SET button The screen moves t...

Page 25: ...Ergopower shifting should be done slowly and steadily S S button should be pushed when the chain has securely shifted to the next chainring Shift from the inner chainring to the middle Push S S butto...

Page 26: ...s on the screen AT screen and STW screen is independently counted When either is on the screen the other is simultaneously continuing in the hidden screen Thus the ErgoBrain C1 offers two types of mea...

Page 27: ...ed STW DST Trip Distance RESET RESET RESET RESET RESET RESET RESET RESET To start the stopwatch push S S button To stop it push the button again To reset the data push S S button and MODE button simul...

Page 28: ...et operation in either of TM DST AV MX All the data of AT screen is erased It does not affect the data of STW screen TM AV DST G D CDC SPD AUTO TIMER SCREEN to Stopwatch SCREEN Main Function Sub Funct...

Page 29: ...dless of which screen the unit is displaying you can start stop the measurement of STW Reset Operation Do the reset operation in any mode of STW screen All the data of STW screen is erased It does not...

Page 30: ...e and Switching between Wheel A and B Push S S button and MODE button simultaneously in ODO of Auto Timer screen sub mode The current wheel circumference is displayed By fur ther holding down the two...

Page 31: ...cle You can start the updating with any chain position but be sure that chain is not skidding but in secure position and the crank is rotating firmly In any measuring modes hold down S S button for mo...

Page 32: ...t It returns to normal by being left in the shade It does not affect the data Display response is slow Was the ambient temperature too low below 32 F 0 C It returns to normal when the temperature rise...

Page 33: ...590 inch 0 01 m 1 inch Clock time 0 00 00 23 59 59 1 00 00 12 59 59 0 003 Cadence 0 20 0 299 0 rpm 1 rpm under 199rpm Stopwatch STW 0 00 00 0 99 59 59 0 003 STW Average speed STW AV 0 0 110 7 km h mph...

Page 34: ......

Page 35: ...oduction du nombre de dents des pignons Page 6 R glage du temps de d raillage des plateaux Page 7 Utilisation Page 8 Ecran Page 8 Utilisation des touches Page 8 Visualisation Auto Timer Page 10 Visual...

Page 36: ...ntion sur la route sur le trafic et sur tous les obstacles Tenez les piles hors de port e des enfants En cas d ingestion d une pile contactez imm diatement un m decin Conservez cet appareil hors de po...

Page 37: ...s 10 Indicateur du pignon utilis 11 Nombre de dents du plateau pignon B Touche S S C Touche MODE D Bouton SET E Bouton AC F Couvercle Pile G Contacts H Base I Support Caract ristiques L ErgoBrain est...

Page 38: ...uton SET poussez et r lachez le bouton AC Sur l cran s affichent toutes les indications pour une seconde ensuite il s affiche l cran de selection de l unit de m sure Relachez le bouton SET Avec cette...

Page 39: ...r le bouton SET pour confirmer MODE S S Echange entre A et B Augmente la valeur Diminue la valeur 3 Pas successif SET SET 2sec 4 SET MODE 4 S lection de lacadence on off Si vous utilisez le senseur de...

Page 40: ...ionnez FREE et vous pourrez introduire chaque pignon manuellement Note Effectuez tout d abord la configuration des pignons de la roue A Tenez le bouton SET appuy et continuez en configurant la roue B...

Page 41: ...e l Ergopower Vous de vez appuyer sur la touche S S lorsque la cha ne est totale ment pass e sur le plateau suivant Mettez le d railleur avant sur le deuxi me plateau Appuyez la touche S S Mettez le d...

Page 42: ...TW s allume Les fonctions AT e STW sont ind pendantes Le calcul qui se fait lorsque l une d elles est affich e se fait galement pour l autre qui reste cach e L ErgoBrain offre deux types de calcul par...

Page 43: ...ET RESET RESET RESET RESET RESET RESET RESET condes comme il est montr sur le dessin Pour mettre le chronom tre en marche appuyez sur la touche S S Pour l arr ter appuyez de nouveau sur S S Pour remet...

Page 44: ...tre effectu e dans les fonctions TM DST AV MX Tou tes les donn es de la visualisation AT seront effac es sans pour autant interf rer avec les donn es de la visualisation STW TM AV DST G D CDC SPD VIS...

Page 45: ...ge de la vitesse clignote Il est possible d activer et arr ter le calcul STW dans n importe quelle fonction Mise z ro Vous pouvez effectuer le mise z ro de n importe quelle fonction STW Toutes les don...

Page 46: ...nt que la fonc tion secondaire ODO est active en visualisation Auto Timer La circonf rence de la roue actuelle sera visualis e En appuyant encore sur les tou ches la roue A et la roue B s alternent Mo...

Page 47: ...v lo La mise jour est pos sible quelle que soit la position de la cha ne Assurez vous toutefois qu elle ne bouge pas et que le plateau puisse tourner librement Quel que soit le type de calcul tenez la...

Page 48: ...t l ombre Les donn es seront modifi es L afficheur r agit trop lentement Est ce que la temp rature ambiante est au dessous de 0 C 32 F L afficheur redevient normal d s que la temp rature remonte Les d...

Page 49: ...00 23 59 59 1 00 00 12 59 59 0 003 Cadence 0 20 0 299 0rpm 1rpm au dessous de 199tr min Chronom tre STW 0 00 00 0 99 59 59 0 003 STW Vitesse moyenne STW AV 0 0 110 7 km h mph 0 5 km mph STW Vitesse m...

Page 50: ......

Page 51: ...JAPANESE J 1 Pag 2 Pag 2 Pag 3 Pag 3 Pag 4 A B Pag 4 Pag 5 Pag 5 Pag 6 Pag 6 Pag 7 Pag 8 Pag 8 Pag 10 Pag 11 Pag 12 Pag 12 Pag 12 A B Pag 12 Pag 12 Pag 13 Pag 13 Pag 14 Pag 14 Pag 14 Pag 15...

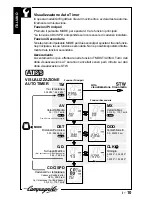
Page 52: ...JAPANESE J 2 Campagnolo AC...

Page 53: ...JAPANESE J 3 AC SET 1 7 6 5 9 11 10 3 2 4 A B H C I E F D H 8 1 G A 1 2 3 4 5 6 7 8 9 10 11 B S S C MODE D SET E AC F G H I 9 SpeedErgopower 99 2000...

Page 54: ...JAPANESE J 4 2 AC SET S S 1 AC 0 SET AC AC SET EEPROM 1 EEPROM 1 AC AC SET MODE KMH MPH 2 SET 2 MODE KMH MPH SET L...

Page 55: ...JAPANESE J 5 3 A MODE S S 2 SET B SET A B 3 SET 2sec S S MODE SET 4 MODE SET 4 ON OFF MODE SET 5 MODE 2 3 SET 5 MODE SET...

Page 56: ...S SET S S MODE 1 CDC ON 8 7 7 FREE A B SET 9 6 7 FREE COG 11 21 COG 11 23 COG 12 21 COG 12 23 COG 13 23 COG 13 26 COG 13 28 F R E E 1 1 2 3 FREE CDC OFF CDC ON SET 2 SET SET SET SET SET SET SET MODE...

Page 57: ...JAPANESE J 7 8 S S 1 5 S S 1 2 S S 3 2 1 S S TM Error S S 1 2 3 2 1 S S 8 F 1 R 5 F2 3 2 1 S S S S...

Page 58: ...JAPANESE J 8 SET AC S S MODE C1 1 2 34 5 6 AT AT S S STW STW STW STW STW C1 1 1 10 2 1 2 3 4 5 6 2 2 2 MODE MODE 2 3 4 2 1 5 6 MODE 2 AT STW S S S S MODE MODE...

Page 59: ...JAPANESE J 9 CDC TM AVS DST SPD CDC SPD SPD SPD SPD SPD SPD SPD SPD SPD SPD SPD G D ODO CLK MXS STW STW AVS STW MXS STW DST STW S S STW S S MODE SET AC 2...

Page 60: ...DE AT TM DST AV MX AT STW TM AV DST G D CDC SPD 00 00 00 99 59 59 0 0 110 7 km h 291 34359 km mile 0 00 9999 99 km MX ODO CLK 0 0 110 7 km h 0 0 00000 0 km 0 00 00 23 59 59 1 00 00 12 59 59 0 64 14 99...

Page 61: ...TM MODE STW STW MODE AT TM STW S S STW STW STW STW STW AT STW STW AV STW MX STW DST 0 00 00 0 9 59 59 9 10 00 00 99 59 59 0 0 110 7 km h 0 0 110 7 km h 0 9999 99 km TM 291 34359 km mile MODE MODE 2 A...

Page 62: ...JAPANESE J 12 15 AV STW AV A B ODO S S MODE A B SET SET SET KMH 24 MPH 12 ODO 3 S S MODE S S MODE CLK TM S S MODE S S MODE SET SET SET...

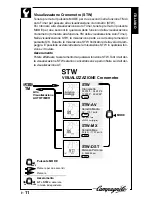
Page 63: ...JAPANESE J 13 CDC S S 2 5 CDC TM SET 2 S S...

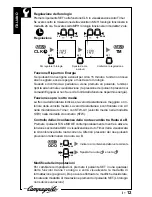
Page 64: ...JAPANESE J 14 SPD CDC 4 0 CR2032 AC AC AC 4 CR2032...

Page 65: ...DO 0 0 99999 9 km mile 0 1 km mile G D 0 64 14 99 m 25 590 inch 0 01 m inch 0 00 00 23 59 59 1 00 00 12 59 59 0 003 0 20 0 299 0 rpm 1 rpm 199 rpm STW 0 00 00 0 99 59 59 0 003 STW STW AV 0 0 110 7 km...

Page 66: ......

Page 67: ...eben S 6 Z hneanzahl der Ritzel eingeben S 6 Umwerfvorgang synchronisieren S 7 Hauptfunktionen S 8 Display S 8 Verwendung der Tasten S 8 Auto Timer Anzeige S 10 Stoppuhr Anzeige S 11 Einstellen der Uh...

Page 68: ...tet bleiben Bewahren Sie alle Batterien f r Kinder unerreichbar auf Sollte eine Batterie einmal unabsichtlich verschluckt werden so ist umgehend ein Arzt aufzusuchen Bewahren Sie dieses Ger t f r Kind...

Page 69: ...Ritzel 11 Z hneanzahl von Zahnkranz Ritzel B S S Taste C MODE Taste D SET Taste E AC Taste F Batteriedeckel G Kontakte H Montageeinheit I Befestigungsb gel Merkmale Der ErgoBrain ist der erste Comput...

Page 70: ...scheinen eine Sekunde lang s mtliche Anzeigesymbole wonach die Bildfl che f r de Auswahl der Masseinheit angezeigt wird SET Taste los lassen Durch den soeben be schriebenenVorgang werden alle Eingaben...

Page 71: ...T Taste zur Best tigung MODE S S Wechsel zwischen A und B Wert nimmt zu Wert nimmt ab 3 N chster Schritt SET SET 2sec 4 SET MODE 4 Trittfrequenz On Off w hlen Wenn Sie den Trittfrequenzsensor verwende...

Page 72: ...nicht vorhanden sein so w hlen Sie FREE und dann k nnen Sie jedes einzelne Ritzel manuell eingeben Hinweis F hren Sie zuerst die Konfiguration der Ritzel f r Rad A aus halten Sie dann die SET Taste ge...

Page 73: ...opower schalten Die S S Taste muss jedesmal gedr ckt werden wenn die Antriebskette ganz auf den n ch sten Zahnkranz gewechselt hat Bringen Sie den Umwerfer auf den zweiten Zahnkranz Dr cken Sie die S...

Page 74: ...hren ihre Z hlungen unabh ngig voneinan der durch W hrend eine Funktion angezeigt wird und z hlt erfolgt gleich zeitig ausgeblendet die Z hlung der anderen Funktion Der ErgoBrain verf gt ber zwei Mess...

Page 75: ...ESET RESET RESET RESET RESET RESET RESET Zum Starten der Stoppuhr dr cken Sie die S S Taste um die Stoppuhr anzuhalten dr cken Sie S S erneut Zur Nullstellung dr cken Sie gleichzeitig die S S Taste un...

Page 76: ...tellung Die Nullstellung kann in den Funktionen TM DST AV MX erfolgen Alle Daten der AT Anzeige werden gel scht auf die Daten der STW Anzeige hat dies jedoch keine Auswirkung TM AV DST G D CDC SPD AUT...

Page 77: ...ndigkeitsindikator Die STW Messung kann von jeder beliebigen Funktion aus gestartet ge stoppt werden Nullstellung Die Nullstellung k nnen Sie von jeder beliebigen STW Funktion aus durch f hren Alle Da...

Page 78: ...S Taste und die MODE Taste w hrend die Zusatzfunktion ODO in der Auto Timer Anzeige aktiv ist Daraufhin wird der Umfang des aktuellen Rads angezeigt Wenn Sie beide Tasten wie derholt dr cken wechseln...

Page 79: ...Das Aktualisieren k nnen Sie mit der Antriebskette in jeder beliebigen Position beginnen Achten Sie je doch darauf dass die Kette fest sitzt dass sie nicht springt und dass sich die Kettenradgarnitur...

Page 80: ...esetzt Lassen Sie die Einheit eine Zeitlang im Dunklen Die Daten werden hierdurch nicht beeintr chtigt Das Display reagiert nur langsam Ist die Au entemperatur zu tief unter 0 C 32 F Sobald die Temper...

Page 81: ...4 99 m 25 590 Zoll 0 01 m 1 Zoll Uhrzeit 0 00 00 23 59 59 1 00 00 12 59 59 0 003 Trittfrequenz 0 20 0 299 0 Upm 1 Upm unter 199Upm Stoppuhr STW 0 00 00 0 99 59 59 0 003 STW Mittlere Geschw STW AV 0 0...

Page 82: ......

Page 83: ...plato Pag 6 Introducci n combinaci n pi n Pag 6 Ajuste cambio de plato Pag 7 Operaciones b sicas Pag 8 Pantallas Pag 8 Bot n de operaciones Pag 8 Pantalla Auto Timer Pag 10 Pantalla Stopwatch Pag 11...

Page 84: ...y eventuales obstaculos etc Mantener las pilas fuera del alcance de los ni os En caso de ingesti n de una pila contactad inmediatamente un m dico Conservar este aparato fuera del alcance de los ni os...

Page 85: ...da 9 Indicador de plato 10 Indicador del pi n 11 N mero de dientes del plato pi n B Pulsante S S C Pulsante MODE D Pulsante SET E Pulsante AC F Tapa pila G Contactos H Base I Soporte Caracter sticas E...

Page 86: ...e AC En la panta lla aparecer n todas las indicaciones durante un se gundo para despu s aparecer la pan talla de selecci n de la unidad de medida Soltar el pulsante SET Con esta operaci n se cancelar...

Page 87: ...ante SET Apretad el pulsante SET para confirmar MODE S S Elejir entre A y B Aumentar d gitos Disminuir d gitos 3 Siguiente paso SET SET 2sec 4 SET MODE 4 Seleccionar cadencia on off Si se utiliza el s...

Page 88: ...combinaci n no existe seleccionad FREE y podr is intro ducir cada pi n manualmente Nota Efectuad primero la configuraci n para los pi ones de la rueda A mantened apretado el pulsante SET y proceded c...

Page 89: ...cambio con el Ergopower lentamente de modo regular El pulsante S S debe apretarse cuando la cadena haya pa sado completamente al plato sucesivo Colocad el desviador en el segundo plato Apretad el pul...

Page 90: ...iende Las pantallas AT y STW realizan mediciones independientes Mientras una se visualiza la medici n se realiza contemporaneamente en la otra pantalla no visualizada ErgoBrain ofrece dos modos de med...

Page 91: ...T RESET RESET RESET Para poner en marcha el cron metro apretad el pulsante S S y para pa rarlo apretad S S nuevamente Para poner a cero apretad los pulsantes S S y MODE contemporaneamente La puesta a...

Page 92: ...puede efectuar en las funciones TM DST AV MX Todos los datos de la visualizaci n AT se eliminar n sin influir sobre los datos de la visualizaci n STW TM AV DST G D CDC SPD PANTALLA AUTO TIMER A Pantal...

Page 93: ...indicador de la velocidad parpadea Es posible iniciar finalizar la medici n STW desde cualquier funci n en don de os encontr is Puesta a cero Pod is realizar la puesta a cero desde qualquier funci n...

Page 94: ...mientras esta activada la funci n secundaria ODO en visualizaci n Auto Timer Se visualizar la circunferencia de la rueda actualmente en uso La presi n continua de los dos pulsantes provoca la alternan...

Page 95: ...ualizaci n es posi ble con la cadena en cualquier posici n pero aseguraos de que est bien fijada que no salte y que las bielas puedan girar correcctamente En cual quier modo de medici n mantened apret...

Page 96: ...er la unidad a la sombra Los datos no se alteran La pantalla responde lentamente La temperatura ambiente es demasiado baja inferior a los 0 C 32 F Vuelve a la normalidad con el aumento de la temperatu...

Page 97: ...14 99 m 25 590 pulgadas 0 01 m 1 pulgadas Reloj 0 00 00 23 59 59 1 00 00 12 59 59 0 003 Cadencia 0 20 0 299 0 rpm 1 rpm sotto i 199rpm Cron metro STW 0 00 00 0 99 59 59 0 003 STW Velocidad media STW...

Page 98: ...interfer ence and 2 this device must accept any interference received including interference that may cause undesired operation Modifications The FCC requires the user to be notified that any changes...

Page 99: ...055 26 x 2 1 2068 26 x 2 125 2070 26 x 2 35 2083 27 x 1 2145 27 x 1 1 8 2155 27 x 1 1 4 2161 27 x 1 3 8 2169 650 x 35A 2090 650 x 38A 2125 650 x 38B 2105 700 x 18C 2070 700 x 19C 2090 700 x 20C 2086 7...

Page 100: ...lo fr CAMPAGNOLO USA INC 2105 L CAMINO VIDA ROBLE CARLSBAD CA 92009 USA PHONE 1 760 9310106 FAX 1 760 9310991 E mail info campagnolousa com CAMPAGNOLO LATINO AMERICANA CML LTDA AV DR ANTONIO LVARO 330...

Reviews: