Campbell GRANITE, Product Manual
The Arrma GRANITE is an electrifying RC truck designed for off-road adventures. To get you up and running in no time, we offer a Quick Start Manual that provides step-by-step instructions. Download it for free from 88.208.23.73:8080 and unlock the full potential of your GRANITE, hassle-free.
Share
Download


Reviews:
No comments
Related manuals for GRANITE

MHUB PRO (8X8) 70
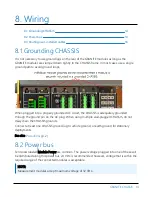
Brand: HDanywhere Pages: 2

IW-RS104-07
Brand: InWin Pages: 24
Supero SC936 Series
Brand: Supermicro Pages: 84
EVOLV Series
Brand: Phanteks Pages: 35

CSR-G6400
Brand: CYP Pages: 28

SC113TQ-700CB
Brand: Supermicro Pages: 80

1269
Brand: Racal Instruments Pages: 170

RSV-X4000
Brand: Rosewill Pages: 8

RSV-L4412
Brand: Rosewill Pages: 8


