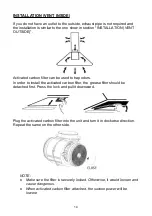
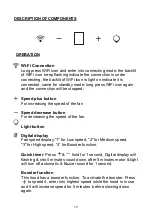
background image

FRANÇAIS

NOTICE D'INSTALLATION ET DUTILISATION

DEUTSCH

INSTALLATIONS- UND BEDIENUNGSANLEITUNG

ENGLISH

INSTALLATION AND USER’S MANUAL

Summary of Contents for CDG6CEBWIFI

Page 1: ...FRANÇAIS NOTICE D INSTALLATION ET DUTILISATION DEUTSCH INSTALLATIONS UND BEDIENUNGSANLEITUNG ENGLISH INSTALLATION AND USER S MANUAL ...

Page 2: ... INTRODUCTION SAFETY PRECAUTION SPECIFICATION INSTALLATION VENT OUTSIDE INSTALLATION VENT INSIDE DESCRIPTION OF COMPONENTS OPERATION MAINTENANCE TROBULESHOOTING CONFORMITY WITH DIRECTIVES ENVIRONMENTAL PROTECTION 11 15 15 17 18 19 19 2 2 5 6 1 ...

Page 3: ... exhausting fumes from appliances burning gas or other fuels Regulations concerning the discharge of air have to be fulfilled Thank you for choosing this cooker hood This instruction manual is designed to provide you with all required instructions related to the installation use and maintenance of the appliance In order to operate the unit correctly and safety please read this instruction manual c...

Page 4: ...ce by a person slide for their safety Children should be supervised to ensure that they do not play with the appliance Do not flambé under the range hood CAUTION Accessible parts may become hot when used with cooking appliance Electrical Shock Hazard Only plug this unit into a properly earthed outlet If in doubt seek advice from a suitably qualified engineer Failure to follow these instructions ca...

Page 5: ...ge If the supply cord is damaged it must be replaced by a special cord or assembly available from the manufacturer or its service agent WARNING This is a Class I appliance and MUST be earthed This appliance is supplied with a 3 core mains cable coloured as follows Brown L or Live Blue N or Neutral Green and Yellow E or Earth The fuse must be rated at 3 Amps Electrical Installation All installation...

Page 6: ...Accessories List Spec Illustration Picture Qty Casing 1 Upper Chimney 1 Lower Chimney 1 Lower chimney bracket 1 Upper chimney bracket 1 Hanging Board 1 φ8 rawl plugs φ8 φ6 white color 9 Screws ST4 0 30 9 φ7 2screws ST4 0 8 2 5 ...

Page 7: ...mmable material with an interior diameter of 150mm 1 Before installation turn the unit off and unplug it from the outlet 2 The cooker hood should be placed at a distance of 65 75cm above the cooking plane for best effect 3 Drill 3 x 8mm holes to accommodate the bracket Screw and tighten the bracket onto the wall with the screws provided Wall plug Wall bracket 107 5mm Screw 4mm x 30mm 6 ...

Page 8: ...eed to drill 2x8mm extra holes fixing screws screw plugs before installation Voor schuine modellen For inclined panel Model 7 ...

Page 9: ...r hood and hang onto the wall bracket hook Cooker hook Wall bracket 5 Fix the one way valve to the air outlet of the cooker hood Then attached the exhaust pipe onto the one way valve as shown below Exhaust pipe Cooker hood 8 ...

Page 10: ...ot tighten the screws too strongly i By Put the inner chimney into outer chimney Then pulling out the inner chimney upwards Adjust to reach the height required ii Sliding the chimney to adjust the chimney height When the height you required is reached then hang the fixing hole to the fixing screws as showed in below pictures Inner chimney Outer chimney 9 ...

Page 11: ...m holes to accommodate the plate II Screw and tighten the plate II onto the wall with 2 screws provided ii Assembly the chimney onto the unit and fix it with 2 screws Plate II Wall plug Screw 4mm x 8mm Screw 4mm x 30mm 10 ...

Page 12: ...Standard Installation Accessories List Spec Illustration Picture Qty Air Deflector 1 Bracket 1 φ8 rawl plugs φ8 φ6 white color 2 Screws ST4 0 30 2 Screws ST3 5 12 2 11 ...

Page 13: ...e bracket to the T shaped plastic outlet with 2pcs ST3 5x12mm screws provided as shown below 2 Drill 2 holes on the wall to accommodate the wall plugs then screw and tighten the bracket onto the wall with 2pcs ST4x30mm screws provided 3 Attach the exhaust pipe onto the air outlet of the cooker hood as shown below 12 ...

Page 14: ...et and v flaps can not be use d at the same time You can use them in two ways 1 Add v flap on existing o utlet 2 Use T shaped plastic outlet no add v flap o Note The product is provided with v flap accessory This accessory is not mandatory for installation operation and use of the product 13 ...

Page 15: ...o trap odors In order to install the activated carbon filter the grease filter should be detached first Press the lock and pull it downward Plug the activated carbon filter into the unit and turn it in clockwise direction Repeat the same on the other side NOTE o Make sure the filter is securely locked Otherwise it would loosen and cause dangerous o When activated carbon filter attached the suction...

Page 16: ... For decreasing the speed of the fan Light button Digital display Fan speed display 1 for Low speed 2 for Medium speed 3 for High speed 4 for Booster function Quick timer Press hold for 1 second Digital display will flashing into 5 minutes count down after 5 minutes motor light will turn off automatic Buzzer sound for 1 second Booster function This hood has a booster function To activate the boost...

Page 17: ...ur portable device Then enroll your hood NOTE ENROLLMENT CANDY HOOD 1 Press the WiFi button until the icon starts blinking When the pairing is completed the WiFi icon will be on The image of the hood has the only purpose of presenting it May not be perfectly representative 16 ...

Page 18: ...ing for Activated Carbon Filter Apply SOLELY to unit that installed as a recirculation unit not vented to the outside This filter traps odors and must be replaced at least once a year depending on how frequent the cooker hood used IV Changing a light bulb Remove the screws on the glass take off the hood glass Find the bulb that requires replacement you will find it located in the light fixture whi...

Page 19: ...the bracket Take down the unit and check whether the bracket is in proper location Suction performance not good Too long distance between the unit and the cooking plane Readjust the distance to 65 75cm Technology Wi Fi Standard 802 11 b g n Frequency Band s MHz 2400 MHz 2483 5 MHz Maximum Power mW 100 mW Product information for networked equipment power consumption of the product in networked stan...

Page 20: ...the recycling of electrical and electronic equipment Disposal must be carried out in accordance with local environmental regulations for waste disposal For more detailed information about treatment recovery and recycling of this product please contact your local city office your household waste disposal service or the shop where you purchased the product CUSTOMER ASSISTANCE SERVICE If you cannot i...

Page 21: ...SIGNES DE SÉCURITÉ 21 RISQUE DE CHOC ELECTRIQUE 22 INSTALLATION ELECTRIQUE 23 INSTALLATION MONTAGE MURAL 25 INSTALLATION ÉVACUATION INTERNE 33 DESCRIPTION DES COMPOSANTS 34 FONCTIONNEMENT 34 ENTRETIEN 36 DÉPANNAGE 37 SERVICE APRÈS VENTE 38 PROTECTION DE L ENVIRONNEMENT 38 ...

Page 22: ...sse internet suivante www candy group com CONSIGNES DE SÉCURITÉ Ne laissez jamais les enfants faire fonctionner la machine La hotte est à usage domestique uniquement ne convient pas au barbecue au rôtissoire et à d autres usages commerciaux La hotte et son filtre doivent être nettoyés régulièrement afin de rester en bon état de fonctionnement Nettoyez la hotte conformément au mode d emploi et gard...

Page 23: ...rité Surveillez les enfants afin qu ils ne jouent pas avec l appareil Ne pas faire flamber les aliments sous la hotte ATTENTION Les pièces accessibles peuvent être chaudes lorsqu elles sont utilisées avec des appareils de cuisson Risque de choc électrique Branchez uniquement cet appareil dans une prise correctement mise à la terre En cas de doute demandez conseil à un ingénieur dûment qualifié Le ...

Page 24: ...l est conforme au schéma de câblage Le câble ne doit pas être plié ou comprimé Vérifiez régulièrement que la prise électrique et le cordon d alimentation ne sont pas endommagés Si le cordon d alimentation est endommagé il doit être remplacé par un cordon ou un montage spécial disponible auprès du fabricant ou de son agent de maintenance AVERTISSEMENT Il s agit d un appareil de classe I et DOIT êtr...

Page 25: ...Spéc Image d illustration Qté Logement 1 Haut de conduit 1 Partie inférieure de conduit 1 Support de conduit inférieur 1 Support de conduit supérieur 1 Plaque suspendue 1 Ø 8 bouchons rawl Ø 8 Ø 6 couleur blanche 9 Vis ST4 0 30 9 Ø 7 2 vis ST4 0 8 2 ...

Page 26: ... avec un diamètre intérieur de 150 mm 1 Avant l installation éteignez l appareil et débranchez le de la prise de courant 2 Pour de meilleures performances la hotte doit être placée à une distance de 65 à 75cm au dessus de la plaque de cuisson 3 Percez des trous de 3 x 8 mm pour recevoir le support Vissez et serrez le support sur le mur avec les vis fournies 107 5 mm Prise murale Fixation murale Vi...

Page 27: ...26 Pour le modèle de panneau incliné avant l installation percer des trous supplémentaires de 2 x 8 mm et fixer les vis et les bouchons de vis Pour les modèles coudés ...

Page 28: ... support mural 5 Fixez la valve anti retour sur la prise de sortie de l air de la hotte Ensuite fixez le tuyau d échappement sur la soupape unidirectionnelle comme indiqué ci dessous Hotte de cuisine Fixation murale Hotte de cuisine Tuyau d échappement ...

Page 29: ...s vis trop fort 6 i En plaçant le conduit intérieur dans celui extérieur puis en tirant celui intérieur vers le haut Ajustez pour atteindre la hauteur requise ii Faites glisser le conduit pour régler sa hauteur Lorsque la hauteur requise est atteinte accrochez le trou de fixation aux vis de fixation comme indiqué dans les images ci dessous Conduit intérieur Conduit extérieur ...

Page 30: ... de 2 x 8 mm pour recevoir la plaque II Vissez et serrez la plaque II sur le mur avec 2 vis fournies ii Assemblez le conduit sur l appareil et fixez la à l aide de 2 vis Plaque II Prise murale Vis 4 mm x 8 mm Vis 4 mm x 30 mm ...

Page 31: ...30 Liste d accessoires d installation standard Spéc Image d illustration Qté Collecteur déflecteur 1 Support 1 Ø 8 bouchons rawl Ø 8 Ø 6 couleur blanche 2 Vis ST4 0 30 2 Vis ST 3 5 12 2 ...

Page 32: ...t mentionné comme inclus et non optionnel 1 Fixez le support à la sortie en plastique en forme de T avec 2 vis ST 3 5x12 mm fournies comme indiqué ci dessous 2 Percez 2 trous sur le mur pour recevoir les fiches murales puis vissez et serrez le support sur le mur avec 2 vis ST4x30 mm fournies ...

Page 33: ... forme de T et les volets en V ne peuvent pas être utilisés en même temps Vous pouvez les utiliser de deux façons 1 Ajoutez un rabat en V sur la sortie existante 2 Utiliser une sortie en plastique en forme de T sans ajouter de volet en V o Remarque Le produit est équipé d un volet en V Cet accessoire n est pas obligatoire pour l installation le fonctionnement et l utilisation du produit ...

Page 34: ...installer le filtre à charbon actif le filtre à graisse doit d abord être détaché Appuyez sur le système d ouverture et tirez le filtre vers le bas Branchez le filtre à charbon actif dans l unité et tournez le dans le sens des aiguilles d une montre Faites pareil de l autre côté REMARQUE o Assurez vous que le filtre soit correctement bloqué Dans le cas contraire il pourrait tomber et endommager le...

Page 35: ...itesse du ventilateur Bouton d éclairage Affichage numérique Affichage de la vitesse du ventilateur 1 pour la basse vitesse 2 pour la vitesse moyenne 3 pour la haute vitesse 4 pour la fonction Booster Minuterie rapide Appuyez sur et maintenez enfoncé pendant 1 seconde l écran numérique clignote et compte à rebours pendant 5 minutes au bout de 5 minutes le moteur et la lumière s éteignent automatiq...

Page 36: ...l portable Ensuite enregistrez votre hotte REMARQUE ENREGISTREMENT DE LA HOTTE CANDY L image de la hotte a pour seul but de la présenter Il se peut qu il ne soit pas parfaitement représentatif 1 Appuyez sur le bouton Wi Fi jusqu à ce que l icône clignote Lorsque l appariement est terminé l icône Wi Fi est activée ...

Page 37: ...unité de recirculation non ventilée vers l extérieur Ce filtre piège les odeurs et doit être remplacé au moins une fois par an en fonction de la fréquence d utilisation de la hotte IV Changement d ampoule Retirez les vis sur la vitre retirez la vitre de la hotte Identifiez l ampoule qui doit être remplacée vous la trouverez dans le luminaire qui se trouve à l intérieur de la section exposée de l a...

Page 38: ...au support Faites descendre l appareil et vérifiez si le support est correctement positionné Les performances d aspiration ne sont pas bonnes Distance trop grande entre l appareil et le plan de cuisson Réajustez la distance à 65 75 cm Technologie Wi Fi Standard 802 11 b g n Bande s de fréquence MHz 2400 MHz 2483 5 MHz Puissance maximale mW 100 mW Informations sur le produit pour les équipements en...

Page 39: ... obtenir des conseils sur le recyclage Cet appareil comporte les symboles conformes à la directive européenne 2012 19 EU sur les déchets des équipements électriques et électroniques DEEE En veillant à ce que ce produit soit éliminé correctement vous aidez à prévenir d éventuelles conséquences négatives pour l environnement et la santé humaine qui pourraient résulter d une élimination inappropriée ...

Page 40: ...ÜHRUNG 40 SICHERHEITSVORKEHRUNGEN 40 STROMSCHLAGGEFAHR 41 ELEKTRISCHE INSTALLATION 42 INSTALLATION WANDMONTAGE 44 INSTALLATION ENTLÜFTUNG INNEN 52 BESCHREIBUNG DER BAUTEILE 53 BETRIEB 53 INSTANDHALTUNG 55 FEHLERBEHEBUNG 56 KUNDENDIENST 57 UMWELTSCHUTZ 57 ...

Page 41: ...Wortlaut der Konformitätserklärung ist unter folgender Internetadresse abrufbar www candy group com SICHERHEITSVORKEHRUNGEN Lassen Sie niemals Kinder die Maschine bedienen Die Dunstabzugshaube ist nur für den häuslichen Gebrauch vorgesehen und nicht für andere Zwecke wie Grillpartys Feinkostgeschäfte oder eine gewerbliche Nutzung geeignet Die Dunstabzugshaube und ihr Filter müssen regelmäßig gerei...

Page 42: ...ngel nur unter Aufsicht oder nach ausreichender Einweisung durch eine für ihre Sicherheit verantwortliche Person benutzt werden Kinder müssen beaufsichtigt werden um sicherzugehen dass sie nicht am Gerät herumspielen Flambieren Sie nicht unter der Dunstabzugshaube VORSICHT Zugängliche Teile können bei der Verwendung mit Kochgeräten heiß werden Stromschlaggefahr Schließen Sie dieses Gerät nur an ei...

Page 43: ...wurde und dem Schaltplan entspricht Das Kabel darf weder geknickt noch gequetscht werden Überprüfen Sie regelmäßig den Netzstecker und das Netzkabel auf Beschädigungen Ein beschädigtes Netzkabel darf nur durch ein Spezialkabel ausgetauscht werden das entweder beim Händler oder bei seinem technischen Kundendienst erhältlich ist WARNUNG Dies ist ein Gerät der Klasse I und MUSS geerdet werden Dieses ...

Page 44: ...dmäßigen Zubehörteile Teil Darstellung Menge Gehäuse 1 Oberer Abzug 1 Unterer Abzug 1 Untere Abzugshalterung 1 Obere Abzugshalterung 1 Kabelführung 1 Ø 8 Dübel Ø 8 Ø 6 weiß 9 Schrauben ST4 0 30 9 Ø 7 2 Schrauben ST4 0 8 2 ...

Page 45: ...eschlossen werden 1 Schalten Sie das Gerät vor der Installation aus und ziehen Sie den Stecker aus der Steckdose 2 Um eine optimale Wirkung zu erzielen sollte die Abzugshaube in einem Abstand von 65 75 cm von der Kochstelle montiert werden 3 Bohren Sie 3 x 8 mm Löcher für die Aufnahme der Halterung Schrauben Sie die Halterung mit den mitgelieferten Schrauben an der Wand fest 107 5mm Dübel Wandhalt...

Page 46: ...45 Für Schrägplattenmodell Vor der Installation sind zwei zusätzliche 8 mm Löcher für Befestigungsschrauben und Dübel zu bohren Für abgewinkelte Modelle ...

Page 47: ...aube am Haken der Wandhalterung auf 5 Befestigen Sie das Einwegeventil am Abluftrohr der Dunstabzugshaube Befestigen Sie dann das Abluftrohr wie unten gezeigt am Einwegeventil Dunstabzugshaube Wandhalterung Dunstabzugshaube Abluftrohr ...

Page 48: ... vermeiden 6 i Setzen Sie den inneren Abzug in den äußeren Abzug ein und ziehen Sie den inneren Abzug nach oben heraus Stellen Sie die gewünschte Höhe ein ii Verschieben des Abzugs zur Einstellung der Abzugshöhe Wenn die von Ihnen gewünschte Höhe erreicht ist führen Sie die Befestigungsschrauben wie in den folgenden Bildern gezeigt in die Befestigungsöffnung ein Innerer Abzugskanal Äußerer Abzugsk...

Page 49: ...die Aufnahme der Platte II Schrauben Sie die Platte II mit den 2 mitgelieferten Schrauben an der Wand fest ii Montieren Sie den Abzug am Gerät und befestigen Sie ihn mit 2 Schrauben Platte II Dübel Schraube 4 mm x 8 mm Schraube 4 mm x 30 mm ...

Page 50: ...49 Liste der standardmäßigen Zubehörteile Teil Darstellung Menge Luftleitblech 1 Halterung 1 Ø 8 Dübel Ø 8 Ø 6 weiß 2 Schrauben ST4 0 30 2 Schrauben ST3 5 12 2 ...

Page 51: ...ieferumfang enthalten und nicht optional 1 Befestigen Sie die Halterung am T förmigen Kunststoffauslass mit 2 ST3 5x12 mm Schrauben wie unten gezeigt 2 Bohren Sie 2 Löcher für die Dübel in die Wand Befestigen Sie die Halterung mit den 2 mitgelieferten St4x30 mm Schrauben an der Wand fest ...

Page 52: ...ffauslass und V Klappen können nicht gleichzeitig verwendet werden Sie können sie auf zwei Arten verwenden 1 V Klappe zum vorhandenen Auslass hinzufügen 2 T förmigen Kunststoffauslass verwenden keine V Klappe hinzufügen o Hinweis Das Produkt ist mit V Klappen Zubehör ausgestattet Dieses Zubehör ist für die Installation den Betrieb und die Verwendung des Produkts nicht zwingend erforderlich ...

Page 53: ...ivkohlefilter zu installieren sollte zuerst der Fettfilter entfernt werden Drücken Sie auf die Verriegelung und ziehen Sie sie nach unten Setzen Sie den Aktivkohlefilter in das Gerät ein und drehen Sie ihn im Uhrzeigersinn Wiederholen Sie diesen Vorgang auf der anderen Seite HINWEIS o Vergewissern Sie sich dass der Filter sicher verriegelt ist Andernfalls könnte er sich lösen und zu einer Gefahr w...

Page 54: ... zur Leistungsverringerung Zum Verringern der Lüfterdrehzahl Lichttaste Digitale Anzeige Gebläsedrehzahlanzeige 1 für niedrige Drehzahl 2 für mittlere Drehzahl 3 für hohe Drehzahl 4 für Booster Funktion Schnelltimer Halten Sie die Taste 1 Sekunde lang gedrückt Die Digitalanzeige blinkt und zählt nach 5 Minuten nach unten Nach 5 Minuten schalten Motor und Licht den automatischen Ton und den Summer ...

Page 55: ...den Sie anschließend Ihre Abzugshaube an HINWEIS ANMELDEN DER CANDY ABZUGSHAUBE Die Abbildung der Abzugshaube dient lediglich zur Veranschaulichung und kann eventuell abweichend sein 1 Drücken Sie die WiFi Taste bis das Symbol zu blinken beginnt Wenn die Kopplung abgeschlossen ist wird das WiFi Symbol eingeschaltet ...

Page 56: ...e im Umluftmodus betrieben werden keine Abluft nach außen Der Aktivkohlefilter fängt Gerüche ab und muss mindestens einmal im Jahr ausgetauscht werden je nachdem wie häufig die Dunstabzugshaube verwendet wird IV Auswechseln des Leuchtmittels Lösen Sie die Schrauben der Glasabdeckung und entfernen Sie diese Machen Sie die auszutauschende Glühbirne ausfindig die sich im Lampensockel im freiliegenden...

Page 57: ... Gerätes Der Gebläseflügel ist beschädigt Schalten Sie das Gerät aus und lassen Sie es ausschließlich durch qualifiziertes Servicepersonal reparieren Der Gebläsemotor ist nicht korrekt befestigt Schalten Sie das Gerät aus und lassen Sie es ausschließlich durch qualifiziertes Servicepersonal reparieren Das Gerät ist nicht ordnungsgemäß an der Halterung aufgehängt Nehmen Sie das Gerät ab und überprü...

Page 58: ...Gerät Dies trägt dazu bei unnötige Anfahrten für Techniker und damit und insbesondere anfallende Kosten zu vermeiden UMWELTSCHUTZ Elektroaltgeräte dürfen nicht mit dem Hausmüll entsorgt werden und sind dem Recycling zuzuführen wenn entsprechende Einrichtungen vorhanden sind Erkundigen Sie sich bei Ihrer örtlichen Behörde oder Ihrem Händler über die geltenden Vorschriften für die Entsorgung Dieses ...

Reviews: