NOTE
Install the
print head.
Install the
print head.
1
2
3
If you open the scan unit while the machine is
turned ON, the paper output tray will open.
Open the inner cover.
Raise the lock lever.
• A printer cable is not included. You must purchase a USB cable (less than 5 m) to connect your
machine to a computer.
• Please note that the items included with your machine may vary depending on the country of purchase.
NOTE
Depending on the telephone line used, the method of connection differs. This machine has a function for automatically setting the telephone line type.
However, in the case of connecting to an ADSL modem, please set the telephone line type manually.
For details, see "Registering Information in Your Machine" of the
User's Guide.
Connect external devices as follows:
Telephone or answering machine
Built-in computer modem and telephone
Telephone
line
Telephone
line
Machine
Machine
Telephone or
answering machine
= Telephone line jack
= External device jack
TEL
LINE
Machine
Computer
Telephone
Next page
Next page
1
2
Load
the print
media.
Load
the print
media.
Install the
ink tanks.
Install the
ink tanks.
Unpack the
machine.
Unpack the
machine.
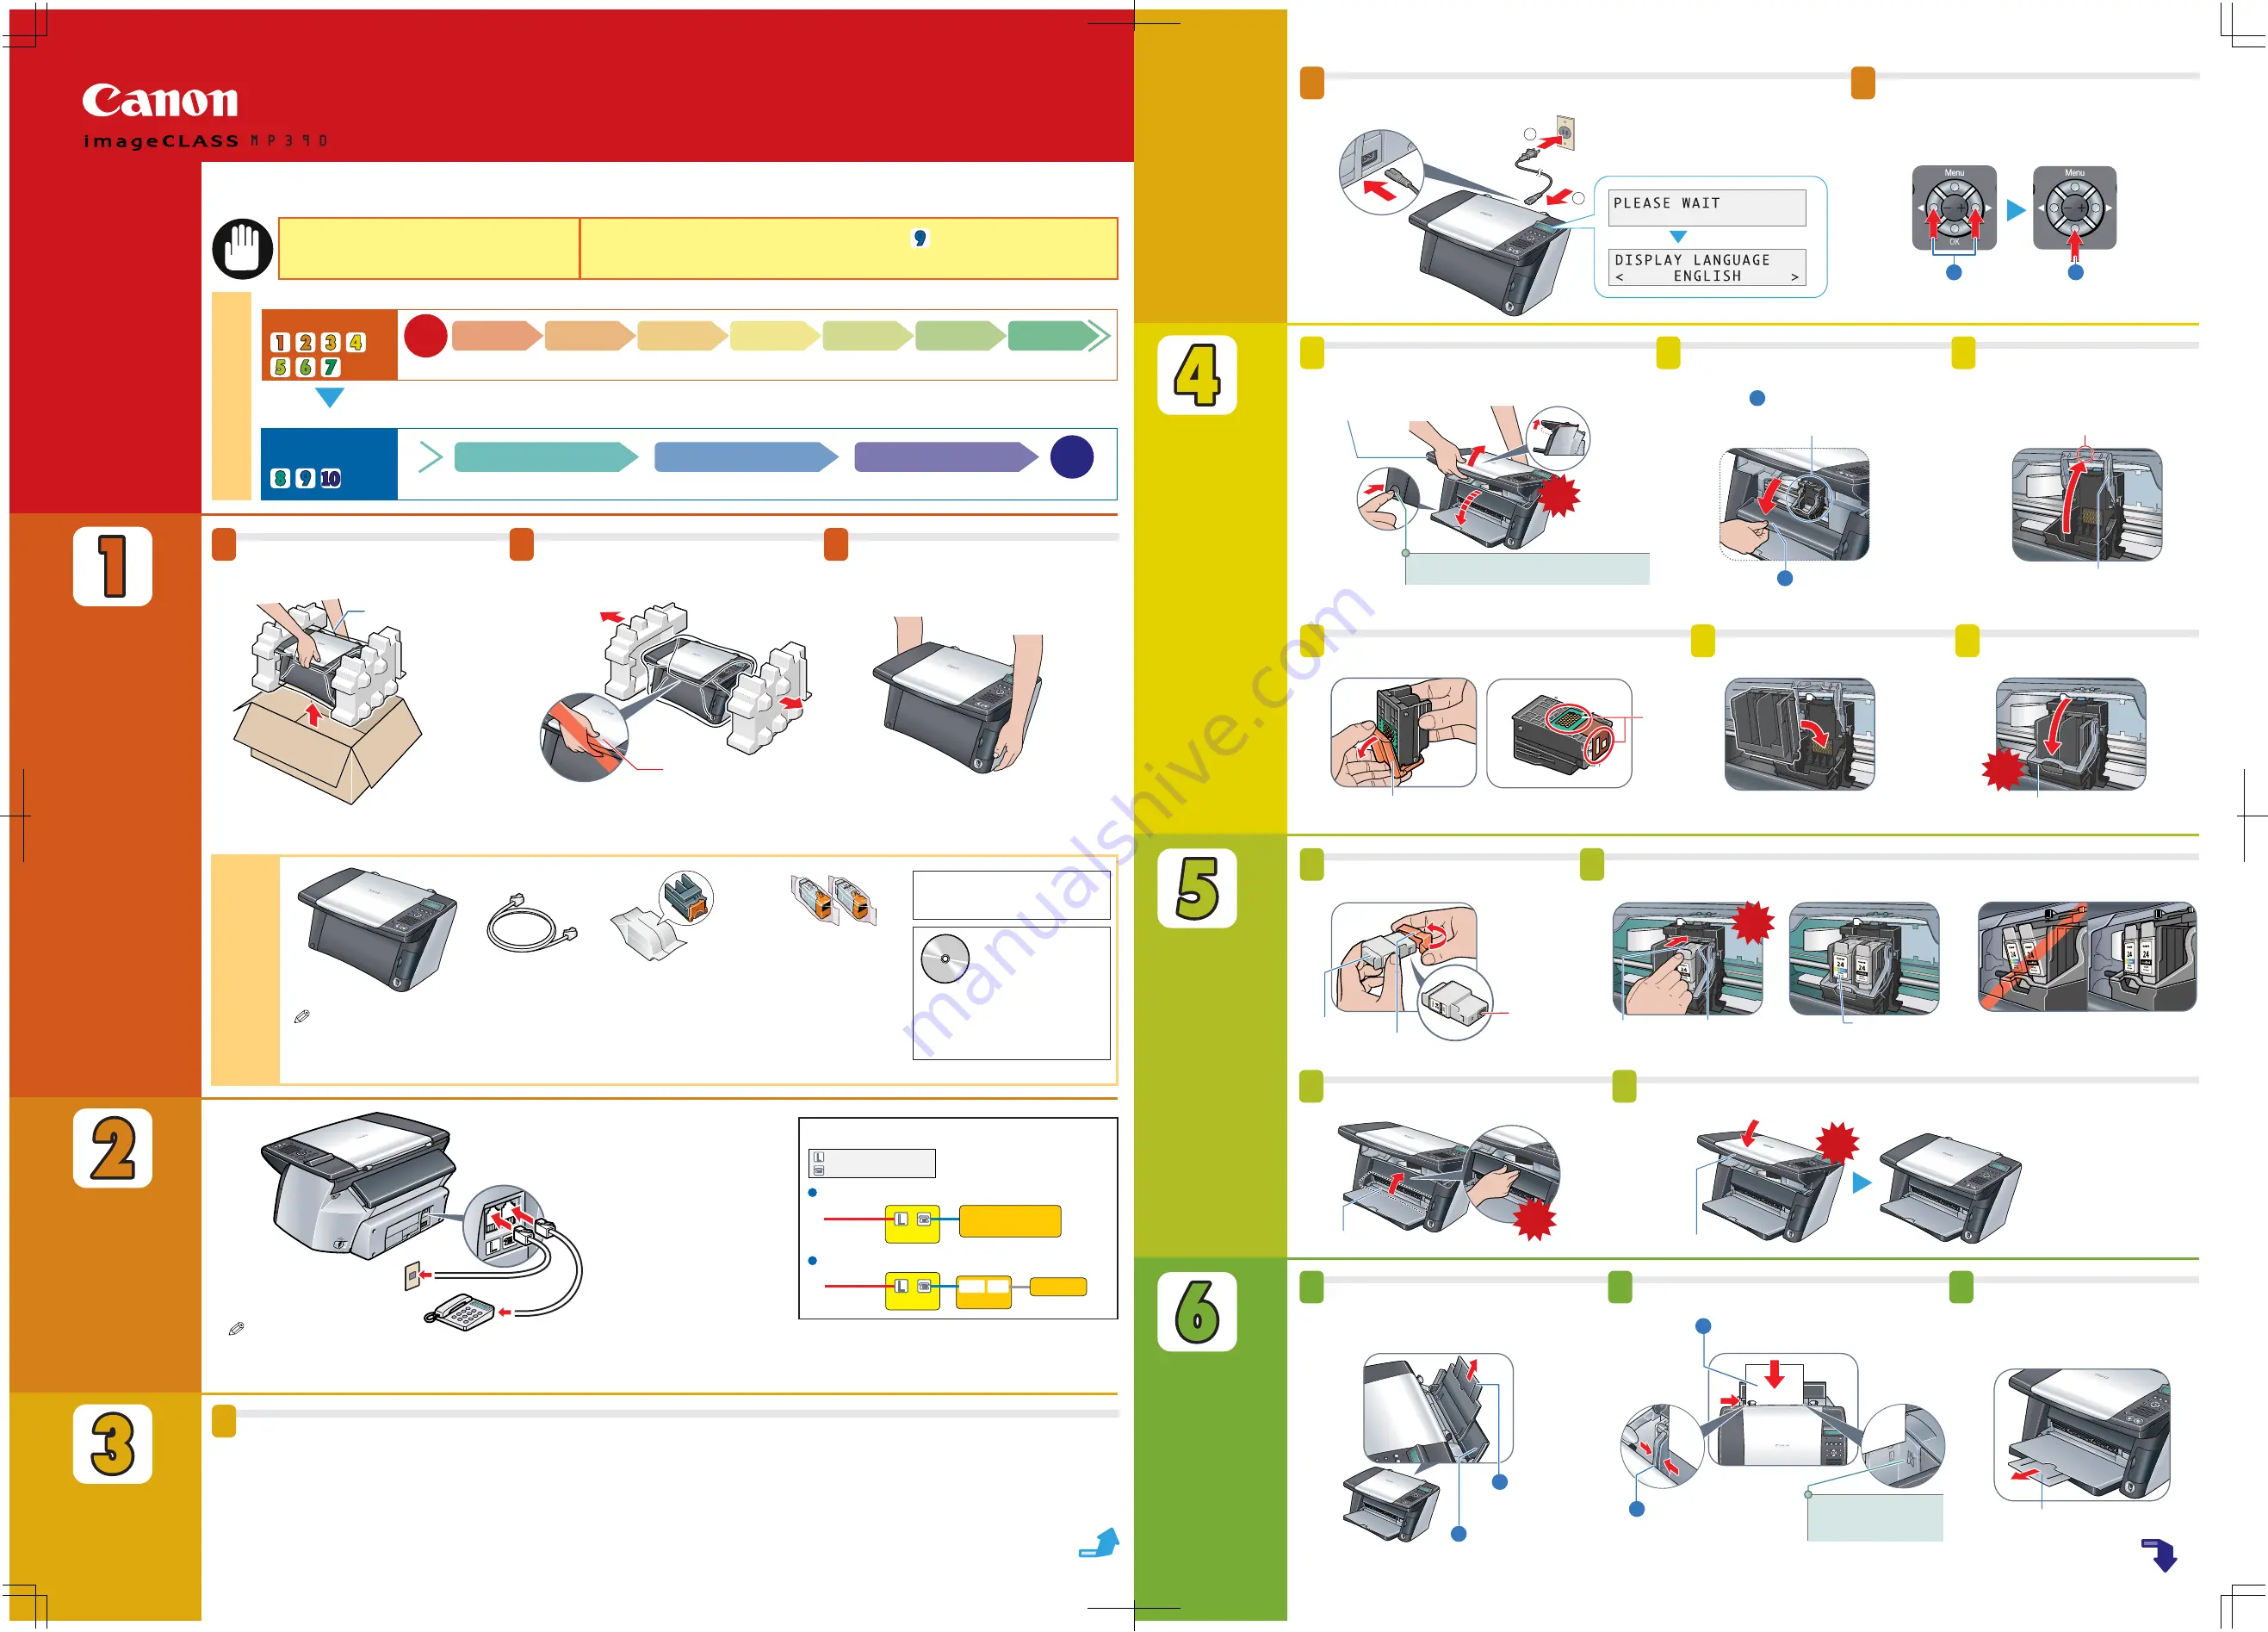
Set-Up Guide
Thank you for purchasing the Canon imageCLASS MP390. To prepare your machine for use, please follow the instructions in
this
Set-Up Guide before referring to any other documentation.
Setup procedures
This side explains the setup procedure for use without connecting to a computer. <Check packed contents, install and adjust machine>
Setup procedures
You can use the copy, photo print, fax functions.
You can use the print, PC fax, scan functions.
Connect the
telephone
line.
Connect the
telephone
line.
Rear side
Rear side
Start
End
For
PC users
IMPORTANT
Do not connect the USB cable until , "Connect the
USB cable."
This side explains the setup procedure for use by connecting to a computer. <Install MP Drivers and Utility Software>
Set-Up Guide
User's Guide
Warranty
* The Setup CD-ROM
contains the MP
Drivers, as well as
the electronic
manuals
Software
Guide and Photo
Application Guide.
PC users, please
read these guides.
1
1
2
3
4
5
6
1
2
3
4
1
2
3
2
3
Connect the
power cord.
Connect the
power cord.
Setup
flow
Load
print media
Install
print head
Install
ink tanks
Connect USB cable
Install MP Drivers
Install Utility Software
Unpack
Connect
power cord
Connect
telephone line
Align
print head
Setup
CD-ROM
MP390
Power cord
Print head
Modular cable
Check
the
contents.
Carefully remove all
items from the box.
Remove the protective
material.
Place the machine on
a flat surface.
When removing the machine from the
box, take sufficient care not to drop it.
You can connect an external
device (telephone or answering
machine) if necessary.
Connect the telephone
line cord to the wall jack.
After removing the protective material, do not
lift the machine by grasping the scan unit.
Be sure to hold the machine by the sides.
Set nothing in front of the machine.
Hold the bottom side.
Ink tanks
Black
BCI-24 Black
Color
BCI-24 Color
Remove the protective cap and dispose of it.
Lower the lock
lever until it locks into place.
Do not
touch!
Prepare the print head.
Insert the print head.
Lower the lock lever.
Remove the
protective cap and dispose of it.
Do not
touch!
Black
Push it in until
it locks into place.
Insert the black
ink tank into
the right slot.
Insert the color
ink tank into
the left slot.
Swing it upward into place.
Lower it into place.
Prepare the ink tanks.
Insert the ink tanks.
Close the inner cover.
Close the scan unit.
Pull it out until it stops.
Open the multi-purpose
tray.
Load the print media.
Pull out the tray
extension of the
paper output tray.
Open the tray.
2
Incorrectly
installed
Correctly
installed
Do not grasp
the scan unit.
Pull up the tray
extension until
it stops.
1
Ensure the paper stack
does not exceed paper
limit mark.
1
Load the print media
with the print side face up.
Click
Click
Click
Click
1
2
2
Pinch and adjust the
paper guide to the
width of the stack.
After removing the tape, remove the protective sheet.
Remove
all
shipping tape
from
the
exterior
of the machine.
Connect the power cord.
1
2
Click
HT3-2147-000-V.1.0
Lift the scan unit until it
locks into place.
Lift the scan unit.
If the paper output tray does not open, press
the Open button to open the paper output tray.
The print head holder
moves to the center.
Install here.
Touch only here!
Raise this securely.
Use [
4
] or [
e
] to select the
language for the LCD
q
, then
press [OK]
w
.
If the message <PUT IN CARTRIDGE> appears,
go to procedure 4, “Install the print head.”
Open the inner cover.
Approx. 15 seconds


