background image

Windows/Macintosh

Windows
Macintosh

p. 11
p. 50

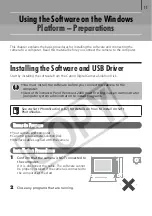
• This guide explains how to install the software programs and 

briefly introduces their functions and operating procedures. 

• Please read the software license agreement in this guide before 

using the software. By using the software, you agree to be 
bound by the terms of the agreement. 

Software Starter Guide

(For the Canon Digital Camera Solution Disk Version 25)

CDI-E201-010

xx04xxxx

© 2005 CANON INC.

PRINTED IN JAPAN

ENGLISH

Windows

Macintosh

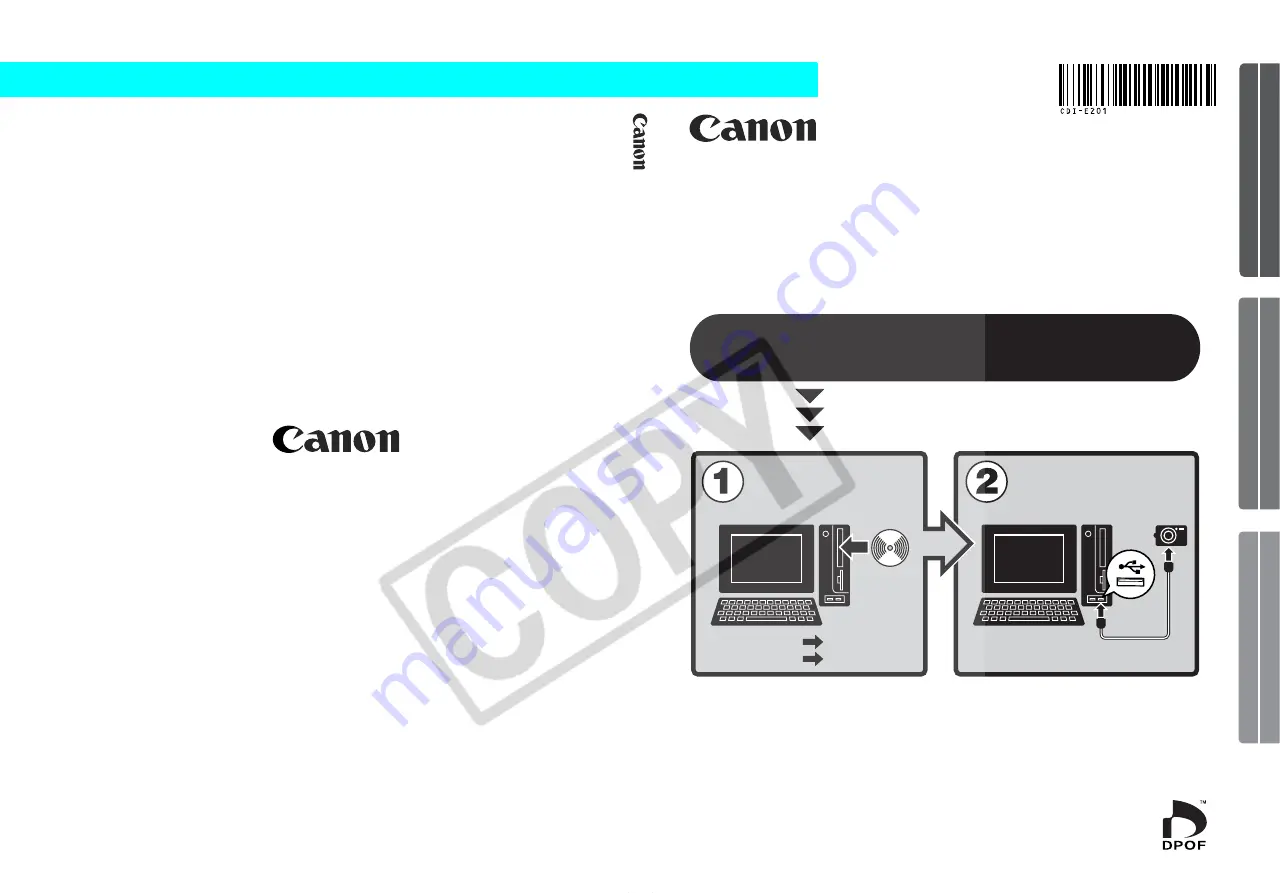
Software Starter Guide For V

ersion 25

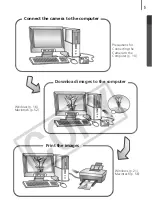
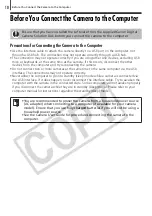
You must install the software bundled on the Canon 
Digital Camera Solution Disk before connecting the 
camera to the computer.

Install the software.

Connect the camera 
to the computer.

Summary of Contents for PowerShot A410

Page 1: ...By using the software you agree to be bound by the terms of the agreement Software Starter Guide For the Canon Digital Camera Solution Disk Version 25 CDI E201 010 xx04xxxx 2005 CANON INC PRINTED IN J...

Page 2: ...Mon Fri 8 30 AM 5 30 PM PST E mail support arcsoft com Other Regions Please see the ArcSoft web site http www arcsoft com maininternational html SAFETY PRECAUTIONS Warnings This symbol indicates topi...

Page 3: ...of this Agreement You must reproduce and include the copyright notice on the back up copy 3 SUPPORT AND UPDATES Neither Canon nor its subsidiaries dealers or distributors will be responsible for prov...

Page 4: ...null and void with respect to the jurisdiction of that court or tribunal and all the remaining provisions of this Agreement shall remain in full force and effect 9 CONTROLLING LAW The terms of this A...

Page 5: ...dows Platform The Basics 16 Downloading Images to the Computer 16 Printing Images 21 Using the Software on the Windows Platform Advanced Techniques 27 The ZoomBrowser EX Windows 27 ZoomBrowser EX Feat...

Page 6: ...and Features 98 Index 99 Using the PDF Manuals The following PDF format manuals hereafter PDF manuals are provided to explain the features and procedures for using ZoomBrowser EX and ImageBrowser Zoo...

Page 7: ...ed to use the software About this Guide The explanations in this guide are based on Windows XP and Mac OS X v10 3 If you are using another version of these operating systems the actual screen contents...

Page 8: ...e a Pro 4 It s so Simple Make Prints Right at Home Like a Pro See your Camera User Guide for shooting instructions Just install the software once at the beginning Shoot the images Install the software...

Page 9: ...5 Download images to the computer Print the images Connect the camera to the computer Windows p 16 Macintosh p 52 Windows p 21 Macintosh p 56 Precautions for Connecting the Camera to the Computer p 10...

Page 10: ...indows and ImageBrowser Macintosh The examples shown are from ZoomBrowser EX and PhotoRecord Windows Stitch a Panorama Together Create a panoramic image from a series of images with PhotoStitch Confir...

Page 11: ...sh Edit a Movie You can edit movies linking movies and stills that have been downloaded to the computer adding text such as titles adding background music or applying various special effects Extract S...

Page 12: ...MB or more Interface USB Free Hard Disk Space Canon Utilities ZoomBrowser EX 250 MB or more Including the PhotoRecord printing program PhotoStitch 40 MB or more Canon Camera TWAIN Driver 25 MB or mor...

Page 13: ...ickTime VR type It is also required to play and edit movies on the Windows 98 SE Windows Me and Windows 2000 platforms and to edit movies with Windows XP QuickTime is included on the Canon Digital Cam...

Page 14: ...y Never allow the computer to go into standby sleep mode while a camera is connected via the USB interface If it does happen never disconnect the interface cable Try to awaken the computer with the ca...

Page 15: ...Digital Camera Solution Disk Interface cable supplied with the camera Installation Procedures 1 Confirm that the camera is NOT connected to the computer If it is disconnect the cable The software cann...

Page 16: ...it does not appear automatically Windows XP 1 Select My Computer from the Start menu 2 Right click the CD ROM icon and select Open 3 Double click the SETUP EXE icon Windows 2000 Windows Me Windows 98...

Page 17: ...tems displayed here differ according to the software installed When Custom Installation is Selected The USB driver the software for connecting is required when the camera is connected to the computer...

Page 18: ...nterface cable and set the camera to the correct mode for connecting Users of Windows XP and Windows 2000 must log in as an Administrator computer system administrator after restarting to carry out th...

Page 19: ...a message A dialog allowing you to set the default settings will display after installation See Using the Software on the Windows Platform The Basics p 16 for the subsequent procedures This concludes...

Page 20: ...to your computer The downloading procedure is slightly different according to whether you are using a camera to computer connection see below or a memory card reader p 19 Camera to Computer Connectio...

Page 21: ...s First Time Camera is Connected to a Computer Set the following settings the first time you connect the camera to the computer These procedures are not required from the second connection onward Sele...

Page 22: ...gs menu will appear in the LCD monitor In addition the Print Share button will light if your camera is equipped with one See the Camera User Guide for instructions regarding Direct Transfer settings a...

Page 23: ...See the manual for the memory card reader for its connection and handling instructions 2 Select View Download Images using Canon CameraWindow when the dialog to the right appears and click OK The Cam...

Page 24: ...ndow Next print out the images p 21 By default all the images that have yet to be downloaded will download to the My Pictures folder To download images that have had their transfer settings set with t...

Page 25: ...ls after they have been extracted from movies and saved to files To use the Index Print option click Print in the Main Window followed by Index Print If you have installed the Easy PhotoPrint program...

Page 26: ...ayout Settings and adjust the categories as you feel necessary 4 Click 3 Print Printing will start The background of selected images changes to blue Selects the printer and the paper size etc Sets the...

Page 27: ...teps to use PhotoRecord Please see the PhotoRecord Help menu for detailed instructions 1 Click Print in ZoomBrowser EX s Main Window followed by Layout Print 2 Confirm that 1 Select Images is selected...

Page 28: ...nd times included 4 Click 3 Open Layout Print PhotoRecord will start displaying the selected image and the information selected in Step 3 in the Album window In addition the steps that will take you t...

Page 29: ...um and change the design of the image background and border as desired Click the Themes Backgrounds Photo Frames Text Frames or Clipart button to switch between selections Perform the procedures accor...

Page 30: ...may vary slightly according to the printer in use Album Type Description One Photo Per Page Prints one image on each sheet of paper One Photo Per Sheet Free Form Allows images to be freely positioned...

Page 31: ...s This section describes the principal ZoomBrowser EX windows the Main Window Viewer Window and Properties Window Main Window This window is for displaying and organizing images downloaded to the comp...

Page 32: ...selection You can sort the image order in the Browser Area by file name shooting date or other characteristics by clicking the Tools menu and selecting View and Sort by The following icons will displ...

Page 33: ...nvenient for checking the images in multiple folders at once If the displayed folder is at the highest level then all thumbnails in the lower level folders also display You can change the folder level...

Page 34: ...displaying only those images in the Browser Area One of three Star Ratings can be assigned to an image in the Viewer Window the Properties Window or in the information column in the Preview Mode Sele...

Page 35: ...rams for editing Image Selector Button Switches between images Full Screen Button Displays the image in the full screen mode Click the image or press any key on the keyboard to restore the normal disp...

Page 36: ...n Displays detailed information about the shooting settings when the image was captured such as the shutter speed or exposure setting The camera model will determine what information is displayed Prot...

Page 37: ...g Set to Camera Sets camera settings such as the My Camera settings p 45 It also uploads images from the computer to the camera memory card Remote Shooting Allows you to operate the camera shutter fro...

Page 38: ...port Still Images Allows you to change the image size or type and export it as a new image Export Movies Allows you to change the movie size or type and export it as a new movie Extract frames from a...

Page 39: ...er Software Select the software to use and then print Internet Email Images Converts the selected images to the appropriate size for transmission by e mail You can also use it to automatically start a...

Page 40: ...me please follow these procedures 1 Place the Canon Digital Camera Solution Disk in the CD ROM drive If the installer panel fails to appear automatically display it using the procedures in the How to...

Page 41: ...program is required to replay or edit movies on the Windows 2000 Windows Me or Windows 98 SE platform or to edit movies on the Windows XP platform Install it during procedures in the Replaying Movies...

Page 42: ...dow the Navigator window and the Image Quality Adjustment Window will display 3 Adjust the image quality as required in the Image Quality Adjustment Window This window is explained in the Functions of...

Page 43: ...used This section adjusts the white balance according to the light source and color temperature This section adjusts the digital exposure compensation photo effect contrast sharpness and saturation T...

Page 44: ...red settings when you convert a RAW image You can also select preset color schemes such as Positive Film Furthermore you can add your own color schemes My Color to apply to other RAW images when they...

Page 45: ...nd place the camera in the correct mode for connecting The Camera Control Window will display 2 Open the lens cover or remove the lens cap on models equipped with them Proceed to the next step if your...

Page 46: ...which images are captured You can add comments to images by placing a check mark here and typing text in the boxes below Viewfinder Display Click the Start Stop Viewfinder button while a connection to...

Page 47: ...ormance cannot be guaranteed if the computer enters the standby mode If your camera is equipped with the Auto Rotate function and you set it to On the image will automatically be rotated and appear in...

Page 48: ...the camera In addition the symbol below displays by the image in the Browser Area Starting PhotoStitch 1 Click Edit in the ZoomBrowser EX s Main Window and click Stitch Photos 2 Click 1 Select Images...

Page 49: ...Camera Window 1 Attach the supplied interface cable to the computer s USB port and the camera s DIGITAL terminal and place the camera in the correct mode for connecting The Camera Control Window will...

Page 50: ...or in themed sets Displays the list of settings files saved onto the computer Play Button Plays the audio from the selected settings file Delete Button Deletes a settings file from the computer Delet...

Page 51: ...tup as a theme tab in the My Camera window To set the start up image or sound individually click the Set individually tab and select it 2 Select the settings files from the Camera list that you wish t...

Page 52: ...g the My Camera Maker program 1 Click the Edit menu in the ZoomBrowser EX Main Window and select Manage My Camera The My Camera window will display 2 Click the Set individually tab in the My Camera wi...

Page 53: ...her than My Camera Maker Compression Method JPEG Baseline JPEG Sampling Rate 4 2 0 or 4 2 2 Image Size w x h 320 x 240 pixels Use settings like those below when creating a sound file using a sound rec...

Page 54: ...mera Solution Disk Items to Prepare Your camera and computer Canon Digital Camera Solution Disk Interface cable supplied with the camera Installation Procedures 1 Close any programs that are running 2...

Page 55: ...nt 7 Review the installation settings and click Next Follow the onscreen instructions to proceed 8 When the installation is over click OK 9 Click Exit in the installer panel and remove the disk from t...

Page 56: ...plied interface cable to the computer s USB port and the camera s DIGITAL Terminal Prepare the camera for communication with the computer The Camera Control Window will appear If it does not open clic...

Page 57: ...oad Images Direct Transfer Function Set the Direct Transfer settings on the camera and press the Print Share button or the SET button Using the Computer to Download Images Click Starts to download ima...

Page 58: ...d are downloaded and saved to the Pictures folder To download images that have had their transfer settings set with the camera click Preferences and select Images whose transfer settings were specifie...

Page 59: ...ny versions of the downloaded images will display in ImageBrowser s Browser Window when downloading is complete Continue by printing out an image p 56 By the default settings all images are downloaded...

Page 60: ...dard photo format If you select multiple images it will print them on the corresponding number of pages 1 Select the images to print Clicking on an image selects it and displays a blue frame around it...

Page 61: ...ages for printing in the Browser Window Clicking on images selects them and changes the background to blue To select multiple images hold the shift or key down while clicking on images 2 Click Print a...

Page 62: ...rint window 6 After setting the number of copies and other settings click Print 7 After the printing finishes click to close the window To save the layout click Save To proceed without saving click Do...

Page 63: ...the desired items in the Items to Print in Caption category A PDF format manual for ImageBrowser is also available It provides further information about the program s features and procedures See Usin...

Page 64: ...sics chapter The ImageBrowser Windows This section describes the principal ImageBrowser windows the Browser Window Viewer Window and File Information Window Browser Window This window is for displayin...

Page 65: ...ng to their attributes Images shot with the camera s Stitch Assist mode RAW images Movies Images with sound memo attachments Protected images Images shot with the camera s AEB function Images shot wit...

Page 66: ...larger size as well as the image information List Displays the images in the folder selected in the Explorer Panel section in rows and columns TimeTunnel Displays images in chronological order in a si...

Page 67: ...images in the Browser Area Hide Buttons Left Hides the Explorer Panel Middle Hides the control panel Right Hides the image information in the Preview display mode Display Size Changes the size of the...

Page 68: ...exts You can also use it to start up other programs for editing Image Selector Button Switches between images Zoom Changes the image zoom setting Full Screen Button Displays the image in the full scre...

Page 69: ...ge Shooting Information Displays detailed information about the shooting settings when the image was captured such as the shutter speed or exposure setting The camera model will determine what informa...

Page 70: ...int option Full Page Print option or by selecting images before printing Set to Camera Sets camera settings such as the My Camera settings p 77 It also uploads images from the computer to the camera m...

Page 71: ...ver Exports the image as a screen saver file Export an Image as Wallpaper Exports the image as a wallpaper file Organize Images File menu Organize Image Sort Images sorts images according to criteria...

Page 72: ...ides or shows image information beneath the thumbnail such as the file name or the shooting date and time Sort Images View menu Sort Arranges image order in the Browser Area according to criteria such...

Page 73: ...th a movie icon in ImageBrowser s Browser Area The movie will appear in the Viewer Window Movie icon 2 Click the Play button You can save the displayed scene as a still image by clicking here You can...

Page 74: ...iple movies or stills 2 Click the Edit menu and select Movie Edit 3 Follow the steps displayed in the middle of the window to edit the movie and save it Click this button to play the movie being edite...

Page 75: ...he Navigator window and the Image Quality Adjustment Window will display 3 Adjust the image quality as required in the Image Quality Adjustment Window This window is explained in the Functions of the...

Page 76: ...chemes My Color to apply to other RAW images when they are being converted See the PDF manual for ImageBrowser for more information p 2 This section adjusts the white balance according to the light so...

Page 77: ...d place the camera in the correct mode for connecting The Camera Control Window will display 2 Open the lens cover or remove the lens cap on models equipped with them Proceed to the next step if your...

Page 78: ...which images are captured You can add comments to images by placing a check mark here and typing text in the boxes below Viewfinder Display Click the Start Stop Viewfinder button while a connection to...

Page 79: ...ormance cannot be guaranteed if the computer enters the sleep mode If your camera is equipped with the Auto Rotate function and you set it to On the image will automatically be rotated and appear in t...

Page 80: ...lder when it is downloaded from the camera In addition the symbol below displays by the image in the Browser Area Symbol displayed by images shot in Stitch Assist mode Starting PhotoStitch 1 Select a...

Page 81: ...the My Camera Window 1 Attach the supplied interface cable to the computer s USB port and the camera s DIGITAL terminal and place the camera in the correct mode for connecting The Camera Control Windo...

Page 82: ...Displays the list of settings files saved onto the computer Play Button Plays the audio from the selected settings file Send to Trash Button Deletes a settings file from the computer Save to Camera Bu...

Page 83: ...ct the type of setting you wish to save to the computer from the Type list box 2 Select the setting in the Camera list that you wish to save to the computer 3 Click the button 4 Input a file name to t...

Page 84: ...f w 320 x h 240 pixels 1 Click the File menu in the ZoomBrowser EX Main Window and select Manage My Camera The My Camera window will display 2 Select the Start up Image in Type 3 Click Add 4 Select th...

Page 85: ...Rate 4 2 0 or 4 2 2 Image Size w x h 320 x 240 pixels Use settings like those below when creating a sound file with a sound recording program Compression Method WAV Monaural Quantifying Bits 8 bit Sam...

Page 86: ...ms that are running 2 Place the Canon Digital Camera Solution Disk in the CD ROM drive If the installer panel displays click Exit to close it 3 Click the Start menu and select My Computer Windows 2000...

Page 87: ...cSoft PhotoStudio from the program list and click 3 Finish ImageBrowser 1 Select an image to edit click the Edit menu and select ArcSoft PhotoStudio Manual for ArcSoft PhotoStudio You can obtain the A...

Page 88: ...l and Add or Remove Programs With Windows 2000 Me 98 uninstall the program by clicking the Start menu and selecting Settings followed by Control Panel and Add Remove Programs You can remove other prog...

Page 89: ...camera for communication with the computer For interface cable connection instructions see the Camera User Guide 2 Click the Finish button if the Camera Control Window displays 3 Click the Start menu...

Page 90: ...mber appears in place of the x x Windows 2000 Windows 98 SE Perform Step 6 with no substitutions Windows Me Substitute the following for the underlined portions of Step 6 Camera WIA Driver x x Uninsta...

Page 91: ...A_0001 JPG STB_0002 JPG STC_0003 JPG All folders except the xxxCANON folders contain image settings files Do not open or delete them IMG_xxxx JPG JPEG images _MG_xxxx JPG JPEG images recorded in the A...

Page 92: ...ll you need do is connect the camera to the computer with an interface cable to easily download images using the Scanners and Cameras Wizard or other procedures However there are some inconveniences a...

Page 93: ...h ends Is the camera set to the playback mode some models only Some models require the camera to be set to the playback mode to transfer data See the Camera User Guide for details Is the battery suffi...

Page 94: ...ay be resolved by lowering the transmission speed for data by following the procedures below Solution Hold the MENU button on the camera down and press the Print Share button and FUNC SET button simul...

Page 95: ...install it first and then reinstall it Solution 2 If the problem is not resolved with the procedures in Solution 1 continue by implementing the following procedures The specific steps are explained be...

Page 96: ...Camera if it appears in one or more places in the Other devices or Imaging devices categories 6 Close the System Properties window Delete the setup information files 7 Double click the My Computer ico...

Page 97: ...procedures to show all files and folders 1 Open the WINNT folder 2 Click the Tools menu and select Folder Options 3 Click the View tab 4 In the Files and Folders category in the Advanced Settings sec...

Page 98: ...es if it is being recognized as an other device 4 Select your camera model name or Canon Camera and click Remove 5 Click OK in the confirmation dialog Delete all instances of your camera model name or...

Page 99: ...er Options Windows Me Click the Tools menu and select Folder Options 2 Click the View tab 3 Windows 98 SE Set the Hide files section to Show all files Windows Me Set the Hidden files and folders secti...

Page 100: ...e acceleration to a setting below Full and click OK 4 Restart the computer if prompted If You Were Using ZoomBrowser EX Version 2 or 3 Take the following steps if you were using ZoomBrowser EX version...

Page 101: ...the images it contains from the Program Files folder to another folder e g Copy the image folders in C Program Files Canon ZoomBrowser EX Library One to another location The moved folder images can no...

Page 102: ...models Non Supported Programs and Features Applicable Camera Models PowerShot SD30 DIGITAL ELPH DIGITAL IXUS i zoom PowerShot SD550 DIGITAL ELPH DIGITAL IXUS 750 PowerShot A410 Non Supported Function...

Page 103: ...cintosh 52 Windows 16 E Easy PhotoPrint 21 E mail 7 Events Dialog 17 90 Extract Stills from Movies 7 F Favorite Folder Macintosh 61 Windows 28 File Information Window 65 Folders Area 27 28 Function Bu...

Page 104: ...Operating Systems 9 Properties Window 32 PTP Picture Transfer Protocol Windows 88 Q QuickTime Windows 36 R Remote Shooting Macintosh 73 Windows 41 Replaying Movies Macintosh 69 Windows 36 S Scanners...

Page 105: ...101 MEMO...

Page 106: ...102 MEMO...

Reviews: