background image

CS 9300C

User Guide

Summary of Contents for CS 9300C

Page 1: ...CS 9300C User Guide...

Page 2: ...may be subject to modification without notice justification or notification to the persons concerned No part of this Guide may be reproduced without the express permission of Carestream Health Inc Th...

Page 3: ...phalometric Program Pane 3 4 Cephalometric Patient Pane 3 5 Cephalometric Parameter Pane 3 6 4 GETTING STARTED Switching On the Unit 4 1 Starting the Imaging Software 4 2 Starting the KODAK Dental Ima...

Page 4: ...ers for the Adult Patient 5 20 Preparing the Unit and Setting the Acquisition Parameters for the Pediatric Patient 5 21 Preparing and Positioning the Adult Patient 5 22 Preparing and Positioning the P...

Page 5: ...e potential risk to personnel or equipment WARNING Warns you to avoid injury to yourself or others by following the safety instructions precisely CAUTION Alerts you to a condition that might cause ser...

Page 6: ...Conventions in this Guide 1 2 About This Guide...

Page 7: ...l The panoramic and 3D digital sensor The X ray source assembly The X ray remote control The chin rest base The panoramic chin rest and bite block The 3D bite block and support The 3D head rest The te...

Page 8: ...Overview 2 2 CS 9300C OVERVIEW Mobile Components Figure 2 1 illustrates the up and down movement of the CS 9300C mobile component and the 360 rotation of the rotative arm Figure 2 1 CS 9300C Mobile Co...

Page 9: ...button 7 Sensor 2 Unit fixed arm 8 X ray source assembly 3 Control panel 9 Unit rotative arm 4 Hand Grips 10 X Ray remote control 5 Chin rest base 11 Cephalostat arm 5 a Panoramic chin rest 12 Cephal...

Page 10: ...ocations Figure 2 3 illustrates the locations of the following digital sensors Panoramic and 3D digital sensor Cephalometric digital sensor panoramic 3D and cephalometric digital sensors of the CS 930...

Page 11: ...the lasers of the CS 9300C Figure 2 4 CS 9300C System Laser Positions 1 3D central positioning laser beam 2 Mid sagittal positioning laser beam 3 Horizontal positioning laser beam 4 3D Field of View...

Page 12: ...unit rotative arm movements 4 Laser Beam button Activates the beams to correctly position the patient 5 3D Position Verification button Positions the unit rotative arm at the selected or memorized 3D...

Page 13: ...you to launch a radiological image acquisition via the exposure button from outside the X ray room You must press and hold the exposure button until the end of acquisition Figure 2 6 X Ray Remote Cont...

Page 14: ...They are delivered with the CS 9300 Panoramic Positioning Accessories Table 2 1 lists the panoramic positioning accessories Table 2 1 Panoramic Positioning Accessories and Replacement Parts Accessory...

Page 15: ..._Ed 01 2 9 3D Positioning Accessories Table 2 2 lists the 3D positioning accessories Table 2 2 3D Positioning Accessories and Replacement Parts Accessory Description 3D bite block 3D bite block suppor...

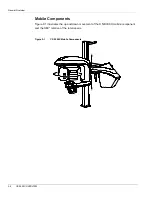
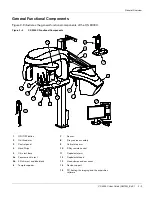
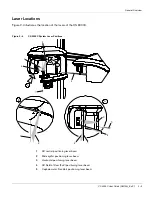
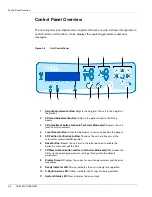
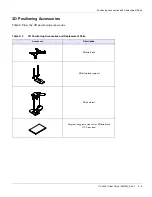
Page 16: ...Positioning Accessories and Replacement Parts 2 10 CS 9300C OVERVIEW...

Page 17: ...connected to the computer via a point to point Ethernet link and not via a LAN General Software Overview The CS 9300C operates with the following software Imaging software Acquisition interface Imagi...

Page 18: ...Resets to the manufacturing parameter settings Memorize settings Memorizes the user preference settings for each patient type kV mA and seconds Save current mode as default Sets the current selected p...

Page 19: ...tion Black indicates the unit is not ready to start acquisition 8 X Ray Emission indicator Yellow indicates the X ray emission status 9 Exit button Closes the Acquisition interface 10 Selector Button...

Page 20: ...rogram Pane 1 Radiological exam options Click for a lateral exam Click for a submento vertex exam Click or for a frontal exam AP and PA Click for a carpus exam Click for an oblique exam 2 Acquisition...

Page 21: ...erent patient parameters The selection of the patient parameters influences the quality of the image The selected parameters must be based on the patient age and morphology Figure 3 3 Cephalometric Pa...

Page 22: ...radiological image acquisition If the default parameter setting is not adapted to your patient type you can manually adapt the parameter settings to the patient type and save this setting as the defau...

Page 23: ...unit and wait for a minute for the connection between the unit and the computer to be established In the status bar red must become green 3 If you start the imaging software before the connection is e...

Page 24: ...nfiguration you may have either Kodak Dental Imaging Software or CS Imaging Software installed For KODAK Dental Imaging Software see Starting the KODAK Dental Imaging Software For CS Imaging Software...

Page 25: ...e of the patient to the record Select the picture from your directory and click Open 4 Click OK to save The patient record is automatically assigned a 7 digit number starting with a letter for example...

Page 26: ...ent Card To create a patient card follow these steps 1 Click in the Patient Browser tab The Patient Card window is displayed 2 Enter the patient information in the Patient Card window 3 When you have...

Page 27: ...nterface To access the Acquisition interface follow these steps 1 Select and double click the patient card in the patient list The Image Viewer tab is displayed 2 In the Image Viewer tab click to acce...

Page 28: ...Starting the Imaging Software 4 6 GETTING STARTED...

Page 29: ...am 2 In the Cephalometric Acquisition interface click the Program button to access the Program pane In the Program pane The for a lateral exam is active Select the appropriate acquisition format optio...

Page 30: ...is active Select the appropriate acquisition format option 3 Click the Patient button to access the Patient pane Select the pediatric patient type 4 If the default parameter setting is not adapted to...

Page 31: ...oulders 3 Open the head clamps and ask the patient to stand up straight in front of the cephalometric unit in the appropriate position 4 On the control panel press and hold to level the ear cones to t...

Page 32: ...Acquiring a Lateral Image 5 4 ACQUIRING CEPHALOMETRIC IMAGES 7 Lower the nasion support to a vertical position...

Page 33: ...3 Open the head clamps and ask the pediatric patient to stand up straight in front of the cephalometric unit in the appropriate position 4 On the control panel press and hold to level the ear cones to...

Page 34: ...Acquiring a Lateral Image 5 6 ACQUIRING CEPHALOMETRIC IMAGES 7 Lower the nasion support to a vertical position...

Page 35: ...ition The turns yellow indicating X ray emission The image appears on the Preview Screen of the Cephalometric Acquisition interface When the acquisition ends the Cephalometric Acquisition interface di...

Page 36: ...In the Cephalometric Acquisition interface click the Program button to access the Program pane In the Program pane The for a frontal AP exam is active Click for a frontal PA exam Select the appropriat...

Page 37: ...s active Click for a frontal PA exam Select the appropriate acquisition format option 3 Click the Patient button to access the Patient pane Select the pediatric patient type 4 If the default parameter...

Page 38: ...to stand up straight in front of the cephalometric unit in the following positions For a frontal AP facing the generator For a frontal PA facing the cephalometric sensor 4 On the control panel press...

Page 39: ...Acquiring a Frontal AP or PA Image CS 9300C User Guide SM750 _Ed 01 5 11 Figure 5 3 Frontal AP Figure 5 4 Frontal PA...

Page 40: ...patient to stand up straight in front of the cephalometric unit in the following positions For a frontal AP facing the generator For a frontal PA facing the cephalometric sensor 4 On the control panel...

Page 41: ...ay follow these steps 1 Leave the X ray room and close the door You must keep visual contact with the patient during acquisition Figure 5 7 Frontal AP Figure 5 8 Frontal PA IMPORTANT To stop the acqui...

Page 42: ...w indicating X ray emission The image appears on the Preview Screen of the Cephalometric Acquisition interface When the acquisition ends the Cephalometric Acquisition interface disappears and the acqu...

Page 43: ...phalometric Acquisition interface click the Program button to access the Program pane In the Program pane The for an oblique exam is active Click to select the desired angle Select the appropriate acq...

Page 44: ...ive Click to select the desired angle Select the appropriate acquisition format option 3 Click the Patient button to access the Patient pane Select the pediatric patient type 4 If the default paramete...

Page 45: ...apron lays flat across the patient s shoulders 3 Open the head clamps and ask the patient to stand up straight in front of the cephalometric unit in the appropriate position 4 On the control panel pre...

Page 46: ...s flat across the pediatric patient s shoulders 3 Open the head clamps and ask the pediatric patient to stand up straight in front of the cephalometric unit in the appropriate position 4 On the contro...

Page 47: ...quisition The turns yellow indicating X ray emission The image appears on the Preview Screen of the Cephalometric Acquisition window When the acquisition ends the Cephalometric Acquisition interface d...

Page 48: ...ephalometric Acquisition interface click the Program button to access the Program pane In the Program pane The for a frontal AP exam is active Click for a submento vertex exam Select the appropriate a...

Page 49: ...e Click for a submento vertex exam Select the appropriate acquisition format option 2 Click the Patient button to access the Patient pane Select the pediatric patient type 3 If the default parameter s...

Page 50: ...hat the apron lays flat across the patient s shoulders 3 Open the head clamps and ask the patient to sit for a more comfortable position or stand up straight in front of the cephalometric unit in the...

Page 51: ...objects 2 Ask the pediatric patient to wear a lead apron with a thyroid collar Ensure that the apron lays flat across the pediatric patient s shoulders 3 Open the head clamps and ask the pediatric pa...

Page 52: ...Insert gently the second cone in the auditory canal of the pediatric patient Launching the X ray To launch the X ray follow these steps 1 Leave the X ray room and close the door You must keep visual...

Page 53: ...Acquiring a Submento Vertex Image CS 9300C User Guide SM750 _Ed 01 5 25...

Page 54: ...sition The turns yellow indicating X ray emission The image appears on the Preview Screen of the Cephalometric Acquisition interface When the acquisition ends the Cephalometric Acquisition interface d...

Page 55: ...the head clamps manually for a frontal AP exam 2 In the Cephalometric Acquisition interface click the Program button to access the Program pane In the Program pane The for a frontal AP exam is active...

Page 56: ...ient s thyroid area and lays flat across the patient s shoulders 3 Ask the pediatric patient to Stand to the side and as far as possible from the cephalometric unit Open the hand fully and place it fl...

Page 57: ...w Screen of the Cephalometric Acquisition interface When the acquisition ends the Cephalometric Acquisition interface disappears and the acquired image is automatically transferred to the Imaging wind...

Page 58: ...on each image to display the estimated emitted dose received by the patient You can use this information to calculate the effective dose received by the patient for the image The radiation emission d...

Page 59: ...ve contact with the mucous membranes The accessories are delivered unsterilized To ensure maximum hygienic safety for the patient follow the following instructions carefully to prepare them for use Th...

Page 60: ...ou must disinfect all components and the following accessories with a low level disinfectant between each patient use Panoramic TMJx2 Sinus chin rest 3D bite block support WARNING To sterilize with he...

Page 61: ...mmonium compounds some phenolics and some iodophors You must use the disinfectant according to the manufacturer instructions Monthly Wipe the outer covers of the unit with a soft dry cloth Annually We...

Page 62: ...Annually 6 4 MAINTENANCE...

Page 63: ...sage Description Action I 1 X ray tube cooling Cooling in progress Wait until the Generator Cooling Indicator on the Acquisition interface reaches zero I 2 Thermal security Cooling in progress Wait un...

Page 64: ...Quick Troubleshooting 7 2 TROUBLESHOOTING...

Reviews: