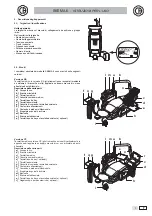
background image

SKEMA

  6

97050180
r e v.   0 0 5
1 2 / 2 0 1 0

0051

ITALIANO (Lingua originale) ..................................................................3

ENGLISH (translation from the original in Italian).............................77

FRANÇAIS (traduction de l'original en italien)................................151

DEUTSCH (Übersetzung aus dem Original in Italienisch)..............225
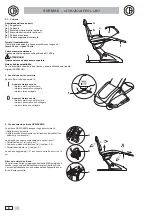
I

Gb

F

D

Summary of Contents for SKEMA 6 CP

Page 1: ...rev 005 1 2 2 0 1 0 0051 ITALIANO Lingua originale 3 ENGLISH translation from the original in Italian 77 FRANÇAIS traduction de l original en italien 151 DEUTSCH Übersetzung aus dem Original in Italienisch 225 I Gb F D ...

Page 2: ......

Page 3: ...8 5 3 Siringa 30 5 4 Turbina 31 5 5 Micromotore elettrico 32 5 5 1 Modalità di funzionamento CONSERVATIVE 34 5 5 2 Modalità di funzionamento ENDO 35 5 5 3 Modalità di funzionamento SURGERY 36 5 5 4 Menu impostazione rapporto di riduzione 37 5 6 Detartaratore 38 5 6 1 Detartaratore chirurgico SURGISON 2 40 5 6 1 1 Modalità di funzionamento NORMAL 40 5 6 1 2 Modalità di funzionamento BOOST 41 5 7 La...

Page 4: ...Apparecchiatura conforme ai requisiti stabiliti dalla direttiva CE 93 42 e successive modifiche intervenute Apparecchiature in Classe IIa 13 Apparecchiatura conforme ai requisiti stabiliti dalla direttiva CE 93 42 successive modifiche intervenute Apparecchiature in Classe I 14 Simbolo per lo smaltimento ai sensi delle Direttive 2002 95 EC 2002 96 EC e 2003 108 EC 15 Attenzione pericolo biologico F...

Page 5: ...ppoggio dei trays Non devono essere superati i valori di carico massimo di seguito indicati portatray applicato alla tavoletta medico carico massimo ammesso sul vassoio 2 Kg distribuito portatray applicato alla tavoletta assistente carico massimo ammesso sul vassoio 1 Kg distribuito Collegamenti a strumenti esterni L apparecchio può essere collegato elettricamente solo ad altri strumenti provvisti...

Page 6: ...erfici È pertanto importante non lasciare il prodotto prescelto sulle superfici dell apparecchio oltre il tempo prescritto dal fabbricante Data l aggressività dei principi attivi utilizzati nei disinfettanti si raccomanda di utilizzare prodotti che contengano come massimo Etanolo al 96 Concentrazione massimo 30 g per ogni 100 g di disinfettante Propanolo Concentrazione massimo 20 g per ogni 100 g ...

Page 7: ...ticolato ed autobilanciato Descrizione delle varie parti a Gruppo idrico b Braccio orientabile c Tavoletta medico d Consolle comandi medico e Tavoletta porta tray f Tavoletta assistente g Consolle di comando tavoletta assistente h Contenitore allacciamenti i Comando a piede multifunzionale l Erogatore acqua al bicchiere m Bacinella n Braccio autobilanciato q Tavoletta porta tray su tavoletta assis...

Page 8: ...ecchiatura accesa impianto elettrico alimentato impianto pneumatico collegato impianto idrico collegato Apparecchiatura spenta impianto elettrico non alimentato impianto pneumatico non collegato impianto idrico non collegato 4 Funzionamento poltrona NEW SKEMA La poltrona NEW SKEMA esegue i seguenti movimenti Salita discesa del sedile Salita discesa dello schienale con inclinazione del sedile Tren ...

Page 9: ...oggiatesta può essere di 2 tipi 1 con bloccaggio cuscino di tipo manuale 2 con bloccaggio cuscino di tipo pneumatico Regolazione altezza poggiatesta Il posizionamento dell asta del poggiatesta è ottenuto per mezzo di una frizione magnetica L operatore deve sollevare e o spingere in basso il poggiatesta fino al raggiun gimento della posizione desiderata Regolazione orientamento del cuscino Con bloc...

Page 10: ...er regolare l altezza della tavoletta e o il suo orientamento sul piano oriz zontale è sufficiente impugnare la maniglia a NOTA per sbloccare il freno pneumatico del braccio a pantografo occorre impugnare la maniglia appoggiando il pollice sul punto B Dispositivo di arresto braccetti richiamo strumenti solo versione SPRIDO Qualora sia previsto tale dispositivo è possibile bloccare il braccetto di ...

Page 11: ...ordoni dopo aver svitato le relative ghiere di fissaggio in plastica poste sotto la tavoletta ATTENZIONE Spegnere l unità operatoria prima di eseguire l operazione di rimozione dei cordoni strumento Dopo avere spento l unità operatoria svuotare le condotte della siringa premendo i relativi pulsanti aria e acqua direttamente sulla bacinella fino al termine della fuoriuscita di acqua spray I cordoni...

Page 12: ...imento esclusione sistema S S S Pulsante chiamata assistente Pulsante comando movimentazione bacinella in senso antiorario attivo solo con bacinella motorizzata Pulsante comando movimentazione bacinella in senso orario attivo solo con bacinella motorizzata Pulsante attivazione pompa peristaltica attivo solo se presente la pompa peristaltica Pulsante memorizzazione funzioni poltrona Pulsante richia...

Page 13: ...terfaccia utente è strutturato come da schema a lato ed è composto dai seguenti menu 5 1 1 1 Selezione operatore 5 1 1 2 IMPOSTAZIONI GENERALI 5 1 1 2 1 Regolazione contrasto display 5 1 1 2 2 Selezione lingua 5 1 1 2 3 Regolazione blocco freno braccio a pantografo 5 1 1 2 4 Inserimento anagrafica operatore 5 1 1 2 5 Cronometro 5 1 1 2 6 Regolazione ora 5 1 1 2 7 Selezione pulsante preferito 5 1 1...

Page 14: ... caratteri vedi paragrafo 5 1 1 2 4 Dalla videata principale premere ripetutamente il pulsante multifunzione in corrispondenza dell icona fino al raggiungimento dell operatore desiderato NOTA la variazione dell operatore avviene in maniera ciclica ogni volta si preme il pulsante multifunzione 5 1 1 2 Impostazioni generali Dalla videata principale eseguire le seguenti operazioni Premere il pulsante...

Page 15: ...e i seguenti valori pulsante MAX livello 10 pulsante MED livello 5 pulsante MIN livello 1 Una volta trovata la luminosità voluta premere il pulsante muntifunzione ESC per uscire dal sottomenu salvando automaticamente l impostazione definita 5 1 1 2 2 Selezione lingua Questa impostazione è unica per tutti gli operatori Dal menu IMPOSTAZIONI GENERALI eseguire le seguenti operazioni Premere il pulsan...

Page 16: ...fo Premere il pulsante MENU per scorrere le icone fino a selezionare quella relativa a Blocco freno braccio a pantografo Premendo i pulsanti AUMENTA e o DIMINUISCI è possibile attivare o inibire lo sblocco del freno braccio a pantografo NOTA lo stato di freno non sbloccabile è segnalato dall apposita icona A posta in alto sul display consolle ATTENZIONE Per una migliore sicurezza di lavoro tale op...

Page 17: ...e l icona cancellando da destra a sinistra 5 1 1 2 5 Cronometro Questa impostazione è unica per tutti gli operatori Dal menu IMPOSTAZIONI GENERALI eseguire le seguenti operazioni Premere il pulsante MENU per scorrere le icone fino a selezionare quella relativa a Cronometro Premere il pulsante muntifunzione OK per entrare nel sottomenu selezio nato Una volta impostato il tempo premere il pulsante m...

Page 18: ...elativa a Selezione pulsante preferito Premere il pulsante muntifunzione OK per entrare nel sottomenu selezio nato dove sono presenti le icone relative alle funzioni selezionabili Impostazione cicloAS Impostazione ciclo TF Cronometro Impostazione LAEC Premere il pulsante MENU per scorrere le icone fino a selezionare la funzione desiderata Per confermare la funzione scelta è sufficiente uscire da q...

Page 19: ...ssibilità di accedere al sottomenu Impostare il tempo di permanenza del liquido disinfettante utilizzando i pulsanti AUMENTA e o DIMINUISCI NOTA il tempo impostabile varia da un minimo di 5 minuti ad un massimo di 30 minuti con intervalli di 30 secondi Con i pulsanti di selezione rapida è possibile impostare automaticamente i seguenti valori pulsante MAX minuti 30 pulsante MED minuti 15 pulsante M...

Page 20: ...santi AUMENTA e o DIMINUISCI NOTA il tempo impostabile varia da un minimo di 1 minuto ad un massimo di 5 minuti con intervalli di 1 minuto Con i pulsanti di selezione rapida è possibile impostare automaticamente i seguenti valori pulsante MAX minuti 5 pulsante MED minuti 3 pulsante MIN minuti 1 NOTA con il serbatoio del sistema S S S si consiglia di non impostare un tempo superiore ai 2 minuti Est...

Page 21: ... dato in dotazione Premere il pulsante multifunzione per avviare il ciclo di svuota mento NOTA il ciclo di svuotamento non si avvia se è attivo il sistema S S S o se il sistema M W B si trova in uno stato di errore Per interrompere il ciclo di svuotamento premere il pulsante multifunzione STOP NOTA il sistema si ripristina automaticamente Una volta terminato il ciclo di svuotamento è possibile spe...

Page 22: ...i lavaggio della bacinella utilizzare i pulsanti AUMENTA e o DIMINUISCI Per confermare le impostazioni scelte è sufficiente uscire da questo sot tomenu premendo il pulsante multifunzione ESC 5 1 1 4 2 Impostazione acqua al bicchiere Questa impostazione è unica per tutti gli operatori Dal menu IMPOSTAZIONI GRUPPO IDRICO eseguire le seguenti opera zioni Premere il pulsante MENU per scorrere le icone...

Page 23: ...esto sot tomenu premendo il pulsante multifunzione ESC 5 1 2 Programmazione della Posizione risciacquo e Posizione di azzeramento della poltrona Questa impostazione è specifica per ogni operatore Dalla videata principale eseguire le seguenti operazioni Regolare la poltrona nella posizione desiderata utilizzando i pulsanti di movimentazione manuale Attivare la modalità di memorizzazione premendo il...

Page 24: ...mergenza per portare il paziente nella posizione di Trendelemburg NOTA la posizione di Trendelemburg è già impostata e non è modificabile 5 2 Comando a piede Il comando a piede può essere di 3 tipi 1 Comando a piede multifunzione 2 Comando a piede a pressione 3 Comando a piede Power Pedal 5 2 1 Comando a piede multifunzione Descrizione delle parti 1 Maniglia 2 Leva di comando a movimento orizzonta...

Page 25: ...io di aria per eliminare l eventuale goccia residua di liquido presente nelle condotte degli spray Joystick movimenti poltrona 3 Il joystick movimenti poltrona 3 ha 2 diverse modalità di funzionamento a seconda che venga o no precedentemente premuto il comando verticale 4 NOTA una volta premuto il comando 4 si hanno a disposizione 5 secondi per azionare il joystick 3 trascorsi i quali il comando s...

Page 26: ...e G Attivazione con Spray X X X X G Detartaratore attivazione a potenza max Telecamera fermo immagine X X X X C Micromotore inversione rotazione X X D Micromotore e Detartaratore funzione ENDO X A B D Navigazione menu strumento modalità chirurgica X E Attivazione con Chip Air X X X X Navigazione menu strumento modalità chirurgica CONFIGURAZIONI AZIONAMENTO FUNZIONE 0 1 2 3 A AUMENTA valore X B DIM...

Page 27: ... commutazione Il LED 6 acceso segnala il funzionamento con acqua spray Comando movimenti poltrona 3 Controlla i seguenti movimenti Salita sedile poltrona Salita schienale poltrona Discesa sedile poltrona Discesa schienale poltrona Per interrompere il movimento rilasciare il comando NOTA tutti i comandi di movimentazione della poltrona risultano bloccati con uno strumento estratto e la leva del com...

Page 28: ...ico della poltrona o richiamo programma A 8 LED segnalazione funzionamento con acqua spray Funzionamento pedalino di comando 2 Con strumento estratto Premendo il pedalino si avvia lo strumento E possibile regolare il numero di giri o la potenza dello strumento modulando la pressione sul pedalino NOTA il pedalino regola la velocità potenza dello strumento dal minimo fino al massimo impostato dalla ...

Page 29: ...no in posizione di lavoro Breve pressione del tasto con strumento estratto Attivazione o disattivazione dell acqua spray allo strumento ATTENZIONE Un breve segnale acustico avverte dell avvenuta commutazione Il LED 6 acceso segnala il funzionamento con acqua spray Funzionamento leva destra 6 NOTA la leva funziona solo con gli strumenti in posizione di riposo Per ragioni di sicurezza il comando pre...

Page 30: ... ottica occorre premere in maniera prolungata almeno 2 secondi il pulsante Regolare il livello dell intensità luminosa utilizzando i pulsanti AUMENTA e o DIMINUISCI NOTA il valore impostabile varia da 1a 16 Con i pulsanti di selezione rapida è possibile impostare automaticamente i seguenti valori pulsante MAX livello 16 pulsante MED livello 8 pulsante MIN livello 1 Per confermare l intensità scelt...

Page 31: ...e lo strumento in posizione di lavoro Attivare la fibra ottica premendo il pulsante NOTA l attivazione della fibra ottica è segnalato sul display dall icona A Regolazione intensità luminosa della fibra ottica Per regolare l intensità luminosa della fibra ottica occorre premere in maniera prolungata almeno 2 secondi il pulsante Regolare il livello dell intensità luminosa utilizzando i pulsanti AUME...

Page 32: ...ti di riduzione modalità di variazione del regime di rotazione del motore impostabile da variabile a fisso e viceversa segnale di allarme progressivo a partire dal 60 della coppia massi ma pulsante di calibrazione durante la rotazione del motore 3 SURGERY vedi paragrafo 5 5 3 velocità regolabile da 5 a 2500 Rpm con valore sempre riferito alla fresa indipendentemente dal rapporto di riduzione ridut...

Page 33: ...l funzionamento venga sempre erogata l acqua spray In questo caso il tipo di funzionamento attivo è segnalato sul display consolle dall icona D Icona SPENTA funzionamento senza acqua spray Icona ACCESA funzionamento con acqua spray Inversione del senso di rotazione del micromotore Per invertire il senso di rotazione del micromotore occorre premere il pul sante INVERSIONE Il senso di rotazione inve...

Page 34: ...impostata L icona relativa alla modalità selezionata viene raffigurata in corrispondenza del pulsante MENU icona allarme attivo icona allarme non attivo Premendo il pulsante multifunzione di destra è possibile impostare la velocità di rotazione corrente come velocità massima Premendo pulsanti AUMENTA e o DIMINUISCI è possibile modificare la velocità massima di rotazione della fresa Menu impostazio...

Page 35: ...e multifunzione di destra mentre si fa funzionare il manipolo al massimo e a vuoto si imposta il valore di coppia corrente come valore 0 calibrazione del manipolo Menu impostazioni di funzionamento Con micromotore estratto ma non attivo premendo il pulsante multifunzione di destra si entra in un sottomenu dove sono presenti le seguenti icone relative alle funzioni impostabili Impostazione rapporto...

Page 36: ...va alla modalità selezionata viene raffigurata in corrispondenza del pulsante MENU icona allarme attivo icona allarme non attivo Premendo il pulsante multifunzione di destra mentre si fa funzionare il manipolo al massimo e a vuoto si imposta il valore di coppia corrente come valore 0 calibrazione del manipolo Premendo pulsanti AUMENTA e o DIMINUISCI è possibile modificare la velocità massima di ro...

Page 37: ...variano a seconda modalità di funzionamento corrente Per confermare le impostazioni scelte è sufficiente uscire da questo sot tomenu premendo il pulsante multifunzione ESC Come creare dei rapporti di riduzione personalizzati Per creare e memorizzare dei rapporti di riduzione personalizzati procedere come segue Premere il pulsante multifunzione di destra NEW Premere i pulsanti AUMENTA e o DIMINUISC...

Page 38: ...D di Classe 1 in caso di pulizia e manutenzione evitare di dirigere il fascio luminoso negli occhi consigliato tenere le fibre ottiche spente Regolazione della potenza del detartaratore Portare lo strumento in posizione di lavoro Regolare la potenza massima erogata utilizzando i pulsanti AUMENTA e o DIMINUISCI NOTA con i pulsanti di selezione rapida è possibile impostare automaticamente i seguenti...

Page 39: ... in funzionamento bistabile vedere paragrafo 5 2 1 è possibile impostare lo strumento in modo che durante il funzionamento venga sempre erogata l acqua di raffreddamento In questo caso il tipo di funzionamento attivo è segnalato sul display consolle dall icona D Icona SPENTA funzionamento senza acqua di raffreddamento Icona ACCESA funzionamento con acqua di raffreddamento Cordone removibile Il det...

Page 40: ...NORMAL vedi paragrafo 5 6 1 1 l inserto vibra sottoposto ad una potenza continua non modulata la cui ampiezza dipende dal valore di potenza impostato 2 BOOST vedi paragrafo 5 6 1 2 oltre alla vibrazione ultrasonica dell l inserto viene eseguita una mo dulazione in apiezza della potenza erogata circa 40 della potenza impostata La modulazione crea un effetto di percussione sull osso favorendone l in...

Page 41: ...u per modificare le impostazioni di funzionamento Menu impostazioni di funzionamento Con strumento estratto ma non attivo premendo il pulsante multifunzione di destra si entra in un sottomenu dove sono presenti le seguenti icone relative alle funzioni impostabili Impostazione tipo di modulazione Modalità di variazione della potenza erogata Premere il pulsante MENU per scorrere le icone fino a sele...

Page 42: ...di gas anestetico infiammabile con aria ossigeno o protossido d azoto L apparecchio è progettato per il funzionamento intermittente 60 sec lavoro 13 min riposo Pulizia La lampada polimerizzante può costituire un mezzo di trasmissione di infezioni crociate da paziente a paziente Le parti che sono maggiormente contaminate sono la fibra ottica e la protezione per gli occhi Soltanto la fibra ottica pu...

Page 43: ...i accoppiamento siano pulite ed asciutte Portare lo strumento in posizione di lavoro L avvenuta estrazione dello strumento è segnalata dalla relativa immagine sul display consolle Selezionare il tempo desiderato premendo e rilasciando in successione il pulsante 2 l accensione di uno dei led 3 4 o 5 indica il tempo selezionato Un azionamento prolungato del pulsante 2 non provoca lo scorrimento dei ...

Page 44: ... temperatura della punta della telecamera è normale che aumenti significativamente se questo causa disagio il manipolo andrebbe riposto per alcuni minuti per raffreddare la sorgente di luce Per periodi d utilizzo maggiore l intensità luminosa andrebbe ridotta con l apposito cursore disponibile nel Pannello di Controllo OSD vedi paragrafo 5 8 1 Se lasciata in funzione per lunghi periodi verificare ...

Page 45: ...e mere il pulsante multifunzione di sinistra L icona relativa alla modalità selezionata viene raffigurata in corrispondenza del pulsante multifunzione icona modalità singola immagine attiva icona modalità multi immagine attiva NOTA l attivazione della modalità multi immagine è segnalata anche sul monitor da un apposita icona posta nell angolo in alto a destra Funzionamento modalità singola immagin...

Page 46: ... immagine l immagine congelata viene direttamente visualizzata sul monitor ponendola nella prima casella libera es A della pagina attiva in quel momento Ogni successiva immagine congelata viene posizionata nella casella sucessiva ruotando in senso orario NOTA una volta riempite le 4 caselle disponibili ogni sucessiva immagine congelata andrà a sostituire le esistenti sempre ruotando in senso orari...

Page 47: ...condato dai LED deve essere rivolto verso il basso verso la pellicola posteriore cartacea Inserire gentilmente il manipolo fino a fondo 2 Rimuovere le pellicole protettive tirando la linguetta blu 3 La telecamera è ora protetta e pronta all uso ATTENZIONE Assicurarsisemprecheilmanipolosiacorrettamenteinseritoall interno della protezione Per garantire l igiene degli utilizzatori e dei pazienti si r...

Page 48: ...re Agisce sul tempo di esposizione 2 COLOR SATURATION aumenta o diminuisce la saturazione di colore Al minimo l immagine è in bianco e nero al massimo il colore è molto accentuato 3 GAMMA è simile ad un controllo di contrasto ma con effetto più potente Modifica la resa dei chiari scuri nell immagine al valore minimo l immagine è più morbida al valore massimo è più dura 4 LED POWER permette di rego...

Page 49: ...e automaticamente quello pilota sempre con un time out di 1 min NOTA Durante l operatività del laser sono interdetti gli altri strumenti in tavoletta e tutti i movimenti della poltrona ATTENZIONE Per tutte le altre funzionalità del laser vedere le specifiche istruzioni di utilizzo e manutenzione allegate all apparecchiatura Norme di sicurezza ATTENZIONE Questo dispositivo laser è classificato come...

Page 50: ...e la contaminazione microbiologica del paziente Aprire il coperchio d della pompa peristaltica ruotandolo verso l alto Inserire il tubo flessibile facendo attenzione a posizionare il tratto di diametro maggiore all interno delle sedi a V della pompa La rotazione della pompa avviene in senso orario posizionare il tubo in modo che il tratto proveniente dalla sacca entri dalla parte sinistra della po...

Page 51: ...tendo il monitoraggio della posizione nel canale durante i trattamenti Descrizione componenti 1 Cablaggio esterno LAEC 1 1 Cablaggio esterno LAEC polo neutro 1 2 Cablaggio esterno LAEC polo attivo 2 Elettrodo a gancio 3 Sonda 4 Pinzetta collegamento clip LAEC 5 Presa per cablaggio esterno LAEC Funzionamento Su questo complesso odontoiatrico il LAEC si attiva automaticamente all inserimento del cab...

Page 52: ...umento fermo in quanto non è possibile avere un buon contatto elettrico se il file è in vibrazione E sufficiente rilasciare il pedale per pochi secondi per rilevare correttamente la posizione dello strumento rispetto all apice Rilevazione della lunghezza del canale radicolare L uso del file manuale è di primaria importanza per la rilevazione del canale La procedura corretta prevede di inserire il ...

Page 53: ...oletta incontrano un ostacolo Pulizia rulli scorrevoli Sfilare i rulli scorrevoli f premendo verso il basso Pulire i rulli scorrevoli utilizzando un prodotto idoneo che sia stato provato efficace contro batteri e funghi ed ampiamente efficace verso i virus compresi HBV e HIV vedere il paragrafo 1 4 NOTA il prodotto deve essere spruzzato su carta morbida monou so ATTENZIONE Non impiegare prodotti a...

Page 54: ...ogliatore effet tuando una manovra di rotazione e trazione sull attacco del tubo Separare i tubi di aspirazione dai terminali porta cannula effettuando una manovra di rotazione e trazione sull attacco del tubo ATTENZIONE Non effettuare mai questa operazione afferrando direttamente il tubo di aspirazione Lavaggio Cannule Le cannule di aspirazione devono essere pulite e disinfettate periodicamente v...

Page 55: ...ettuare questa operazione Togliere il terminale a operando una manovra di rotazione e trazione contemporanea Estrarre il filtro b Pulire sostituire il filtro codice 97290060 Rimontare il filtro e il terminale NOTA onde evitare possibili gocciolamenti di liquidi e secreti dal filtro che viene estratto è buona norma prima di eseguire le suddette operazioni aspirare solo aria per circa 5 secondi Manu...

Page 56: ...tomatici della bacinella solo con bacinella motorizza ta La bacinella si muove automaticamente nei seguenti casi premendo il pulsante Posizione di risciacquo per la poltrona NOTA in questo caso la posizione della bacinella è anche im postabile vedere il paragrafo 5 1 2 premendo il pulsante Posizione di azzeramento per la poltrona premendo il pulsante per richiamare 1 dei 4 programmi disponibili Pe...

Page 57: ...urante questa operazione l aria in pressione contenuta nel serbatoio si scarica automaticamente all esterno Togliere il serbatoio a ruotandolo in senso orario Versare nel serbatoio acqua distillata sino al raggiungimento del livello massimo ATTENZIONE Utilizzare solo acqua distillata che può essere addizionata con 600 parti per milione ppm di acqua ossigenata 20 ml di acqua ossige nata al 3 in 1 l...

Page 58: ...ragrafo 5 2 e per le siringhe tramite il tasto dell acqua NOTA a questo punto le condotte contengono acqua ossi genata Riporre gli strumenti C Tempo di contatto del disinfettante Lasciar permanere l acqua ossigenata per un tempo minimo di 10 minuti ma non superiore a 30 minuti D Fase di risciacquo delle condotte Sostituire labottigliadell acquaossigenata distillataconquellacontenente acqua distill...

Page 59: ...nata Per riempire il serbatoio dell acqua ossigenata occorre procedere come segue Estrarre il serbatoio a dell acqua ossigenata Togliere il tappo k e versare acqua ossigenata nel serbatoio sino al suo completo riempimento NOTA il tappo ha una forma tale da poter essere utilizzato come imbuto per facilitare l operazione di riempimento Riposizionare il tappo e il serbatoio Infine richiudere il carte...

Page 60: ... di liquido disinfettante presente nel serbatoio e se neces sario aggiungerne NOTA il ciclo di disinfezione non si attiva se il livello di liquido presente nel serbatoio è inferiore alla riserva Utilizzando la consolle medico o il pulsante AS posto sulla tavoletta assi stente entrare nel menu Impostazione cicloAUTOSTERIL ed impostare il tempo di permanenza del liquido disinfettante all interno del...

Page 61: ...degli strumenti estratti premendo il pulsante multifunzione si fa riprendere il ciclo di disinfezione dal punto in cui era stato interrotto Nel menu Lavaggio strumenti premendo il pulsante multifunzione si attiva il ciclo di svuotamento e lavaggio delle condotte degli strumenti estratti utilizzando acqua di rete o acqua distillata se presente il sistema S S S NOTA al termine del ciclo di lavaggio ...

Page 62: ...ire i terminali cannule nei rispettivi attacchi b posti sotto il collettore La depressione che si genera nei venturimetri innesca l inizio del ciclo di lavaggio NOTA l attivazione del ciclo di lavaggio è segnalata anche sul display consolle Fasi operative del ciclo di lavaggio erogazione di acqua di rete per 50 sec con funzionamento intermittente 2 sec ON 1 sec OFF bloccaggio del flusso di acqua e...

Page 63: ...en te entrare nel menu Impostazione ciclo TIME FLUSHING ed impostare la durata del ciclo vedere paragrafo 5 1 1 3 2 Inserire i cordoni degli strumenti da trattare nell apposito contenitore posto nell idrico ATTENZIONE Per lo strumento siringa occorre utilizzare l apposito adattatore f e deve avere il sistema di riscaldamento spento Il cordone del micromotore deve essere inserito completo di corpo ...

Page 64: ...l monitor workstation sono allegate al complesso odontoiatrico 8 3 Attacchi rapidi aria acqua 230V Gli attacchi rapidi aria acqua 230V sono posti lateralmente sulla cassetta allacciamenti ATTENZIONE Spegnere l apparecchiatura prima di collegare o scollegare le prese aria acqua Dati tecnici Presa di corrente 230Vac 2A in accordo con la norma IEC EN 60320 2 2 F Pressione attacco rapido aria 6 Bar Pr...

Page 65: ...anutenzione Si consiglia di sterilizzare la cartuccia mensilmente ATTENZIONE La sterilizzazione deve avvenire in autoclave a vapore d acqua a 135 C 2 bar tempo minimo 15 min Non impiegare sterilizzatrici a secco Sostituire la cartuccia una volta all anno o dopo 200 cicli di sterilizzazio ne Rimozione della cartuccia filtrante Portare la poltrona alla massima altezza Spegnere il complesso odontoiat...

Page 66: ...e di rete ATTENZIONE La mancata osservazione di queste prescrizioni può far decadere la responsabilità del costruttore su eventuali danni o malfunzionamenti delle apparecchiature 9 1 Manutenzione degli strumenti Le istruzioni di manutenzione degli strumenti sono allegate ad ogni strumento ATTENZIONE Si consiglia di eseguire le operazioni di manutenzione degli strumenti con apparecchiatura spenta 9...

Page 67: ...clave a vapore d acqua fino a 135 C 2 bar tempo minimo 15 min Alla fine di ogni giornata lavorativa Aspirare con ciascuna cannula 1 litro di acqua alternando acqua e aria te nendo la cannula alternativamente immersa in acqua e fuori dall acqua Terminato il risciacquo con acqua aspirare con ognuna delle cannule utilizzate circa mezzo litro di soluzione disinfettante NOTA Al termine delle operazioni...

Page 68: ...lastiche e delle gomme soggette ad inveccchiamento Prima di assentarsi dall ambulatorio per alcuni giorni Mettere in moto l aspiratore farlo funzionare per 20 30 minuti senza aspirare liquidi Il gruppo aspirante si asciugherà completamente Si eviterà così quelle formazionidisalicausatadall umiditàedallesostanzebasiche salichetalvolta possono far grippare la ventola e bloccare di conseguenza il mot...

Page 69: ...riale infetto ATTENZIONE Per lo smaltimento dei contenitori a perdere pieni di amalgama atte nersi alle Normative locali e nazionali 9 8 Separatore di amalgama DÜRR Le istruzioni di manutenzione del separatore di amalgama DÜRR sono allegate all apparecchio se lo stesso è equipaggiato con tale tipo di se paratore Il dispositivo di controllo del separatore è situato all interno dell idrico ATTENZION...

Page 70: ...l imballo in cartone sono riportate le indicazioni di imma gazzinamento di trasporto e quelle per il disimballo Tali indicazioni devono essere scrupolosamente osservate 1 Trasportare e immagazzinare solo nel senso indicato dalle frecce 2 Evitare gli urti 3 Proteggere dall umidità 4 Non usare ganci per la movimentazione 5 Targa riportante le condizioni ambientali di immagazzinamento temperatura da ...

Page 71: ...saggio di errore si presenta nuovamente chiamare l Assistenza Tecnica M Strumento configurato C Lo strumento in quella posizione della tavoletta è stato automatica mente configurato con i dati di fabbrica R Se il messaggio di errore si presenta nuovamente chiamare l Assi stenza Tecnica M Riporre le cannule C Le cannule di aspirazione risultano estratte quando si accende il complesso odontoiatrico ...

Page 72: ...KSTA TION Zona scheda poltrona 12 Dati tecnici Pianta di installazione 97042072 Manuale tecnico 97071123 Catalogo ricambi unità operatoria 97023067 Catalogo ricambi poltrona 97023067 Peso massimo unità operatoria 90 Kg Peso massimo poltrona dentistica 115 Kg Portata massima poltrona NEW SKEMA 190 Kg Tensione nominale 230V 115V Frequenza nominale 50 60 Hz Potenza assorbita 1500 W Collegamento aria ...

Page 73: ... 530 4 0 A F1 F2 950 98 0 800 610 306 1 6 6 1 6 0 1890 180 170 100 15 0 A F1 F2 1610 2010 2420 210 680 160 500 390 800 1710 2120 410 8 5 7 8 5 1 5 3 5 1910 73 I SKEMA 6 ISTRUZIONI PER L USO 12 1 Caratteristiche dimensionali SKEMA 6 RS ...

Page 74: ...6 0 5 0 0 3 9 0 8 0 0 1 7 1 0 2 1 2 0 4 1 0 8 5 7 8 5 1 5 3 5 1910 10 0 8 8 0 800 310 400 170 2450 530 4 0 A F1 F2 9 50 9 8 0 80 0 61 0 306 1 6 6 1 6 0 1890 180 170 100 150 74 I SKEMA 6 ISTRUZIONI PER L USO 12 2 Caratteristiche dimensionali SKEMA 6 CP ...

Page 75: ...i lavaggio se presente od aspirare con ognuna delle can nule utilizzate circa mezzo litro di soluzione di STER 3 PLUS Vedi paragrafo 9 4 Protezioni flessibili Sterilizzare le protezioni flessibili contami nate Barriere monouso Sostituire le barriere monouso Superfici contaminate Bonificare le superfici utilizzando STER 1 PLUS Fine attività giornaliera Condotte degli spray Disinfezione dei condotti...

Page 76: ...ione allegata al separatore Separatore di amalgama DÜRR Svuotare il vaso del separatore Vedi documentazione allegata al separatore Lampada operatoria Pulire il vetro anteriore e lo specchio riflet tore Vedi documentazione allegata all apparecchiatura Monitor Workstation a palo lampada Pulire le superfici Vedi documentazione allegata all apparecchiatura Superfici verniciate e sellerie poltrona Puli...

Page 77: ...r Pedal foot control 102 5 3 Syringe 104 5 4 Turbine 105 5 5 Micromotor 106 5 5 1 CONSERVATIVE operating mode 108 5 5 2 ENDO operating mode 109 5 5 3 SURGERY operating mode 110 5 5 4 Reduction ratio setup menu 111 5 6 Scaler 112 5 6 1 SURGISON 2 surgical detartarer device 114 5 6 1 1 Normal operational mode 114 5 6 1 2 BOOST functioning mode 115 5 7 LEDA curing light 117 5 8 C U2 PRO intraoral cam...

Page 78: ...ven in annex IX of directive 93 42 and subsequent changes EEC Class IIa ELECTRICAL MEDICAL EQUIPMENT classification Classification of the dental unit in accordance with standard EN 60601 1 for safety of medical equipment Class I Type B Reference standards SKEMA 6 series operatory units are designed and constructed in compliance with CEI EN 60601 1 CEI EN 60601 1 2 ISO 7494 ISO 6875 and EN 1717 typ...

Page 79: ...e precaution given above Dental chair The maximum chair capacity is 190Kg This weight must never be exceeded Tray holders The maximum weights that can be held must never be exceeded Instrument tray attached to the instrument board maximum allowable load 2 Kg evenly distributed Instrument tray attached to the instrument board maximum allowable load 1 Kg evenly distributed Connections to external in...

Page 80: ...The harsh actions of chemical products also depend on the amount of time they are left on the surfaces It is therefore important not to leave the product on the surfaces longer than the time specified by the manufacturer Due to the harsh effects of the active substances present in disinfectants products that contain the following maximum percentage of chemical disinfectants should be used Ethanole...

Page 81: ...ing operated arms attached to a double supporting arm one of which is articulated while the other is autobalancing Description of equipment a Hydrogroup b Adjustable arm c Instrument board d Doctor s console e Tray holder f Assistant s board g Assistant s control console h Utility service center i Multifunction foot control l Water to cup m Bowl n Autobalancing arm q Instrument tray on assistant s...

Page 82: ...er supplied pneumatic system connected hydrogroup connected Equipment off electrical power not supplied pneumatic system not connected hydrogroup not connected 4 NEW SKEMA Dental chair operation The NEW SKEMA dental chair can be moved as follows Chair seat up down Back up down with inclination of the chair seat Trendelem burg compensated The dental chair can be operated from the following places I...

Page 83: ... clockwise and place the cushion in the desired position Once adjusted tighten the knob secured in place pneumatically 2 Press and hold down the lock button u and place the cushion in the desired position Once adjusted simply release the button u to block the cushion in place NOTE the locking device is active only When the air circuit is pressurized Safety guidelines ATTENTION Maximum weight suppo...

Page 84: ... all directions To adjust the height of the board and or direct it horizontally simply grasp the handle a NOTE Grasp the handle placing your thumb on point B to release the air lock for the pantograph arm Instrument return stop arms only in SPRIDO versions If this device is provided the instrument return arm can be locked in the instrument extracted position When the device is used a click is hear...

Page 85: ...ts and remove the cords CP version boards Loosen the plastic ring nuts found underneath the board and then remove the cords ATTENTION Shut off the operatory unit before attempting to take off the cords After shutting off the operatory unit empty the syringe s ducts by pressing and holding down the relative air and water buttons directly on the bowl until water spray is no longer present The cords ...

Page 86: ...nstruments S S S system on off Assistant call button Bowl counter clockwise rotation button operative only with powered bowl Bowl clockwise rotation button operative only with powered bowl Peristaltic pump start button operative only if the peristaltic pump is present Dental chair functions save button Automatic return position button Rinse position button Emergency position button Programmed posi...

Page 87: ...own in the diagram and includes the following menus 5 1 1 1 Operator settings 5 1 1 2 GENERAL SETTINGS 5 1 1 2 1 Adjusting display contrast 5 1 1 2 2 Language selection 5 1 1 2 3 Adjusting engaging the pantograph arm s brake 5 1 1 2 4 Entering the operator s personal identification 5 1 1 2 5 Chronometer 5 1 1 2 6 Setting the time 5 1 1 2 7 Selecting your favourite button 5 1 1 2 8 LAEC setting onl...

Page 88: ...hat consists of up to 20 characters see paragraph 5 1 1 2 4 Press the multifunction button for icon on the main screen several times until the desired operator is reached NOTE The user is changed whenever multifunction button is pressed 5 1 1 2 General settings Perform the following steps from the main screen Press button MENU to enter the main menu that contains the following icons GENERAL SETTIN...

Page 89: ... selection buttons to automatically set the following values MAX button level 10 MED button level 5 MIN button level 1 Once the brightness has been adjusted press function key ESC to quit the submenu automatically saving the brightness setting 5 1 1 2 2 Language selection This setting is used for all the operators Perform the following steps from the GENERAL SETTINGS menu Press button MENU to scro...

Page 90: ... pantograph arm s brake Press button MENU to scroll the icons selecting the one for Engaging the pantograph arm s brake Press buttons INCREASE and or DECREASE to enable or disable release of the pantograph arm s brake NOTE Icon A found at the top of the console display signals if the brake cannot be disengaged IMPORTANT INFORMATION As an additional safety measure this operation is mandatory if an ...

Page 91: ...o enter a letter NOTE Uppercase letters are present in each group of letters To delete any errors use icon canceling from right to left 5 1 1 2 5 Chronometer This setting is used for all the operators Perform the following steps from the GENERAL SETTINGS menu Press button MENU to scroll the icons selecting the one for Chrono meter Press multifunction button OK to enter the selected submenu Once th...

Page 92: ...S menu Press button MENU to scroll the icons selecting the one for Selecting your favourite button Press multifunction button OK to enter the selected submenu that contains the icons for the functions that can be selected AS cycle setting TF cycle setting Chronometer LAEC setting Press button MENU to scroll the icons selecting the desired function To confirm the selected function press multifuncti...

Page 93: ...tem A beep will signal that the submenu cannot be accessed Set the time liquid disinfectant has to be left in with the INCREASE and or DECREASE buttons NOTE NOTE the time may range from at least 5 minutes to at most 30 minutes with 30 second intervals Use the fast selection buttons to automatically set the following values MAX button 30 minutes MED button 15 minutes MIN button 5 minutes ATTENTION ...

Page 94: ...INCREASE and or DECREASE buttons NOTE the time may range from at least 1 minute to at most 5 minutes with 1 minute intervals Use the fast selection buttons to automatically set the following values MAX button 5 minutes MED button 3 minutes MIN button 1 minutes NOTE it is advisable not to set a time longer than 2 minutes with the S S S system tank Withdraw the instruments to be treated the correspo...

Page 95: ...the selected submenu Put the cup e provided under the spout Press multifunction button to start the the drain cycle NOTE the drain cycle will not start if the S S S system is turned on or a fault is present in the M W B system Press multifunction button STOP to stop the drain cycle NOTE the system automatically resets itself Once the drain cycle has been completed it is possible to shut off the de...

Page 96: ...REASE and or DECREASE to select deselect a controller or change the bowl flushing time To confirm the settings simply quit the submenu by pressing multifunction button ESC 5 1 1 4 2 Setting water to cup This setting is used for all the operators Perform the following steps from the HYDROGROUP SETTINGS menu Press button MENU to scroll the icons selecting the one for Setting water to cup Press multi...

Page 97: ...by pressing multifunction button 5 1 2 Setting the dental chair s rinse and home positions This setting is specific for each operator Perform the following operations from the main screen Bring the dental chair into the desired position with the manual movements buttons NOTE in the case of the Rinse position the position of the bowl can be saved if powered Hold button SAVE for at least 2 seconds t...

Page 98: ...e Trendelemburg position is already set and cannot be changed 5 2 Foot control 3 types of foot controls are available 1 Multifunction foot control 2 Push pedal foot control 3 Power Pedal foot control 5 2 1 Multifunction foot control Description of the parts 1 Handle 2 Horizontally actuated control lever 3 Joystick for dental chair movements 4 Vertically actuated control Control lever 2 When the in...

Page 99: ...ning in the spray ducts Joystick for dental chair movements 3 The joystick for dental chair movements 3 has 2 different operating modes depending on whether or not the pedal 4 is pushed before hand NOTE once the pedal 4 is pushed the joystick 3 must be ac tuated within 5 seconds The function is automatically cancelled once this time has elapsed Operation with the instruments in place on the holder...

Page 100: ...X X X Automatic dental chair movements instruments in place CONFIGURATIONS ACTIVATION FUNCTION 0 1 2 3 G A Position 1 retrieval X X X G B Position 3 call up X X X G C Position 2 call up X X X G D Position 4 retrieval X X X G E Rinse position retrieval X X X G F End stop Reset position retrieval X X X Auxiliary equipment instruments in place CONFIGURATIONS ACTIVATION FUNCTION 0 1 2 3 F End stop Den...

Page 101: ...to signal the operating status has been changed LED 6 lights up to signal operation with water spray Dental chair buttons 3 These buttons move the dental chair as follows Chair seat up Chair back up Chair seat down Chair back down To stop movement release the button NOTE All the buttons used to move the dental chair are inoperative when an instrument is removed and the foot control pedal is actuat...

Page 102: ...TE The product should be sprayed on soft disposable paper towel or sterile gauze ATTENTION Do not use acids or harsh products NOTE If the foot control slips on the floor dust the slip proof rubber found under the base with a dry cloth 5 2 3 Power Pedal foot control Description of the parts 1 Handle 2 Foot control 3 Dental chair movements 4 Water Clean System control or spray to instruments functio...

Page 103: ...th instrument extracted Spray water to instrument on or off ATTENTION A beep sounds to signal the operating status has been changed LED 8 lights up to signal operation with water spray Right lever operation 6 NOTE the lever functions only with the instruments in their rest position For safety reasons the selected function starts only after the switch has been briefly actuated and then released Lev...

Page 104: ...tically saved Adjusting brightness of the fiber optic Hold down the button at least 2 seconds to adjust brightness of the fiber optic Use buttons INCREASE and or DECREASE to adjust the brightness level NOTE A value ranging from 1 to 16 can be set The following values can be set using the fast selection buttons button MAX level 16 button MED level 8 button MIN level 1 To confirm the selected bright...

Page 105: ...e instrument to its work position Press the button to turn on the fiber optic NOTE Icon A appears on the display to signal the fiber optic has been turned on Adjust brightness with the increase and or decrease buttons The set level is automatically saved Adjusting brightness of the fiber optic Hold down the button at least 2 seconds to adjust brightness of the fiber optic Use buttons INCREASE and ...

Page 106: ...ol peristaltic pump on off if present handpiece reduction ratio Press the MENU button with the instrument in its work position to select 3 different operating modes 1 CONSERVATIVE see paragraph 5 5 1 possibility to set a speed ranging from 100 to 50000 rpm regardless of the reduction multiplication ratio possibility to set torque values ranging from 1 to 100 customized list of reduction ratios rpm...

Page 107: ... to set the instrument so that water spray is always delivered during operation In this case the type of operation is indicated by the icon D on the console display Icon OFF operation without water spray Icon ON operation with water spray Reversing the micromotor Press REVERSE button to reverse the direction in which the micro motor runs A beep is heard and the icon C appears on the display to sig...

Page 108: ...ivate an alarm signal once the set maximum torque is reached The icon indicating the selected mode appears near the MENU button icon alarm active icon alarm not active Press the right multifunction button to set the current speed to the maximum allowable one Use buttons INCREASE and or DECREASE to change the maximum speed of the burrs Set up menu Press the right multifunction button with the micro...

Page 109: ...con alarm active icon alarm not active Press the right multifunction button While the handpiece is idling at maximum the current torque value is set to value 0 handpiece calibra tion Set up menu Press the right multifunction button with the micromotor withdrawn but not turned on to go to the submenu containing the following icons which indicate the settable functions Reduction ratio setting Maximu...

Page 110: ... signal once the set maximum torque is reached The icon indicating the selected mode appears near the MENU button icon alarm active icon alarm not active Press the right multifunction button While the handpiece is idling at maximum the current torque value is set to value 0 han dpiece calibration Use buttons INCREASE and or DECREASE to change the maximum speed of the burrs Set up menu Press the ri...

Page 111: ...can be used to set the preset values that vary according to the current operating mode To confirm the selections made simply quit this submenu by pressing mul tifunction button ESC How to create customized reduction ratios Follow the directions given below to create and save customized reduction ratios Press the right multifunction button NEW Press buttons INCREASE and or DECREASE to modify the te...

Page 112: ... scalers Class 1 LED apparatus Do not direct the light beam in anyone s eyes When cleaning or servicing the device it is recommended to keep the fiber optics shut off Adjusting the scaler s power Put the instrument in its work position Use the buttons INCREASE and or DECREASE to adjust the maximum power delivered NOTE The following values can be set using the fast selection buttons button MAX 100 ...

Page 113: ...t control is set to bistable operation see paragraph 5 2 1 it is possible to set the instrument so that cooling water is always delivered during operation In this case the type of operation is indicated by the icon D on the console display Icon OFF operation without cooling water Icon ON operation with cooling water Removable cord The scaler has a removable cord to ease cleaning see paragraph 5 Cl...

Page 114: ...MAL see paragraph 5 6 1 1 The bit vibrates subjected to a continuous not modulated power the amplitude of which depends on the set value of the power 2 BOOST see paragraph 5 6 1 2 in addition to the ultrasonic vibration of the bit a modulation in the amplitude of the generated power approx 40 of the set power is performed The modulation creates a percussion effect on the bone thereby making incisi...

Page 115: ...d multifunction button the submenu for chan ging the operational settings is accessed Operational settings menu With the instrument extracted but not active when the right hand multifunction button the submenu is accessed where the following icons regarding the settable functions are to be found For setting the type of modulation Method for varying the supplied power Press the MENU button to scrol...

Page 116: ...of inflammable anaesthetic gas with oxygen or nitrous oxi de The equipment is designed for intermittent operation 60 sec work 13 min pause Cleaning The curing lamp may be a vehicle for cross contamination between patients The most contaminated parts are the fiber optic and eye protection Only the fiber optic is autoclavable with water steam at 135 C Always clean the fiber optic before sterilizing ...

Page 117: ...mply snapping it NOTA the mating surfaces must be clean and dry Put the instrument in its work position The relative image appears on the console display to signal the instrument has been withdrawn Select the desired time by pressing and releasing button 2 The led 3 4 or 5 that lights up indicates the selected time Holding down button 2 does not cause the times to elapse but changes the operating ...

Page 118: ...nuous use example more than 10 minutes consecutively the temperature of the camera s tip usually increases significantly if this is uncomfor table put the handpiece in its holder for a few minutes to allow the light source to cool down When the camera needs to be used a prolonged time reduce the strength of the light emitted with the cursor on the OSD control panel see paragraph 5 8 1 If left runn...

Page 119: ...m single image to multi image mode and vice versa The icon for the selected mode appears at the multifunction button icon single image mode activated icon multi image mode activated NOTE The relative icon appears in the top right hand corner of the monitor to signal multi image mode has been selected Operation in single image mode Take out the camera in LIVE mode and set to single image mode the l...

Page 120: ...the frozen image appears directly on the monitor in the first box available e g 1 on the page currently displayed Each subsequent frozen image is placed in the next box turning clockwi se NOTE Once the 4 boxes available are full the next frozen images will replace the existing ones going clockwise NOTE in order to save other images without deleting the previous ones simply press the MENU button an...

Page 121: ... push the handpiece to the end of the sheath 2 Pull the blue tab removing the protective covers 3 The dental camera is now protected and ready for use ATTENTION Always make certain the handpiece is correctly inserted inside the infection control sheath Always change the disposable infection control sheath before using the device on a new patient This is a fundamental step in preventing cross conta...

Page 122: ...cording to the power of the lighting unit It affects the exposure time 2 COLOR SATURATION increases or decreases color saturation If set to minimum the image appears in black and white at maximum the color is very strong 3 GAMMA similar to a contrast control but with a stronger effect It changes how dark bright areas render in the image the image is softer at the lowest value it is harder at the m...

Page 123: ... on a 1 min time out is always used NOTE Whilethelaserisfunctioning theotherinstrumentsontheboard along with all dental chair movements are disabled ATTENTION See the specific Operations and maintenance instructions enclosed with the equipment for information about all the other laser device functions Safety guidelines ATTENTION This laser device is classified as a Class 4 laser Only expert person...

Page 124: ... lines are sterile and disposable reusing them may put patients at risk of microbiological contamination Open the cover d of the peristaltic pump turning it upwards Attach the tube being careful to place the part with the largest diameter inside the pump s V seats The pump rotates clockwise Place the tube so that the section that runs from the bag enters from the left side of the pump see figure C...

Page 125: ...he canal to be monitored during treatment Description of the components 1 LAEC outer cable 1 1 LAEC outer cable neutral pole 1 2 LAEC outer cable active pole 2 Hook electrode 3 Probe 4 LAEC clip connecting forceps 5 Outlet for LAEC outer cable Operation In this dental unit the LAEC automatically turns on when the outer cable 1 is inserted in the outlet 5 placed under the instrument board When turn...

Page 126: ... place NOTE with the scaler it is necessary to take the measurements with the instrument stopped as good electrical contact cannot be obtained if the file is vibrating Simply release the pedal for a few seconds to correctly measure the position of the instrument in relation to the apex Measuring the length of the root canal Use of the manual file is fundamental to measure the canal The correct pro...

Page 127: ...r movement when the board s arms are obstructed Cleaning the sliding rollers Push down and take off the sliding rollers f Clean the sliding rollers with a suitable product approved against bacteria and fungi and effective against viruses including HBV and HIV see paragraph 1 4 NOTE The product should be sprayed on soft disposable paper towel or sterile gauze ATTENTION Do not use acids or harsh pro...

Page 128: ... fittings by turning and twisting the tube fitting Detach the suction tubes from the holders by turning and twisting the tube fitting ATTENTION Never directly grasp the suction tube Cleaning the suction tubes The suction tubes need to be regularly cleaned and disinfected see para graph 9 4 Use a product specially designed for this purpose ATTENTION Use only a diluted solution of STER 3 PLUS Castel...

Page 129: ...iva ejector filter NOTE This operation must be carried out at the end of each work day ATTENTION Put on gloves before attempting to perform this operation Take off the cap a by turning and twisting at the same time Remove the filter b Clean replace the filter code 97290060 Put the filter and cap back in place NOTE To prevent liquids and matter from dripping from the filter taken out suck air only ...

Page 130: ... in the following cases press button Dental chair rinse position NOTE in this case the position of the bowl can also be set see paragraph 5 1 2 by pressing button Dental chair reset position by pressing the button to retrieve 1 of the 4 programs available See paragraph 5 1 1 4 3 for information on how to modify operation Removing the spouts bowl and bowl filter Pull up the spouts l and n and remov...

Page 131: ...ve icon C appears on the console Turn the tank counter clockwise a and remove it Pour distilled water into the tank until the maximum level is reached ATTENTION Use only distilled water which 600 parts per million ppm of hydrogen peroxide 20 ml of 3 hydrogen peroxide in 1 liter of distilled water can be added to Put the tank back in place turning it clockwise ATTENTION Assure the tank is firmly se...

Page 132: ...le of distilled water a with the one containing hydrogen peroxide see paragraph 7 2 NOTE make sure there is at least 300 cc of liquid present Make certain the spray cocks d found at the bottom of the board are opened if they are not either water does not come out or too little water flows out Press the key to fill the cup 5 five consecutive times thereby filling 5 cups with water This step is very...

Page 133: ...ydrogen peroxide runs out the operatory continues running but uses municipal water that is NOT treated Filling the hydrogen peroxide tank Follow the instructions given below to fill the hydrogen peroxide tank Remove the hydrogen peroxide tank a Take off the cap k and fill the tank with hydrogen peroxide NOTE the shape of the cap allows it to be used as a funnel to more easily fill the tank Put the...

Page 134: ...liquid disinfectant in the tank topping up if necessary NOTE the disinfecting cycle will not start if the liquid in the tank is below the reserve level Use the doctor s console or button AS found on the assistant s board to go to the AUTOSTERIL cycle setup menu and set the time the liquid disinfectant has to remain in the water ducts of the instruments see paragraph 5 1 1 3 1 Place the instruments...

Page 135: ...flushing menu to flush the ducts of the withdrawn instruments press multifunction button to restart the disinfecting cycle from the point at which it was interrupted press multifunction button on the Instrument flushing menu to start the cycle to drain and flush the ducts of the instruments withdrawn using municipal water or distilled water if the S S S system is present NOTE Once the disinfection...

Page 136: ...suction tube terminals Insert the suction cannulae terminals in the corresponding fittings b under the manifold The vacuum created by the Venutri meters triggers the washing cycle NOTE an indication is also given on the console display to inform the user the flushing cycle has been started Washing cycle stages deliver municipal water for 50 sec using intermittent operation 2 sec ON 1 sec OFF stop ...

Page 137: ...he assistant s board to go to the TIME FLUSHING cycle setup menu and set the time the cycle lasts see paragraph 5 1 1 3 2 Place the instruments to be treated in the container provided in the hydrogroup ATTENTION Use the adapter f provided for the syringe The heater should be turned off The micromotor should be put in without the handpiece The turbine and scaler should be put in without any burrs o...

Page 138: ...sed with the dental unit 8 3 Air water 230V quick connect couplers The air water 230V quick connect couplers are placed to the side of the elec trical box ATTENTION Shut off the equipment before attempting to connect or disconnect the air water outlets Technical specifications Electrical outlet 230Vac 2A in accordance with standard IEC EN 60320 2 2 F Air quick connect coupler pressure 6 Bar Water ...

Page 139: ...th neutral detergent and hot water Care Sterilize the element every month IMPORTANT INFORMATION Sterilization must be done in steam autoclave at 135 C 2 bar for at least 15 min Do not use dry sterilizers Replace the element once a year or after 200 sterilization cycles Removing the filter element Move the dental chair completely up Shut off the dental unit with the main switch see paragraph 3 Oper...

Page 140: ...enever electrical parts that are live are repaired updated ATTENTION The manufacturer shall not be held liable for any personal injury or equipment damage if the precautions given above are not observed 9 1 Instrument maintenance Maintenance instructions for the instruments are enclosed with each instrument ATTENTION Maintenance of the instruments should be carried out with the equipment shut off ...

Page 141: ...rilize the ends of the tube holder in autoclave with water steam at up to 135 C 2 bar minimum time 15 min At the end of each work day Draw in 1 liter of water with each suction tube alternating water and air keep the suction tube alternately in and out of the water Once rinsed with water draw in approximately half a liter of the disinfecting solution with each of the suction tubes used NOTE After ...

Page 142: ...ck all the internal tubes and plastic and rubber parts subject to wear Before leaving the surgery empty for a few days Start the aspirator and run it 20 30 minutes without sucking in liquids The aspirator will dry itself completely As a result salt caused by moisture and basic substances will not form salt that may cause fan seizure and motor blockage How to remove the separator s container ATTENT...

Page 143: ...g the separator ATTENTION When disposing one time use containers full of amalgam observe current local and national laws 9 8 DURR amalgam separator The maintenance instructions for the DURR amalgam separator are enclosed with the equipment if the equipment comes with this type of separator The separator s control device is located in the hydrogroup ATTENTION Always wear gloves to prevent contact w...

Page 144: ...nsport and storage Storage transport and unpacking instructions are given on the outside of the carton Carefully follow the instructions provided 1 Transport and store only in the direction indicated by the arrows 2 Avoid banging 3 Protect against humidity 4 Do not use hooks to lift 5 Nameplate containing environmental conditions for storage temperature from 10 to 70 C relative humidity from 10 to...

Page 145: ...all technical support M Instrument configured C The instrument in the indicated position on the board has been auto matically configured with the factory settings R If the message appears again call technical support M Put suction tubes back in place C Suction tubes extracted when dental unit is turned on R Make sure the suction tubes are correctly placed in their housings If the message appears a...

Page 146: ...inage rate 10 l min Drain duct inclination 10 mm m Aspirator connection ø40 mm Vacuum minimum 65 mbar Vacuum delivery rate 450 l min Mark of approval CE 0051 Electrical work in compliance with I E C 60364 7 710 FUSES Identification Value Protection Position Dental unit Fuse F2 Fuse F4 Fuse F5 Fuse F6 T 8 A T 8 A T 6 3 A T 6 3 A T 6 3 A 230 V Dental unit power supply line 115 V Dental unit power su...

Page 147: ...0 530 4 0 A F1 F2 950 98 0 800 610 306 1 6 6 1 6 0 1890 180 170 100 15 0 A F1 F2 1610 2010 2420 210 680 160 500 390 800 1710 2120 410 8 5 7 8 5 1 5 3 5 1910 SKEMA 6 OPERATING INSTRUCTION 147 GB 147 GB 12 1 Overall dimensions SKEMA 6 RS ...

Page 148: ...6 0 5 0 0 3 9 0 8 0 0 1 7 1 0 2 1 2 0 4 1 0 8 5 7 8 5 1 5 3 5 1910 10 0 8 8 0 800 310 400 170 2450 530 4 0 A F1 F2 9 50 9 8 0 80 0 61 0 306 1 6 6 1 6 0 1890 180 170 100 150 SKEMA 6 OPERATING INSTRUCTION 148 GB 148 GB 12 2 Overall dimensions SKEMA 6 CP ...

Page 149: ...orm an automatic flushing cycle if present or draw approximately half a liter of STER 3 PLUS solution with each suction tube See paragraph 9 4 Flexible protection Sterilize the contaminated flexible protection Single use barriers Replace the single use barriers Contaminated surfaces Disinfect with STER 1 PLUS At the end of the work day Spray ducts Disinfect water ducts of sprays wih manual cycle i...

Page 150: ... documentation enclosed with the separator DURR amalgam separator Empty the separator bowl See documentation enclosed with the separator Operatory light Clean the front glass and reflector mirror See documentation enclosed with the equipment Monitor Workstation with light pole Clean the surfaces See documentation enclosed with the equipment Coated surfaces and dental chair upholstery Clean with a ...

Page 151: ...u pied Power Pedal 176 5 3 Seringue 178 5 4 Turbine 179 5 5 1 Modalité de fonctionnement CONSERVATIVE 182 5 5 2 Modalité de fonctionnement ENDO 183 5 5 3 Modalité de fonctionnement SURGERY 184 5 5 4 Menu de programmation rapport de réduction 185 5 6 Détartreur 186 5 6 1 Détartreur chirurgical SURGISON 2 188 5 6 1 1 Modalité de fonctionnement NORMAL 188 5 6 1 2 Modalité de fonctionnement BOOST 189 ...

Page 152: ...t modifications ultérieures Classe IIa Classification DISPOSITIFS ELECTROMEDICAUX Classification de l appareil selon la norme EN 60601 1 pour la sécurité des appareils médicaux Classe l Type B Réglementations de référence Les unités de travail de la série SKEMA 6 sont des appareillages conçus en conformité aux normes CEI EN 60601 1 CEI EN 60601 1 2 ISO 7494 ISO 6875 et EN 1717 type AA et AB en ce ...

Page 153: ...la tablette praticien charge maximale tolérée sur le plateau 2 Kg distribuée porte plateau installé sur la tablette assistante charge maximale tolérée sur le plateau 1 Kg distribuée Branchements aux instruments externes L appareil ne peut être branché électriquement qu à d autres instruments disposant de la marque CE Interférences électromagnétiques L utilisation en cabinet ou à proximité d appare...

Page 154: ...e l appareil au delà du temps préconisé par le fabricant Vu l agressivité des principes actifs utilisés dans les désinfectants et dans les produits d hygiène on recommande d utiliser des produits aux teneurs maximales suivantes Ethanol à 96 Concentration maximum 30g pour 100g de désinfectant Propanol Concentration maximum 20g pour 100g de désinfectant Combinaison de éthanol et propanol Concentrati...

Page 155: ... articulé et auto équilibré Description de l appareillage a Groupe hydrique b Bras orientable c Tablette praticien d Console commandes praticien e Tablette porte tray plateau f Tablette assistante g Console de commande tablette assistante h Boîtier raccordement i Commande au pied multifonctions rhéostat l Jet d eau au verre m Crachoir n Bras auto équilibré q Tablette porte plateau sur tablette ass...

Page 156: ...ctrique alimentée installation pneumatique connectée installation hydrique raccordée Appareillage éteint installation électrique non alimentée installation pneumatique non connectée installation hydrique non raccordée 4 Fonctionnement fauteuil NEW SKEMA Le fauteuil NEW SKEMA peut effectuer les mouvements suivants Montée descente du siège Montée descente du dossier avec inclinaison du siège Trendel...

Page 157: ...elâcher la touche u pour bloquer de nouveau le coussin REMARQUE le dispositif de blocage n est activé que si le circuit de l air est sous pression Avertissement d utilisation ATTENTION Charge maximale applicable sur la têtière 30 Kg Ne pas modifier l orientation du coussin sans avoir désactivé le dispositif de blocage Afin d éviter tout mouvement incontrôlé de la têtière il est conseillé de la sou...

Page 158: ...toutes les directions Pour régler la hauteur de la tablette et ou son orientation sur le plan hori zontal il suffit de saisir la poignée a NOTE pour débloquer le frein pneumatique du bras à pantographe il faut saisir la poignée en appuyant le pouce sur le point B Dispositif d arrêt des bras de rappel des instruments uniquement version SPRIDO Si ce dispositif est prévu il est possible de bloquer le...

Page 159: ...lettes version CP Retirer les cordons après avoir dévissé les embouts de fixations en plastique correspondants se trouvant sous la tablette ATTENTION Eteindre l unité de travail avant d effectuer l opération de retrait des cordons instrument Après avoir éteint l unité de travail vider les conduits de la seringue en frappant sur les touches correspondantes de l air et de l eau direc tement sur le c...

Page 160: ...uche activation désactivation système S S S Touche appel assistante Touche commande actionnement crachoir dans le sens antihoraire activée uniquement avec crachoir motorisé Touche commande actionnement crachoir dans le sens horaire activée uniquement avec crachoir motorisé Touche activation pompe péristaltique activée uniquement en présence de la pompe péristaltique Touche mémorisation fonctions f...

Page 161: ... Structure du menu d interface utilisateur Le menu d interface est structuré comme indiqué dans le schéma ci après et se compose des menus suivants 5 1 1 1 Sélection opérateur 5 1 1 2 PARAMETRAGES GENERAUX 5 1 1 2 1 Réglage contraste afficheur 5 1 1 2 2 Sélection langue 5 1 1 2 3 Réglage blocage frein bras à pantographe 5 1 1 2 4 Introduction état civil opérateur 5 1 1 2 5 Chronomètre 5 1 1 2 6 Ré...

Page 162: ...he 5 1 1 2 4 À partir de la page écran principale frapper de manière répétée sur la touche multifonctions en face de l icône jusqu à trouver l opérateur souhaité REMARQUE Le changement d opérateur se fait de manière cyclique chaque fois que l on frappe sur la touchela multifonctions 5 1 1 2 Paramétrages généraux À partir de la page écran principale effectuer les opérations suivantes Frapper sur la...

Page 163: ...antes touche MAX niveau 10 touche MED niveau 5 touche MIN niveau 1 Une fois que l on a trouvé la luminosité souhaitée frapper sur a touche multifonctions ESC pour sortir du sous menu en sauvegardant automati quement le paramétrage défini 5 1 1 2 2 Sélection langue Ce paramétrage est unique pour tous les opérateurs À partir du menu PARAMÉTRAGES GÉNÉRAUX effectuer les opérations suivantes Frapper su...

Page 164: ...sur la touche MENU pour faire défiler les icônes jusqu à sélectionner celle qui correspond au Blocage frein bras à pantographe En frappant sur les touches AUGMENTE et ou DIMINUE il est possible d activer ou désactiver le déblocage du frein du bras à pantographe REMARQUE l état de frein non déblocable est signalé par l icône correspondante A placée en haut sur l afficheur console ATTENTION Pour une...

Page 165: ...ffaçant de droite à gauche 5 1 1 2 5 Chronomètre Ce paramétrage est unique pour tous les opérateurs À partir du menu PARAMÉTRAGES GÉNÉRAUX effectuer les opérations suivantes Frapper sur la touche MENU pour faire défiler les icônes jusqu à sélec tionner celle qui correspond au Chronomètre Frapper sur la touche multifonctions OK pour entrer dans le sous menu sélectionné Une fois que l on a programmé...

Page 166: ...le qui correspond au Sélection touche préféré Frapper sur la touche multifonctions OK pour entrer dans le sous menu sélectionné dans lequel sont présentes les icônes relative aux fonctions sélectionnables Paramétrage cycle AS Paramétrage cycle TF Chronomètre Programmation LAEC Frapper sur la touche MENU per faire défiler les icônes jusqu à sélec tionner la fonction souhaitée Pour confirmer la fonc...

Page 167: ...BEEP signalera l impossibilité d accéder au sous menu Programmer le temps de permanence du liquide désinfectant en utilisant les touches AUGMENTE et ou DIMINUE REMARQUE le temps programmable varie d un minimum de 5 minutes à un maximum de 30 minutes avec des intervalles de 30 secondes Avec les touches de sélection rapide il est possible de programmer au tomatiquement les valeurs suivantes touche M...

Page 168: ...hes AU GMENTE et ou DIMINUE REMARQUE le temps programmable varie d un minimum d de 1 minute à un maximum de 5 minutes avec des intervalles de 1 minute Avec les touches de sélection rapide il est possible de programmer automatiquement les valeurs suivantes touche MAX 5 minutes touche MED 3 minutes touche MIN 1 minute REMARQUE avec le réservoir du système S S S il est conseillé de ne pas programmer ...

Page 169: ...ipe ment Frapper sur la touche multifonctions pour lancer le cycle de vidage REMARQUE le cycle de vidage ne partira pas si le système S S S est activé ou si le système M W B est en état d erreur Pour interrompre le cycle de vidage frapper sur la touche multifonctions STOP REMARQUE le système est automatiquement réinitialisé Une fois que le cycle de vidage est terminé il est possible d éteindre l e...

Page 170: ...de lavage du crachoir utiliser les touches AUGMENTE et ou DIMINUE Pour confirmer les programmations sélectionnées il suffit de sortir de ce sous menu en frappant sur la touche multifonctions ESC 5 1 1 4 2 Programmation eau au verre Cette programmation est unique pour tous les opérateurs À partir du menu PROGRAMMATIONS GROUPE HYDRIQUE effectuer les opérations suivantes Frapper sur la touche MENU po...

Page 171: ...C 5 1 2 Programmation de la Position Rinçage et Rétablissement du fauteuil Cette programmation est spécifique à chaque opérateur À partir de la page écran principale effectuer toutes les opérations sui vantes Régler le fauteuil à la position souhaitée en utilisant les touches d action nement manuel REMARQUE dans le cas de la Position Rinçage il est également possible de mémoriser la position du cr...

Page 172: ...ur mettre le patient en position de Trendelembourg REMARQUE la position de Trendelembourg est déjà programmée et ne peut être modifiée 5 2 Commande au pied La commande au pied peut être de 3 types différents 1 Pédale multifonctions 2 Pédale à pression 3 Pédale Power Pedal 5 2 1 Commande au pied multifonctions Description des parties 1 Poignée 2 Levier de commande à mouvement horizontal 3 Joystick ...

Page 173: ...uelle de liquide présente dans les conduits des sprays Joystick mouvements fauteuil 3 Le joystick des mouvements du fauteuil 3 a 2 modalités différentes de fonctionnement en fonction du fait que l on a préalablement appuyé sur la commande verticale 4 ou pas REMARQUE une fois que l on a frappé sur la commande 4 on dispose de 5 secondes pour actionner le joystick 3 au bout desquelles la commande s a...

Page 174: ...X D Descente dossier X X X X Mouvements automatiques fauteuil instruments reposés CONFIGURATIONS ACTIONNEMENT FONCTION 0 1 2 3 G A Rappel position 1 X X X G B Rappel position 3 X X X G C Rappel position 2 X X X G D Rappel position 4 X X X G E Rappel position rinçage X X X G F Fin de course Rappel position réinitialisation X X X Équipements auxiliaires instruments reposés CONFIGURATIONS ACTIONNEMEN...

Page 175: ...mutation a bien été effectuée Lorsque la LED 6 est allumée cela signale le fonctionnement avec eau spray Commande mouvements fauteuil 3 Contrôle les mouvements suivants Montée siège fauteuil Montée dossier fauteuil Descente siège fauteuil Descente dossier fauteuil Pour interrompre le mouvement relâcher la commande REMARQUE Toutes les commandes d actionnement du fauteuil seront bloquées au moment d...

Page 176: ...e la gaze stérile ATTENTION Ne pas utiliser de produits abrasifs ou acides REMARQUE Dans le cas où la commande au pied viendrait à glisser sur le sol nettoyer la poussière présente sur le caoutchouc anti dérapant placé sous la base de la pédale en utilisant un chiffon sec 5 2 3 Commande au pied Power Pedal Description des parties 1 Poignée 2 Pédale de commande 3 Commande mouvements fauteuil 4 Comm...

Page 177: ...u spray aux instruments ATTENTION Un bref signal sonore prévient que la commutation a bien été effectuée Lorsque la LED 8 est allumée cela signale le fonctionnement avec eau spray Fonctionnement levier droit 6 REMARQUE la levier fonctionne uniquement avec les instruments en position de repos Pour des raisons de sécurité la commande présélectionnée s active par un bref actionnement du levier suivi ...

Page 178: ...e prolongée au moins 2 secondes sur la touche Régler le niveau de l intensité lumineuse en utilisant les touchesAUGMENTE et ou DIMINUE REMARQUE La valeur programmable varie de 1 à 16 Avec les touches de sélection rapide il est possible de programmer automa tiquement les valeurs suivantes touche MAX niveau 16 touche MED niveau 8 touche MIN niveau 1 Pourconfirmerl intensitéchoisie ilsuffitdesortirde...

Page 179: ...nt Allumage arrêt de la fibre optique Mettre l instrument en position de travail Activer la fibre optique en frappant sur la touche REMARQUE l activationdelafibreoptiqueestsignaléesurl afficheur par l icône A Réglage de l intensité lumineuse de la fibre optique Pour régler l intensité lumineuse de la fibre optique frapper de manière prolongée au moins 2 secondes sur la touche Régler le niveau de l...

Page 180: ...e couple on off fibre optique on off inversion sens de rotation on off eau spray uniquement avec pédale de commande à pression on off pompe péristaltique si présente rapport de réduction pièce à main Avec l instrument en position de travail en frappant sur la touche MENU il est possible des sélectionner 3 modalités de fonctionnement différentes 1 CONSERVATIVE voir paragraphe 5 5 1 vitesse réglable...

Page 181: ...2 1 il est possible de programmer l instrument de manière à ce que l eau spray soit toujours distribuée pendant le fonctionnement Dans ce cas le type de fonctionnement activé est indiqué sur l afficheur de la console par l icône D Icône ÉTEINTE fonctionnement sans eau spray Icône ALLUMÉE fonctionnement avec eau spray Inversion du sens de rotation du micromoteur Pour inverser le sens de rotation du...

Page 182: ...a été atteint L icône correspondante à la modalité sélectionnée est représentée en face de la touche MENU icône alarme activée icône alarme non activée En frappant sur la touche multifonctions de droite il est possible de programmer la vitesse de rotation actuelle comme vitesse maximale En frappant sur les touchesAUGMENTE et ou DIMINUE il est possible de modifier la vitesse maximale de rotation de...

Page 183: ...fonctions de droite CAL alors que l on fait fonctionner la pièce à main au maximum et à vide on programme la valeur de couple actuelle comme valeur 0 réglage de la pièce à main Menu paramétrages de fonctionnement Avec le micromoteur extrait mais non activé en frappant sur la touche multifonctions de droite on entre dans un sous menu dans lequel sont présentes les icônes suivantes relatives aux fon...

Page 184: ...dalité sélectionnée est représentée en face de la touche MENU icône alarme activé icône alarme non activée En frappant sur la touche multifonctions de droite CAL alors que l on fait fonctionner la pièce à main au maximum et à vide on programme la valeur de couple actuelle comme valeur 0 réglage de la pièce à main En frappant sur les touches AUGMENTE et ou DIMINUE il est possible de modifier la vit...

Page 185: ... prédéfinies qui varient en fonction de la modalité de fonctionnement actuelle Pour confirmer les programmations sélectionnées il suffit de sortir de ce sous menu en frappant sur la touche multifonctions ESC Comment créer des rapports de réduction personnalisés Pour créer et mémoriser des rapports de réduction personnalisés procéder comme suit Frapper sur la touche multifonctions de droite NEW Fra...

Page 186: ...en cas de nettoyage et d entretien éviter de diriger le rayon lumineux dans les yeux il est recommandé de garder les fibres optiques éteintes Réglage de la puissance du détartreur Mettre l instrument en position de travail Régler la puissance maximale en utilisant les touches AUGMENTE et ou DIMINUE REMARQUE avec les touches de sélection rapide il est possible de programmer automatiquement les vale...

Page 187: ...agraphe 5 2 1 il est possible de programmer l instrument de manière à ce que l eau de refroidissement soit toujours distribuée pendant le fonctionnement Dans ce cas le type de fonctionnement activé est indiqué sur l afficheur de la console par l icône D Icône ÉTEINTE fonctionnement sans eau de refroidissement Icône ALLUMÉE fonctionnement avec eau de refroidissement Cordon extractible Le détartreur...

Page 188: ... insert vibre étant soumis à une puissance continue non modulée dont l ampleur dépend de la valeur de puissance programmée 2 BOOST voir paragraphe 5 6 1 2 en plus de la vibration ultrasonique de l insert une modulation de l ampleur de la puissance distribuée est effectuée environ 40 de la puissance programmée La modulation créée un effet de percussion sur l os favorisant son incision 3 temps de mo...

Page 189: ...ifier les programmations de fonctionnement Menu programmations de fonctionnement Avec instrument retiré mais non activé en appuyant sur le bouton multi fonction de droite on entre dans un sous menu où sont présentes les icônes suivantes relatives aux fonctions programmables Programmation type de modulation Modalité de variation de la puissance distribuée Appuyer sur le bouton MENU pour faire défil...

Page 190: ...nge de gaz anesthésiant inflam mable avec l air l oxygène ou le protoxyde d azote L appareil est conçu pour un fonctionnement intermittent 60 sec lavoro 13 min riposo Nettoyage La lampe à polymériser peut constituer un moyen de transmission d infections croisées de patient à patient Les parties qui sont majoritairement contaminées sont la fibre optique et la protection pour les yeux Seule la fibre...

Page 191: ...nt soient propres en sèches Mettre l instrument sur la position de travail L extraction de l instrument est signalée par l image correspondante sur l afficheur de la console Sélectionner le temps souhaité en frappant et en relâchant en succession la touche 2 l allumage d une des Dels 3 4 ou 5 indique le temps sélectionné Un actionnement prolongé de la touche 2 ne provoque pas le défilement des tem...

Page 192: ...ormal que la température de la pointe de la caméra augmente significati vement si cela représente une gêne pour l utilisation la pièce à main devra être replacée sur son support pendant quelques minutes afin de refroidir la source de lumière Pour des périodes d utilisation plus longues l intensité lumineuse devra être réduite au moyen du curseur disponible sur le Tableau de Contrôle OSD voir parag...

Page 193: ...multiples et inversement il suffit de frapper sur la touche multifonctions de gauche L icône relative à la modalité sélectionnée est représentée en face de la touche multifonctions icône modalité image simple activée icône modalité images multiples activée REMARQUE l activation de la modalité images multiples est si gnalée sur le moniteur également par une icône placée dans l angle en haut à droit...

Page 194: ... le moniteur en la mettant dans la première case libre ex 1 de la page activée à ce moment Chaque image qui sera congelée par la suite sera positionnée dans la case successive en tournant dans le sens des aiguilles de la montre REMARQUE Une fois que les 4 cases disponibles auront été remplies chaque image congelée successivement remplacera les images existantes toujours en procédant dans le sens d...

Page 195: ...vers la pellicule postérieure en papier Introduire doucement la pièce à main jusqu au fond 2 Retirer la couverture de protection en tirant sur la languette bleue 3 La caméra est prête pour l utilisation ATTENTION Toujours s assurer que la pièce à main est correctement intro duite à l intérieur de la protection Afin de garantir l hygiène des utilisateurs nous rappelons que la protection jetable doi...

Page 196: ...roupe illuminateur Agit sur le temps d exposition 2 COLOR SATURATION augmente ou diminue la saturation de couleur Au minimum l image est en noir et blanc et au maximum la couleur est très accentuée 3 GAMMA est similaire à un contrôle de contraste mais avec un effet plus puissant Modifie le rendu des parties claires foncées de l image à la valeur minimale l image est plus souple et à la valeur maxi...

Page 197: ...e out de 1 min REMARQUE Pendant le fonctionnement du laser il est interdit d avoir d autre instruments sur la tablette ainsi que tous les mouvements du fauteuil ATTENTION Pour toutes les autres fonctions du laser consulter les instructions d utilisation et d entretien spécifiques jointes avec l appareillage Normes de sécurité ATTENTION Ce dispositif laser est classifié comme un laser de Classe 4 S...

Page 198: ...r la contamination microbiologique du patient Ouvrir le couvercle d de la pompe péristaltique en le tournant vers le haut Introduire le tube souple en faisant attention à positionner la section de plus gros diamètre à l intérieur des logements en V de la pompe La rotation de la pompe se fait dans le sans horaire positionner le tube de manière à ce que la section provenant du sac entre dans la part...

Page 199: ...fs permettant ainsi de contrôler la position dans le canal pendant les traitements Description composants 1 Câblage externe LAEC 1 1 Câblage externe LAEC pôle neutre 1 2 Câblage externe LAEC pôle activé 2 Électrode à fixation 3 Sonde 4 Pincette raccordement clip LAEC 5 Prise pour câblage externe LAEC Fonctionnement Sur cet ensemble de soins dentaires le LAEC s active automatiquement à l introducti...

Page 200: ...me sure avec l instrument arrêté car il n est pas possible d avoir un bon contact électrique si le tire nerf est en vibration Il suffit de relâcher la pédale pendant quelques secondes pour détecter correctement la position de l instrument par rapport à l apex Relevé de la longueur du canal radiculaire L utilisation du tire nerfs manuel est d une important primordiale pour la détection du canal La ...

Page 201: ...u fauteuil quand les bras de la tablette rencontrent un obstacle Nettoyage rouleaux coulissants Faire glisser les rouleaux coulissants f en appuyant vers le bas Nettoyer les rouleaux coulissants en utilisant un produit adapté dont l action contre les bactéries et les champignons a été prouvée et qui est particulièrement efficace contre les virus HBV et HIV compris voir paragraphe 1 4 REMARQUE Le p...

Page 202: ... rotation et de traction sur le raccord du tuyau Séparer les tuyaux d aspiration des terminaux porte canule en effectuant une manœuvre de rotation et de traction sur le raccord du tuyau ATTENTION Ne jamais effectuer cette opération en saisissant directement le tuyau d aspiration Lavage Canules Les cannules d aspiration doivent être nettoyées et désinfectées régu lièrement voir paragraphe 9 4 en ut...

Page 203: ...l ATTENTION Mettre des gants avant de procéder à cette opération Retirer le terminal a en effectuant une manœuvre de rotation et de traction simultanées Enlever le filtre b Nettoyer Remplacer le filtre code 97290060 Remonter le filtre et le terminal REMARQUE Afin d éviter que des gouttes de liquides et des sécrétions ne tombent du filtre qui vient d être retiré il est conseillé avant de réaliser c...

Page 204: ...nt directement sur le crachoir même Mouvements automatiques du crachoir uniquement avec crachoir motorisé Le crachoir se déplace automatiquement dans les cas suivants en frappant sur la touche Position de rinçage pour le fauteuil REMARQUE dans ce cas la position du crachoir peut également être programmée voir paragraphe 5 1 2 en frappant sur la touche Position de réinitialisation pour le fauteuil ...

Page 205: ...rant cette opération l air sous pression contenu dans le réservoir se vide automatiquement à l extérieur Enlever le réservoir a en le tournant dans le sens contraire des aiguilles de la montre Verser l eau distillée dans le réservoir jusqu à atteindre le niveau maxi mal ATTENTION Utiliser uniquement de l eau distillée qui peut être additionnée avec 600 parties par million ppm d eau oxygénée 20 ml ...

Page 206: ...illée a par celle contenant de l eau oxygénée voir paragraphe 7 2 REMARQUE s assurer qu il y a bien une quantité de liquide au moins égale à 300 cc S assurer que les robinet des sprays d placés sur la partie inférieure de la tablette sont ouverts si ce n est pas le cas l eau ne sort pas ou il en sort trop peu Appuyer sur la touche pour le remplissage de l eau au verre pendant 5 cinq fois consécuti...

Page 207: ...quand même de fonctionner mais en utilisant l eau de ville NON traitée Remplissage du réservoir de l eau oxygénée Pour remplir le réservoir de l eau oxygénée procéder comme suit Extraire le réservoir a de l eau oxygénée Retirer le bouchon k et verser l eau oxygénée dans le réservoir jusqu à ce qu il soit complètement plein REMARQUE le bouchon a une forme telle qu il peut être utilisé comme embout ...

Page 208: ...e liquide désinfectant présent dans le réservoir et si nécessaire en rajouter REMARQUE le cycle de désinfection ne s active pas si le niveau de liquide présent dans le réservoir est inférieur à la réserve En utilisant la console praticien ou la touche AS placée sur la tablette assistante entrer dans le menu Paramétrage cycle AUTOSTERIL et programmer le temps de permanence du liquide désinfectant à...

Page 209: ...ctuer le lavage des conduits des instruments extraits en frappant sur la touche multifonctions on fait reprendre le cycle de désinfection du point où il avait été interrompu Dans le menu Lavage instruments en frappant sur la touche multifonctions on active le cycle de vidage et de lavage des conduits des instruments extraits en utilisant de l eau courante ou de l eau distillée en présence du systè...

Page 210: ...rds respectifs b sous le collecteur La dépression qui se créé dans les tubes Venturi déclenche le début du cycle de travail REMARQUE l activation du cycle de lavage est également signalée sur l afficheur de la console Phases opératives du cycle de lavage envoi de l eau de ville pendant 50 sec avec fonctionnement intermittent 2 sec ON 1 sec OFF blocage du flux de l eau et envoi de 10cc de liquide d...

Page 211: ... cycle TIME FLUSHING et programmer la durée du cycle voir paragraphe 5 1 1 3 2 Introduire les instruments à traiter dans le conteneur spécifique placé dans le groupe hydrique ATTENTION En ce qui concerne l instrument seringue il faut utiliser l adaptateur spécifique f et le réchauffeur doit toujours être éteint Le micromoteur doit être inséré sans la pièce à main La turbine et le détartreur doiven...

Page 212: ...ntretien du moniteur workstation sont jointes en annexes de l ensemble dentaire 8 3 Raccords rapides air eau 230V Les attaches rapides air eau 230V sont placées latéralement sur le boîtier des raccordements ATTENTION Éteindre l appareillage avant de brancher ou débrancher les prises air eau Données techniques Prise de courant 230Vac 2A conformément à la réglementation IEC EN 60320 2 2 F Pression r...

Page 213: ...ien Il est conseillé de stériliser la cartouche mensuellement ATTENTION La stérilisation doit se faire en autoclave avec de la vapeur d eau à 135 C 2 bar temps minimum 15 min Ne pas utiliser de stérilisateurs à sec Remplacer la cartouche une fois par an ou au bout de 200 cycles de stérili sation Retrait de la cartouche filtrante Mettre le fauteuil à la hauteur maximale Éteindre l ensemble de soins...

Page 214: ...quelles on applique la tension de secteur ATTENTION La non observation de ces prescriptions peut faire annuler la responsabilité du fabricant sur d éventuels dommages ou dysfonctionnement des appareillages 9 1 Entretien des instruments Les instructions d entretien des instruments sont jointes à chaque instrument ATTENTION On conseille d effectuer les opérations d entretien des instruments avec l a...

Page 215: ...te canule en autoclave avec de la vapeur d eau jusqu à 135 C 2 bars temps minimal 15 min À la fin de chaque journée de travail Aspirer avec chaque canule 1 litre d eau en alternant eau et air en tenant la canule alternativement immergée dans l eau et non Une fois le rinçage à l eau terminé aspirer avec chacune des canules utilisées environ un demi litre de solution désinfectante REMARQUE À la fin ...

Page 216: ...issement Avant de s absenter du cabinet pour quelques jours Mettrel aspirateurenfonction lefairefonctionnerpendant20 30minutessans aspirer de liquides Le groupe aspirant va sécher complètement On évitera les formations de sels causées par l humidité et par les substances basiques selsquipeuventparfoisfairegripperleventilateuretparconséquent bloquer le moteur Comment démonter le vase du séparateur ...

Page 217: ...ériel infecté ATTENTION Pour le recyclage des conteneurs perdus pleins d amalgame s en tenir aux Normes locales et nationales 9 8 Séparateur d amalgame DÜRR Les instructions d entretien du séparateur d amalgame DÜRR sont jointes à l appareil si celui ci est équipé de ce type de séparateur Le dispositif de contrôle du séparateur est situé à l intérieur du groupe hydrique ATTENTION Procéder aux opér...

Page 218: ...n carton sont reportées les indications de stockage de transport ainsi que les instructions de déballage Ces indications doivent être respectées scrupuleusement 1 Transporter et stocker uniquement dans le sens indiqué par les flè ches 2 Eviter les chocs 3 Protéger de l humidité 4 Ne pas utiliser de crochet pour la manutention 5 Plaque reportant les conditions ambiantes de stockage a Températures d...

Page 219: ... Si le message d erreur se présente à nouveau contacter l Assistance Technique M Instrument configuré C L instrument à cette position de la tablette a été automatiquement configuré avec les données d usine R Si le message d erreur se présente à nouveau contacter l Assistance Technique M Repositionner les canules C Les canules d aspiration sont extraites à l allumage de l unité de soins dentaire R ...

Page 220: ...ndaire Unit Protect secondaire Lampe de travail Boîte raccordement Boîte raccordement Boîte raccordement Boîte raccordement Fauteuil Fusible FU1 T 4 A 230 V Ligne d alimentation fauteuil Boîte raccordement Attaches rapides Fusible T 2 A 230 V Ligne d alimentation prise électrique Boîte raccordement Alimentateur MONITOR Fusible T 6 3 A 21 V Ligne d alimentation MONITOR WORKSTATION Zone carte fauteu...

Page 221: ...30 4 0 A F1 F2 950 98 0 800 610 306 1 6 6 1 6 0 1890 180 170 100 15 0 A F1 F2 1610 2010 2420 210 680 160 500 390 800 1710 2120 410 8 5 7 8 5 1 5 3 5 1910 SKEMA 6 INSTRUCTION DE SERVICE 221 F 12 1 Caractéristiques de dimensions SKEMA 6 RS ...

Page 222: ...0 5 0 0 3 9 0 8 0 0 1 7 1 0 2 1 2 0 4 1 0 8 5 7 8 5 1 5 3 5 1910 10 0 8 8 0 800 310 400 170 2450 530 4 0 A F1 F2 9 50 9 8 0 80 0 61 0 306 1 6 6 1 6 0 1890 180 170 100 150 SKEMA 6 INSTRUCTION DE SERVICE 222 F 12 2 Caractéristiques de dimensions SKEMA 6 CP ...

Page 223: ...fectuer un cycle automatique de lavage si présent ou aspirer avec chacune des canules utilisées environ demi litre de solution de STER 3 PLUS Voir paragraphe 9 4 Protections souples Stériliser les protections souples conta minées Barrières jetables Remplacer les barrières jetables Superficies contaminées Nettoyer les superficies en utilisant STER 1 PLUS Fin de l activité journalière Conduits des s...

Page 224: ...tion jointe en annexe du séparateur Séparateur d amalgame DÜRR Vider le vase du séparateur Voir documentation jointe en annexe du séparateur Lampe de travail Nettoyer le verre avant et le miroir réfléchis sant Voir documentation jointe en annexe de l appareillage Moniteur Workstation à poten ce lampe Nettoyer les superficies Voir documentation jointe à l appareillage Superficies vernis et sellerie...

Page 225: ...ng 246 5 2 1 Multifunktions Fußpedalsteuerung 246 5 2 2 Druck Fußpedalsteuerung 249 5 2 3 Fußpedalsteuerung Power Pedal 250 5 3 Spritze 252 5 4 Turbine 253 5 5 Elektrischer Mikromotor 254 5 5 1 Funktionsweise CONSERVATIVE 256 5 5 2 Funktionsweise ENDO 257 5 5 3 Funktionsweise SURGERY 258 5 5 4 Eingabe Menü Untersetzungsverhältnis 259 5 6 Zahnsteinentferner 260 5 6 1 Chirurgisches Gerät zur Entfern...

Page 226: ...ugsgebende Richtlinien Klassifizierung der ZAHNÄRZTLICHEN VORRICHTUNGEN Klassifizierung des zahnärztlichen Komplexes gemäß den in Anlage IX der EG Richtlinie 93 42 und nachfolgende Änderungen genannten Regeln Klasse IIa Klassifizierung der ELEKTRISCHEN ZAHNÄRZTLICHEN VORRICHTUNGEN Klassifizierung des Geräts gemäß Norm EN 60601 1 zur Sicherheit medizinisch genutzter Geräte Klasse I Typ B Bezugsgebe...

Page 227: ...endeten Teilen unterscheiden modifiziert wird so übernimmt er eine Verantwortung die analog zu derjenigen des Herstellers ist CASTELLINI S p A lehnt jegliche Verantwortung für Sach oder Personenschäden ab wenn die hier angeführte Klausel nicht berücksichtigt wird Patientenstuhl Die maximal am Patientenstuhl zulässige Last beträgt 190 kg Dieser Wert darf nicht überschritten werden Auflagefläche der...

Page 228: ...ertigten Teile beschädigen falls diese nicht miteinander verträglich sind Tests und Forschungsergebnisse haben ergeben dass die Oberflächen nicht vollständig vor einem Angriff aller auf dem Markt erhältlichen Produkte geschützt sind Wann immer es möglich ist empfiehlt sich daher der Einsatz schutzschranken bildender Maßnahmen Die aggressivenAuswirkungen dieser Produkte hängen auch von deren Verwei...

Page 229: ...lenk versehen und selbstausgleichend ist Beschreibung der Einrichtung a Wassereinheit b Schwenkbarer Arm c Arztplatte d Arzt Steuerpult e Tray Tragplatte f Helferinneneinheit g Steuerpult Helferinneneinheit h Anschlusskasten i Multifunktionale Fußpedalsteuerung Rheostat l Wasserversorgung für Becher m Speibecken n Selbstausgleichender Arm q Traytablett an Helferinnenplatte optional Version CP Arzt...

Page 230: ...tet Elektrische Anlage versorgt Druckluftanlage angeschlossen Wasseranlage angeschlossen Gerät ausgeschaltet Elektrische Anlage nicht versorgt Druckluftanlage nicht angeschlossen Wasseranlage nicht angeschlossen 4 Betrieb Patientenstuhl NEW SKEMA Der Patientenstuhl NEW SKEMA führt folgende Bewegungen aus Auffahren Abfahren des Sitzes Auffahren Abfahren der Rückenlehne mit Sitzneigung Tren delembur...

Page 231: ... Sperrvorrichtung ist nur dann aktiviert wenn der Luftkreislauf unter Druck steht Gebrauchshinweise ACHTUNG Maximal auf die Kopfstütze anwendbare Last 30 kg Ohne vorherige Deaktivierung der Sperrvorrichtung darf die Kissen einstellung nicht verändert werden UmunkontrollierteBewegungenderKopfstützezuvermeiden empfiehltes sich diesemitbeidenHändenabzustützen bevormandieSperrvorrichtung deaktiviert 4...

Page 232: ...htungen bewegen Zur Höheneinstellung der Platte und oder ihrerAusrichtung in waagerechter Ebene muss einfach nur der Griff a gefasst werden HINWEIS Um die pneumatische Bremse des Pantographarms zu entsperren muss man den Griff umfassen und den Daumen an der Stelle A auflegen Anhaltevorrichtung Instrumenten Rückholausleger nur Versionen SPRIDO Wenn diese Vorrichtung vorgesehen ist kann der Instrume...

Page 233: ...ernen nachdem man die entsprechende Befestigungszwinge aus Kunststoff die unter der Platte gelagert sind losgeschraubt hat ACHTUNG Die Behandlungseinheit ausschalten bevor man die Kabelstränge des Instruments entfernt Nach dem Ausschalten der Behandlungseinheit müssen die Leitun gen der Spritze entleert werden Hierzu die entsprechenden Tasten für Luft und Wasser direkt auf dem Mundspülbecken drück...

Page 234: ...usschalten des S S S Systems Taste Helferinnenaufruf Steuertaste Mundspülbeckenbewegung gegen den Uhrzeigersinn nur mit motorbetriebenem Mundspülbecken aktiviert Steuertaste Mundspülbeckenbewegung im Uhrzeigersinn nur mit motorbetriebenem Mundspülbecken aktiviert Taste Aktivierung Schlauchpumpe nur mit vorhandener Schlauchpumpe aktiviert Taste Speicherung Patientenstuhlfunktionen Taste Aufruf Posi...

Page 235: ...Menüs Das Benutzerschnittstellen Menü ist baut sich wie im nebenstehend abge bildeten Schema ersichtlich auf und setzt sich aus den folgenden Menüs zusammen 5 1 1 1 Bedienerwahl 5 1 1 2 GENERELLE EINSTELLUNGEN 5 1 1 2 1 Regulierung Display Kontrast 5 1 1 2 2 Sprachwahl 5 1 1 2 3 Regulierung Sperre Bremse Pantographarm 5 1 1 2 4 Eingabe Bediener Stammdaten 5 1 1 2 5 Zeitmesser 5 1 1 2 6 Regulierung...

Page 236: ...zeichnet ist siehe Abschnitt 5 1 1 2 4 Um den gewünschten Bediener aufzurufen muss man auf der Hauptbild schirmanzeige übereinstimmend zur Ikone wiederholt auf die entspre chende Multifunktionstaste drücken HINWEIS Die Benutzer werden bei jedem Drücken der Multifunktionstaste in zyklischer Form durchgegangen 5 1 1 2 Generelle Einstellungen Die folgenden Eingriffe lassen sich von der Hauptanzeige a...

Page 237: ...ste MED Stufe 5 Taste MIN Stufe 1 Wenn die gewünschte Helligkeit eingestellt worden ist muss man die Multifunktionstaste ESC drücken um das Untermenü zu verlassen Auf diese Weise wird die festgelegte Einstellung automatisch gespeichert 5 1 1 2 2 Sprachwahl Diese Einstellung ist für alle Bediener gleich Über das Menü der GENERELLEN EINSTELLUNGEN lassen sich die folgenden Eingriffe vornehmen Die MEN...

Page 238: ...m MENÜ Taste drücken und die Ikonen solange durchgehen bis man die Ikone die sich auf die Sperre der Bremse des Pantographarms bezieht anwählen kann Durch Drücken der Taste ZUNAHME und oderABNAHME kann die Bremse des Pantographarms freigegeben oder blockiert werden HINWEIS Der Zustand einer nicht freigebbaren Bremse wird durch die dafür vorgesehene Ikone A oben im Display des Pults erscheint angez...

Page 239: ...ese Einstellung ist für alle Bediener gleich Über das Menü der GENERELLEN EINSTELLUNGEN lassen sich die folgen den Eingriffe vornehmen Die MENÜ Taste drücken und die Ikonen solange durchgehen bis man die Ikone die sich auf den Zeitmesser bezieht anwählen kann Die Multifunktionstest OK drücken um Zugriff zum ausgewählten Unter menü zu erhalten Nach Eingabe des Zeitwertes auf die Multifunktionstaste...

Page 240: ...is man die Ikone die sich auf die Wahl der bevorzugten Taste bezieht anwählen kann Die Multifunktionstest OK drücken um Zugriff zum ausgewählten Un termenü zu erhalten das die Ikonen enthält die sich auf die wählbaren Funktionen beziehen Einstellung AS Zyklus Einstellung TF Zyklus Zeitmesser Einstellung LAEC Die MENÜ Taste drücken und die Ikonen solange durchgehen bis man gewünschte Funktion anwäh...

Page 241: ... vorliegt Der nicht mögliche Zugriff auf dieses Untermenü wird durch ein akustisches Signal PIEP Ton gemeldet Zum Eingeben der Verweilzeit des Desinfektionsmittels müssen die Tasten ZUNAHME und oder ABNAHME verwendet werden HINWEIS Es kann ein Zeitwert eingegeben werden der zwischen einem Minimum von 5 Minuten und einem Maximum von 30 Minuten liegt und Intervalle von 30 Sekunden aufweist Mit den S...

Page 242: ...der Spüldauer müssen die Tasten ZUNAHME und oder ABNAHME verwendet werden HINWEIS Es kann ein Zeitwert eingegeben werden der zwischen einem Minimum von 1 Minute und einem Maximum von 5 Minuten mit einminütigen Intervallen liegt Mit den Schnellwahltasten können die folgenden Werte automatisch eingestellt werden Taste MAX 5 Minuten Taste MED 3 Minuten Taste MIN 1 Minute HINWEIS Für den Behälter des ...

Page 243: ...nktionstaste drücken um den Entleerungszyklus zu starten HINWEIS Mit aktiviertem S S S System oder mit in einem Fehler zustand befindlichen M W B System startet der Entleerungszyklus nicht Um den Entleerungszyklus zu unterbrechen muss auf die Multifunktion staste STOPP gedrückt werden HINWEIS Das System nimmt eine automatische Rücksetzung vor Nach Abschluss des Entleerungszyklus kann der zahnärztl...

Page 244: ...automa tische Steuerung anzuwählen abzuwählen oder um die Spülzeit des Mundspülbeckens zu ändern Um die gewählten Einstellungen zu bestätigen muss dieses Untermenü einfach nur durch Drücken der Multifunktionstaste ESC verlassen 5 1 1 4 2 Einstellung Wasser zum Becher Diese Einstellung ist für alle Bediener gleich Über das Menü der EINSTELLUNGEN DER WASSEREINHEIT lassen sich die folgenden Eingriffe...

Page 245: ...tionstaste ESC verlassen werden 5 1 2 Programmierung der Spülposition und Nullstellung des Patientenstuhls Diese Eingabe ist für jeden einzelnen Bediener spezifisch Von der Hauptanzeigeseite aus müssen folgende Schritte vorgenommen wer den Den Patientenstuhl mit Hilfe der Tasten für die manuelle Bewegung in die gewünschte Stellung bringen HINWEIS Im Fall der Spülposition kann auch die Position des...

Page 246: ...benutzt werden um den Patienten in die Trendelemburg Stellung zu bringen HINWEIS die Trendelemburg Stellung wurde bereits eingestellt und kann nicht verändert werden 5 2 Fußpedalsteuerung Es liegen 3 unterschiedliche Fußpedalsteuerungen vor 1 Multifunktions Fußpedalsteuerung 2 Druck Fußpedalsteuerung 3 Fußpedalsteuerung Power Pedal 5 2 1 Multifunktions Fußpedalsteuerung Beschreibung der Teile 1 Gr...

Page 247: ...sigkeitstropfen in den Sprayleitungen zu be seitigen Joystick Patientenstuhlbewegungen 3 Der Joystick für die Patientenstuhlbewegungen 3 kann auf zwei verschiedene Funktionsweisen arbeiten Dies ist davon abhängig ob das vertikale Steuere lement 4 zuvor gedrückt worden ist oder nicht HINWEIS Nach dem Drücken des vertikalen Steuerelements 4 hat man 5 Sekunden lang Zeit um den Joystick 3 zu betätigen...

Page 248: ...lehne X X X X D Abwärtsbewegung Rückenlehne X X X X Automatische Bewegungen Patientenstuhl rückplatzierte Instrumente KONFIGURATIONENI BETÄTIGUNG FUNKTION 0 1 2 3 G A Aufruf Position 1 X X X G B Aufruf Position 3 X X X G C Aufruf Position 2 X X X G D Aufruf Position 4 X X X G E Aufruf Spülposition X X X G F Endschalter Aufruf Grundstellungsposition X X X Hilfseinrichtungen rückplatzierte Instrumen...

Page 249: ...y Wasser Steuerung Patientenstuhlbewegungen 3 Folgende Bewegungen werden gesteuert Auffahrt Sitz Patientenstuhl Auffahrt Rückenlehne Patientenstuhl Abfahrt Sitz Patientenstuhl Abfahrt Rückenlehne Patientenstuhl Zum Unterbrechen des Bewegungsablaufs das Bedienelement loslas sen HINWEIS alle Bewegungssteuerungen des Patientenstuhls sind blockiert wenn ein Instrument ausgezogen ist und der Hebel der ...

Page 250: ...dmull aufgesprüht werden ACHTUNG Keine abscheuernden oder säurehaltigen Produkte verwenden HINWEIS wenn die Fußpedalsteuerung auf dem Boden verrutscht muss das unter der Grundlage angebrachte rutschfeste Gummielement mit einem trockenen Lappen gereinigt bzw vorhandene Staubansammlungen entfernt werden 5 2 3 Fußpedalsteuerung Power Pedal Beschreibung der Teile 1 Griff 2 Steuerpedal 3 Steuerung Pati...

Page 251: ...rung oder Deaktivierung des Spray Wassers für die Instrumente ACHTUNG Ein kurzes akustisches Signal weist auf die stattgefundene Umschaltung hin Der eingeschaltete Zustand der LED 8 meldet die Funktionsweise mit Spray Wasser Funktionsweise Hebel rechts 6 HINWEIS Der Hebel funktioniert nur mit in Grundstellung positionierten Instrumenten Aus Sicherheitsgründen aktiviert sich die gewählte Steuerung ...

Page 252: ...werden Die Lichtstärkenstufe kann unter Verwendung derTasten ZUNAHME und oder ABNAMHE reguliert werden HINWEIS Es lässt sich ein Wert zwischen 1 und 16 einstellen Mit den Schnellwahltasten lassen sich automatisch die folgenden Werte eingeben Taste MAX Stufe 16 Taste MED Stufe 8 Taste MIN Stufe 1 Um die gewählte Stärke zu bestätigen muss man dieses Untermenü einfach nur durch Drücken der Multifunkt...

Page 253: ... der Optikfaser Das Instrument in Arbeitsstellung bringen Die Optikfaser durch Drücken der Taste aktivieren HINWEIS Die Aktivierung der Optikfaser wird auf dem Display durch die Ikone A angezeigt Regulierung der Lichtstärke der Optikfasern Regulieren der Lichtstärke der Optikfaser muss die Taste lang anhal tend mindestens 2 Sekunden lang gedrückt werden Die Lichtstärkenstufe kann unter Verwendung ...

Page 254: ...Off Schlauchpumpe falls vorhanden Untersetzungsverhältnis Handstück Wenn man mit in Arbeitsposition befindlichem Instrument auf die MENÜ Taste drückt werden 3 verschiedene Betriebsweisen zur Auswahl angezeigt 1 CONSERVATIVE siehe Abschnitt 5 5 1 Regulierbare Geschwindigkeit von 100 auf 50000 U Min ist vom Untersetzungs Übersetzungsverhältnis abhängig Drehmoment regulierbar von 1 auf 100 Personalis...

Page 255: ...des Betriebs ständig Spraywasser abgegeben wird In diesem Fall wird die aktivierte Funktionsweise auf dem Pult Display durch die folgende Ikone D angezeigt Ikone AUS Betrieb ohne Spray Wasser Ikone EIN Betrieb mit Spray Wasser Drehrichtungsumkehr des Mikromotors Um die Drehrichtung des Mikromotors umzukehren muss die UMKEHR Taste gedrückt werden Die Umkehrung der Drehrichtung wird durch ein akusti...

Page 256: ...Die auf die entsprechende Funktionsweise bezogene Ikone erscheint übe reinstimmend zur MENÜ Taste Ikone Alarm aktiviert Ikone Alarm nicht aktiviert Durch Drücken der rechten Multifunktionstaste kann die laufende Drehgeschwindigkeit als Höchstgeschwindigkeit eingestellt werden Durch Drücken der Tasten ZUNAHME und oder ABNAHME kann die maxi male Drehgeschwindigkeit der Fräse geändert werden Menü Fun...

Page 257: ...e Multifunktionstaste CAL drückt während man das Handstück auf dem Maximum und im Leerlauf laufen lässt wird der laufende Drehmomentwert als Wert 0 eingestellt Handstückkalibrierung Menü Funktionseinstellungen Durch Drücken der rechten Multifunktionstaste mit ausgezogenem aber nicht aktiviertem Mikromotor erhält man Zugriff auf das Untermenü das die folgenden auf die einstellbaren Funktionen bezog...

Page 258: ...bezogene Ikone erscheint übereinstimmend zur MENÜ Taste Ikone Alarm aktiviert Ikone Alarm nicht aktiviert Wenn man die rechte Multifunktionstaste CAL drückt während man das Handstück auf dem Maximum und im Leerlauf laufen lässt wird der lau fende Drehmomentwert als Wert 0 eingestellt Handstückkalibrierung Durch Drücken der Tasten ZUNAHME und oder ABNAHME kann die maximale Drehgeschwindigkeit der F...

Page 259: ...gewählte Einstellungen zu bestätigen muss man dieses Unter menü einfach nur durch Drücken der Multifunktionstaste ESC verlas sen Vorgangsweise zur Erstellung von spezifisch auf den persönlichen Bedarf abgestimmten Untersetzungsverhältnissen Zur Erstellung und Speicherung von spezifisch auf den persönlichen Bedarf abgestimmten Untersetzungsverhältnissen muss wie folgt vorgegangen werden Die rechte ...

Page 260: ...r Zahnsteinentferner PIEZOLIGHT 6 LED Gerät der Klasse 1 Während der Reinigungs und Wartungsarbeiten darf das Lichtstrahlenbündel nicht in die Augen gerichtet werden es rät sich die Optikfasern ausgeschaltet zu lassen Leistungsregulierung des Zahnsteinentferners Das Instrument in Arbeitsstellung bringen AnhandderTasten ZUNAHME und oderABNAHME diemaximaleerzeugte Leistung regulieren HINWEIS Mit den...

Page 261: ...g auf bistabile Funktionsweise eingestellt ist siehe Abschnitt 5 2 1 kann das Instrument so eingestellt werden dass während des Betriebs ständig Kühlwasser abgegeben wird In diesem Fall wird die aktivierte Funktionsweise durch die Ikone D auf dem Pult Display angezeigt Ikone AUS Betrieb ohne Kühlwasser Ikone EIN Betrieb mit Kühlwasser Ablösbarer Kabelstrang Der Zahnsteinentferner ist mit einem abl...

Page 262: ...MAL siehe Paragrafen 5 6 1 1 Der Einsatz vibriert bei einer ununterbrochenen nicht modulierten Leistung deren Umfang vom eingestellten Leistungswert abhängt 2 BOOST siehe Paragrafen 5 6 1 2 Neben den Ultraschallschwingungen des Einsatzstückes wird eine Amplitudenmodulation der abgegebenen Leistung ungefähr 40 der eingestellten Leistung durchgeführt Die Modulation erzeugt Schläge und so kann besser...

Page 263: ... das Un termenü um die Betriebseinstellungen abzuändern Menü Betriebseinstellungen Wenn man die Multifunktionstaste rechts mit herausgezogenem aber nicht aktivem Instrument drückt öffnet man das Untermenü mit den folgenden Symbolen entsprechend der Funktionen die eingestellt werden können Einstellung des Modulationstyps Änderungsmodalität der abgegebenen Leistung Die Taste MENU drücken um aus den ...

Page 264: ...ionslampe eignet sich nicht für einen Gebrauch in Präsenz von Betäubungsgasmischungen die durch Luft Sauerstoff oder Stickstoffoxydul Lachgas entflammbar sind Das Gerät wurde für eine aussetzende Gebrauchsweise entworfen 60 sec lavoro 13 min riposo Reinigung Die Polymerisationslampe kann ein Medium zur Übertragung von Kreuzinfektionen von Patient zu Patient darstellen Die Optikfaser und der Augens...

Page 265: ... Ausziehen des Instruments wird durch die entsprechende Ab bildung auf dem Display des Pults signalisiert Auswahl der gewünschten Zeit indem man die Taste 2 nacheinander drückt und wieder loslässt Das Aufleuchten von einer der Leuchtdioden 3 4 oder 5 gibt die gewählte Zeit an Eine länger anhaltende Betätigung der Taste 2 bewirkt nicht das Durchlaufen der Zeiten sondern verändert die Funktionsweise...

Page 266: ...nem ständigen Gebrauch beispielsweise mehr als 10 Minuten ununterbrochen ist es normal dass sich die Temperatur der Kameraspitze beträchtlich erhöht Wenn dies zu Unannehmlichkeiten führt sollte das Handstück wieder einige Minuten lang in die dafür vorgesehene rückplatziert werden damit sich die Lichtquelle abkühlen kann Bei einer längerfristigen Einsatzdauer sollte die Lichtstärke durch den dafür ...

Page 267: ... die linke Multifunktionstaste gedrückt werden Die Ikone die sich auf entsprechend gewählte Modalität bezieht wird übereinstimmend zur Multifunktionstaste angezeigt Ikone Einzelbildanzeige aktiviert Ikone Mehrfachbildanzeige aktiviert HINWEIS Die Aktivierung der Mehrfachbildanzeige wird auch auf dem Monitor durch eine eigens dafür vorgesehene Ikone angezeigt die in der Ecke oben rechts erscheint F...

Page 268: ...rd direkt auf dem Mo nitor angezeigt wobei es in das erste freie Feld Bsp 1 der momentan aktivierten Seite platziert wird Je nachfolgend eingefrorene Aufnahme wird in dem nächsten Feld posi tioniert wobei im Uhrzeigersinn vorgegangen wird HINWEIS Wenn die 4 zu Verfügung stehenden Felder besetzt worden sind werden die bereits aufgenommenen Bilder durch jede nachfolgend eingefrorene Aufnahme ersetzt...

Page 269: ...d h zur Papierfolie hin Das Handstück ganz bis nach hinten einführen 2 Die Schutzfolien abziehen indem man an der blauen Lasche zieht 3 Die Kamera ist nun geschützt und einsatzbereit ACHTUNG Stets sicherstellen dass das Handstück richtig in die Schutzhaube eingeführt worden ist Um den Benutzern hygienische Sicherheit zu garantieren wird darauf hingewiesen dass der Einwegschutz nach jedem Gebrauch ...

Page 270: ... auf die Expositionszeit aus 2 COLOR SATURATION steigert oder vermindert die Farbsättigung Bei Einstellung auf dem Minimum erhält man Schwarzweißbilder bei Einstellung auf dem Maximum wird die Farbe stark akzentuiert 3 GAMMA gleicht einer Kontrastkontrolle allerdings mit leistungsfähi gerer Auswirkung Modifiziert die Hell Dunkelwiedergabe im Bild Bei Einstellung des Mindestwertes ergibt sich ein w...

Page 271: ...r ein stets mit einer Auszeit von 1 Min HINWEIS Während des Einsatzes des Lasers sind der Gebrauch aller Instrumente der Platte und alle Bewegungen des Patientenstuhls untersagt ATTENTION Für alle weiteren Funktionsweisen des Lasers siehe die spezifischen Gebrauchs und Wartungsanleitungen die dem Gerät beiliegen Sicherheitsvorschriften ATTENTION Dieses Lasergerät ist als ein Laser der Klasse 4 kla...

Page 272: ...amination des Patienten führen Den Deckel d der Schlauchpumpe durch nach oben gerichtetes Drehen öffnen Den Schlauch einsetzen Dabei darauf achten dass der Abschnitt mit dem größer bemessenen Durchmesser in die V förmigen Einsätze der Pumpe positioniert wird Die Pumpe dreht im Uhrzeigersinn Den Schlauch so posi tionieren dass der von dem Beutel kommende Abschnitt am linken Teil der Pumpe einläuft ...

Page 273: ...l während der Behandlungen genau überwacht werden kann Beschreibung der Bestandteile 1 Externe Verkabelung LAEC 1 1 Externe Verkabelung LAEC Neutralpol 1 2 Externe Verkabelung LAEC aktiver Pol 2 Hakenelektrode 3 Sonde 4 Pinzette Verbindung Klemme LAEC 5 Buchse für externe Verkabelung LAEC Betrieb An diesem zahnärztlichen Komplex wird LAEC automatisch aktiviert sobald das externe Kabel 1 in die daf...

Page 274: ...endem Instrument vorgenommen werden da mit vibrierender Feile kein einwandfreier elektrischer Kontakt hergestellt wer den kann Um die Position des Instruments in Bezug auf die Wurzelspitze korrekt festzustellen muss das Pedal einfach nur einige Sekunden lang freigegeben werden Messung der Wurzelkanallänge Der Gebrauch der manuellen Feile ist für die Kanalmessung von grun dlegender Wichtigkeit Die ...

Page 275: ...me der Helferinnenplatte auf ein Hindernis stoßen Reinigung Laufrollen Die Laufrollen f durch Drücken nach unten herausnehmen Die Laufrollen unter Verwendung eines geeigneten Produkts reinigen dessen Wirksamkeit gegen Bakterien und Pilze erprobt wurde und das weitgehend wirksam gegen Viren ist einschließlich HBV und HIV siehe Abschnitt 1 4 HINWEIS DasProduktmussaufweichesEinwegpapieroderaufsterile...

Page 276: ...des Fördersystems herausziehen Hierzu muss auf zweckmäßige Weise am Anschlussstück des Schlauchs gedreht und gezogen werden Um die Saugschläuche von den Kanülenhalter Endstücken zu trennen muss auf zweckmäßige Weise am Anschlussstück des Schlauchs gedreht und gezogen werden ACHTUNG Bei der Durchführung dieses Vorgangs darf der Saugschlauch niemals direkt gegriffen werden Kanülenreinigung Die Saugk...

Page 277: ...HTUNG Vor Ausführung dieses Vorgangs müssen Schutzhandschuhe angezogen werden Das Endstück a durch gleichzeitiges Drehen und Ziehen abnehmen Den Filter b herausziehen Den Filter Art Nr 97290060 reinigen austauschen Den Filter und das Endstück wieder einbauen HINWEIS Um das mögliche Tröpfeln von Flüssigkeiten oder Sekreten beim Ausziehen des Filters zu vermeiden ist es vor der Durchführung der zuvo...

Page 278: ...omatisch durch Drücken der Taste Spülposition für den Patientenstuhl HINWEIS In diesem Fall kann die Mundspülposition auch eingestellt werden siehe Abschnitt 5 1 2 durch Drücken der Taste Grundstellungsposition für den Patienten stuhl durch Drücken der Taste mit der eines der 4 zu Verfügung stehenden Programme aufgerufen werden Zum Ändern dieser Funktionsweise siehe Abschnitt 5 1 1 4 3 Ausbau Spei...

Page 279: ...dieses Vorgangs wird die unter Druck ste hende Luft im Behälter automatisch nach außen hin abgelassen Den Behälter a abnehmen Diesen hierzu gegen den Uhrzeigersinn drehen Den Behälter soweit mit destilliertem Wasser bis der Maximalstand erreicht ist ACHTUNG Nur destilliertes Wasser verwenden dem 600 pmm Teile pro Million Wasserstoffperoxyd zugefügt werden kann 20 ml 3 iges Wasser stoffperoxyd in e...

Page 280: ...destillierten Wassers a durch die Wasserstoffpe roxydflasche ersetzen siehe Abschnitt 7 2 HINWEIS Sicherstellen dass eine Wassermenge von minde stens 300 cm3 vorhanden ist Sicherstellen dass die im unteren Teil des Elements angebrachten Hähne d geöffnet sind andernfalls kann kein Wasser oder nur zu wenig Wasser ausströmen Die Taste zum Füllen des Bechers mit Wasser 5 fünf mal hinterei nander drück...

Page 281: ...d muss wie folgt vorgegangen werden Den Behälter a des Wasserstoffperoxyds herausnehmen DenDeckel k entfernenundsolangeWasserstoffperoxydindenBehältereinfüllen bis dieser ganz voll ist HINWEIS Die Form des Deckels ist so beschaffen dass es als Trichter verwendet werden kann um das Einfüllen zu erleichtern Den Deckel wieder anbringen und den Behälter rückplatzieren Nun kann die seitliche Abdeckung ...

Page 282: ...bdeckung der Wassereinheit wieder geschlossen werden ACHTUNG Zur Wiederauffüllung darf nur mit reines und unverdünntes 3 iges Wasserstoffperoxyd 10 Volumen verwendet werden Einstellung des Desinfektionszyklus Den Füllstand des im Behälter enthaltenen Desinfektionsmittels kontrollieren und falls notwendig Desinfektionsmittel nachfüllen HINWEIS Wenn der Flüssigkeitsstand im Behälter unter den Reser ...

Page 283: ...et werden kann Wenn man möchte kann die Einwirkzeit des Desinfektionsmittels geändert und oder es können weitere zu desinfizierende Instrumente hinzugefügt werden Durch Drücken der MENÜ Taste erhält man Zugriff auf das Menü Reini gung der Instrumente um die Leitungen der ausgezogenen Instrumente zu spülen Durch Drücken der Multifunktionstaste wird der Desinfektionszyklus wieder an der Stelle aufge...

Page 284: ...andstücke der Absaugkanülen in die entsprechenden Anschlüsse b unter der Sammelleitung einstecken Der in den Venturirohren erzeugte Unterdruck löst den Spülvorgang aus HINWEIS Die Aktivierung des Spülzyklus wird auch am Display Pult angezeigt Betriebsphasen des Spülvorgangs 50 Sekunden lange Leitungswasserversorgung mit aussetzendem Betrieb 2 Sekunden ON 1 Sekunde OFF Unterbrechung des Wasserfluss...

Page 285: ... Zyklus zuzugreifen und dann die Dauer des Zyklus eingeben siehe Abschnitt 5 1 1 3 2 Die zu behandelnden Instrumente in den dafür vorgesehenen Behälter unter der Wassereinheit einführen ACHTUNG Für das Spritzeninstrument muss der dafür vorgesehene Adapter f verwendet werden und das Heizgerät muss ausgeschaltet sein Der Mikromotor muss ohne das Handstück eingeführt werden Die Turbine und der Zahnst...

Page 286: ...itors der Workstation werden dem zahnärztlichen Behandlungskomplex beigefügt 8 3 Luft Wasser Schnellkupplungen 230V Die Schnellanschlüsse für Luft Wasser 230V sind seitlich am Anschlusskasten angebracht ACHTUNG VordemAnschließenoderAblösenderLuft Wasseranschlüssemussdie Einrichtung ausgeschaltet werden Technische Daten Steckerbuchse 230Vac 2A übereinstimmend zur Norm IEC EN 60320 2 2 F Druck Schne...

Page 287: ...rät sich den Einsatz ein Mal pro Monat zu sterilisieren ACHTUNG Die Sterilisierung muss mindestens 15 Minuten lang im Autoklav mit Wasserdampf bei 135 C 2 Bar erfolgen Es darf kein Trockensterilisator verwendet werden Den Einsatz ein Mal pro Jahr oder nach 200 Sterilisationszyklen austau schen Entfernung des Filtereinsatzes Den Patientenstuhl auf Maximalhöhe einstellen DenzahnärztlichenBehandlungs...

Page 288: ... jeder Abänderung zur Aktualisierung an den mit Netzstrom versorgten elektrischen Teilen vorgenommen werden ACHTUNG Die Nichtbeachtung dieser Vorschriften kann zum Verfall der Herstellerhaftung für eventuelle Schäden und Betriebsstörungen der Einrichtungen führen 9 1 Wartung der Instrumente Die Wartungsanleitung der Instrumente wird jedem Instrument beigefügt ACHTUNG Es empfiehlt sich die Wartungs...

Page 289: ...dampf bis zu 135 C 2 Bar sterilisieren Mindestdauer 15 Min Am Ende eines jeden Arbeitstages Mit jeder Kanüle 1 Liter Wasser ansaugen und dabei zwischen Wasser und Luft abwechseln alternativ dazu kann die Kanüle abwechselnd in Wasser eingetaucht uns wieder herausgezogen werden Wenn man den Spülvorgang mit Wasser beendet hat mit jeder der verwen deten Kanülen ca einen halben Liter an Desinfektionslö...

Page 290: ...assen der Praxis für einige Tage Die Saugvorrichtung einschalten und 20 30 Minuten lang laufen lassen ohne Flüssigkeiten abzusaugen damit die Sauggruppe vollständig trock nen kann Auf diese Weise wird das Bilden von Salzen aufgrund von Feuchtigkeit und basischer Substanzen vermieden Besagte Salze können bisweilen zur Festsetzung des Flügelrades und dementsprechend zum Blockieren des Motors führen ...

Page 291: ...r vollen Amalgam Einwegbehälter müssen die örtlichen und nationalen Vorschriften eingehalten werden 9 8 Amalgam Abscheider DÜRR Die Gebrauchs und Wartungsanleitung des Amalgam Abscheiders DÜRR wird dem Gerät das mit diesem Abscheidertyp ausgerüstet ist beigefügt Die Steuervorrichtung des Abscheiders ist innerhalb der Wassereinheit untergebracht siehe Abschnitt 7 4 ACHTUNG Bevor man mit dem Reinige...

Page 292: ...gen für die Einlagerung den Transport und für dasAuspacken werden außen an der Pappverpackung dargestellt Diese Anweisungen müssen strikt eingehalten werden 1 Nur in Pfeilrichtung transportieren und einlagern 2 Stöße vermeiden 3 Vor Feuchtigkeit schützen 4 Keine Haken für den Transport benutzen 5 Schild mit Angaben zu den Raumbedingungen für die Einlagerung a Temperatur von 10 bis 70 C b Relative ...

Page 293: ...uriertes Instrument C Das in dieser Position der Platte befindliche Instrument wurde auto matisch mit den Fabrikdaten konfiguriert R Falls die Fehlermeldung erneut erscheint muss der technische Kun dendienst gerufen werden M Kanülen rückplatzieren C Beim Einschalten des zahnärztlichen Behandlungskomplexes wird festgestellt dass die Saugkanülen ausgezogen sind R Sicherstellen dass die Saufkanülen k...

Page 294: ...blass 10 l Min Neigung der Ablassleitung 10 mm m Sauganschluss ø40 mm Saug Unterdruck Minimum 65 mbar Saugleistung 450 l Min Markenzeichen zur Genehmigung CE 0051 Elektrische Installierung entspricht I E C 60364 7 710 SICHERUNGEN Bezeichnung Wert Schutz Position Behandlungseinheit Sicherung F2 Sicherung F4 Sicherung F5 Sicherung F6 T 8A T 8A T 6 3 A T 6 3 A T 6 3 A 230 V Zuleitung Behandlungseinhe...

Page 295: ...450 530 4 0 A F1 F2 950 98 0 800 610 306 1 6 6 1 6 0 1890 180 170 100 15 0 A F1 F2 1610 2010 2420 210 680 160 500 390 800 1710 2120 410 8 5 7 8 5 1 5 3 5 1910 SKEMA 6 GEBRAUCHSANWEISUNGEN 295 D 12 1 Charakteristische Maße SKEMA 6 RS ...

Page 296: ... 1 6 0 5 0 0 3 9 0 8 0 0 1 7 1 0 2 1 2 0 4 1 0 8 5 7 8 5 1 5 3 5 1910 10 0 8 8 0 800 310 400 170 2450 530 4 0 A F1 F2 9 50 9 8 0 80 0 61 0 306 1 6 6 1 6 0 1890 180 170 100 150 SKEMA 6 GEBRAUCHSANWEISUNGEN 296 D 12 2 Charakteristische Maße SKEMA 6 CP ...

Page 297: ...jeder verwendeten Kanüle ca einen halben Liter der Lösung STER 3 PLUS ansaugen Siehe Abschnitt 9 4 Flexible Schutzvorrichtungen Die kontaminierten flexiblen Schutzvorrichtun gen sterilisieren Einwegschutz Den Einwegschutz austauschen Kontaminierte Oberflächen Die Oberflächen unter Verwendung von STER 1 PLUS säubern Am Ende des Arbeitstages Spray Leitungen Desinfektion der Wasserleitungen der Spray...

Page 298: ...in Anlage an den Abscheider Amalgam Abscheider DÜRR Das Abscheider Gefäß entleeren Siehe Unterlagen in Anlage an den Abscheider Behandlungsleuchte Das vordere Glas und den Reflektorspiegel reinigen Siehe Unterlagen in Anlage an den Abscheider Monitor Workstation mit Lam penständer Die Oberflächen reinigen Siehe Unterlagen in Anlage an den Abscheider Lackierte Oberflächen und Patientenstuhlbezüge M...

Page 299: ......

Reviews: