background image

AFX 

USER GUIDE

INCLUDES MMX GUIDE

User Guide Version 1.1 Rev 3

AFX USER GUIDE

WWW.CDATEK.COM

1

Summary of Contents for AFX

Page 1: ...AFX USER GUIDE INCLUDES MMX GUIDE User Guide Version 1 1 Rev 3 AFX USER GUIDE WWW CDATEK COM 1 ...

Page 2: ... to the AFX s interface port In addition using our optional MMX expander you can also control the zoom and iris functionality of lenses as well the focus by attaching multiple motors Preparing your AFX for first use Your AFX package includes the items shown below 1 AFX unit 2 R1 Controller 3 Motor interface cable 4 Mini ball head mounting adapter 5 USB C power charging adapter for AFX charging tim...

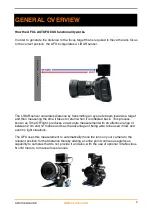
Page 3: ...k This process known as Time Of Flight produces an accurate measurement with an effective range of between 2 cm and 12 metres and has the advantage of being able to be used in low and even no light situations The AFX uses this measurement to automatically move the lens on your camera to the relevant position for that distance thereby adding a centre point continuous autofocus capability to cameras...

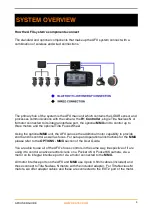
Page 4: ...nal motor capability to provide zoom and iris control as well as focus For setup and operational instructions for the MMX please refer to the OPTIONS MMX section of the User Guide You are able to use all of the AFX s focus controls in the same way irrespective of if are using it to control a native electronic lens on a Pocket 4K or Pocket 6K camera via a motor on its integral interface port or via...

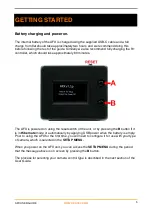
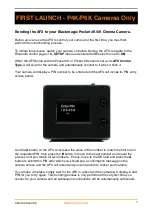
Page 5: ...eset switch of the unit or by pressing the B button if it is in Hibernate mode or automatically by applying USB power when the battery is empty Prior to using the AFX for the first time you will need to configure it for use with your type of camera which is selected in the SETUP MENU When you power on the AFX unit you can access the SETUP MENU during the period that the message above is on screen ...

Page 6: ...ONS section of the MENU REFERENCE GUIDE so you should consult that first to determine the correct one to choose for your particular system before proceeding When you have determined which type to use navigate to the AFX Control Type field using the B button on the AFX unit and then press the A button to step through the available options until the one you require is displayed To save this configur...

Page 7: ...voke its PIN entry screen below Use the A button on the AFX to increase the value of the number to match the first one in the requested PIN then press the B button to move to the next number and repeat the process until you match all six numbers Finally move to the OK field and press the A button to submit the PIN after which you should see a confirmation message on the camera screen and the AFX w...

Page 8: ...ific lens is subsequently used and up to 128 CALIBRATION FILES can be stored on the AFX To aid with the calibration process you can download the focus target chart above from our website at www cdatek com and either print it out or display it as an image on a tablet or monitor screen The accuracy of the AFX s auto focus performance for each lens is directly linked to the accuracy of its initial ca...

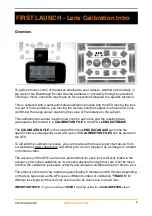
Page 9: ...o for P4K P6K 2 Lens Details Motor Lenses 3 Lens Details P4K P6K Lenses 3 ii Lens Profiling Start P6K Only 3 iii Lens Profiling End P6K Only 4 Set focal Length auto for P4K P6K 5 Increment Calibration Point 6 Store Calibration Point 7 Set Infinity Point 8 Set Infinity Point 9 Write CALIBRATION NOTE Steps 5 6 are repeated for all calibration points AFX USER GUIDE WWW CDATEK COM 9 FIRST LAUNCH Lens ...

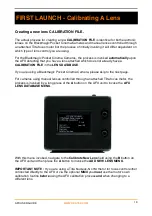
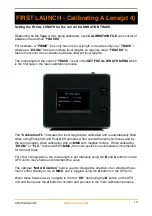
Page 10: ...are using a Blackmagic Pocket Cinema Camera please skip to the next page For cameras using manual lenses controlled through an attached Tilta focus motor the process is invoked by a long press of the A button on the AFX unit to invoke the AFX LENS DATABASE MENU With this menu invoked navigate to the Calibrate New Lens field using the B button on the AFX unit and then press the A button to invoke t...

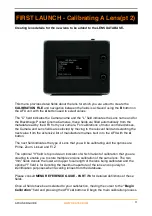
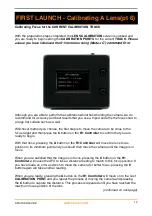
Page 11: ...ilt in to the AFX with the A button The next field indicates the type of Lens that you will be calibrating and the options are Prime Zoom Linked and F I Z The optional V field is to provide an indicator of which Variant of calibration that you are creating to enable you to store multiple versions calibration of the same lens The two mm fields denote the lower and upper focal length of the lens bei...

Page 12: ...then incrementing the focus position in single steps towards the maximum focus position of the lens Although the stepping process is automatic the determination of when the lens has reached its maximum focus position is user controlled so you must observe the image on the camera and press the B button on the AFX unit when it has reached that position Due to variance in the focus control resolution...

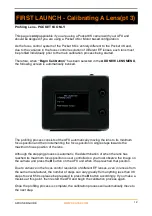
Page 13: ...using Pocket 4K and Pocket 6K cameras when used with electronic lenses and by the zoom position when calibrating with an MMX with multiple motors When calibrating ZOOM or F I Z lenses with the MMX the zoom position is automatically incremented for the next track For other configurations the focal length is set manually using the B and A buttons on the AFX unit to move fields and increment the valu...

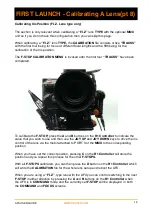
Page 14: ... ready to begin With that done pressing the A button on the R1 Controller will move the lens focus position to its minimum point and you should then move the camera until the image is in focus When you are satisfied that the image is in focus pressing the C button on the R1 Controller will cause the AFX to take a distance reading to match to this focus position If you have made an error and wish t...

Page 15: ...RATION screen The purpose of the INFINITY CALIBRATION screen is to establish the actual infinity focus point as some MFT and EF lenses in particular can be focused beyond that point Whilst having the camera directed to the infinity point that you wish to calibrate you should then press the A and B buttons on the R1 Controller to adjust the focus on the lens until you are satisfied that the infinit...

Page 16: ...nd then use the JOY UP and JOY DOWN keys to drive the iris control of the lens via the motor attached to PORT 3 of the MMX to the corresponding position When you have set the correct position pressing C on the R1 Controller will store the position and you repeat this process for the other F STOPS With all F STOPS calibrated you can then press the D button on the R1 Controller which will write the ...

Page 17: ... motor R1 Controller MMX and Tilta Nucleus Focus Wheel as determined by the options you have chosen in the SETUP menu Please see CONNECTION ORDER to make sure you have these set up correctly Once booted you will be presented with one of the following two screens depending upon which camera you are using The screen on the left is the COMMAND SCREEN and is the one you will be presented with if you a...

Page 18: ...field and press the A button to confirm the selection which will then invoke the CALIBRATION OFFSET screen If you have moved the position of the AFX unit from the position it was in when you calibrated the lens that you are loading then you can set an offset amount for it in this screen The Calibration Offset is set in cm using the B button on the AFX to navigate to the unit and the A button to cy...

Page 19: ...er A or APERTURE DOWN when using F I Z Lens Type Recall FOCUS POINT A Store FOCUS POINT A B Change Assigned Camera Parameter B or APERTURE UP when using F I Z Lens Type Recall FOCUS POINT B Store FOCUS POINT B C Change Assigned Camera Parameter C Recall FOCUS POINT C Store FOCUS POINT C D Change Assigned Camera Parameter D Recall FOCUS POINT D Store FOCUS POINT D JOY L Toggle AF S AF C mode Toggle...

Page 20: ...he FOCUS SCREEN shows the current AF mode and if this is displaying AF C instead of AF S on your AFX then do a short press of the JOY L on the R1 Controller now to change it With AF S mode active aim your camera at a focus target and then press the LOW TRIG on the R1 controller and the lens should now change focus to the target As you are in AF S mode the focus will not automatically change when y...

Page 21: ... focus automatically when you direct the camera to a new focus target and will continue to do so until you press the LOW TRIG again to de activate it After you have spent some time familiarising yourself with the AF S and AF C modes and switching between them and if are not using a Pocket 4K or Pocket 6K system you should now move ahead to the IN USE MORE FOCUS FUNCTIONS section of this User Guide...

Page 22: ...s by pressing the B button on the AFX unit or by a long press of the UP TRIG on the R1 if you are using a Pocket 4K camera Once in COMMAND MODE pressing the A B C D JOY L long press or JOY R long press on the R1 will activate the function on the camera that you currently have assigned to them By default the C and D buttons on the R1 are assigned to the ISO control of the camera so press these now ...

Page 23: ... focus points to be stored and recalled in different ways and we will start by first capturing our four points To do this use whichever method you prefer to select a focus target either one of the AF modes or using MANUAL FOCUS and then when you are happy with it do a long press of the A button on the R1 You will then see a confirmation message on the AFX screen and this point will now be stored i...

Page 24: ...ngly Using this mode when you use MANUAL FOCUS the AFX will automatically stop sending any further focus commands when the currently selected MEMORY target point has been reached In this way you can have the additional control of moving the focus manually with the benefit of being prevented from overshooting the target focus point To resume MANUAL FOCUS control you now either choose another MEMORY...

Page 25: ...focus targets several metres in the background that the AFX picks up when the primary target moves off centre The Out Of Range setting can be set to Hold the current focus position move to the Maximum Calibrated position or move to the Infinity position set in the CALIBRATION FILE and is useful for controlling focus behaviour when the AFX sensor cannot register a distance such as nothing being in ...

Page 26: ...n flash a sequence of BLUE flashes to indicate which CLIENT ID it is currently set to The CLIENT ID should be set to match the SERVER ID of the AFX that you want to attach the MMX to and you should refer to AFX PREFERENCES MENU in MENU REFERENCE GUIDE PART 2 for information about how to set this on the AFX To change the CLIENT ID of the AFX press the BUTTON to advance to the next setting and the I...

Page 27: ...you can either cycle power by removing and replacing the cable in Port 1 or hold down the BUTTON for several seconds until you see the INDICATOR LED begin a RED flashing sequence after which it will reboot and begin the startup sequence again To ensure the continuity of the CLIENT SERVER connection between the MMX and AFX powering off the MMX will instigate a reboot of the AFX As with the AFX the ...

Page 28: ...ll also be updated automatically by the AFX should you put the camera into or out of record directly on the camera or from the AFX itself An additional option that is available is to use the REC button of the Focus Wheel to toggle AF C mode between ON and OFF and this option is selected in the main SETUP MENU As the Focus Wheel works in absolute mode the AFX features a special update mode to conso...

Page 29: ...nd finally the MMX Irrespective of the configuration that you are using it is also important to ensure that once the AFX is booted that you complete the operational link to it from the R1 Controller When you switch the R1 Controller on its LED will begin flashing BLUE to indicate that it is awaiting a Bluetooth connection When the AFX boots this LED will go out to indicate that it is successfully ...

Page 30: ...he AFX cannot find an available camera to connect to it will switch to Hibernate mode When the AFX is connected to a Pocket 4K or Pocket 6K the second automatic method is invoked if the camera breaks communication for a period of 20 seconds This second method provides a very convenient way to put the AFX into Hibernate mode as you simply switch off your camera and the AFX will automatically enter ...

Page 31: ... not necessary to mount it on the focal plane of the camera as it is the relationship between the AFX s position when being calibrated that defines the relationship to the focus position of the lens For this reason you are able to mount the AFX anywhere that you choose as long as you then use the same position or use the OFFSET function when you use the lens 4 If you find when using longer focal l...

Page 32: ...tenance These different configuration menus are necessary to deal with the flexibility of control options that the AFX offers but for many users they only require occasional if any access if they do not need any of this extended functionality For those occasions when changes are required or just for familiarity purposes the final section of this User Guide provides a comprehensive reference guide ...

Page 33: ...CRIPTION NOTES P4K Blackmagic Pocket 4K Cinema Camera Electronic lenses only P4K TILTA Blackmagic Pocket 4K Cinema Camera and Tilta Nucleus control wheel Electronic lenses only HYBRID Blackmagic Pocket 4K 6K Cinema Camera using Tilta motor to control focus Uses AFX interface port P6K Blackmagic Pocket 6K Cinema Camera Electronic lenses only P6K TILTA Blackmagic Pocket 6K Cinema Camera with Tilta N...

Page 34: ...ast Lens Switch between automatic loading calibration data of last lens used in HYBRID F I Z MOTOR ONLY modes YES NO Sensitivity Selects minimum distance of change in CM between LIDAR range data to trigger re focus 1 5 Save Saves AFX preferences to NVRAM and re boots AFX O FUNCTION DESCRIPTION SETTINGS Next Lens Displays Camera Name Lens Name Lens Details and Lens Number of next Lens in the Databa...

Page 35: ...ton Assigns function to single press of the A button on R1 controller when AFX is in CONTROL mode See FUNCTION LIST B Button Assigns function to single press of the B button on R1 controller when AFX is in CONTROL mode See FUNCTION LIST C Button Assigns function to single press of the C button on R1 controller when AFX is in CONTROL mode See FUNCTION LIST D Button Assigns function to single press ...

Page 36: ... Temperature value O TNT Increases white balance Tint value O TNT Decreases white balance Tint value O WB Switches to next White Balance preset O WB Switches to previous White Balance preset O HFR Toggles HFR function O AWB Activates Auto White Balance function O AEX Activates Auto Exposure function O AF Activates the native Auto Focus function of the camera with an attached electronic lens O REC ...

Page 37: ...ttached to zoom port Port 2 of an optional MMX Slow Medium Fast Focus MTR Dir Switches direction of focus motor either to AFX Interface Port or Port 1 of an MMX between Clockwise and Counter Clockwise CW CCW Exit Exits without saving AFX Adjustment preferences to NVRAM O Exit and Overwrite Exits and saves AFX Adjustment preferences to NVRAM O Function Description Settings Max Cal Focus will move t...

Page 38: ...y selected Lens calibration and accesses the CALIBRATION OFFSET MENU See CALIBRATION OFFSET MENU Calibrate New Lens Accesses the ADD NEW LENS MENU O Function Description Settings Calibration Offset Selects offset distance in cm between current AFX position and its position when the currently loaded Lens was Calibrated 0 999 Offset Direction Selects whether offset direction of the offset is negativ...

Page 39: ...m 000 mm Set upper value of the focal length of a zoom Lens being added to the Database Automatically generated for P4K P6K Modes 0 999 mm f Set f stop of the Lens being added to the Database Automatically generated for P4K P6K Modes 0 0 9 9 Begin Calibration Accesses the SET FOCAL LENGTH MENU to begin the Calibration process for the new Lens being added to the Database O Function Description Sett...

Page 40: ...cus at user defined focal lengths 1 for Iris Requires MMX Function Description Notes Calibration FL Non editable automated indicator of current focal length being calibrated for the Lens that is being added to the Database O Calibration Track Non editable automated indicator of current Track being calibrated for the Lens that is being added to the Database O Calibration Point Non editable automate...

Page 41: ...MX must be connected by the wired interface port in that instance Function Pocket 4K Pocket 6K Other Connects to camera over Bluetooth Low Energy X Camera settings control X Native electronic lens focus control X Native electronic aperture control X Focus control by motor Zoom control by Motor with MMX with MMX with MMX Iris control by motor with MMX with MMX with MMX Focus control by Tilta Nucleu...

Reviews: