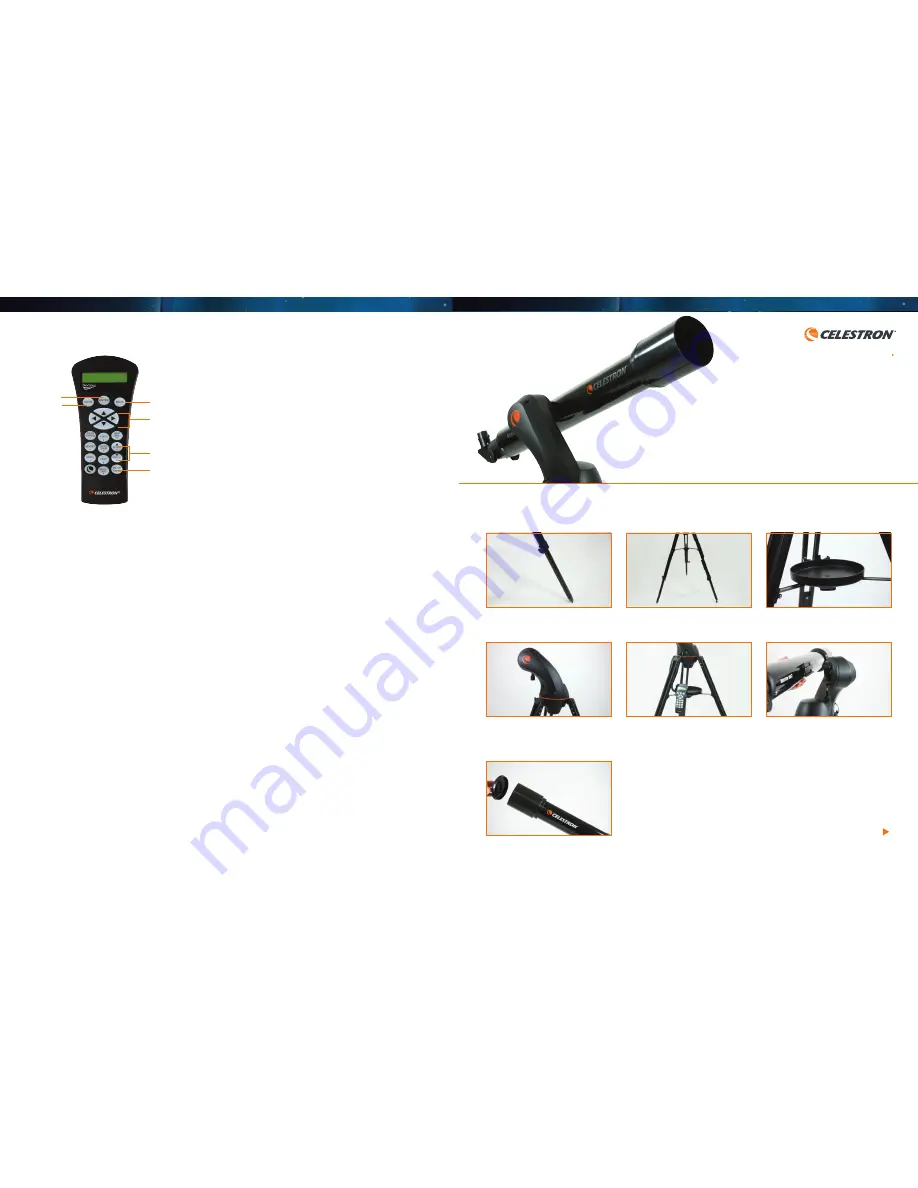
GETTING TO KNOW YOUR HAND CONTROL
These are the buttons on the hand control that you will be using to align your
computerized mount:
a.
BACK:
If you make a mistake when entering data, the BACK button will take you to the
last menu.
b.
DIRECTIONAL ARROW BUTTONS:
These four buttons move the telescope up, down,
left and right.
c.
SCROLL BUTTONS:
These two buttons help you navigate the hand control menus. Use
them to scroll through the choices whenever you see an up or down caret on the right
side of the display.
d.
MOTOR SPEED:
This button changes the speed of the motors when the directional
arrow buttons are pressed. Press the MOTOR SPEED button followed by a number, 1
through 9. Speed 9 is the fastest speed and works well for moving long distances.
Speed 1 is the slowest, so slow that you need to be looking through the 4mm eyepiece
to see a star move. For alignment purposes, we recommend using speeds 5-9.
e. E
NTER:
This button confirms data choices throughout the alignment process.
f.
ALIGN:
Press this button to confirm that the selected objects are centered in
the eyepiece.
ALIGNING THE COMPUTERIZED MOUN
T
1. Set up the telescope and make sure your Red Dot Finder has been properly aligned.
Turn on the Red Dot Finder.
2. When you first plug in the telescope, the display will read “Verifying Packages – Please
Wait.” After a few seconds, it will display “NexStar Ready.” Press the ENTER button to
begin the alignment process.
3. A menu will appear showing the many different methods of alignment. We’re selecting
SkyAlign, the easiest one. Press ENTER to continue.
4. The Location menu appears. Use the scroll buttons to display “City Database” and press
ENTER. You will then be asked to select your country, state and closest city from the lists.
Press ENTER after each selection.
5. The Time menu appears. Using the number buttons, enter the current time in hours,
minutes and seconds and press ENTER. You will be asked to select AM or PM and press
ENTER. Then use the scroll buttons to choose between standard time and daylight
saving time.
6. Use the scroll buttons to select your time zone and press ENTER.
7. The Date menu appears. Use the number buttons to enter the month, day and year. Then,
press ENTER.
8. The hand control has now saved your settings. The next time you set up the telescope, your
settings will be saved, making it much easier and quicker to align. You will only have to
update the date and time.
9. Now look up in the sky with the naked eye and find three bright celestial objects. (Any
bright star in the sky will work.) For the most accurate results, the objects you align to
should be in three different parts of the sky.
10. Use the hand control directional buttons to move the telescope toward the first bright
object. When you get close to your object, look through the Red Dot Finder and move the
telescope to center the red dot in your finderscope directly on top of the object.
Press ENTER.
11. If your Red Dot Finder was properly aligned, you should see the bright object in your 20mm
eyepiece. Use the directional buttons to center the bright object in the eyepiece. The
motors will automatically slow down to help you center your object. (Note: Always center
the star in the eyepiece using the UP and RIGHT directional buttons last. If you have gone
too far in one of these directions, use the DOWN or LEFT buttons to pass center and then
re-approach using UP and RIGHT.) When your object is centered, press ALIGN.
12. You are now ready to move the telescope to the second object. Use the same procedure as
you did for the first object: center it in the Red Dot Finder and press ENTER, then center in
the eyepiece and press ALIGN.
13. Repeat this same procedure for the third object. This time, when you press ALIGN, the
hand control will display “Please Wait” while it calculates the alignment. After a few
seconds, the hand control will display “Match Confirmed.”
You are now ready to explore the cosmos! Press ENTER to continue. If you want to know the
names of the objects you just aligned on, press the BACK button and scroll through the list.
Don’t forget to turn your Red Dot Finder off to conserve the battery.
FINDING OBJECTS
Now that your mount is properly aligned, you can access any of the objects in the computerized
mount’s database. To have the computer find a planet, simply press the SOLAR SYSTEM button
and use the scroll buttons to look through the list of planets that are currently above your
horizon. Press ENTER and the scope will automatically rotate and center the planet in the
view of your 20mm eyepiece and will track the planet as it moves across the night sky.
WHAT’S IN THE BOX:
Telescope tube, computerized mount, tripod, accessory tray with hand control holder, hand control, battery pack with pouch, red dot finder, mirror
diagonal, 4mm eyepiece, 20mm eyepiece, TheSkyX – First Light Edition Astronomy Software
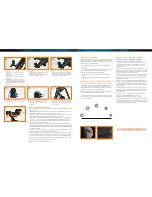
SETTING UP THE TELESCOPE
1. Loosen the bolts at the bottom of each tripod leg and extend the
legs fully. Retighten bolts to secure the legs in place.
(
Note:
Do not overtighten.)
4. Take the computerized mount and place the bottom end into the
cup at the top of the tripod, securing with the large hand knob
on the tripod.
7. Remove the lens caps from both ends of the telescope.
2. Gently separate the tripod legs. The Y-shaped brace in the
middle of the tripod will move upward and snap into place.
5. Plug the hand control into the port on the side of the computer-
ized mount. Place the hand control into the hand control holder
on the accessory tray.
8. NOW YOU’RE READY TO ATTACH ACCESSORIES TO THE TELESCOPE TUBE
3. Place the accessory tray on top of the Y-shaped brace. Secure
the tray using the hand knob on the bottom of the brace.
6. Next, attach telescope tube to the computerized mount. Start by
loosening the large black bolt near the top of the computerized
mount. Then, slide the dovetail bar on the side of the telescope
tube into the clamp at the top of the computerized mount. Tighten
the large black bolt to secure the tube in place.
1
4
7
2
5
3
6
ITEM #778984/22095
Q U I C K S E T - U P G U I D E
9 0 G T
R E F R A C T O R
C O M P U T E R I Z E D
T E L E S C O P E
N E X S T A R
QUESTIONS OR PROBLEMS WITH SET-UP?
CONTACT:CELESTRON TECHNICAL SUPPORT: 310.803.5955
INCLUDES PRE-ASSEMBLED ALUMINUM TRIPOD WITH ACCESSORY TRAY
SOLAR WARNING:
Never attempt to view the sun through any telescope without proper filtering!
FO R D ETAI LED USAG E I N FO RMATI O N PLEASE CO NSU LT YO U R OWN ER’S MAN UAL.
C. SCROLL BUTTONS
b. DIRECTIONAL ARROW BUTTONS
d. MOTOR SPEED
a. BACK
e. ENTER
f. ALIGN


