background image

Assembly instructions © 2010
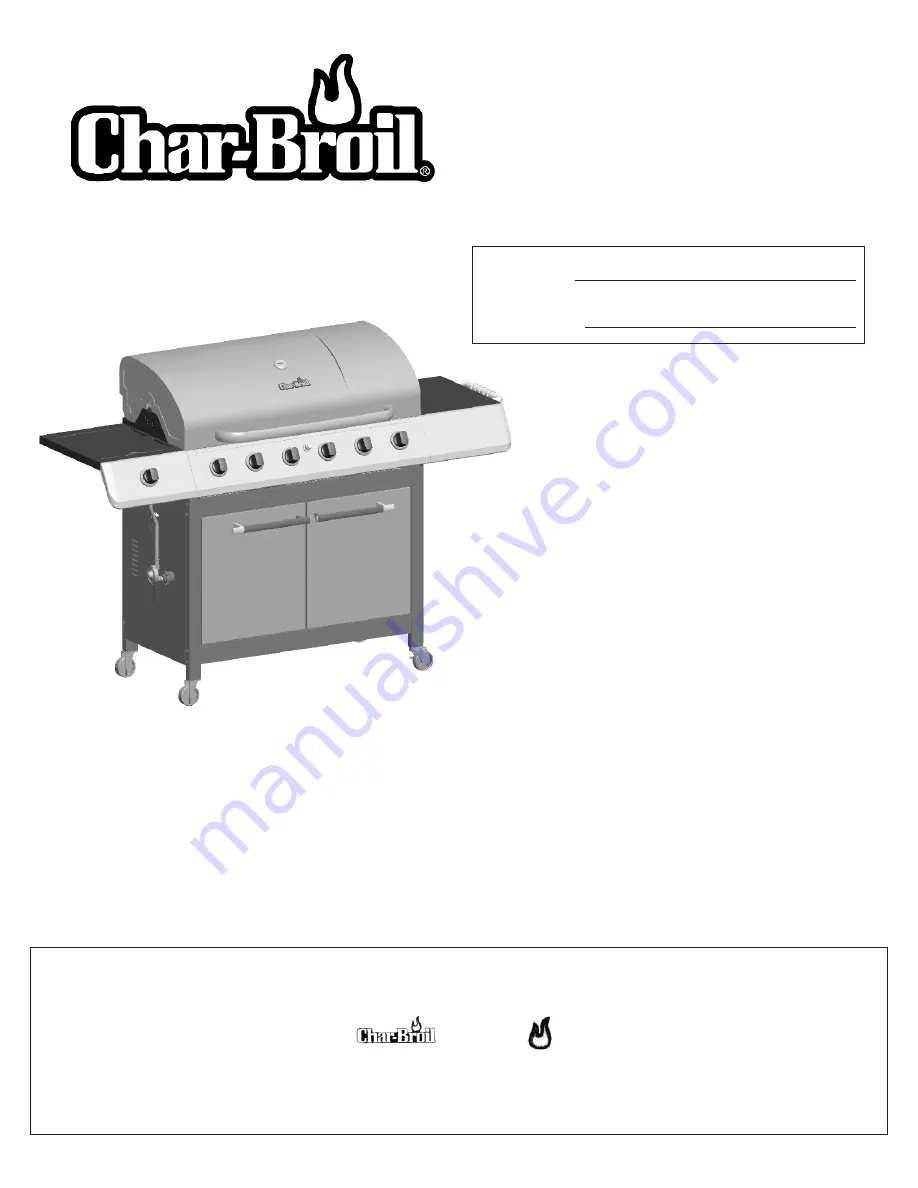
PRODUCT GUIDE
MODEL  463234511

© 2010 Char-Broil, LLC    Columbus, GA  31902

Printed in China 

Serial Number

Date Purchased

IMPORTANT: Fill out the product record information below.

See rating label on grill for serial number.

For support and to register your 
grill, please visit us at 

www.charbroil.com

Estimated assembly time:


 35-40


minutes

If you have questions or need 
assistance during assembly, 
please call 

1-800-241-7548

.

12/16/10 

 G651-001-070801

The following are trademarks registered by W.C. Bradley Co. in the U.S. Patent and Trademark Office: Caldera®; Charcoal2Go®; Char-Broil®; American Gourmet®; 
Bandera®; Brush Hawg®; CB 940®; Char-Diamonds®; Char-Broil Charcoal/Gas®; Everybody Grills®; Grill 2 Go®; Grill 2 Go® Express®; Grill Lovers®; Infrared 
Grilling That’s All About U®; Keepers of the Flame®;   Magneto®; New Braunfels Smoker Company®; Patio Bistro®; Patio Caddie®; Patio Kitchen®; Pro-Sear®; 
RED®; Quantum®; Santa Fe®; Sear and Grill®; Sierra®; Signature Series®; Sure2Burn®; The Big Easy®; U®;  Wild West Tradition®; and the following marks:

®

®

The following are trademarks of W.C. Bradley Co.:America's Legendary Barbeque Company™;   Advantage Series™; Auto-Clean™;Chef Tested™; Commercial 
Series™; Designer Series™;; Diamond Flame™; Double Chef™; Everybody Outside™; FastStart™;  FlavorMaster™; Front Avenue™; Grill 2 Go® Advantage™; 
Grill 2 Go® Ice™;   Hog and Yard Bird™; H20 Smoker™; Infrared. Grilling’s Juicy Little Secret™; Incredible Taste. Infallible Results™; Infrared Inside™; Let’s Grill 
Something Together™; Longhorn™;; Precision Flame™; Quick2Burn™; QuickSet™; Ready When You Are™; Season, Set, And Savor™; Sizzle On The Grill™; 
SureFire™; Torchfork™; Trentino™; Universal Grill Parts™; You Bring the Party™      TEC™ is a trademark of Tec Infrared Grills.

Summary of Contents for 463234511

Page 1: ...ill Lovers Infrared Grilling That s All About U Keepers of the Flame Magneto New Braunfels Smoker Company Patio Bistro Patio Caddie Patio Kitchen Pro Sear RED Quantum Santa Fe Sear and Grill Sierra Signature Series Sure2Burn The Big Easy U Wild WestTradition and the following marks The following are trademarks of W C Bradley Co America s Legendary Barbeque Company Advantage Series Auto Clean Chef ...

Page 2: ...ch heading means Read and follow all of the messages found throughout the manual DANGER If you smell gas 1 Shut off gas to the appliance 2 Extinguish any open flame 3 Open lid 4 If odor continues keep away from the appliance and immediately call your gas supplier or your fire department THIS GRILL IS FOR OUTDOOR USE ONLY CAUTION Read and follow all safety statements assembly instructions and use a...

Page 3: ...Propane Storage and Handling Code B149 2 or the Standard for Recreational Vehicles ANSI A 119 2 NFPA 1192 and CSA Z240 RV Series Recreational Vehicle Code as applicable All electrical accessories such as rotisserie must be electrically grounded in accordance with local codes or National Electrical Code ANSI NFPA 70 or Canadian Electrical Code CSA C22 1 Keep any electrical cords and or fuel supply ...

Page 4: ...vertently activate this safety feature without having a gas leak This typically occurs when you turn on the gas using the grill control knob before you turn on the LP tank valve If the gas regulator safety feature activates the grill will only reach temperatures between 250 F and 300 F even with all burners on the high setting If your grill is not getting hotter than 250 F to 300 F these steps sho...

Page 5: ...eath the meat to catch grease and food drippings and helps minimize clean up Rotisserie Cooking Rotisserie cooking is best for round meat such as large roasts whole poultry and pork It generally requires an accessory motor and spit rod that allows the meat to be turned at a constant speed Rotisserie cooking is best done in front of a special rotisserie burner or utilizing an indirect cooking burne...

Page 6: ...nades and Rubs To enhance the flavor of grilled foods a liquid marinade or dry rub can be used prior to cooking Meat can be either soaked or injected with liquid marinade up to 24 hours prior to grilling Dry rubs can be applied directly to the meat immediately before grilling www isitdoneyet gov GRILLING GUIDE Tips Tricks Wood Chips For extra smoke flavor when grilling try adding wood chips Soak t...

Page 7: ...ainless steel can rust under certain conditions This can be caused by environmental conditions such as chlorine or salt water or improper cleaning tools such as wire or steel wool It can also discolor due to heat chemicals or grease build up To maintain your grill s high quality appearance wash with mild detergent and warm water or use a stainless steel grill cleaner Baked on grease deposits may r...

Page 8: ...nexpectedly when mixed with air LP Cylinder Filling Use only licensed and experienced dealers LP dealer must purge new cylinder before filling Dealer should NEVER fill LP cylinder more than 80 of LP cylinder volume Volume of propane in cylinder will vary by temperature A frosty regulator indicates gas overfill Immediately close LP cylinder valve and call local LP gas dealer for assistance Do not r...

Page 9: ... described in the LP Cylinder section of this manual Always keep new and exchanged LP cylinders in upright position during use transit or storage Leak test new and exchanged LP cylinders BEFORE connecting to grill LP Cylinder Leak Test For your safety Leak test must be repeated each time LP cylinder is exchanged or refilled Do not smoke during leak test Do not use an open flame to check for gas le...

Page 10: ...P cylinder valve by turning hand wheel counterclockwise If you hear a rushing sound turn gas off immediately There is a major leak at the connection Correct before proceeding 4 Brush soapy solution onto areas circled below or other similar 5 If growing bubbles appear there is a leak Close LP cylinder valve immediately and retighten connections If leaks cannot be stopped do not try to repair Call f...

Page 11: ...e grill cooking surfaces ensure no loose bristles remain on cooking surfaces prior to grilling It is not recommended to clean cooking surfaces while grill is hot s If you notice grease or other hot material dripping from grill onto valve hose or regulator turn off gas supply at once Determine the cause correct it then clean and inspect valve hose and regulator before continuing Perform a leak test...

Page 12: ...s Damage to and failure of parts can result Porcelain surfaces Because of glass like composition most residue can be wiped away with baking soda water solution or specially formulated cleaner Use nonabrasive scouring powder for stubborn stains Painted surfaces Wash with mild detergent or nonabrasive cleaner and warm soapy water Wipe dry with a soft nonabrasive cloth Stainless steel surfaces To mai...

Page 13: ... grates Store in dry location When LP cylinder is connected to grill store outdoors in a well ventilated space and out of reach of children Cover grill if stored outdoors Choose from a variety of grill covers offered by manufacturers Store grill indoors ONLY if LP cylinder is turned off and disconnected removed from grill and stored outdoors When removing grill from storage follow Cleaning the Bur...

Page 14: ...or for failure or damage resulting from acts of God improper care and maintenance grease fire accident alteration replacement of parts by anyone other than Manufacturer misuse transportation commercial use abuse hostile environments inclement weather acts of nature animal tampering improper installation or installation not in accordance with local codes or printed manufacturer instructions THIS LI...

Page 15: ...RDWARE U 1 HANDLE F LID V 5 HEAT TENT W 4 COOKING GRATE X 1 WARMING RACK Y 1 LEFT SIDE SHELF F SB Z 1 DRIP PAN F SB AA 1 SIDEBURNER GRATE BB 1 ELECTRODE F SB CC 1 ELECTRODE WIRE F SIDEBURNER DD 1 SIDEBURNER LID EE 1 SIDEBURNER FF 1 SIDEBURNER VALVE CLIP GG 1 CONTROL PANEL F SB HH 1 RIGHT SIDE SHELF II 1 FASCIA F RIGHT SHELF JJ 1 TOWEL BAR KK 5 TOOL HOOK LL 1 RIGHT SIDE CART PANEL Key Qty Descripti...

Page 16: ... E B B B B P O T S Q R I H II JJ A G GG HH M TT NN K BB EE AA Z Y X FF U F F F F DD L L L L L L M M M M M RR KK YY PP VV WW MM XX ZZ LL L M QQ OO AAA SS J BBB BBB ZZ WW TT RR KK KK KK KK W W W V V V V UU CCC 16 DDD DDD FFF FFF EEE ...

Page 17: ...h cut out hole for LP cylinder on left 1 2 1 4 20 Flange Nut Qty 6 Place lower back panel between side panels as shown Attach to left and right side panels with 4 8 32x3 8 sheet metal screws Then attach to bottom shelf with 2 8 32x3 8 sheet metal screws Sheet Metal Screws Qty 6 8 32x3 8 Left Side Panel Right Side Panel Right Side Panel Left Side Panel Magnet Assembly Lower Back Panel For Front Doo...

Page 18: ...lf with 8 32x3 8 sheet metal screws 4 Attach to left and right side panels with flange nuts Place front door brace as shown 1 4 20x2 3 8 machine screws and 1 4 20 Sheet Metal Screws Qty 2 8 32x3 8 Front Door Brace 1 4 20 Flange Nut Qty 4 1 4 20x2 3 8 Machine Screw Qty 4 Metal Tap Lower Back Panel 18 ...

Page 19: ...he two locking casters are secured to the right legs and the non locking casters are secured to the left legs After all 4 casters are secure remove the Caster Pin and save for future maintenance B Stand cart upright Turn assembly upside down Attach weight block to bottom shelf with 2 1 4 20x2 machine screws and 1 4 20 flange nuts C Caster Pin A Caster Pin 1 4 20x2 Machine Screw Qty 2 1 4 20 Flange...

Page 20: ...he cart Make sure the regulator hose is hanging outside the cart Attach with 1 4 20x1 2 screws This step requires two people to lift and position grill head onto cart 1 4 20x1 2 Screw Qty 4 Grill Head Right side panel removed for clarity 20 ...

Page 21: ...the right side shelf with 1 7mm fire washer and 1 4 20x1 2 screw as shown B Attach right side shelf with 1 4 20 flange nuts as shown D 8 1 4 20x1 2 Screw Qty 6 7mm Lock Washer Qty 2 Sheet Metal Screws Qty 3 8 32x3 8 7mm Fiber Washer Qty 4 Attach fascia to firebox with 8 32x3 8 sheet metal screws 1 4 20 Flange Nut Qty 4 A B C D Support Bracket Back of Firebox 1 4 20x1 2 Screw 7mm Lock Washer 7mm Fl...

Page 22: ...m fire washers and 1 4 20x1 2 screws as shown B At back of firebox attach the sideburner shelf with 1 7mm fire washer and 1 4 20x1 2 screw as shown A Attach sideburner shelf with 1 4 20 flange nuts as shown C Attach fascia to firebox with 8 32x3 8 sheet metal screws 7mm Fiber Washer Qty 4 A B C Sideburner Shelf Support Bracket 1 4 20x1 2 Screw Back of Firebox 1 4 20x1 2 Screw 7mm Fiber Washer Fasc...

Page 23: ...deburner with 8 32 wing nut B Hook venturi clip to sideburner tube and around manifold Attach sideburner ignitor wire C Press sideburner control knob onto valve stem D Place grate onto sideburner shelf E Venturi Clip Sideburner Ignitor Wire Sideburner Valve Sideburner Bezel E Sideburner Sideburner Control Knob Sideburner Grate A B C D 8 32 wing nut Sideburner Tube Sideburner Valve 23 ...

Page 24: ...5mm flat washers and 5mm lock washers A Insert hinge pin on bottom shelf into hole in door Press upper hinge pin in front door brace align hinge hole on top of door and release hinge pin into door Left Handle Left Door Right Handle Right Door Hinge Pin hole Hinge Pin hole 5mm Flat Washer 5mm Lock Washer 10 24x1 2 Machine Screw 24 ...

Page 25: ...sert ends of Warming Rack pivot wire into holes in sides of gril lid Insert ends of Warming Rack leg wire into holes in sides of firebox NOTE Pivot and leg wires running side to side should be under wires running front to back If pivot and leg wires are on top Warming Rack is installed upside down Unscrew ignitor cap and place AA battery into ignitor slot with positive end facing outward Screw ign...

Page 26: ...Check Insert regulator through the large hole on left side panel CAUTION Failure to install tank correctly may allow gas hose to be damaged in operation resulting in the risk of fire Always keep LP cylinders in upright position during use transport and storage Cylinder screw at rear of cart Tank Retainer Screw Attach the heat shield to grease tray with 8 32x3 8 sheet metal screws A Place grease pa...

Page 27: ...alve Return LP cylinder to gas supplier Turn off LP cylinder valve Remove regulator from cylinder and visually inspect rubber seal for damage See LP Cylinder Leak Test and Connecting Regulator to the LP Cylinder Turn off control knobs and LP cylinder valve Leave lid open to allow flames to die down After fire is out and grill is cold remove burner and inspect for spider nests or rust See Natural H...

Page 28: ... gas in LP cylinder Turn off knobs wait 30 seconds and light grill If flames are still low turn off knobs and LP cylinder valve Disconnect regulator Reconnect regulator and leak test Turn on LP cylinder valve wait 30 seconds and then light grill Turn off knobs and LP cylinder valve Disconnect coupling nut from cylinder Reconnect and retry Turn front of grill to face wind or increase flame height R...

Page 29: ...nnections on and tight Are output connections on and tight If possible observe grill in dark location Operate ignition system and look for arcing between output wires and grill frame All sparks present but weak or at slow rate Has moisture accumulated on electrode and or in burner ports Inspect electrodes for cracks Prevention Solution Install battery make sure that and connectors are oriented cor...

Page 30: ...NOTES 30 ...

Page 31: ...31 Warranty Registration Department P O Box 1240 Columbus GA 31902 1240 ...

Page 32: ......

Reviews: