background image


User Manual 

Wood insert F70L 


Summary of Contents for F70L

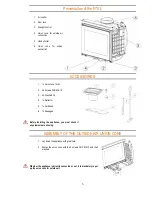
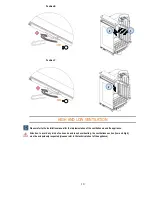
Page 1: ...0 User Manual Wood insert F70L ...

Page 2: ...PERATION 9 HIGH AND LOW VENTILATION 10 ASSEMBLE OF THE FRAME IN OPTION 11 ASSEMBLY OF THE CONVECTION MANTLE IN OPTION 12 INSTRUCTIONS FOR USER 12 General points 12 Recommended fuels 12 Forbidden fuels 12 Wood load 12 INSTRUCTION FOR USE 13 First lightings 13 Lightning 13 Maximum power operation 14 Nominal power operation 14 Operation at a low speed 14 Restarting of the combustion 14 MAINTENANCE 15...

Page 3: ...2 AFTER SALES SERVICE 17 CONTRACTUAL WARRANTY 17 GENERAL POINTS 17 Duration 17 Legal warranty 17 Validity 17 EXCLUSION 18 Wear parts 18 WARRANTY CERTIFICATE 19 ...

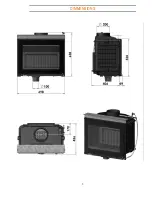
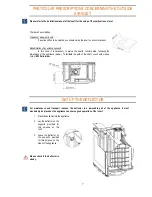
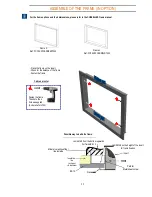
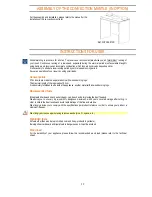
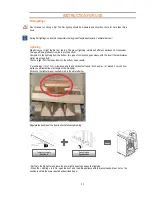
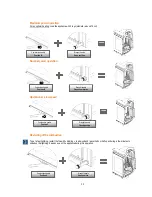
Page 4: ...3 DIMMENSIONS ...
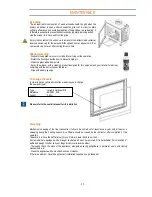
Page 5: ...ie sous la seule responsabilité du fabricant identifié au point 4 Signé pour le fabricant et en son nom par M Thierry MALLEREAU Directeur Recherches et Développement Responsable formation technique et Normalisation Chazelles le 29 juillet 2014 Caractéristiques essentielles Performances Spécifications techniques harmonisées SECURITE AU FEU Réaction au feu A1 SE EN 13229 2001 A2 2004 AC 2007 Distanc...

Page 6: ...the mechanical resistance of the floor is sufficient according to the weight of the fireplace and the insert SECURITY Read carefully the manual delivered with the appliance before using your insert for the first time In case of doubt please refer systematically to the manual An insert is a heating appliance All the parts are very hot 100 C The handling of the different parts of the inserts must be...

Page 7: ...ews CHC M5 12 3 4x Washers L5 4 1x Deflector 5 1x Cold hand 6 1x Squeegee Before installing the appliance you must check if any elements are missing ASSEMBLY OF THE OUTSIDE AIR UNION CONE 1 Lay down the appliance with great care 2 Fasten the union cone with the 4 screws CHC M5 12 and their washers Whether the appliance is directly connected or not it is mandatory to put up the union cone for outsi...

Page 8: ...oncrete slab following the dimensions of the appliance below To facilitate the path of the shaft you should make a hole of Ø120 minimum SET UP THE DEFLECTOR For maintenance and transport reasons the deflector is a removable part of the appliance It must mandatorily be placed on the appliance to ensure a good operation of the insert 1 Place the deflector into the appliance 2 Lay the deflector on th...

Page 9: ...st the draught It allows according to the different phases to act on the smoke flow Then it allows choosing the fire intensity and the power level desired Thus it is important to check its good working order before installing the insert Opening of the draught control Closing of the draught control ...

Page 10: ...ion control is to adjust the combustion It allows according to its various positions to act on the primary and secondary air flow It allows then to choose the fire intensity and the power desired For the firing please refer to the paragraph Use Instructions Attention combustion regulation must always be done with to the cold hand Adjustments Position A 3 1 2 1 2 ...

Page 11: ...stallation manual for the implementation of the ventilation around the appliance Attention to avoid any kind of surrounds and insert overheating the ventilations section low and high must be scrupulously respected pleases refer to the technical sheet of the appliance 2 3 2 ...

Page 12: ...e Cadre à monter Fasten the frame Thanks to the 4 Screws supplied End pieceTorx T20 Possible way to build the frame Mineral ceramique fiber like Isolaine Insulation like rockwool Aluminium BA 13 Jamb M48 from the bottom upwardst For fixing BA 13 Insert Path for Metal sheet screw Frame Jamb M48 on the height of the insert for frame fixation Frame L Ref FOYACFFCADRELD7000 Frame S Ref FOYACFFCADRESD7...

Page 13: ...th of the logs is about 50 cm It is absolutely forbidden to use inside the appliance another material than wood burning logs Recommended fuels Broad leafed hardwoods such as hornbeam oak beech and elm provide the best firewood We advise you to use very dry wood 20 dampness maximum with 2 years covered storage after cutting in order to obtain the best results and avoid rapid bistrage of the flue an...

Page 14: ...result that particulates matter are entirely burnt The fire is light from the top and burn to the bottom like a candle Put some logs 10 to 12 cm criss cross and then 4 sticks of soft wood birch poplar of around 3 cm on 20 cm which you will install like a rectangle on the fire lighter Sticks and fire lighter are surrounded in red in the picture below Regulate the handles of the inserts like the fol...

Page 15: ... restart the fire with kindling load wood and leave the door half open during a few minutes to speed up the lightning Keep an eye on the appliance during this operation Draught handle Open position Combustion handle Position B Draught handle Closed combustion Combustion handle Position B Combustion handle Position C Draught handle Open position Combustion handle Position A Draught handle Closed po...

Page 16: ...vise complying with the instructions on the label Wipe with a damp sponge To change the seals In order to get an optimal combustion we advise you to change the seal every year Type ceramic braid seal Ø9 Reference 5AIT650_009 Lenght 2 50m Please refer to the seal kit manual for its installation Sweeping Mechanical sweeping of the flue is essential It should be carried out at least twice a year with...

Page 17: ...on events outside sparks from the chimneystack for example How to avoid chimney fires Chimney fires can very often be avoided simply by using dry wood Damp wood does not only diminish calorific power it burns poorly bistrage of the window and generates creosotes tarring of the flue which are highly inflammable Never reuse the appliance after a chimney fire without assessment by a qualified profess...

Page 18: ...legal and regulatory provisions In the same way Chazelles should in no way be held responsible for a normal wear and tear of the equipment or its abnormal use in particular in cases of use of the equipment in conditions different from those for which it was dedicated to It is formally prohibited to modify or transform the appliance Duration The warranty period is 10 years for all parts manufacture...

Page 19: ...nty B Air guide 1AT60605775 1 year C Tresse Eversil 9 noir 5AIT650_009 1 year D Deflector F70 1AT60605773 1 year E Damper 0FB605723 1 year F Interior sheet F70 0FB605728 1 year G SOLO stainless steel cable C2999 84 1 year H Drawer F70 1AT60605782 1 year I Top sheet for air box Secondary air box 1AT60605777 1AT60605770 1 year J Cast iron hearth grid 0FB605708 1 year Out of warranty Wear parts ...

Page 20: ...maintenance to ensure proper operation of the appliance PUSCHASER Date Last name First name Address City Country Firm VENDOR document to be returned within the month following purchase at the sales outlet for the appliance Reference Designation of the appliance Last name First name Address Email address Town Country Firm and retailer stamp ...

Page 21: ...hout prior written permission from Chazelles company Chazelles does not warranty that this document is error free and reserves the right to update correct or modify it at any time without notice in the interests of the customers Technical drawings even made with care can t be the reflection of reality EDITION JULY 2014 ...

Reviews: