background image

English

GREAT BRITAIN
customer service


tel:

 08545 300 9799 

e-mail:

 customerservice@clasohlson.co.uk 

internet:

 www.clasohlson.com/uk

V

er

. 20
13071

9

Shower Set

Art.no  40-7348 

Model  ST-RS06021-GAP10

Please read the entire instruction manual before using the product and save it for future reference.
We reserve the right for any errors in text or images and any necessary changes made to technical data.
If you have any questions regarding technical problems please contact our Customer Services.

Assembly 

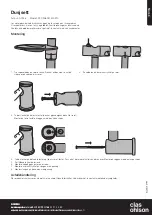
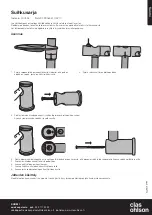
1.  Slide the soap dish onto the tube from the top. Make sure that the end 

with the two holes in the sides is at the bottom end of the tube.

2.  Thread the shower head bracket onto the tube.

3.  Remove the cover on the top bracket (the one that has a hole for the tube). 

Mount the top bracket to the wall using the short screw.

4.  Remove the cover on the bottom bracket and fit the tube into the bracket. Make sure that the smaller hole is pointing inwards.  

Mount the bracket to the wall using the long screw.

5.  Fit the covers back onto the brackets.
6.  Fit the end cap onto the top of the tube. 
7.  Attach the shower head to the hose using a rubber washer. 
8.  Attach the hose to the mixer using a rubber washer. 

Disposal

This product should be disposed of in accordance with local regulations.  
If you are unsure how to proceed, contact your local authority.

Summary of Contents for ST-RS06021-GAP10

Page 1: ... end with the two holes in the sides is at the bottom end of the tube 2 Thread the shower head bracket onto the tube 3 Remove the cover on the top bracket the one that has a hole for the tube Mount the top bracket to the wall using the short screw 4 Remove the cover on the bottom bracket and fit the tube into the bracket Make sure that the smaller hole is pointing inwards Mount the bracket to the ...

Page 2: ... nedre delen av röret 2 Trä på hållaren för duschmunstycket på röret 3 Ta bort locket på den övre infästningen den har genomgående hål för röret Montera den övre infästningen på väggen med den korta skruven 4 Ta bort locket på den nedre infästningen och passa in röret i infästningen Se till att det mindre hålet vänds inåt Montera på väggen med den långa skruven 5 Sätt tillbaka locken till infästni...

Page 3: ...tering 1 Tre såpeholderen på røret ovenfra Sjekk at enden med to hull på sidene er på nedre del av røret 2 Tre holderen på dusjmunnstykket på røret 3 Ta bort lokket på det øvre festet den har gjennomgående hull for røret Monter det øvre festet på veggen med den korte skruen 4 Ta bort lokket på det nedre festet og tilpass røret i festet Pass på at det mindret hullet vender innover Monter på veggen ...

Page 4: ... että putken alapää on se pää jossa on kaksi reikää sivuilla 2 Pujota suihkusuuttimen pidike putkeen 3 Poista ylemmän kiinnikkeen kansi siinä on läpimenevä reikä putkea varten Asenna ylempi kiinnike seinään lyhyellä ruuvilla 4 Poista alemman kiinnikkeen kansi ja sovita putki kiinnikkeeseen Varmista että pienempi reikä tulee sisäpuolelle Asenna seinään pitkällä ruuvilla 5 Aseta kiinnikkeiden kannet...

Page 5: ...terung auf das Rohr schieben 3 Die Abdeckung der oberen Halterung die mit der durchgehenden Öffnung für das Rohr entfernen Die obere Halterung mit der kurzen Schraube an der Wand befestigen 4 Die Abdeckung der unteren Halterung entfernen und das Rohr durchstecken Dabei darauf achten dass das kleinere Loch nach innen zeigt Mit der langen Schraube an der Wand befestigen 5 Dann die Abeckungen wieder ...

Reviews: