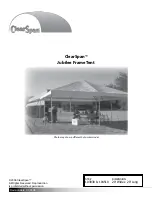
background image

1

CLEARSPAN

 JUBILEE TENTS               

Revision date: 07.01.08

©2008 ClearSpan™

All Rights Reserved. Reproduction 

is prohibited without permission.

Photo may show a different but similar model.

ClearSpan


Jubilee Frame Tent

STK#   


DIMENSION

103938 & 104510  20' Wide x 20' Long

Summary of Contents for 103938

Page 1: ...S Revision date 07 01 08 2008 ClearSpan All Rights Reserved Reproduction is prohibited without permission Photo may show a different but similar model ClearSpan Jubilee Frame Tent STK DIMENSION 103938 104510 20 Wide x 20 Long ...

Page 2: ... Failing to anchor the shelter properly will void the manufacturer s warranty and may cause serious injury and damage LOCATION Choosing the proper location is an important step before you begin to assemble the structure The following suggestions and precautions will help you determine whether your selected location is the best location Never erect the structure under power lines Identify whether u...

Page 3: ...efore you begin to assemble your shelter Conduit An assembly of pipes used to secure the main cover and end panels if equipped Purlins and some strut assemblies also consist of connected pipes to form a conduit Each pipe joint of a conduit assembly is secured with a self tapping Tek screw Coupler or Fitting A part of the frame assembly where legs purlins and rafter pipes are inserted and secured I...

Page 4: ... of the frame The baseboard runs from the front to the back of the building This baseboard is not included with the shipment and must be supplied by the customer Treated or recycled plastic lumber works well for a baseboard The baseboard when installed properly helps prevent the shelter from sinking into the ground when anchored Consult these instructions or contact Customer Service for additional...

Page 5: ...help you identify the different parts of the building Consult the Frame Overview for additional details and diagrams Some parts are not shown 103933 Corner Coupler 100441 Nut Setter FAH007B FALB01B Carriage Bolt and Nut 103932 Crown Coupler 103934 Side Coupler 10015608 3 Way Open Corner 10015808 Short Cross ...

Page 6: ...ilee frame tent For details of each assembly procedure consult the Frame Overview and the individual sections of these instructions See illustration below to identify main parts of shelter Layout the site and identify the required parts for each 1 assembly procedure Assemble all rafters 2 Assemble and anchor the frame 3 Prepare and install the main cover 4 Ground Level Leg Base Rafter Hip Rafter S...

Page 7: ...fer to diagram Using multiples of 3 4 5 such as 6 8 10 or 12 16 20 helps to maintain an accurate 90 angle After squaring the position of the building and placing 3 a stake at all corners string a line between the stakes to mark the base of the building Next paint or mark a line on the ground using the 4 strings between the stakes as guides NOTE If a baseboard is used drill holes through the board ...

Page 8: ... bolt holes at each end of the assembled rafters FRAME ASSEMBLY Gather the parts All rafter assemblies Leg pipe 190P094D Crown Coupler 103932 Corner Coupler 103933 Side Coupler 103934 Short Cross 10015808 3 Way Open Corner 10015608 1 4 Carriage Bolts and 1 4 Nuts Tek Screws and Duct Tape customer supplied Frame Assembly Procedure IMPORTANT When connecting the rafters to the coupler fittings use th...

Page 9: ...ns of 190P094D pipe as 4 they will serve as the legs Starting with a corner carefully hoist the roof section 5 of the frame high enough to slide a leg holes first into the corner coupler Align the holes and secure with a carriage bolt and nut Repeat this process at the other three corners and then add legs to the four sides Connect the side rafters as shown in diagram below 2 Secure each connectio...

Page 10: ...e Rafter Lower Base Rafter Lower Base Rafter Lower Base Rafter Lower Base Rafter Short Cross Short Cross Short Cross Short Cross 3 W ay O pen Corner 3 W ay O pen Corner 3 W ay O pen Corner 3 W ay O pen Corner NOTES Spread the leg pipes apart to fit the lower base rafters into the fittings If needed remove corner leg to fit the final rafter into the final fitting and replace corner leg Continue by ...

Page 11: ...oward the cover Verify that all bolts have been inserted in the first 2 outermost holes of the coupler fittings Verify that each rafter splice is secured with a Tek 3 screw Verify that each Tek screw is positioned with its head 4 away from the outside of the frame Duct tape may be used on the Tek screws to protect the cover Inspect the frame for sharp areas that could damage 5 the cover If found f...

Page 12: ... Toss the ropes over the frame and carefully pull the 3 cover up onto the frame making sure the cover does not snag Once the main cover is pulled into position center the 4 cover on the frame Temporarily secure the cover to the frame using a few short sections of rope Beginning at a corner thread the end of rope through 5 a grommet and around the lower base rafter Use the lacing pattern shown belo...

Page 13: ...Side Panel 1 2 3 NOTE A space will remain between the cover edge and the frame as shown in the diagrams Install all side panels and or end panels 3 Actual frame may differ from frame shown SHELTER CARE AND MAINTENANCE Proper care and maintenance of your shelter is important Check the following items periodically to properly maintain your shelter Regularly check the main cover and panels if equippe...

Page 14: ...fter Base Rafter Base Rafter Base Rafter H i p R a f t e r H i p R a f t e r H i p R a f t e r H i p R a f t e r FULL FRAME TOP VIEW Crown Coupler Corner Coupler Corner Coupler Corner Coupler Corner Coupler Side Rafter Side Rafter Side Rafter Side Rafter Side Coupler Side Coupler Side Coupler Side Coupler ...

Page 15: ...MBLY Lower Base Rafter Lower Base Rafter Lower Base Rafter Lower Base Rafter Lower Base Rafter Lower Base Rafter Lower Base Rafter Lower Base Rafter Short Cross Short Cross Short Cross Short Cross 3 W ay O pen Corner 3 W ay O pen Corner 3 W ay O pen Corner 3 W ay O pen Corner ...

Reviews: