background image

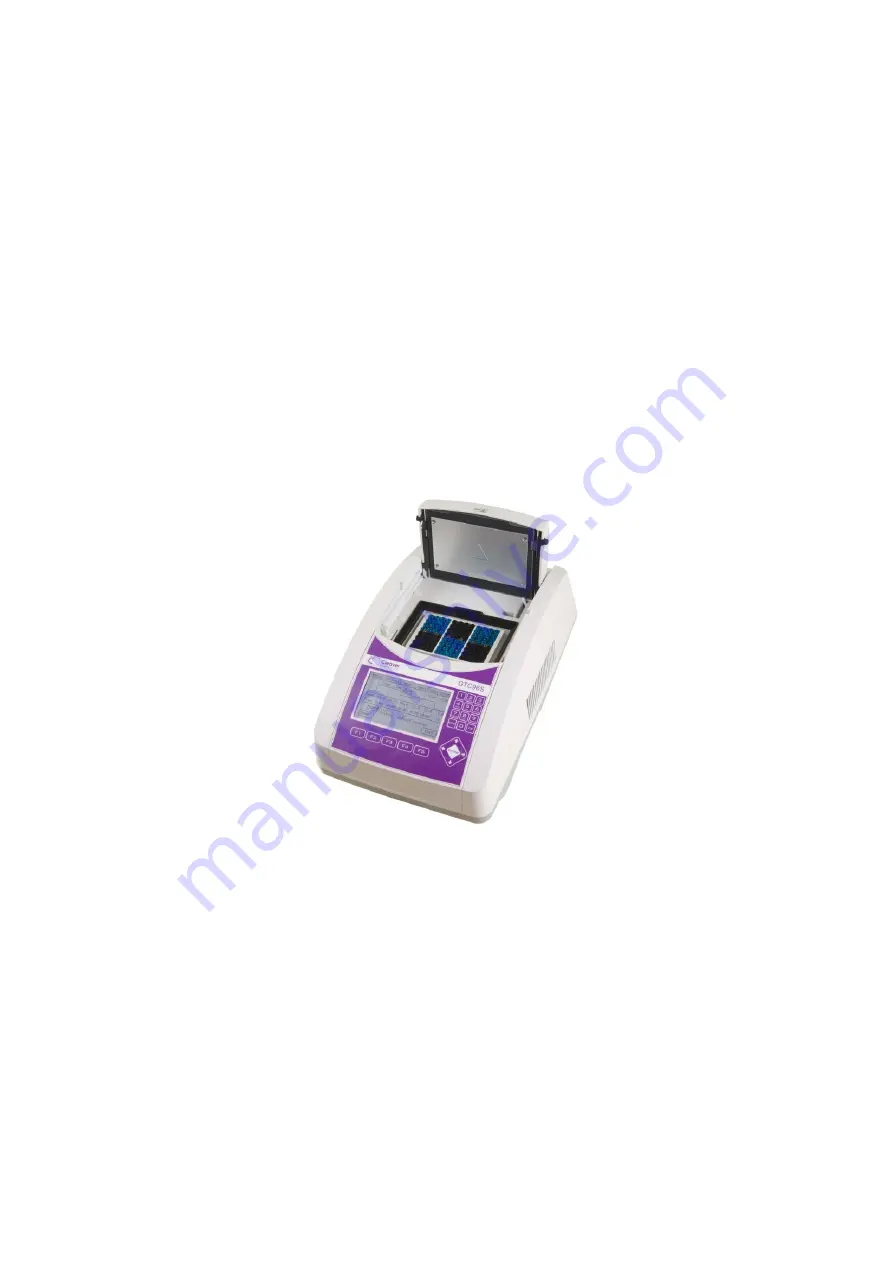
Cleaver Scientific Thermal Cycler 


Cleaver Scientific Thermal Cycler 

GTC96S /GTC96S-230 


Operation Manual 


Ver.2.1 

Cleaver Scientific


Summary of Contents for GTC96S

Page 1: ...Cleaver Scientific Thermal Cycler Cleaver Scientific Thermal Cycler GTC96S GTC96S 230 Operation Manual Ver 2 1 Cleaver Scientific ...

Page 2: ...Notice This instrument is licensed for research and development and for uses other than human in vitro diagnostics ...

Page 3: ... USER FOLDER 12 4 2 CREATING A NEW USER FOLDER 13 4 3 EDITING A USER FOLDER 13 4 4 DELETING A USER FOLDER 13 PROTOCOL MANAGEMENT 15 5 1 RUNNING A PROTOCOL 15 5 2 PAUSE A PROTOCOL 16 5 3 VIEWING RUNNING PROTOCOL INFORMATION 16 5 4 TERMINATING A PROTOCOL 17 CREATING A NEW PROTOCOL 18 6 1 CHANGING TEMPERATURE TIME VALUES 18 6 2 INSERTING DELETING TEMPERATURE SEGMENT 19 6 3 CHANGING TEMPERATURE SEGMEN...

Page 4: ... 30 10 1 CLEANING THE UNIT 30 10 2 CLEANING THE HEATED LID 30 10 3 REPLACING A FUSE 30 10 4 CHANGING THE THERMAL BLOCK 30 TROUBLESHOOTING 31 1 OPERATING TEMPERATURE ENVIRONMENT MAY BE UNSUITABLE 31 2 ELECTRONIC COOLING ELEMENT MAY BE DAMAGED OR AGED 31 11 1 ERROR MESSAGES 32 APPENDIX A TECHNICAL SPECIFICATIONS 33 APPENDIX B PROTOCOLS IN DEFAULT FOLDER 34 APPENDIX C CE DECLARATION 36 ...

Page 5: ...hine in the room temperature 15 30 C relative humidity 20 80 6 DO NOT block the air vents 7 Keep the side and rear of the machine at least 30cm from the wall or other machine 8 Make sure the power source conforms to the required power supply specifications 9 To avoid electric shock make sure the machine is plugged into a grounded electrical outlet 10 Do not allow water or any foreign objects to en...

Page 6: ...d Temperature return function that makes touchdown possible Gradient function enables optimization of annealing temperatures Preset protocols that make starting amplification easier Air intake vents on the front and sides and exhaust vents on the rear that reduce heat based interference with other equipment Interchangeable blocks Automatically creates operating history and error logs Heated lid to...

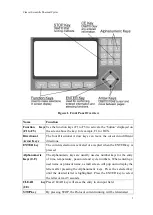
Page 7: ...ccepted when the ENTER key is pressed Alphanumeric Keys 0 9 The alphanumeric keys are usually used as number keys for the entry of time temperature password and cycle numbers When entering a user name or protocol name a small screen will pop out to display the letters after pressing the Alphanumeric keys Press the selected key until the desired letter is highlighted Press the ENTER key to select t...

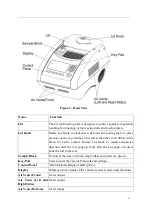
Page 8: ...lock for better contact Rotate Lid Knob in counter clockwise direction until the Lid pops up Only after the Lid pops can users slide the Lid to the rear Sample Block Section of the unit in which sample tubes and plates are placed Key Pad Used to enter the various Protocols and settings Control Panel which includes Display and Key Pad Display Displays current status of the various system features a...

Page 9: ...h Brightness Adjustment Potentiometer Control the brightness of LCD panel Please use Philip head screw driver to adjust it USB Port For run summary download to computer RS 232 Port For run summary download to computer Air Vents Rear For air output Product Label Indicate the model name serial number power specification and other important information ...

Page 10: ...nds and then enter User Folder screen Pressing any key will go to User Folder screen immediately 3 3 Heated Lid The Heated Lid heats the air in the upper part of the sample vessels at higher temperature than the reaction mixture This prevents condensation of the evaporated water vapor on the vessel walls keeping the concentration unchanged during the heating and cooling cycles The top also places ...

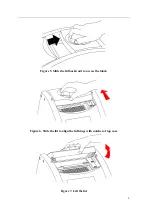
Page 11: ...method is recommended for common operations and to prevent the skin burn from the heated lid The second method is used to clean up the heating plate of the lid Rotate Lid Knob in a clockwise direction to lower down the heating plate and press down on the cap of tubes tighten until you feel resistance This adjustment will provide better contact between the tube or plates and the block for better pe...

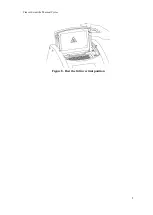
Page 12: ...8 Figure 5 Slide the lid backward to access the block Figure 6 Slide the lid to align the lid hinge with notches of top case Figure 7 Lift the lid ...

Page 13: ...Cleaver Scientific Thermal Cycler 9 Figure 8 Rest the lid in vertical position ...

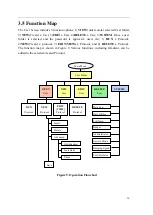
Page 14: ...l 3 EDIT VIEW a Protocol and 4 DELETE a Protocol The function map is shown in Figure 9 Various functions including Gradient can be added to the selected created Protocol Figure 9 Operation Flowchart RUN Protocol NEW Protocol EDIT VIEW Protocol DELETE Protocol EDIT User DELETE User SYSTEM OPEN User User Folder NEW User Insert Delete Advanced Optimization Increment Pause Data Log Date Time Lid Temp ...

Page 15: ... g h i 4 5 J K L j k l 5 6 M N O m n o 6 7 P Q R S p q r s 7 8 T U V t u v 8 9 W X Y Z w x y z 9 3 7 Loading the Reaction Vessel For the optimal performance of the GTS96 we recommend Cleaver tubes and plates The recommended sample volume for 0 2 ml tubes or 96 well plates is 5 100ul If using the heated lid with full skirted 96 well plates it is highly recommended to use a Silicone Compression Mat ...

Page 16: ...folder includes some frequently used Protocols defined by vendor while the PUBLIC folder is open to all users 4 1 Viewing a User Folder All Protocols are stored inside the User folders Use directional arrow keys to select a User folder Press F1 OPEN to view the names of all Protocols inside the selected folder To view the contents of the User will require you to enter the 4 digit Personal F 1 F 2 ...

Page 17: ...ser folder no 50 4 3 Editing a User Folder Under the User Folder screen use directional arrow keys to select a User folder Press F3 EDIT to edit the User name A PIN is required to edit the User folder name After editing the User folder name press F1 ACCEPT to save the edited User name 4 4 Deleting a User Folder Use directional arrow keys to select a User folder Press F4 DELETE to delete the A AC C...

Page 18: ...ter the PIN and press F1 ACCEPT or ENTER The screen will prompt Do you want to delete Press F1 ACCEPT to confirm the deletion Press F5 EXIT to abort the deletion Note User folders which contain any protocols can t be deleted except by administrator ...

Page 19: ... n 0 07 7 2 25 5 1 11 1 0 09 9 1 10 0 2 20 0 P PR RO OT TO OC CO OL L D DA AT TE E T TI IM ME E L La ab b 0 07 7 2 28 8 1 11 1 0 03 3 2 25 5 3 30 0 R RU UN N N NE EW W E ED DI IT T E EX XI IT T D DE EL LE ET TE E F 1 F 2 F 3 F 4 F 5 S ST TA AR RT T M Mi ik ke e L La ab b R RU UN N 8 8 2 21 1 2 20 01 11 1 1 11 1 0 00 0 M Mo od de e 1 1 1 1 2 2 V Vo ol lu um me e 5 50 0u ul l 5 5 1 10 00 0u ul l 1 1...

Page 20: ...re segment Once the countdown is completed the highlighted section will continue to move to the next temperature or cycle segment and start counting down the time 2 The Lid temperature will flash on the status bar when the Protocol starts and remain on until it reaches 50ºC When the lid reaches 50 C HOT will appear in the right hand corner and remain until the temperature falls below 40 C The samp...

Page 21: ... 5 0 00 0 0 0 3 30 0 0 0 3 30 0 0 0 3 30 0 1 10 0 0 00 0 T Te em mp p T Ti im me e 1 1 T Tm mp p 3 3 T Tm mp p 2 25 5 C Cy yc c 2 2 T Tm mp p 1 1 C Cy yc c R Ru un n s st ta ar rt te ed d 0 08 8 2 21 1 1 11 1 1 12 2 2 20 0 5 50 0 R Ru un n w wi il ll l e en nd d 0 08 8 2 21 1 1 11 1 1 13 3 5 50 0 2 20 0 F 1 F 2 F 3 F 4 F 5 Y YE ES S M Mi ik ke e L La ab b R RU UN N S ST TA AR RT T 8 8 2 21 1 2 20 ...

Page 22: ...s to the original protocol settings 6 1 Changing Temperature Time Values 1 Press directional arrow keys to move cursor to the temperature or time settings required to be changed 2 Enter your desired values and press ENTER or to move cursor to other values to save the settings M Mi ik ke e P PR RO OT TO OC CO OL L N NE EW W 8 8 2 21 1 2 20 01 11 1 1 11 1 0 00 0 9 94 4 0 0 9 94 4 0 0 5 55 5 0 0 7 72...

Page 23: ...ent only the selected segment will be inserted deleted 6 3 Changing Temperature Segment Count Temp and Cycle Count Cyc The Temperature Segment Count Temp can be modified by entering a new value 1 to 20 in the first Temperature position and pressing ENTER When the Temperature Segment Count is larger than one the temperature Cycle Count Cyc will appear The Multi Temperature Segment will cycle during...

Page 24: ...T to confirm the settings Press F1 OFF to re enter the settings A capital letter and High temperature value G70 0 will appear on the Temperature Segment graph and Low temperature value will be shown on the Temp value of the section To remove the Optimization Temperature setting place your cursor in the same temperature segment with G Gradient Temperature symbol Press F2 OPTI again The screen will ...

Page 25: ...0 C M Mi ik ke e P PR RO OT TO OC CO OL L N NE EW W O OP PT TI I 8 8 2 21 1 2 20 01 11 1 1 11 1 0 00 0 B Bl lo oc ck k T Te em mp p E EX XI IT T A AU UT TO O B Bl lo oc ck k T Te em mp p 1 1 50 0 A Al ll l O Of ff fs se et t i is s b ba as se e o on n B BL LO OC CK K 1 1 2 2 54 0 3 3 58 0 4 4 62 0 5 5 66 0 6 6 70 0 O OF FF F A AV VG G F 1 F 2 F 3 F 4 F 5 BLOCK 1 BLOCK 2 BLOCK 3 BLOCK 4 BLOCK 5 BLO...

Page 26: ... or F2 CLEAR to re enter the values To remove the Incremental Decremental Temperature and Time settings place the cursor in the temperature segment with Incremental Decremental Temperature and Time values Select F2 CLEAR to clear the values Select F1 ACCEPT will remove the incremental Decremental Temperature setting and its symbol Temperature Increment Max Temperature incremental value 9 9 C Max T...

Page 27: ...ce the cursor under P Pause symbol Press F4 PAUSE again will remove the Pause setting and its symbol 6 5 Saving a Protocol After all settings are entered press F1 SAVE will store the protocol Screen will Prompt Please enter protocol name A Protocol name is required to be entered Max Protocol name 12 characters B BB BB B N NE EW W I IN NC CR RE E 8 8 2 21 1 2 20 01 11 1 1 13 3 0 00 0 9 94 4 0 0 9 9...

Page 28: ...E to save the edited Protocol under the original name or F2 SAVE A to as a new protocol Deleting a Protocol 1 An existing Protocol can be deleted under a User s Folder 2 Under the User s Folder screen choose a Protocol Select F4 DELETE to delete the selected Protocol 3 If F4 DELETE is selected the screen will prompt you Are you sure you want to delete Press F1 YES to confirm the deletion Press F5 ...

Page 29: ...n turn on off the audible beep 5 Administrator Users can delete unwanted Usernames and their Protocols 6 Service Mode is reserved for Service engineers 7 Ramping Speed Users can choose the High Ramping Speed or Low Ramping Speed 8 Tm Calculator Press A T C and G number of sequence then users can get the Tm value M MI IK KE E P PR RO OT TO OC CO OL L 8 8 2 21 1 2 20 01 11 1 1 11 1 0 00 0 A Ar re e ...

Page 30: ... be e C Co on nt tr ro ol l V Vo ol lu um me e 5 50 0 u ul l P Pr ro ot to oc co ol l c co om mp pl le et te ed d s su uc cc ce es ss sf fu ul ll ly y R Ru un n 1 13 3 2 20 0 1 10 0 t to o 1 14 4 2 25 5 0 00 0 E Ex xi it t P PC C F 1 F 2 F 3 F 4 F 5 F 1 F 2 F 3 F 4 F 5 S SE EL LE EC CT T S SY YS ST TE EM M 8 8 2 21 1 2 20 01 11 1 1 11 1 0 00 0 D Da at ta a L Lo og g D Da at te e T Ti im me e L Li ...

Page 31: ...8 8 2 21 1 2 20 01 11 1 1 11 1 0 00 0 D Da at ta a T TY YP PE E 2 2 1 1 Y Y M M D D 2 2 M M D D Y Y 3 3 D D M M Y Y D De ef fa au ul lt t D Da at te e 0 08 8 2 21 1 1 11 1 D De ef fa au ul lt t T Ti im me e 1 11 1 0 00 0 3 33 3 P Pr re es ss s F F1 1 t to o s sa av ve e y yo ou ur r s se et tt ti in ng gs s E EX XI IT T F 1 F 2 F 3 F 4 F 5 A AC CC CE EP PT T S SY YS ST TE EM M L LI ID D T TE EM MP...

Page 32: ...word to enter Service Mode and perform necessary maintenance and repairs 9 7 Ramping Speed Users can choose the Ramping Speed High Ramping Speed heating rate about 4 C sec and cooling rate about 3 C sec Low Ramping Speed heating rate about 3 C sec and cooling rate about 2 C sec Please remember to press F1 SAVE to store your settings A AC CC CE EP PT T S SY YS ST TE EM M B BE EE EP PE ER R 8 8 2 21...

Page 33: ...R Ra am mp pi in ng g S Sp pe ee ed d 1 1 1 1 H Hi ig gh h R Ra am mp pi in ng g S Sp pe ee ed d 2 2 L Lo ow w R Ra am mp pi in ng g S Sp pe ee ed d P Pr re es ss s F F1 1 t to o s sa av ve e y yo ou ur r s se et tt ti in ng gs s E EX XI IT T F 1 F 2 F 3 F 4 F 5 R RU UN N S SY YS ST TE EM M T TM M C CA AL LC CU UL LA AT TO OR R 8 8 2 21 1 2 20 01 11 1 1 11 1 0 00 0 A A 0 0 T T 0 0 C C 0 0 G G 0 0 ...

Page 34: ...tracks Once the lid in secure in the tracks make sure the lid easily slides forward 10 3 Replacing a Fuse The fuse is located in the power socket module just below the power connector If the unit does not turn on when the power switch is turned on then replace the fuse To replace the fuse 1 Disconnect the power cord from the unit 2 Remove the fuse drawer with a small blade screwdriver 3 Pull the f...

Page 35: ...ture environment may be unsuitable 2 Electronic cooling element may be damaged or aged 1 Operate the unit in a environment temperature between 15 to 30 C 2 Return the unit for service Cycle time is too long 1 Operating environment temperature may be unsuitable 2 Electronic cooling element may be damaged or aged 3 Faulty temp sensor 1 Operate the system in a temperature environment between 15 to 30...

Page 36: ...ction HEATER ERROR Lid temperature sensor problem Lid temperature exceeds 132 C Lid temperature can t reach the set temperature Reboot the unit BLOCK ERROR Block temperature sensor or heating element problems The unit can t reach the set temperature because the room temperature is too high The block temperature exceeds 108 C Cool down the room temperature Reboot the unit ROOM ERROR Room temperatur...

Page 37: ... 5 C 30 to 99 9 C Temperature Uniformity 0 5 C Max Temp Increment Decrement Rate 4 C 3 C Gradient Temperature 30 99 C Max temp difference 24 C Max Lid Temperature 60 65 100 115 C Protocol Capacity 200 sets Operating Temperature 15 30 C Operating Humidity 20 80 RH Networking 1 x RS 232 1 x USB Power Supply 100 to 240V AC 50 60 Hz 750VA Dimensions W x D x H 24 x 25 x 42cm Weight Net 9 Kg ...

Page 38: ...Te em mp p T Ti im me e 1 1 T Tm mp p 2 2 T Tm mp p 2 25 5 C Cy yc c 2 2 T Tm mp p 1 1 C Cy yc c F 1 F 2 F 3 F 4 F 5 P PR RE ES SE ET T G GR RA AD DI IE EN NT T R RU UN N 8 8 2 21 1 2 20 01 11 1 1 11 1 0 00 0 9 94 4 0 0 9 94 4 0 0 5 55 5 0 0 7 72 2 0 0 7 72 2 0 0 4 4 0 0 5 5 0 00 0 0 0 3 30 0 0 0 3 30 0 0 0 3 30 0 1 10 0 0 00 0 T Te em mp p T Ti im me e 1 1 T Tm mp p 3 3 T Tm mp p 2 25 5 C Cy yc c...

Page 39: ...l 5 5 1 10 00 0u ul l 1 1 T Tu ub be e C Co on nt tr ro ol l 2 2 B Bl lo oc ck k C Co on nt tr ro ol l 0 0 5 5 F 1 F 2 F 3 F 4 F 5 P PR RE ES SE ET T T Ti im me e i in nc c R RU UN N 2 20 01 11 1 8 8 2 21 1 1 13 3 0 00 0 9 95 5 0 0 9 95 5 0 0 6 65 5 0 0 7 72 2 0 0 7 72 2 0 0 4 4 0 0 5 5 0 00 0 0 0 3 30 0 0 0 3 30 0 0 0 3 30 0 1 10 0 0 00 0 T Te em mp p T Ti im me e 1 1 T Tm mp p 3 3 T Tm mp p 2 20...

Page 40: ...mal Cycler Model Names TC9610 TC9610 230 All models comply with the following European standards EMC EN 61326 Group 1 Class B Safety EN 61010 1 and EN 61010 2 010 To the best of my knowledge and belief these units conform to these standards Name Deb Cleaver Position Quality Assurance Issue Date 2016 08 04 Appendix C CE Declaration ...

Page 41: ...Cleaver Scientific Thermal Cycler 37 Cleaver Scientific Ltd Unit 41 Somers Road Industrial Estate Rugby Warwickshire CV22 7DH ...

Reviews: