background image

Caution:

The user is responsible for operating this product wisely.

This product is intended for use only as a navigational aide and
should not be used when precise measurement of direction, location,
distance or topography is required.

Caution:

GPS (Global Positioning System) is operated by the 

U.S. government. The U.S. government is solely responsible for its
accuracy and maintenance. The system is subject to changes, which
could affect the accuracy and performance of GPS equipment.

Caution:

Remove the batteries from the receiver if you do not

expect to use it for months at a time. As with any batteries, leakage
can occur. When re-installing batteries, observe proper polarity. 

Warning:

If you choose to use this device in a vehicle, it is the sole

responsibility of the operator of the vehicle to use this device in a safe
manner. Be careful to avoid being distracted from safe and proper
driving practices. 

Warning:

If you choose to use this device in a vehicle, it is the sole

responsibility of the operator to secure this GPS receiver so that it will
not cause damage or personal injury in the event of an accident.

DO NOT

mount this GPS receiver over airbag panels or in a place

where the driver or passengers are likely to have an impact with the
device in an accident or collision.

Non-English Manuals

This GPS receiver is equipped to communicate in the language 
of your choice: English, Dutch, French, German, Italian, 
Portuguese, Spanish or Swedish (see “System Page Settings:
Languages,” page 83).

For operating instructions in Dutch, French, German, 
Italian, Portuguese, Spanish, or Swedish please visit 
www.cobra.com/GPS-manuals.html

Cobra Electronics Corporation reserves the right to change or improve
information in this manual without notice. Please visit
www.cobra.com for updates or questions.

Customer Assistance

In this user’s manual, you should find all the information you need to
operate your GPS receiver. If you require further assistance after
reading through this manual, the Cobra Electronics Corporation offers
the following customer support services.

In the USA:

Automated Help Desk

is available in English 

24 hours a day, 7 days a week at 773-889-3087.

Customer Service Operator Support

is available 

in English and Spanish at 773-889-3087 Monday through Friday,
8:00 a.m. to 6:00 p.m. CST.

Questions can be faxed

to 773-622-2269.

E-Mail Technical Assistance

is available in 

English or Spanish 24 hours, 7 days a week via e-mail at: 
productinfo@cobra.com

On-line answers

to frequently asked questions 

(in English only) can be found at: www.cobra.com.

Outside the U.S.A., 

please contact your local dealer

.

A1

I M P O R TA N T   I N F O R M AT I O N

FCC Compliance

This device complies with Class B of the FCC rules.

Operation is subject to the condition that this device does not
cause harmful interference. It must accept any interference
received, including that which may cause undesirable operation.

Cautions and Warnings
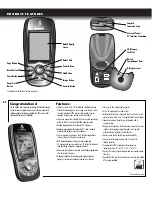
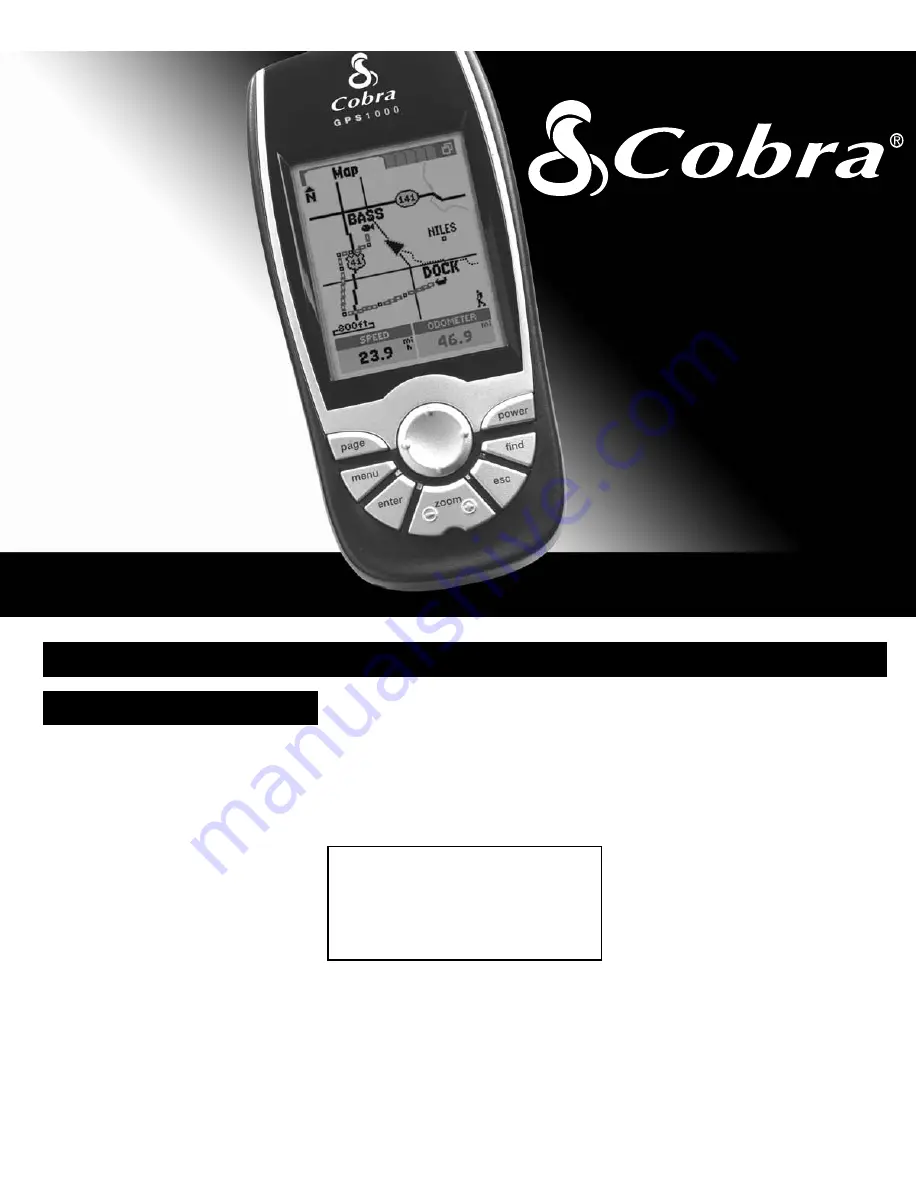
GPS 1000

GLOBAL POSITIONING SYSTEM RECEIVER

Nothing

comes close to a Cobra

®

ENGLISH

Owner’s Manual

Printed in China

Part No. 480-038-P


Summary of Contents for GPS 1000

Page 1: ...guese Spanish or Swedish see System Page Settings Languages page 83 For operating instructions in Dutch French German Italian Portuguese Spanish or Swedish please visit www cobra com GPS manuals html Cobra Electronics Corporation reserves the right to change or improve information in this manual without notice Please visit www cobra com for updates or questions Customer Assistance In this user s m...

Page 2: ...n country boundaries Lets you program and store up to 50 different navigational routes using up to 50 points in each route With optional mapping software interface cable and SD memory card you can connect to a PC to transfer data and take advantage of powerful mapping functions Allows you to navigate to cities and exits already programmed into the receiver s memory Mapping capabilities for display...

Page 3: ...nterest 44 3 6 Addresses 50 3 7 Intersections 54 3 8 Exits 58 3 9 Routes 63 4 System Page 68 84 4 1 Satellites 73 4 2 Display Options 74 4 3 Interface Options 75 4 4 Alerts Screen Options 76 4 5 Proximity Screen Options 78 4 6 Maps Screen Options 81 4 7 Settings Screen Options 82 5 Alerts 85 87 6 Appendix 88 94 6 1 General Information 88 6 2 Worldwide City Time Zones 90 6 3 Interference Errors 91 ...

Page 4: ... to create a route You can then use your GPS receiver to guide you in a straight line from point to point through your stored route Navigate a Track 4 This GPS receiver automatically keeps a record of your progress as you travel and gives you a graphic representation of a track log of the path or track you have taken You can use the track log to create a track that you can recall for navigation Th...

Page 5: ...D ring clockwise to lock As an optional power source a vehicle power adapter see Optional Accessories page 100 can be used with your GPS receiver SD Memory Card Installation Your GPS receiver s memory is expandable with use of an optional SD memory card A SD memory card is required when using the optional mapping software To install a SD memory card 1 Twist the D ring connector counterclockwise 1 ...

Page 6: ...ing and holding the POWER button for 2 seconds will turn the device on or off With the receiver turned on pressing and releasing the POWER button will turn on or off the display backlight The FIND Button Pressing the FIND button will display the Find Screen which allows you to search for various navigation points waypoints points of interest cities addresses intersections or exits The ESCAPE Butto...

Page 7: ...view of the sky to acquire satellite signals for navigation Powersave Mode To save battery power while using just the non navigational features of your receiver you can turn GPS navigation off To do so while still in the Acquiring Satellites screen highlight using the ROCKER PAD and select Continue Acquiring No by pressing the ENTER button See Turning GPS Off and On page 73 for details and instruc...

Page 8: ...ack and your current position on it See page 11 for details and instructions Gauges Page 2 The Gauges Page displays a compass that shows your current direction of travel or the direction to your next waypoint The data fields currently showing TIME TO DEST Time to Destination and LOCATION are user selectable See page 20 for details and instructions Trip Meter Page 3 The Trip Meter Page displays a n...

Page 9: ... you access to Waypoints Points of Interest Cities Addresses Intersections and Exits options such as creating new waypoints downloading POIs searching for an address or sorting a list of cities See individual sections under Navigation Tools pages 24 67 for details and instructions NOTE Whenever satellite lock is lost or GPS is turned OFF certain animation icons below appear on screen and continue ...

Page 10: ...cks 1 Your GPS receiver automatically keeps a record of your travel called a track The receiver shows you a map like picture of your track You can create and store up to 10 different tracks Each track can be recalled and used for navigation as the receiver shows you how to retrace the track again either forward or in the reverse direction how far off course you are in relationship to the track and...

Page 11: ...tion You can have the receiver show you the direction of travel to an individual POI address or intersection or use the POI address or intersection as a point to be used to navigate along a series of points in a route The receiver can also show you how far off course you are in relationship to the navigation and information such as your current speed or distance to the destination in your navigati...

Page 12: ...ch you are currently traveling or the direction of travel to your next point See page 20 for details and instructions The Trip Meter Page can display from 3 to 10 information fields with up to 20 different types of data These can include your current position as well as details about the navigation in process such as speed time and trip odometer See page 22 for details and instructions Map Page Se...

Page 13: ... bodies of water You can choose to display or hide any waypoints points of interest cities exits route line latitude and longitude grid GoTo line track line or track log You can use optional computer software interface cable and SD Memory Card needed for map downloading to download more detailed mapping data from a computer database With this additional information the Map Page could include local...

Page 14: ...o set the parameters used by the Map Page See Map Setup page 14 for details and instructions Measure Distance Select Measure Distance to have the receiver show the distance between any two points you select See Measure Distance Function page 17 for details and instructions Menu Options From the Map Page press the MENU button to access the Map Page Menu Options From the Map Page when you see the me...

Page 15: ...on field After selecting Set select the field you want to change then select the new data from the data choices list See Data Field Descriptions page 92 for details Restore Defaults Select Restore Defaults to restore all Map Page default settings Select YES to restore original settings see page 72 for a complete list of defaults Select NO to maintain all current settings menu enter p Menu Options ...

Page 16: ...n on the map Off Display can be zoomed in or out manually DETAIL High Map shows all streets that have been downloaded major U S state and interstate highways and U S state Canadian provinical and European country boundaries Medium Map only shows main local streets if map data has been downloaded and major highways Low Map only shows major state and interstate highways SHADE Land Land areas will be...

Page 17: ...s at the lower left of the map image The icon 4 lets you set the following for waypoints points of interest cities exits and land cover inland bodies of water TEXT Off Label text for the selected map element will not appear on the map Small Label text for the selected map element is small Medium Label text for the selected map element is medium Large Label text for the selected map element is larg...

Page 18: ...n the map from 20 feet to 800 miles Level Sets the zoom level value at which the selected element will begin to appear on the map zoom level appears at the lower left of the map image 4 Press the ESCAPE button or the PAGE button to return to the main Map Page NOTE To restore default settings for any individual Map Setup Screen press the MENU button while in the selected Setup Screen then select Re...

Page 19: ...ner of the map 3 3 On the Map Page use the ROCKER PAD to position the cursor at the point from which you wish to measure and press the ENTER button 4 Use the ROCKER PAD to move the cursor to the destination point A line will appear connecting the first measuring point and the cursor 3 The distance between the two points is displayed in the measure field 5 Press the ESCAPE button to return to the m...

Page 20: ... road track route or exit can be accessed while in the panning mode Panning Mode To see any portion of the map image that is beyond the left right top or bottom edge of the screen 1 On the Map Page 1 press on the ROCKER PAD in any direction to enter panning mode An arrow shaped cursor will appear 2 2 Move the cursor in any direction by pressing left right up or down on the ROCKER PAD When the curs...

Page 21: ...t which you want to access information 3 Selectable map details will highlight when panned over by the cursor If the cursor reaches an edge of the map the image will pan in that direction Distance from your current location to the highlighted map detail is displayed in the bottom right of the screen 3 Press the ENTER button to select the map detail 4 Select from the detail s options 4 or press the...

Page 22: ...ess the MENU button to access the Gauges Page Menu Options Stop Navigation Select Stop Navigation to stop your current type of navigation One of three screens will appear depending on the type of navigation currently in progress Stop GoTo Stop Route or Stop Track Select OK to stop current navigation and return to the Map To return to the Gauges Page without stopping navigation press the ESCAPE but...

Page 23: ...lect an option Selecting Menu and Options menu enter p enter p esc zoom ter p Set Data Field Select Set Data Field to set the data that is to be in the information fields at the bottom of the screen Select the field you want to change then select the new data from the list See Data Field Descriptions page 92 for details Restore Defaults Select Restore Defaults to restore all Gauges Page default se...

Page 24: ... data that is to be displayed in the information fields Select the field you want to change then select the new data from the list See Data Field Descriptions page 92 for details Menu Options Stop Navigation Select Stop Navigation to stop your current type of navigation One of three screens will appear depending on the type of navigation currently in progress Stop GoTo Stop Route or Stop Track Sel...

Page 25: ...er Page default settings Select YES to restore original settings see page 72 for a complete list of defaults Select NO to maintain all current settings menu enter p Trip Meter Page Menu Options Display This lets you choose the number of fields displayed Select 3 Fields to display 3 data fields with large type Select 6 Fields to display 6 data fields with medium type Select 10 Fields to display 10 ...

Page 26: ...ions as waypoints Waypoints are specific locations you have the receiver record In the following sections you can learn how to mark you current location as a waypoint save cities addresses intersections points of interest or exits as waypoints and set coordinates for a waypoint anywhere in the world This GPS receiver can store up to 500 waypoints which can be recalled to show you the direction of ...

Page 27: ...ight on the ROCKER PAD to accept the new character or symbol and move to the next space or character The next character or symbol is highlighted 3 To clear a selected character and all characters that follow it highlight the Large Dash symbol it comes after the 9 When editing characters repeat the same procedure to change the next character if desired Press left or right on the ROCKER PAD to skip ...

Page 28: ...the search field 2 Repeat the same procedure to change the next character if desired 3 Press left or right on the ROCKER PAD to skip characters you do not want to change The list of available data will update with each new character 4 Press the ENTER button to accept the current data in the search field 5 Choose from the following Press the ENTER button to accept the current highlighted data on th...

Page 29: ...back to your starting point To assist in your Track navigation your GPS receiver is already programmed with locations of hundreds of worldwide cities U S state Canadian provincial and European country boundaries and U S interstate freeways highways and exits With optional computer software interface cable and SD Memory Card needed for map downloading you can access a computer mapping database to t...

Page 30: ...rrently being navigated will have a flashing hiker icon beside it Menu Options Menu Options From the Tracks Page press the MENU button to access the Tracks Page Menu Options From the Tracks Page press on the ROCKER PAD to scroll up or down through a screen or to highlight various options Press the ENTER button to select an option When you see the menu icon press the MENU button to display the avai...

Page 31: ...e only the track log recorded since the last time the receiver was turned on 3 Select Entire Log to save all track log recorded by the receiver since the last time the track log was cleared 3 4 The Details Screen will appear with a default name current date and total distance of the track displayed 4 You can either accept the default name by selecting OK rename the track see Editing or Entering Te...

Page 32: ...he Start At Menu 3 choose from the following Select Begin to start at the beginning of the track or navigate forward through the track Select End to start at the end of the track or navigate in reverse through the track This will jump you to the Map Page 4 and show you the selected track and your current location in relationship to that track To see a select track on the Map Page 1 On the Tracks P...

Page 33: ... and total distance of that track In the Details Screen the track name can be edited 3 see Editing or Entering Text and Symbols page 25 3 Select OK to return to the Track Preview Screen To delete a select track 1 On the Tracks Page 1 select a saved track from the Track List 2 On the Track Preview Screen select DELETE 2 3 Select YES to delete the selected track 4 1Tracks Page 2Track Preview 3Detail...

Page 34: ...ys highways and exits With optional computer software interface cable and SD Memory Card needed for map downloading you can access a computer mapping database to transfer in additional mapping information that includes points of interest local roads and streets intersections and addresses Search Option Select Search to search through the Waypoints List alphabetically by name Select an individual w...

Page 35: ...elect Nearest to sort the Waypoints List by the nearest point to your current location Select an individual waypoint to navigate or GoTo that point see that point on the Map Page in relationship to your current position or delete the individual point Symbol Select Symbol to sort the Waypoints List by common symbol Points with the same symbol will be sorted alphabetically by name Select an individu...

Page 36: ...that individual waypoint See Saved Waypoint Options page 36 for details and instructions Menu Options From a Waypoints List press the MENU button to access the Waypoints Screen Menu Options Waypoints List Menu Options menu enter p New Waypoint Select New Waypt New Waypoint to create a new waypoint An editable default name and symbol will be assigned to your current location and elevation The locat...

Page 37: ...xt and Symbols page 25 Accept the changes by selecting SAVE Accept the default name and symbol and current location and elevation by selecting SAVE NOTE Elevation does not need to be entered to save your new waypoint To save a city POI address intersection or exit as a waypoint see their respective instructions Waypoint Shortcut To mark a new waypoint using current location press and hold the ENTE...

Page 38: ...ist of available data starting with that new character will appear below the search field Repeat steps 4 through 5 to change the next character if desired Press left or right on the ROCKER PAD to skip characters you do not want to change The list of available data will update with each new character 6 Press the ENTER button to accept the current data in the search field 4 7 Choose from the followi...

Page 39: ...ints List by the nearest point to your current location 3 On the Waypoints Options Menu 2 select Symbol to sort the Waypoints List by common symbol Points with the same symbol will be sorted alphabetically by name 4 On the Waypoints Options Menu 2 select Most Recent to sort the Waypoints List by most recently saved points 5 3 Select a point 4 Continue your previous activities continued 4Sort by Sy...

Page 40: ...creen 1 select MAP This will jump you to the Map Page and show you the relationship between your current position and your selected point 3 Deleting a Select or All Waypoints To delete a select point 1 After using the Search or Sort Options to organize the Waypoints List see Search the Waypoint List page 36 or Sort the Waypoint List page 37 select a waypoint 2 On the Waypoint Details Screen 1 sele...

Page 41: ...a computer mapping database to transfer in additional mapping information that includes points of interest local roads and streets intersections and addresses Search Options Select Search to search through the Cities List alphabetically by name Select an individual city to see details including name state postal code country and distance from your current location and to navigate or GoTo that poin...

Page 42: ... Screen when you see the menu icon press the MENU button to display the available menu options find esc Find Screen and Selecting Options Cities List City Details Options Select any city on a City List to GOTO or navigate to that city or to see that city on the MAP in relationship to your current position See Stored Cities Options page 41 for details and instructions City Details Menu Option menu ...

Page 43: ...peat steps 4 through 5 to change the next character if desired Press left or right on the ROCKER PAD to skip characters you do not want to change The list of available data will update with each new character 6 Press the ENTER button to accept the current data in the search field 4 continued NOTE A city is much larger than the precise location indicated by the coordinates stored in your GPS receiv...

Page 44: ...s List for a select city by the nearest to your current location or by the city you last selected 1 On the Find Screen 1 select CITIES 2 Choose from the following On the Cities Options Menu 2 select Nearest to sort the Cities List by the nearest city to your current location 3 On the Cities Options Menu 2 select Last Selected to sort the Cities List by most recently selected city 4 3 Select a city...

Page 45: ...ou to the Map Page and show you the relationship between your current position and your selected city 3 To save the city as a waypoint 1 After using the Search or Sort Options to organize the Cities List see Search the Cities List page 41 or Sort the Cities List page 42 select a city 2 On the City Details Screen 4 when you see the menu icon press the MENU button 3 Select Save as Waypoint 5 4 A New...

Page 46: ...an country boundaries and U S interstate freeways highways and exits With optional computer software interface cable and SD Memory Card needed for map downloading you can access a computer mapping database to transfer in additional mapping information that includes points of interest local roads and streets intersections and addresses Find Screen Points of Interest Categories POI Subcategories Sea...

Page 47: ...rting a point into a route see Editing a Route page 67 by setting a proximity alert to a point see Proximity Settings page 79 Press on the ROCKER PAD to scroll up or down through a screen or to highlight various options Press the ENTER button to select an option From the Points of Interest Details Screen when you see the menu icon press the MENU button to display the available menu options find es...

Page 48: ...oints of Interest Options page 47 for details and instructions Menu Options From the POI Details Screen press the MENU button to access the POI Details Menu Options Point of Interest Details Menu Option menu enter p Save as Waypoint Select Save as Waypoint to save the POI as a waypoint An editable default name and symbol will be assigned to the POI s location and elevation The location and elevati...

Page 49: ...e or character The next character is highlighted A list of available data starting with that new character will appear below the search field Repeat steps 6 through 7 to change the next character if desired Press left or right on the ROCKER PAD to skip characters you do not want to change The list of available data will update with each new character 8 Press the ENTER button to accept the current ...

Page 50: ...Points of Interest Category List select type of POI for which you are searching 2 3 If an option select a subcategory for the type of POI for which you are searching 3 4 Choose from the following On the POI Options Menu select Nearest to sort the POI List by the nearest POI to your current location 4 On the POI Options Menu select Last Selected to sort the POI List by most recently selected POI 5 ...

Page 51: ...ll jump you to the Map Page and show you the relationship between your current position and your selected POI 3 To save the POI as a waypoint 1 After using the Search or Sort Options to organize the Points of Interest List see Search the POI List page 47 or Sort the POI List page 48 select a POI 2 On the POI Details Screen 4 when you see the menu icon press the MENU button 3 Select Save as Waypoin...

Page 52: ...omputer software interface cable and SD Memory Card needed for map downloading you can access a computer mapping database to transfer in additional mapping information that includes points of interest local roads and streets intersections and addresses Find Options Select the NUMBER field to enter the street number Select the STREET field to enter the street name If necessary select the CITY field...

Page 53: ...ill be assigned to the address location and elevation The location and elevation can also be edited See Saving as a Waypoint page 53 for details and instructions There are three ways to get to the Find Screen by pressing the FIND button by inserting a point into a route see Editing a Route page 67 by setting a proximity alert to a point see Proximity Settings page 79 Press on the ROCKER PAD to scr...

Page 54: ... number street and or city 1 On the Find Screen 1 select ADDRESS 2 a On the Address Screen 2 select the NUMBER field b Enter the street number 3 see Editing or Entering Text and Symbols page 25 3 a On the Address Screen 2 select the STREET field b On the Street Screen select the SEARCH field 3 c Enter the street name see Editing or Entering Text and Symbols page 25 4 a If necessary on the Address ...

Page 55: ...ow you the relationship between your current position and your selected address 3 To save an address as a waypoint 1 After using the Find Option to organize the Address Matches List see Find an Address page 52 select an address 2 On the Address Details Screen 4 when you see the menu icon press the MENU button 3 Select Save as Waypoint 5 4 A New Waypoint Screen will appear 6 Choose from the followi...

Page 56: ...er software interface cable and SD Memory Card needed for map downloading you can access a computer mapping database to transfer in additional mapping information that includes points of interest local roads and streets intersections and addresses Find Options Select the STREET 1 field to enter a street name Select the STREET 2 field to enter a street name If necessary select the CITY field to ent...

Page 57: ...nter p esc zoom ter p Matches List Intersection Options Select any intersection on the Matches List to GOTO or navigate to that intersection or to see that intersection on the MAP in relationship to your current position See Intersection Options page 56 for details and instructions Menu Options From the Intersection Details Screen press the MENU button to access Intersections Details Menu Options ...

Page 58: ...ect the STREET 2 field b On the Street Screen select the SEARCH field c Enter the street name 3 see Editing or Entering Text and Symbols page 25 4 a If necessary on the Intersection Screen 2 select the CITY field b On the Cities Screen select the SEARCH field c Enter the city 3 see Editing or Entering Text and Symbols page 25 5 a If necessary on the Intersection Screen 2 select the MAPS field b Se...

Page 59: ...l jump you to the Map Page and show you the relationship between your current position and your selected intersection 3 To save an intersection as a waypoint 1 After using the Find Option to organize the Intersection Matches List see Find an Intersection page 56 select an intersection 2 On the Intersection Details Screen 4 when you see the menu icon press the MENU button 3 Select Save as Waypoint ...

Page 60: ...ds and streets intersections and addresses Exits List Menu Options From the Exits List Screen press the MENU button to access Exits List Menu Options Nearest Road Select Nearest Road to sort the Exits List by exit nearest to your current location on the current nearest road Select an exit from the Exits List to see details including available services and distance from your current location and to...

Page 61: ...en and Selecting Options menu enter p enter p esc zoom ter p Exit Details Screen Menu Options From the Exit Details Screen press the MENU button to access Exits Detail Menu Options Exits List Exit Details Options Select any exit on a Exit List to GOTO or navigate to that exit or to see that exit on the MAP in relationship to your current position See Exit Options page 60 for details and instructio...

Page 62: ...con press the MENU button 4 On the Exits Options Menu 4 select Nearest Road 5 Exits will be sorted by nearest to your current location 5 The road the exit is on is displayed at the top of the screen Choose from the following Press the ENTER button to accept the current highlighted exit on the list Scroll to the exit you are searching for and press the ENTER button to accept the highlighted exit on...

Page 63: ... enter available characters A list of available roads will appear below the search field As you continue entering new characters the list of available roads will update Press the ENTER button to accept the current road in the search field 6 6 Exits will be sorted by nearest to your current location on the selected road The road the exit is on is displayed at the top of the screen Choose from the f...

Page 64: ... On the Exits Details Screen 1 select MAP This will jump you to the Map Page and show you the relationship between your current position and your selected exit 3 To save an exit or exit s service as a waypoint 1 After sorting to organize the Exits List see Sort the Exits List page 60 61 select an exit 2 On the Exits Details Screen 4 when you see the menu icon press the MENU button 3 Select Save as...

Page 65: ...freeways highways and exits With optional computer software interface cable and SD Memory Card needed for map downloading you can access a computer mapping database to transfer in additional mapping information that includes points of interest local roads and streets intersections and addresses Saved Route Options Select any saved route on the Route List to NAVIGATE through that route to see that ...

Page 66: ...p esc zoom er p Menu Options menu enter p Delete All Routes Select Delete All Routes to delete all saved routes Select YES to delete all saved routes Select NO to maintain all current saved routes Stop Navigation Select Stop Navigation to stop your current type of navigation One of three screens will appear depending on the type of navigation currently in progress Stop GoTo Stop Route or Stop Trac...

Page 67: ...Find Screen 5 find and select the first point waypoint city point of interest address intersection or exit you want in the route see Waypoints page 32 Cities page 39 Points of Interest page 44 Addresses page 50 Intersections page 54 Exits page 58 Repeat steps 3 through 5 adding up to 50 points in a sequence you want the route to follow 6 Press the ESCAPE button or PAGE button to save the new route...

Page 68: ...rom which you want to start navigating The Map Page 4 will appear with your selected route and your current location in relationship to that route To see a select route in the Map Page 1 On the Routes Page 1 select a route from the Route List 2 On the Route Preview Screen 2 select MAP This will jump you to the Map Page an show you the selected route and your current location in relationship to tha...

Page 69: ...ly before the one you want to add 4 On the Edit Route Menu select Insert Point 4 5 Using the Find Screen 5 find and select the waypoint city point of interest address intersection or exit you want in the route see Waypoints page 32 Cities page 39 Points of Interest page 44 Addresses page 50 Intersections page 54 Exits page 58 An updated Route Details Screen will appear To remove a point from a rou...

Page 70: ...equired See Setting the Data Port page 75 4 0 S Y S T E M PA G E System Page Satellites Options To turn GPS navigation On or Off or to reset satellite acquisition select SATELLITES from the System Page Select On to access your receiver s navigational features Select Off to disable receiver s navigational features Select Reset to clear and reacquire the receiver s navigational features Turning GPS ...

Page 71: ...t the individual Alarm Radius for each alert You can restore the Alerts defaults through the Alerts Menu See Alerts Screen page 76 for details and instructions Maps Screen Select Maps to Include Exclude or Delete a specific map you have transferred from a computer The Base Map cannot be deleted See Excluding Including or Deleting Maps page 81 for details and instructions Proximity Screen Select Pr...

Page 72: ...tery symbol decreases the amount of black from right to left as it discharges EXT PWR will be displayed when using external power See Optional Accessories page 100 for details Settings Options Select SETTINGS to change the following system settings Clock Format Time Zone Daylight Savings Time Summer Time Language Measurement Units Sounds WAAS Compass Map Datum Positions Format North Reference Batt...

Page 73: ... maintain all current settings Delete Saved Data Select Delete Saved Data to delete all user saved data including waypoints tracks and routes Select YES to delete all user saved data Select NO to maintain all current settings From the System Page when you see the menu icon press the MENU button to display the available menu options Press on the ROCKER PAD to scroll up or down through a screen or t...

Page 74: ...Default GPS Status On Backlight Timeout 15 Seconds Data Port Off Clock Format 12 Hour Time Zone Current Location Daylight Savings Time Auto Summer Time Language English Measurement Units English Sounds On WAAS On Compass Cardinal Map Datum WGS 84 Position Format hddd mm mm North Reference True Battery Saver Refresh 1 sec Alert Alarms On Alarm Radius 50 ft Proximity Alarms On Alarm Radius 50 ft Map...

Page 75: ...ver will begin searching for satellite signals from at least three satellites 4 Press the PAGE button to return to the System Page S Y S T E M PA G E Satellites 4 1 73 Satellites When indoors you can turn GPS navigation off allowing you to use the non navigational features of your GPS receiver while preserving battery power When you turn GPS off the receiver stops searching for signals from satell...

Page 76: ...s backlight remains lit each time you turn it on or when you press and release the POWER button b Select 15 Seconds 30 Seconds 60 Seconds or Stay On 3 WARNING If you choose Stay On battery life will significantly decrease Contrast a Select the CONTRAST field b Press left or right on the ROCKER PAD to increase or decrease the screen contrast 4 c Press the ENTER button to complete your contrast adju...

Page 77: ...optional CD ROM for further instructions 1 On the System Page 1 select INTERFACE The receiver will display the current status of the data port the total card memory in the receiver and the current card memory available 2 2 Select DATA PORT 3 Choose from the following Select On to turn the data port on 3 The data port must be set to On before you can use the data interface Select Off to turn the da...

Page 78: ...stance from the next point in your current navigation Arrival Alert sounds when you reach the specified distance from your final destination Off Course Alert sounds when you deviate the specified distance from you course To get to the Alerts Screen on the System Page select Extras on the Extras Screen select Alerts From the Alerts Screen when you see the menu icon press the MENU button to display ...

Page 79: ...rm settings to Off 4 The individual values set for each Alert will not change 5 Press the PAGE button to return to the System Page To set the Alarm Radius for the Anchor Drag Alert Approach Alert Arrival Alert or Off Course Alert 1 From the System Page 1 select EXTRAS 2 Select Alerts 2 3 Select the individual Alarm Radius in the ALERTS field you what to change 3 4 Select the value at which you wan...

Page 80: ... defaults Select NO to maintain all current settings 78 To get to the Proximity Screen on the System Page select Extras on the Extras Screen select Proximity From the Proximity Screen when you see the menu icon press the MENU button to display the available menu options Press on the ROCKER PAD to scroll up or down through a screen or to highlight various options Press the ENTER button to select an...

Page 81: ...oximity List 1 On the System Page 1 select EXTRAS 2 Select Proximity 2 3 Scroll down the Points List to highlight and select the blank space 3 4 Using the Find Screen 5 select the point at which you want an automatic alarm to sound see Waypoints page 32 Cities page 39 Points of Interest page 44 Addresses page 50 Intersections page 54 or Exits page 58 5 Choose from the following Set the Proximity A...

Page 82: ...at specific point such as location and elevation Select Remove to delete the individual point from the Proximity List 5 Press the PAGE button to return to the System Page To set the Alarm Radius for an individual point 1 From the System Page 1 select EXTRAS 2 Select Proximity 2 3 Select the individual Alarm Radius in the POINTS field you want to change 3 4 Select the value at which you want an aut...

Page 83: ...the Map you want to Include Exclude or Delete 3 The Base Map cannot be deleted 4 Choose from the following 4 Select Include to include the map in the map display search screens or sort screens Select Exclude to exclude the map from the map display search screens or sort screens Select Delete to remove the map from the receiver 5 Press the PAGE button to return to the System Page page To highlight ...

Page 84: ...ngs Screen defaults through the Settings Screen Menu Restore Defaults Select Restore Defaults to restore all Settings Screen defaults to original Settings Screen settings Select YES to restore original settings see page 72 for a complete list of defaults Select NO to maintain all current settings From the Settings Screen when you see the menu icon press the MENU button to display the available men...

Page 85: ... Zones page 90 for details The small window at the top of the screen shows you the difference in hours from the Universal Time Coordinate Daylight Savings Time Summer Time 5 Select the DAYLIGHT SAV Daylight Savings field to set the receiver to use Daylight Saving Time Summer Time in the time and date Select Auto to have the clock switch to Daylight Savings Time automatically Select On to manually ...

Page 86: ...osition Format field to change the format the receiver uses to display the location coordinates Select your choice from those listed North Reference qe Select the NORTH REF North Reference field to change the receiver s method of orientation to the earth s magnetic field Select True for true north Magnetic for magnetic north or Grid for grid north See North Reference page 93 for details Battery Sa...

Page 87: ...specified track If a navigation GoTo route or track was in progress when you last turned the receiver off you will see this alert after satellite lock is achieved when you turn the receiver on again Select YES to resume the same navigation Select NO to stop navigation 1Can t Acquire Satellites Continue Searching Alert 3 Arriving At Destination If you are navigating you will see this message when y...

Page 88: ...o clear the message You will continue to see the message when trying to save a waypoint until you delete one or more waypoints from memory See Waypoints page 32 for details Warning 9 Track Log Almost Full This message appears when the track log memory bank is 90 full Select OK to clear the message The message will reappear each time you turn on the receiver until you clear the track log or the tra...

Page 89: ...n Tools page 24 for details qqNotice Name Already Used qwNotice Too Many Found Enter City qeNotice None Found Warning qr Batteries Low This message appears approximately 30 minutes before your batteries need to be replaced Select OK to clear the message Replace the batteries as soon as possible The message will reappear every 10 minutes until the batteries are replaced or the receiver automaticall...

Page 90: ...y the satellite so that a receiver can continuously determine the time the signal was broadcast The signal contains data that your GPS receiver uses to compute the locations of the satellites and to make other adjustments needed for accurate positioning Your GPS receiver uses the time difference between the time of signal reception and the broadcast time to compute the distance from the receiver t...

Page 91: ...onth of a second or a nanosecond The atomic clocks within satellites are so accurate because even an extremely small inaccuracy would translate into an extremely large position difference 1 100 of a second inaccuracy translates to a position difference of 1 860 miles to any GPS receiver External Components The exterior of the GPS satellite has a variety of antennas The signals generated by the rad...

Page 92: ...to W052 50 4 Caracas W052 50 to W037 50 3 Rio de Janeiro W037 50 to W022 50 2 Fernando de Noronha W022 50 to W007 50 1 Azores Island W007 50 to E007 50 GMT 0 London E007 50 to E022 50 1 Rome E022 50 to E037 50 2 Cairo E037 50 to E052 50 3 Moscow E052 50 to E067 50 4 Abu Dhabi E067 50 to E082 50 5 Maldives E082 50 to E097 50 6 Dhuburi E097 50 to E112 50 7 Bangkok E112 50 to E127 50 8 Hong Kong E127...

Page 93: ... see the better the accuracy Buildings terrain electronic interference or even dense foliage can block signal reception resulting in position errors or possibly no position reading at all In general the clearer the view of the sky is at your location the better the reception will be GPS receivers will not work indoors underwater or underground Due to the errors that might occur it is recommended t...

Page 94: ...ent location shown in degrees minutes of latitude and longitude Maximum Speed the highest speed you traveled during the current navigation Moving Avg Speed the average speed you traveled while moving Moving Time the total time spent moving during your current navigation Odometer total cumulative distance traveled since the last time the odometer was reset Power power icon showing power source exte...

Page 95: ...ll a need to adapt GPS receivers to use with older maps Most navigational charts and maps will have the datum listed This GPS receiver includes up to 100 map datums that allow you to switch to a setting that matches your map The most common US map datums are World Geodetic System 1984 WGS 84 North American Datum 1983 NAD 83 and North American Datum 1927 NAD 27 NOTE Using a map datum that does not ...

Page 96: ...F to 158 F 15 C to 70 C Storage Temperature 40 F to 176 F 40 C to 80 C POWER Input Two 1 5 volt AA batteries and or 12 volt dc external power vehicle power adapter Battery Life Up to 14 hours in battery save mode Up to 10 hours in continuous operation out of save mode A P P E N D I X Specifications 6 6 Specifications Specifications subject to change Temperature rating for this GPS receiver may exc...

Page 97: ...ss where you want the receiver returned 4 Pack the receiver securely to prevent damage during transit If possible use the original packing materials 5 Ship prepaid and insured using a traceable carrier such as United Parcel Service UPS Federal Express or first class mail with delivery confirmation Ship to Cobra Factory Service Cobra Electronics Corporation 6500 West Cortland Street Chicago IL 6070...

Page 98: ...ves you specific rights and you may also have other rights which vary from state to state Exclusions This limited warranty does not apply 1 to any product damaged by accident 2 in the event of misuse or abuse of the product or as a result of unauthorized alterations or repairs 3 if the serial number has been altered defaced or removed 4 if the owner of the product resides outside the U S A All imp...

Page 99: ...Display on Trip Meter Page 23 Reset 23 Set on Gauges Page 21 on Map Page 13 on Trip Meter Page 22 Data Port 68 75 Date 92 Daylight Savings Time 83 Defaults Gauges Page 72 Map Page 72 Restore Alerts 76 All 71 Gauges Page 21 Map Page 13 Proximity 78 Settings Screen 82 Trip Meter Page 23 System Page 72 Trip Meter Page 72 Delete All Saved Data 71 Routes 64 Tracks 28 Waypoints 34 38 Individual Route 63...

Page 100: ...ection 55 57 Point of Interest 46 49 Route 63 66 Track 27 30 Waypoint 34 38 Map Setup 12 14 16 Maps 69 81 Measure Distance 12 17 Measurement Units 83 Menu Button A2 4 Menu Option s Addresses 51 Alerts 76 Cities 40 Exit Details 59 Exit List 58 Gauges Page 20 21 Intersections 55 Map Page 12 13 Points of Interest 46 Proximity 78 Routes 64 Settings Screen 82 System Page 71 Tracks 28 Trip Meter Page 22...

Page 101: ...Card 3 Search Cities 39 41 Points of Interest 44 47 Waypoint 32 36 Serial Number 70 Settings Options 70 82 84 Setting 83 84 Software Version 70 Sort Last Selected Cities 39 42 Points of Interest 45 48 Most Recent Waypoint 33 37 Nearest Cities 39 42 Points of Interest 45 48 Waypoint 33 37 Nearest Road Exits 58 60 Select Road Exits 58 61 Symbol Waypoint 33 37 Sounds 83 Spanish Manual A1 Specificatio...

Page 102: ...R I E S O R D E R F O R M Part Number Description GPA 12VC 7 Ft 12Volt DC power cord For in vehicle power GPA 1500 IC 7 ft PC interface cord 9 pin serial port connector for downloading mapping and points of interest from PC GPA 1500 CC 7 ft Combination PC Interface 12Volt DC power cord 9 pin serial port connector with vehicle power plug for downloading mapping and points of interest from PC GPA 15...

Page 103: ...ble California residents add 7 25 Illinois residents add 8 75 Indiana residents add 6 Michigan residents add 6 Ohio residents add 6 Wisconsin residents add 5 Please print clearly Name Address No P O Box City State Zip Telephone Credit Card No Exp Date Circle One Visa MasterCard Discover Customer Signature Shipping Amount Handling 10 00 or less 3 00 10 01 25 00 5 50 25 01 50 00 7 50 50 01 90 00 10 ...

Page 104: ... GPS Safety Alert Traffic Warning Systems Accessories HighGear Accessories CobraMarine VHF Radios Power Inverters For more information or to order any of our products please visit our website www cobra com Nothing comes close to a Cobra 2003 Cobra Electronics Corporation 6500 West Cortland Street Chicago IL 60707 USA ...

Reviews: