background image

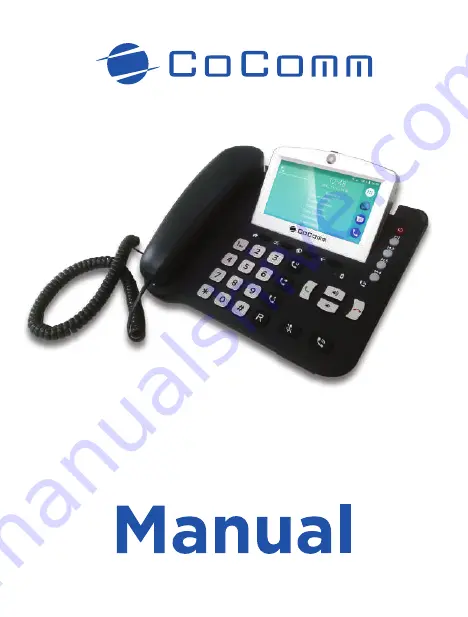
F840

Read carefully the instructions contained in this operation manual before you start using the device

Summary of Contents for F840

Page 1: ...F840 Read carefully the instructions contained in this operation manual before you start using the device ...

Page 2: ......

Page 3: ...3 F840 User manual ...

Page 4: ...4 ...

Page 5: ...nstallation 16 Keyboard 20 Setup Wizard 23 Main menu 24 System icons 28 Calling 29 Messages 32 Contacts 36 LDAP contacts 39 Audio profiles 40 PC suite 41 Wi Fi network connection 42 Bluetooth connection 43 Settings menu 44 Troubleshooting 47 SAR certification information 50 Regulation 51 ...

Page 6: ...ructions Please read carefully following instructions before you start using your Co Comm F840 device Keep this manual for future reference Keep the phone away from moisture Place the phone on a stable surface before start using If any of the following situations occurs have it checked by a qualified service technician It has been exposed to moisture It has been dropped or damaged It has obvious s...

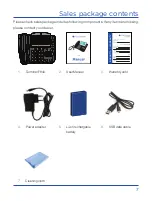
Page 7: ...RE NAME ESTABLECIMIENTO VENDEDOR SALES OUTLET RAZÓN SOCIAL TRADE NAME DOMICILIO ADDRESS TELÉFONO TELEPHONE FECHA DE COMPRA ACQUISITION DATE EQUIPO DEVICE TELÉFONO INALÁMBRICO 4G MODELO MODEL F840 Nº DE SERIE SERIAL NUMBER GARANTÍA WARRANTY CARTA DE GARANTÍA WARRANTY CARD DOMICILIO ADDRESS TELÉFONO TELEPHONE USB data cable 6 R M1 M2 M3 M4 7 8 9 6 5 4 1 2 3 0 F840 Read carefully the instructions con...

Page 8: ...ays switch off your phone when its use is prohibited or if it could cause danger When connecting the phone or any accessory to another device read user manual for detailed safety instructions Do not connect incompatible products It is recommended that the equipment should only be used in normal position to operate properly as well as for personal safety Do not expose to temperatures below 10 C or ...

Page 9: ...e in the ear that is further from your pacemaker Please turn off your phone if you feel there is interference and consult your doctor as soon as possible Emergency calls Like any mobile phone this phone works with radio signals that can not guarantee connection in all conditions Therefore you should never rely solely on a mobile phone for essential communications such as medical emergencies To mak...

Page 10: ...ies Do not place the phone in cold areas When the phone warms up to its normal operating temperature moisture can accumulate within it which may damage electronic circuits Do not place the phone in sunlight exposed areas as it may cause overheating Do not place the phone near flammable liquids gases or explosive substances Do not drop or knock the phone Rough handling can damage electronic circuit...

Page 11: ...charge type of battery and charger used Battery can be charged and discharged hundreds of times but its duration will gradually decrease When operation time is noticeably shorter than normal replace the battery with a new one Use only original chargers batteries and accessories approved by the manufacturer Disconect the charger from the plug and the device when not being used Do not overload your ...

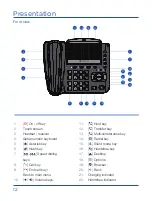
Page 12: ...sference key 16 Handsfree key 17 Desktop 18 Options 21 Charging indicator 22 Handsfree indicator 14 Redial key 15 Silent mode key 19 Browser 20 Back 12 Transfer key 11 Hold key 1 2 Touch screen 3 Headset receiver 4 Alphanumeric keyboard 5 Back to main menu 6 7 Speed dialing keys 8 Call key 9 End call key 10 Volume keys Asterisk key Hash key ...

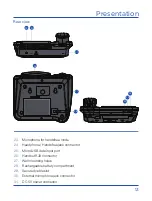
Page 13: ...4 Headphone Handsfree jack connector 25 Micro USB data input port 23 24 31 25 30 26 Handset RJ9 connector 27 Wall mounting holes 29 Secured cable slot 28 Rechargeable battery compartment 30 External microphone jack connector 26 28 27 29 31 DC 5V power connector ...

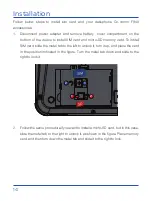
Page 14: ...To install SIM card slide the metal tab to the left to unlock it turn it up and place the card in the position indicated in the figure Turn the metal tab down and slide to the right to lock it 2 Follow the same procedure if you want to install a micro SD card but in this case slide the metal tab to the right to unlock it as shown in the figure Place memory card and then turn down the metal tab and...

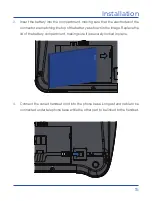
Page 15: ...tor are matching the top of the battery as shown in the image Replace the lid of the battery compartment making sure it is securely locked in place 4 Connect the curled handset cord into the phone base Longest end cable to be connected under telephone base while the other part to be linked to the handset ...

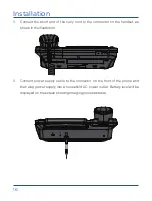
Page 16: ...e connector on the handset as shown in the illustration 6 Connect power supply cable to the connector on the front of the phone and then plug power supply into a household AC power outlet Battery level will be displayed on the screen showing charging process status ...

Page 17: ...ce it is fully charged battery icon appears full A complete charging process can last from 2 to 3 hours Fully charge the battery before first use of the device Note Always make sure your device is turned off before removing your SIM card This will prevent from data loss and SIM card damage Do not place the SIM card near surfaces or electromagnetic environments and avoid touching any metal connecto...

Page 18: ... call press to end it In applications press to return to main menu Press to enter numbers or characters Press asterisk character Press pad character Change text input method Programmable keys to store up to four telephone numbers During an active call press to hold current call During two active calls press to switch from Call 1 to Call 2 Turn On Off Pick up Hang up Numeric pad Asterisk key Hash k...

Page 19: ...de press to redial call log last number Press to decrease increase the volume of handset or speaker Press during an active call to mute the microphone of your phone In standby press to make a call in handsfree mode without lifting the handset During an active call press to enable or disable hands free mode on the phone In applications press to return to main menu or desktop Transfer button Confere...

Page 20: ...ard Key Function Options Browser Back In applications press to display menu options Press and hold to delete shortcuts or widgets on main menu Press to launch Internet browser Press to return to previous level ...

Page 21: ...age list select desired language for on screen menus and then press Next to continue Date time choose Automatic date time to use automatic date and time provided by the network or manually set your phone date time Connecting to Wi Fi networks Select Mobile network or Wi Fi to connect to Internet through your SIM card or also through Wi Fi Click on one available Wi Fi networks and follow the steps ...

Page 22: ... on your phone such as messages email missed calls etc while on the right is shown current status of the system elements as battery level network connections Wi Fi Bluetooth etc You can expand notification area sliding this bar down and switch between notification area and system menu by making scrolling 1 Notifications bar 2 System information 3 Apps menu 6 Web browser 7 Messages 8 Calls 4 Date a...

Page 23: ...h connections change audio profile screen brightness backlight time etc By holding the icon will access configuration of the corresponding function in system settings menu 1 Wi Fi network adapter 2 Bluetooth function adapter 3 No disturb function 7 Time 8 Data connection 9 Date 4 Screen resolution 10 System configuration menu 5 Battery saving 2 3 4 5 9 10 1 11 Open extended menu 6 7 8 11 6 Battery...

Page 24: ...on icon of to access and use the button to return to the previous menu Within an application you can use the button to access options menu Call menu Pres on the icon on the right side of the main menu to access calls menu From this menu you can call to contacts dial a phone number or consult made received and missed calls You can also access call log through the panel located on the left side of t...

Page 25: ...ication you can compose then send SMS MMS as well as check received messages Editing the main menu You can customize phone s main menu by changing or moving widgets or panels installed by default Within main menu press the button to add new widgets and shortcuts or to change desktop background image Hold down the button if you want to remove any items from main menu You can also change the positio...

Page 26: ...ur phone Signal level No signal Mute Call Call end Call transfer Call in progress Call missed Call hold Email SMS text message MMS multimedia message Location active No SIM card Speaker active Low battery Charging battery Bluetooth active WiFi active USB connection Tethering active Headphones connected Alarm active ...

Page 27: ...ive 3 To end the call press the button or hang up the handset Calling from call log 1 Press on the icon on the right side of the main menu or directly press the button to access call log Last call will be shown on screen 2 Press on the icon to access the list of outgoing incoming or missed calls 3 Scroll up and down the list select an item and press the button to call 4 To end the call press the b...

Page 28: ...tents 4 You can associate a phone number or a contact from the phonebook to the memory keys while to the number keys you can only associate contacts from the phonebook 5 Press Add to confirm and complete the operation Note Please ensure that contacts have been installed in the memory keys before using this feature The 1 key is reserved for voicemail function Answer or silence an incoming call 1 Du...

Page 29: ... transfer the incoming call to the second contact or press button before the second call is active for a transfer without consultation Adjusting handset volume During an active call press the buttons to decrease or increase respectively your headset of handsfree volume Calling the voicemail 1 In standby mode press and hold the 1 button to call the voicemail Call will start automatically 2 To end t...

Page 30: ...text within dedicated area and press on the icon if you want to add media files to your message 5 Press on the icon to send message View and reply to messages 1 In the main menu press on the icon to access your phone messaging application of the phone 2 Select one of the messages from the list and press to display 3 To reply a message write the text within apropriate field and press on the icon if...

Page 31: ...efault SMS application messages by default Text message SMS press to access text messages settings Request delivery report select this option to receive a delivery report when sending a message Manage SIM card messages use this option to delete messages and check free and used space on the SIM card Edit quick text this option allows you to edit and add quick texts which can be inserted in your mes...

Page 32: ...n to automatically download when you are in data roaming Creation mode in free mode a text message is converted to MMS when you exceed maximum numbers of allowed characters Size limit it allows you to choose the maximum size for MMS messages Priority it allows you to choose priority for MMS messages Notifications press to access message notifications settings Notifications press to activate or dis...

Page 33: ...llows you to set a limit of stored messages from which oldest messages will be deleted automatically Cell broadcast settings enables cell broadcasting in the SIM card Service message settings enables reception of WAP Push messages A WAP Push message is a type of SMS that is used to directly access a WAP site or page usually to download files User sends an SMS and receive another one with a welcome...

Page 34: ... the new contact and press Done to save the entry and complete operation Creating a new contact from call log 1 In the main menu press on the icon to enter the call log 2 Press on the icon to display the list of incoming outgoing and missed calls and select an item 3 Click on the record you want to save and then on Create a new contact 4 Select the destination where the contact will be saved SIM c...

Page 35: ...Contact edit 1 In the main menu press on the on the right side of the main menu to access contact directory 2 Scroll up and down the contact list and select desired contact 3 Press the button and then select Edit from popup menu 4 Fill out the form with the data to be entered for the new contact and press Done to save the entry and complete operation Contact lists management 1 In the main menu pre...

Page 36: ... menu press on the on the right side of the main menu to access contact directory 2 Select a contact from the list and press icon in the top left hand corner 3 Scroll the contact form to the end press More fields and select a group of contacts in the Tag field 4 Click on Save to memorize the entry and finish the operation 5 Click on the icon and select one of the groups to display all the contacts...

Page 37: ...you need the name and port number of the LDAP server and a user name and password to connect to server Add an account from a LDAP contact server 1 Click on the main menu icon to access the menu applications and then click on the icon to access the Co LDAP application 2 If this is the first time you enter it will be appeared a configuration form of the connection to the LDAP contact server Enter th...

Page 38: ...media content played All of them can be activated for a certain period of time or up to that you manually disable them in the system information bar Also you can adapt them to your needs by clicking on the Customize option on the screen Editing audio profiles You can edit general audio profile to suit to your taste Press on the icon on the right side of the main menu to access application menu and...

Page 39: ...es pcsuite Download and install the application on your PC When you launch the application the following interface will be displayed To enable PC Suite mode on your phone press on the icon in the main menu to access applications menu and then on the icon to access the PC Suite application Connect the USB cable between terminal and PC and then click on Start PC Suite on the phone screen to connect ...

Page 40: ...ng the icon in the system menu or by pressing on the icon on the main menu Then press the icon of the application menu to access the system settings menu Then access Network e Internet and finally Wi Fi If Wi Fi network adapter is active all networks within terminal range will be displayed Press on the Wi Fi network you want to connect enter the password in the pop up window and press on Connect t...

Page 41: ... system notification bar Pairing to a Bluetooth device Hold down the icon in the system menu to access Bluetooth settings or access through system settings menu by pressing on the icon in the main menu and then on the icon in the applications menu Within Bluetooth configuration menu in Connected devices click on the terminal name to activate device temporary visibility and do the same on the other...

Page 42: ... portable hotspot VPN Airplane mode CONECTED DEVICES Bluetooth USB APPLICATIONS AND NOTIFICATIONS Recently opened applications See all apps Notifications Applications notifications On the lock screen Allow notification bubbles Default notification sound Application permissions Advanced settings Default applications Special access to applications ...

Page 43: ...ercentage of battery Suspend after Use of data DISPLAY Brightness level Wallpaper Suspend after Font size advanced settings Screen content size Screensaver Font style SOUND Volume Do not disturb Phone ring Advanced settings Default notification sound Default alarm sound Keypad tones Screen lock sound Battery charge sound Sound when playing Sound enhancement ...

Page 44: ...on Application permissions Research Search for Wi Fi networks Search for Bluetooth devices Show passwords Device manager applications Data protection Encryption and identifiers Encrypt phone Type of storage Trust certificates User IDs Install from SD card Delete certificates Trust agents Screen settings Apps with usage access ...

Page 45: ...ynthesis Preferred engine Language Voice speed Tone Font size Screen content size Enlarge Larger selection pointer Click after the pointer has stopped moving The power button allows you to hang up the call Duration of a normal click and a long click Audio in mono Subtitles Language Font size Subtitle style High contrast text Color correction Reverse colors Settings menu ...

Page 46: ...Recovery options Restore DRM Restore Wi Fi Mobile network and Bluetooth settings Restore app settings Clear all data restore factory settings Phone information System update State Battery status Battery level SIM card status IMEI number IP adress MAC address of the Wi Fi network Bluetooth address Serial number Operating time Legal information COCOMM technical support Model Settings menu ...

Page 47: ...the first time you must enter the PIN code provided with the SIM card Phone asks for PUK code PIN code has been incorrectly entered 3 times and now SIM card is locked Enter PUK code provided by your network operator Phone asks for unlock code Automatic locking function has been enabled on the phone You must enter unlock code before you can use your device SIM card error Clean metal contacts on SIM...

Page 48: ... number Check the fixed dialing setting is disabled Check that the SIM card is under network coverage Your network operator may be experiencing connection problems The call quality is poor Check volume It is in a weak signal area such as near tall buildings or in a basement Move to a location with better signal strength Your network operator may be experiencing connection problems Your corresponde...

Page 49: ...tion You may be in a weak signal area If the phone can not receive signals it will keep sending a signal to search network and consume additional power which shortens the battery duration Battery needs to be changed If battery cannot charge properly Make sure power cable is correctly inserted to the device Clean charging connectors in the phone and battery with a clean dry cloth Replace the batter...

Page 50: ...mobile devices SAR tests are conducted in standard operating positions with the phone transmitting at its highest certified power level however the actual SAR level of the phone while operating can be well below the maximum value In general the closer you are to a base station the lower your phone emits SAR values may vary depending on different phone models To ensure the safety and health of user...

Page 51: ...s product can be used in all EU countries and other countries following the 2014 53 EU directive ErP product information Through this CO COMM Servicios Telecomunicaciones S L declares that this product complies with 2009 125 EC Directive and its implementing regulation EC Nº1275 2008 amended by EC Nº278 2009 EC Nº642 2009 EU Nº617 2013 EU Nº801 2013 and its implementing regulation EC Nº278 2009 Pr...

Page 52: ...due to the presence of hazardous substances Environmental management cost is included within final product cost of the electronic residues as it is established legally in the R D 208 2005 Bluetooth mark and logos are owned by Bluetooth SIG Inc Wi Fi Wi Fi Protected Access Wi Fi Protected Setup y WPA are trademarks of the Wi Fi Alliance All other trademarks products services and company names menti...

Page 53: ......

Page 54: ...Copyright CO COMM Servicios Telecomunicaciones S L 2018 Todos los derechos reservados Copyright CO COMM Servicios Telecomunicaciones S L 2020 All rights reserved ...

Reviews: