
Cat. No. 1088
Traceable
®
and Giant-Digits™ Atomic Clock are registered
trademarks/trademarks of Cole-Parmer.
©2020 Traceable
®
Products.
92-1088-00 Rev. 1 041720
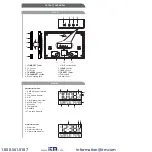
TRACEABLE
GIANT-DIGITS
ATOMIC CLOCK
WITH INDOOR
TEMPERATURE
INSTRUCTIONS
®
™
Traceable
®
Products is ISO 9001:2018 Quality-
Certified by DNV and ISO/IEC 17025:2017
accredited as a Calibration Laboratory by A2LA.
© 2015 Chung’s Electronic Co., Ltd. All rights reserved.
Rev-0 2015-5-29 17:10 PM
RC off
RC on
DISABLE / ENABLE RCC SIGNAL RECEPTION
●
Press and hold
[ RCC ]
button for 8 seconds to disable the reception.
●
Press and hold
[ RCC ]
button for 8 seconds to enable automatic RCC reception.
SETTING THE TIME AND CALENDAR
●
In normal time mode, press and hold
[ TIME SET ]
button for 2 seconds until
the 12/24 Hr flashes.
●
Press
[ +/- ]
button to set 12/24 Hour format.
●
Press
[ TIME SET ]
button again until Hour digit flashes and press
[ +/- ]
button to adjust its value.
●
Repeat above operations to set the time and calendar in this sequence:
WWVB version:
12/24Hr>Time Zone>Hour>Minute>Second>Year>Month>Date>
+/-23 Hour offset>Language>DST auto/off
●
Press
[ TIME SET ]
button to save the setting and return to normal time
mode. Or the clock will automatically exit the setting mode after 1 minute
without pressing any button.
NOTE:
●
When setting second, press
[ +/- ]
button to set its value to 00.
●
7 selectable languages and setting orders:
EN
(English)
→
FR
(French)
→
DE
(German)
→
ES
(Spanish)
→
IT
(Italian)
→
NL
(Dutch)
→
RU
(Russian)
SETTING THE ALARM TIME
●
In normal time mode, press and hold
[ ALARM SET ]
button for 2 seconds
until Hour digit flashes.
●
Press
[ +/- ]
button to set its value.
●
Press
[ ALARM SET ]
button again to step to Minute setting. Press
[ +/- ]
button to set its value.
●
Press
[ ALARM SET ]
button to save the setting and return to normal time
mode. Or the clock will automatically exit the setting mode after 1 minute
without pressing any button.
NOTE:
After pressing
[ +/- ]
button, alarm function is automatically turned on (icon
“ ”
displayed).
USING THE ALARM AND SNOOZE
●
In normal time mode, press
[ ALARM SET ]
button to enter alarm time mode.
Press
[ ALARM SET ]
button again to turn on (icon
“ ”
displayed) or turn
off alarm function.
If alarm is turned on, alarm beeps at the alarm time.
Alarm beeping can be stopped by:
●
Auto stop if no button is pressed during alarm sound beeping. Alarm beeping
lasts for 2 minutes.
●
Press
[ SNOOZE ]
button to stop the current alarm and enter snooze. Alarm
icon will be flashing continuously. The alarm will sound again in 5 minutes.
Snooze can be operated continuously in 24 hours.
●
Press
[ ALARM ]
button to turn off alarm function.
BATTERAY REPLACEMENT
When the low battery indicator
“ ”
displays, it indicates that the battery
power is not enough. You should replace with 4 AA size batteries at once.
NOTE:
●
If the clock is not used for a long time, please take off the batteries.
●
Attention! Batteries should not be exposed to excessive heat such as sunshine, fire or
the like. Please dispose of used unit or batteries in an ecologically safe manner.
SPECIFICATIONS
Radio controlled signal: WWVB
TEMPERATURE
Display range: -40°C~70°C (-40°F~158°F)
Operating range: 0°C~45°C (32°F~113°F)
Accuracy:
-5°C~-0.1°C: +/-2°C
0°C~40°C: +/-1°C
40.1°C~50°C: +/-2°C
( 23°F~32°F: +/-4°F
33°F~86°F: +/-2°F
87°F~122°F: +/-4°F )
HUMIDITY
Display range: 20%~90%
Accuracy:
20% RH~40% RH: +/-7% RH
41% RH~70% RH: +/-5% RH
71% RH~90% RH: +/-7% RH
POWER
4 x AA size 1.5V batteries (Alkaline recommended)
DIMENSION
430(L) x 288(H) x 33(D) mm
© 2015 Chung’s Electronic Co., Ltd. All rights reserved.
Rev-0 2015-5-29 17:10 PM
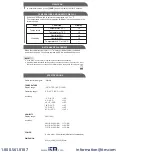
Area
Temperature
Humidity
Temperature<-40°C
Lo
HI
Lo
HI
---
Temperature>70°C
Temperature<0°C or >60°C
Humidity<20%
Humidity>90%
Condition
Display
RC off
RC on
DISABLE / ENABLE RCC SIGNAL RECEPTION
●
Press and hold
[ RCC ]
button for 8 seconds to disable the reception.
●
Press and hold
[ RCC ]
button for 8 seconds to enable automatic RCC reception.
SETTING THE TIME AND CALENDAR
●
In normal time mode, press and hold
[ TIME SET ]
button for 2 seconds until
the 12/24 Hr flashes.
●
Press
[ +/- ]
button to set 12/24 Hour format.
●
Press
[ TIME SET ]
button again until Hour digit flashes and press
[ +/- ]
button to adjust its value.
●
Repeat above operations to set the time and calendar in this sequence:
WWVB version:
12/24Hr>Time Zone>Hour>Minute>Second>Year>Month>Date>
+/-23 Hour offset>Language>DST auto/off
●
Press
[ TIME SET ]
button to save the setting and return to normal time
mode. Or the clock will automatically exit the setting mode after 1 minute
without pressing any button.
NOTE:
●
When setting second, press
[ +/- ]
button to set its value to 00.
●
7 selectable languages and setting orders:
EN
(English)
→
FR
(French)
→
DE
(German)
→
ES
(Spanish)
→
IT
(Italian)
→
NL
(Dutch)
→
RU
(Russian)
SETTING THE ALARM TIME
●
In normal time mode, press and hold
[ ALARM SET ]
button for 2 seconds
until Hour digit flashes.
●
Press
[ +/- ]
button to set its value.
●
Press
[ ALARM SET ]
button again to step to Minute setting. Press
[ +/- ]
button to set its value.
●
Press
[ ALARM SET ]
button to save the setting and return to normal time
mode. Or the clock will automatically exit the setting mode after 1 minute
without pressing any button.
NOTE:
After pressing
[ +/- ]
button, alarm function is automatically turned on (icon
“ ”
displayed).
USING THE ALARM AND SNOOZE
●
In normal time mode, press
[ ALARM SET ]
button to enter alarm time mode.
Press
[ ALARM SET ]
button again to turn on (icon
“ ”
displayed) or turn
off alarm function.
If alarm is turned on, alarm beeps at the alarm time.
Alarm beeping can be stopped by:
●
Auto stop if no button is pressed during alarm sound beeping. Alarm beeping
lasts for 2 minutes.
●
Press
[ SNOOZE ]
button to stop the current alarm and enter snooze. Alarm
icon will be flashing continuously. The alarm will sound again in 5 minutes.
Snooze can be operated continuously in 24 hours.
●
Press
[ ALARM ]
button to turn off alarm function.
VIEW YEAR
In normal time mode, press
[ YEAR ]
button to display Year for 5 seconds.
TEMPERATURE AND HUMIDITY DISPLAY
Slide the
<°C/°F>
switch to select the temperature unit °C or °F.
The temperature and humidity will display
“Hi/Lo/---”
on the conditions in the
following chart:
www.
.com
information@itm.com
1.800.561.8187


