background image

Compsee  


1  

Apex-0698-Part 2: Apex-trak 


Part 2 


Apex II 


By   


PORTABLE DATA  

COLLECTION TERMINAL


Manual #: COAMIIUG0000 


Opertaions & Programming Manual 


PART 2 – Apex-Trak 


COMPSEE 


All rights reserved.  No part of this manual, including illustrations and specifications, may be reproduced or used in 
any form or by any means without permission in writing from Compsee. 
 
The material contained in this manual is for informational purposes only and subject to change without notice. 


©Compsee 1997 


Printed in USA 

Revision 1.2 


Summary of Contents for apex II

Page 1: ...x Trak COMPSEE All rights reserved No part of this manual including illustrations and specifications may be reproduced or used in any form or by any means without permission in writing from Compsee Th...

Page 2: ...nventory Item Track or Physical Inventory 17 Navigating Through Apex Trak Menus and Options 17 Using the ALT Key 18 Set Date and Time 18 View the Amount of Free Memory 19 Read Bar Codes 19 View the Co...

Page 3: ...y AI Item Track IT and Physical Inventory PI programs Since the programs are factory installed the novice can begin using the Apex II immediately The novice can read this manual to become familiar wit...

Page 4: ...ury Caution and warning messages are shown in boxes How This Manual Is Organized This manual is designed for Initial self instruction Quick reference for procedures that are performed only occasionall...

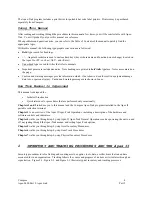
Page 5: ...fer Data To PC Figure 2 1 Typical Asset Tracking Inventory Process Record When Items Are Issued To Internal Customer Record When Items Are Returned From Internal Customer Assign Numbers and Tags To It...

Page 6: ...can Add view and edit data records during inventory Use a minimum of 4 fields and maximum of 8 fields of data for each asset being tracked Record observable information such as physical description r...

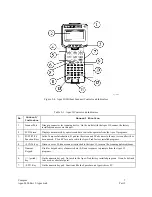
Page 7: ...F1 F2 F3 F4 Function Keys In the Compsee Introduction F1 pauses the screen and F4 advances to the next screen after it has been paused F2 and F3 are not used in the Apex Trak factory installed progra...

Page 8: ...on Red in color Used to turn the Apex II on and off 14 RS 232 Port RJ 10 phone connector for cable connecting the Apex II to the PC Apex Trak Main Menus Procedures from the menus shown on this page ar...

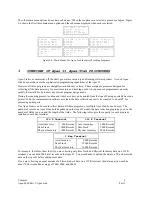
Page 9: ...d code to meet any custom program design needs During the scanning process location and item bar codes can be printed from the Apex II using a portable bar code printer With the communication software...

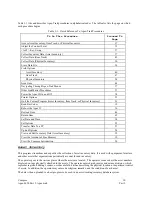
Page 10: ...eboot the Apex II 16 Restock Item 46 Return Item 45 Set Date and Time 18 Set Options 22 Transfer Data To a PC 27 Upload Options 24 View and Edit Inventory Data Asset Inventory 39 View the Amount of Fr...

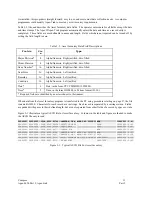
Page 11: ...24 hour format 23 30 Required fields are identified by an asterisk next to their names When data from the Asset Inventory program is transferred to the PC using procedures starting on page 27 the file...

Page 12: ...nters data for all fields except the date and time stamps The Apex II Apex Trak program automatically enters the date and time as a record entry is completed The fields are user definable in name and...

Page 13: ...y attached to the items and then keys the quantity of the scanned items The data is then uploaded to a host program to be used in an inventory tracking database system As installed this program is str...

Page 14: ...I AND Apex Trak PROCEDURES The following paragraphs describe procedures that are not specific to one of the Inventory Tracking programs These procedures control the Apex II and guide the operator thro...

Page 15: ...1 Press the ALT key The cursor on the LCD screen is disabled frozen 2 Press J until the contrast is at the desired level The contrast increases until the J key is released Alternatively you can press...

Page 16: ...not been saved to flash Press and hold the ALT and the period key while you turn the Apex II on by pressing the red power on key Perform the following action to reboot the Apex II erase all data coll...

Page 17: ...avigating down the Apex Trak menus press the alpha key associated with your menu choice When navigating up the Apex Trak program Press the Q key if a menu is currently displayed For example use Q to d...

Page 18: ...e Apex Trak main menu to set the current date and time on the Apex II 1 Press the S key The Date and Time screen is displayed with the cursor in the year field The currently set time is displayed D a...

Page 19: ...scanned bar codes are stored in one of three data files to be later transferred to a PC This procedure is used to simply read and verify a bar code number and symbology Note You cannot scan bar codes...

Page 20: ...nner is connected to the Apex II but it cannot read the scanned bar code the LASER BEAM ON message is displayed on the LCD screen until the SCAN key or trigger on the scanning device is released View...

Page 21: ...es settings to print not print location tags print not print item tags and edit the tag headers for the current program Upload Options Change settings to transfer data via RS 232 directly to the PC or...

Page 22: ...t 2 Select the desired option by pressing the key associated with that option Then proceed to the page listed in the following table To perform this procedure Proceed to this page Field Options 22 Pri...

Page 23: ...9 4 9 0 T r a n s p o r t P 2 2 4 2 2 Select the printer that is connected to your Apex II The Barcode Printing screen is displayed prompting you to turn Location barcode tag printing on Yes or off No...

Page 24: ...bar code Refer to Table 3 2 Table 3 3 and Table 3 4 for names assigned to data fields when the Apex II is delivered 7 Use the BKSP key to delete unwanted characters Then type line 2 of the tag header...

Page 25: ...ing the transfer procedure beginning on page 27 Then press ENTER A data entry screen is displayed The number of records to be transferred to the wedge in each block of transmitted data can be set from...

Page 26: ...ram and the current program s Set Options menu is displayed Erase Data File This procedure deletes all the data in the current program It is usually performed only after data is successfully transferr...

Page 27: ...rm the procedure beginning on page 27 If you are transferring data via LinkMaster perform the procedure beginning on page 28 If you are transferring data via a Wedge perform the following procedure Tr...

Page 28: ...ommunications utility is ready for data transfer Then press any key on the Apex II 6 The Erase Data File screen is displayed E r a s e D a t a F i l e D i d A L L t h e D a t a T r a n s f e r Y e s N...

Page 29: ...I handheld computer Please use your arrow keys to select a menu choice 01 19 1996 15 22 3 Select the Communications Port option A status box below is displayed If your computer has more than one port...

Page 30: ...Apex II Apex Trak main menu select A sset Invent I tem Track or P hysical Invent The associated menu is displayed Press T The RS 232 Upload screen is displayed prompting you to run LinkMaster or pres...

Page 31: ...on the PC Once data has been copied to the PC the operator may import it into any spreadsheet report generator or other computer software application that supports the import of ASCII data Other LinkM...

Page 32: ...01 356 Assure that cable coming from the Apex II is physically connected to the computer port selected on the PC LinkMaster program Page 29 describes the port selection procedure 2 Assure that the Ape...

Page 33: ...ash instead of leaving it in RAM 8 Unless you have been directed otherwise Select Y and press ENTER A prompt asks if you want to send the Run Command starting Apex Trak after the program has been down...

Page 34: ...e Then the line is cleared and the cycle repeats itself This processing indication continues until downloading is complete Establishing communications please wait Sending Immediate Command to Apex Cur...

Page 35: ...es the download procedure is complete and you may quit out of LinkMaster on the PC Establishing communications please wait Sending Immediate Command to Apex Current version in Apex v1 19a Apex Operati...

Page 36: ...ction menu which explains how to navigate through the introduction S C R E E N F L O W F 1 t o P a u s e F 4 t o a d v a n c e Q t o c a n c e l Press Q to display the main menu A p e x I I A s s e t...

Page 37: ...iture appliance etc during inventory If you are using a printer and want to print bar codes for locations or item numbers turn these options on see page 23 Otherwise turn the printing options off see...

Page 38: ...S c a n t h e D e s c r i p t i o n _ _ _ _ _ _ _ _ _ _ _ _ _ _ _ _ 5 Key the description or press ENTER The screen prompts you to key remarks for the item number entered in Step 4 D a t a C o l l e c...

Page 39: ...e I t e m N u m b e r _ _ _ _ _ _ _ _ _ _ _ _ _ _ _ _ 2 Key or scan the number for the item to be viewed Characters are displayed as entered If the location uses 8 characters the next screen is autom...

Page 40: ..._ _ _ _ _ _ _ _ _ _ _ _ _ _ D e s c r i p t i o n C o m _ _ _ _ _ _ _ _ _ _ _ _ _ 6 Type the desired data Characters are displayed as entered If the data uses the maximum characters and spaces allowed...

Page 41: ...i s i o n I t e m N u m b e r F i e l d S e t t i n g s _ _ _ _ _ _ _ _ _ _ _ _ _ _ _ _ I t e m N u m b e r D e s c r i p t i o n F i e l d S e t t i n g s _ _ _ _ _ _ _ _ _ _ _ _ _ _ _ _ D e s c r i...

Page 42: ...ing message in Step 6 press ENTER and skip to Step 9 Otherwise continue procedures in Step 8 8 Use the BKSP and number keys to enter the desired field length This is the desired length for the data fi...

Page 43: ...ng an item page 44 b Returning an Item page 45 c Stocking an Item page 46 Perform the following action from the Item Track menu to access the procedure you wish to perform Press the first letter of th...

Page 44: ...ically displayed I s s u e K e y o r S c a n t h e D e s t i n a t i o n D E P T 0 6 _ _ Otherwise press ENTER The screen prompts you for the first item number issued to the destination entered in Ste...

Page 45: ...ou select yes or no the procedure continues as above Return Item This procedure records the item number and a movement code of R for each item tool merchandise etc being tracked If you are not using a...

Page 46: ...are turned off 1 From the Item Track menu press S The ReStock screen prompts you for the Item Number R e S t o c k K e y o r S c a n t h e I t e m N u m b e r _ _ _ _ _ _ _ _ 2 Key or scan the number...

Page 47: ...al Inventory options are not affected Follow procedures beginning on page 22 to set all options except field options Perform the following procedure to set the Name and length for Item Track data fiel...

Page 48: ...6 Type the desired field name Characters are displayed as entered If the field name uses the maximum allowed 15 characters the next screen is automatically displayed F i e l d S e t t i n g s _ _ _ _...

Page 49: ...t is displayed on the Apex II in capital letters 3 The greater than symbol moves in one of two slightly different patterns through the list depending on which arrow key you press Use the arrow key you...

Page 50: ...ollection screen is displayed D a t a C o l l e c t i o n K e y o r S c a n t h e L o c a t i o n _ _ _ _ _ _ _ _ 2 Key or scan the location for the inventory Characters are displayed as entered If th...

Page 51: ...l Inventory and display the Apex Trak main menu press Q NOTES a If an item number is already in the data file when you key it the ReCount screen is displayed Recount the pieces of this item and re key...

Page 52: ...ress ALT Q The Physical Inventory menu is displayed P h y I n v e n t C o l l e c t D a t a T r a n s f e r D a t a O p t i o n s The following procedure is for when the printing options are turned on...

Page 53: ...inting P r i n t B a r c o d e D o y o u w i s h t o P r i n t a T a g Y e s N o _ 5 If necessary press the arrow keys to place parentheses around Yes or No Then press ENTER Parentheses toggle between...

Page 54: ...Perform the following procedure to set the Name and length for Physical Inventory data fields Note The length of a data field cannot be changed if Physical Inventory data has been collected and is st...

Page 55: ...f the field name uses the maximum allowed 15 characters the next screen is automatically displayed F i e l d S e t t i n g s _ _ _ _ _ _ _ _ _ _ _ _ _ _ _ _ F i e l d N a m e E V I D E N C E C T L N O...

Page 56: ...Otherwise continue to Step 10 10 Press ALT Q The Physical Inventory options menu is displayed P h y I n v e n t F i e l d O p t i o n s P r i n t e r O p t i o n s U p l o a d O p t i o n s 11 Press...

Reviews: