background image


PC-HELPER 


RS-232C 1ch Serial I/O Board 
for Low Profile PCI 

COM-1(LPCI)H


RS-232C 2ch Serial I/O Board 
for Low Profile PCI 

COM-2(LPCI)H 

RS-232C 4ch Serial I/O Board 
for Low Profile PCI 

COM-4(LPCI)H


User’s Guide 


CONTEC CO.,LTD.


Summary of Contents for COM-1(LPCI)H

Page 1: ...RS 232C 1ch Serial I O Board for Low Profile PCI COM 1 LPCI H RS 232C 2ch Serial I O Board for Low Profile PCI COM 2 LPCI H RS 232C 4ch Serial I O Board for Low Profile PCI COM 4 LPCI H User s Guide CONTEC CO LTD ...

Page 2: ...wing list that your package is complete If you discover damaged or missing items contact your retailer Product Configuration List Board One of the following COM 1 LPCI H COM 2 LPCI H or COM 4 LPCI H First step guide 1 COM Setup Disk 1 CD ROM 1 Bracket for PCI 1 1 The CD ROM contains the driver software and User s Guide this guide CD Bracket for PCI Board First step guide ...

Page 3: ...subject to change without notice All relevant issues have been considered in the preparation of this document Should you notice an omission or any questionable item in this document please feel free to notify CONTEC CO LTD Regardless of the foregoing statement CONTEC assumes no responsibility for any errors that may appear in this document or for results obtained by the user as a result of using t...

Page 4: ...al 8 2 SETUP 9 What is Setup 9 Using the Board under Windows Using the Standard COM Driver Software COM Setup Disk9 Using the Board under Windows Using the Driver Library API PAC W32 9 Using the Board under Linux Using the Standard COM Driver Software COM Setup Disk 10 Operating Systems Other than Windows or Linux 10 Step 1 Setting the Hardware 11 Replacing the Bracket 11 Parts of the Board and Fa...

Page 5: ...Connecting it directly from the on board connector 29 In the case of COM 2 LPCI H 30 Using the 9 pin D SUB Connector Conversion Cables 30 Connecting it directly from the on board connector 31 In the case of COM 4 LPCI H 32 Using the 9 pin D SUB Connector Conversion Cables 32 Connecting it directly from the on board connector 33 Types of Cable and Example Connections 34 4 FUNCTIONS 35 Communication...

Page 6: ...COM 1 LPCI H COM 2 LPCI H COM 4 LPCI H v 6 ABOUT HARDWARE 45 For detailed technical information 45 Hardware specification 46 Differences between the COM 1 LPCI H COM 2 LPCI H and COM 4 LPCI H 49 ...

Page 7: ...vi COM 1 LPCI H COM 2 LPCI H COM 4 LPCI H ...

Page 8: ...00bps can be set When using the bundled Standard COM Driver Software and Driver library API PAC W32 baud rates from 15 to 921 600bps can be set Possibly used as Windows Linux standard COM ports using the bundled driver library Comes with a driver software that allows the products to be used under Windows Linux in the same way as COM ports on the PC Under Windows the product supports the OS standar...

Page 9: ...m and 9 pin D SUB connectors male or female type for your own cables are available as optional COM 2 LPCI H Distribution cable for 2channels and 44 pin D SUB connectors male type for your own cables are available as optional COM 4 LPCI H Distribution cable for 4channels and 44 pin D SUB connectors male type for your own cables are available as optional The control line for RS 232C can be controlle...

Page 10: ...ated version from the CONTEC s Web site http www contec com comdrv For more details on the supported OS applicable language and new information please visit the CONTEC s Web site CAUTION The maximum number of COM ports able to be used depends on the configuration of your OS Driver library API PAC W32 Available for downloading free of charge from the CONTEC web site API PAC W32 is the library softw...

Page 11: ...ersion Cross Cable 25F 9F 1 8m RSC 25F 9F Connection Conversion Cable for Serial I O 44M 9M x 4 250mm PCE44 9P4S Connection Conversion Cable for Serial I O 44M 9M x 2 250mm PCE44 9P2S D SUB9P Male Connector Set 5 Pieces CN5 D9M D SUB9P Female Connector Set 5 Pieces CN5 D9F D SUB25P Male Connector Set 5 Pieces CN5 D25M D SUB25P Female Connector Set 5 Pieces CN5 D25F D SUB44P Male Connector Set 5 Pi...

Page 12: ... be free of charge only when this device is returned freight prepaid with a copy of the original invoice and a Return Merchandise Authorization to the distributor or the CONTEC group office from which it was purchased This warranty is not applicable for scratches or normal wear but only for the electronic circuitry and original boards The warranty is not applicable if the device has been tampered ...

Page 13: ...ath and the destruction of equipment and resources Understand the meanings of these labels to operate the equipment safely DANGER DANGER indicates an imminently hazardous situation which if not avoided will result in death or serious injury WARNING WARNING indicates a potentially hazardous situation which if not avoided could result in death or serious injury CAUTION CAUTION indicates a potentiall...

Page 14: ...n the terminals with industrial alcohol Do not install or remove the board to or from the slot while the computer s power is turned on Otherwise the board may malfunction overheat or cause a failure Doing so could cause trouble Be sure that the personal computer or the I O expansion unit power is turned off Make sure that your PC or expansion unit can supply ample power to all the boards installed...

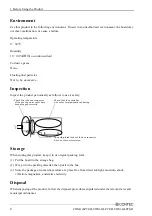
Page 15: ... the board has no dust or foreign matter adhering The gold plated leads of the bus connector have no stain or corrosion Check that the bus connector of the board and its cable have been plugged correctly Storage When storing this product keep it in its original packing form 1 Put the board in the storage bag 2 Wrap it in the packing material then put it in the box 3 Store the package at room tempe...

Page 16: ... You can use the diagnosis program later to check whether the software and hardware function normally Step 1 Setting the Hardware Step 2 Installing the Hardware Step 3 Initializing the Software On the CD ROM refer to the PCI Readmee txt file and the installation instructions files for each OS located in the PCI InstDoc If Setup fails to be performed normally see the Setup Troubleshooting section a...

Page 17: ...re COM Setup Disk in the supplied CD ROM The procedure for using the software is described in the Linux Readmee htm file See also the following parts of this manual as required This chapter Step 1 Setting the Hardware Operating Systems Other than Windows or Linux Refer to the following if using on an OS other than Windows or Linux This chapter Step 1 Setting the Hardware Chapter 4 Functions Chapte...

Page 18: ...ctory defaults untouched You can change board settings later Replacing the Bracket The board is shipped with the bracket for Low Profile PCI If you wish to mount the board in a PCI slot replace this with the PCI bracket The diagram below shows how to replace the bracket Screw Bracket for the PCI Use a flathead screwdriver or hexagonal spanner to undo and tighten the screws Remove the screws and re...

Page 19: ... SW1 BOARD ID SW1 BOARD ID Board ID setting switch SW1 0 1 2 3 4 5 6 7 9 A B C D E F 8 Interface connector CN1 JP1 1 2 3 JP1 PCI bus slot power voltage setting jumper Figure 2 2 Component Locations COM 1 LPCI H COM 2 LPCI H COM 2 LPCI H SW1 BOARD ID SW1 BOARD ID Board ID setting switch SW1 0 1 2 3 4 5 6 7 9 A B C D E F 8 Interface connector CN1 JP1 1 2 3 JP1 PCI bus slot power voltage setting jump...

Page 20: ...CI H 13 COM 4 LPCI H COM 4 LPCI H SW1 BOARD ID SW1 BOARD ID Board ID setting switch SW1 0 1 2 3 4 5 6 7 9 A B C D E F 8 Interface connector CN1 JP1 1 2 3 JP1 PCI bus slot power voltage setting jumper Figure 2 4 Component Locations COM 4 LPCI H ...

Page 21: ...et the arrow to the board ID 1 2 3 4 5 6 0 7 9 A B C D E F 8 BOARD ID SW1 Board ID 0 Factory setting Figure 2 5 Board ID Settings SW1 Setting the Supply Voltage Some PCI bus slots on the PC may supply power only at 3 3 V where 5 V power is not available In that case change the supply voltage of the board before use Setting method To set the PCI bus slot supply voltage use the on board jumper When ...

Page 22: ...t PCI bus board 5 V PCI bus slot 3 3 V PCI bus slot A B Slit for 5 V PCI bus slot Slit for 3 3 V PCI bus slot CAUTION Do not touch the board s metal plated terminals edge connector with your hands Otherwise the board may malfunction overheat or cause a failure If the terminals are touched by someone s hands clean the terminals with industrial alcohol Do not install or remove the board to or from t...

Page 23: ...I PAC W32 install from API PAC W32 instead of from the supplied CD ROM If you install from the CD ROM by mistake uninstall API SIO as described in Uninstalling the Driver Software in Chapter 5 Software The board cannot be properly installed unless the resources I O addresses and interrupt level for the board can be allocated Before attempting to install the board first determine what PC resources ...

Page 24: ... which this board is attached Click on the device PCI Serial Port or PCI Simple Communication Controller and open its properties by clicking the Properties button 1 Please search for Devices and Printers case of Windows 8 The category of the board you have just added is displayed PCI Serial Port or PCI Simple Communication Controller ...

Page 25: ... click the Update Driver button 3 The Driver Installation Wizard is open Click Browse my computer for driver software 4 Specify that folder on the CD ROM which contains the setup information INF file to register the board Source folder PCI ComDrv You have now finished installing the hardware 1 2 The category of the board you have just added is displayed PCI Serial Port or PCI Simple Communications...

Page 26: ... Locate and install driver software 2 When the Found New Hardware window is displayed insert the accompanying CD ROM COM Setup Disk into the CD ROM drive After a while the device installation process begins You have now finished installing the hardware The category of the board you have just added is displayed PCI Serial port ...

Page 27: ...u are using Windows NT 4 0 the Found New Hardware Wizard is not started Go to Step 3 Initializing the Software 2 Specify that folder on the CD ROM which contains the setup information INF file to register the board Source folder PCI ComDrv The name of the board you have just added is displayed COM 1 LPCI H COM 2 LPCI H COM 4 LPCI H The name of the board you have just added is displayed COM 1 LPCI ...

Page 28: ... Installation of the Communication Port starts next If prompted for a file by the OS specify the location of the setup information INF file as described above You have now finished installing the hardware The check method of the completion of hardware installation 1 Select System from Control Panel and open Device Manager 2 Check that the names of the boards you are using are registered correctly ...

Page 29: ...dows 8 7 Server 2008 Vista XP Server 2003 2000 On Windows 8 7 Server 2008 Vista XP Server 2003 and 2000 the COM ports are already assigned by the hardware installation step Run Device Manager as described below if you wish to view or modify the COM port settings Start Device Manager 1 Select System from Control Panel and start Device Manager 2 Check that the new COM ports are displayed in the Port...

Page 30: ...odify the COM port number 3 Clicking the Advanced button opens the Advanced Settings for COMn window Use the COM Port Number combo box to select the COM port number By selecting the Compulsion Half Duplex the software settings are forced to switch from full duplex communication to half duplex By selecting the Used Serial Mice support for the serial mouse devices is enabled You have now finished in...

Page 31: ...to register the board type COM port number and related settings Alternatively double click on a board type name that is already displayed on the screen and modify the COM port number and related settings On other than Windows NT double click on the board type name that is already displayed on the screen and modify the COM port number and related settings Updating the Settings 1 Select Save setting...

Page 32: ...is equivalent to the Hyper Terminal program provided with Windows Serial Communications Diagnostic Program CommChk exe Performs actual communications and indicates whether the results are correct or not error The following describes the procedure for testing using the serial communications diagnostic program CommChk exe Check Method Obtain an RS 232C cross cable If you do not have a cross cable yo...

Page 33: ... Settings COM Setup Specify the number of the COM port you wish to test If connecting two COM ports via a cross cable specify the respective COM ports in Device1 and Device2 When performing loopback communications on a single COM port set the same port number in both Device 1 and Device 2 Communication Settings Specify the Bits Second Data bits and other settings you wish to use ...

Page 34: ...H COM 4 LPCI H 27 Start test Click the Start button to start the test using the specified conditions View test result The test result is displayed in the Message window A successful completion message appears if the test completed OK ...

Page 35: ...t driver software was installed by mistake Windows 8 7 Server 2008 Vista XP Server 2003 2000 The API SIO software from the Driver Library API PAC W32 cannot be installed in the PC at the same time as the Standard COM Driver Software COM Setup Disk from the supplied CD ROM The COM Setup Disk and the API SIO software from API PAC W32 are intended for different purposes Please only use the software t...

Page 36: ... external device use the appropriate cable which can be purchased separately If making your own cable use a CN5 D9F or similar connector which can be purchased separately Pin Assignment CN1 6 9 1 5 Connector used DELC J9PAF 20L9 mfd by JAE Male equivalent Applicable connector 17JE 13090 02 D8C mfd by DDK Female CN5 D9F mfd by CONTEC Female Five connector Screw nut UNC 4 40 inch screw Figure 3 1 In...

Page 37: ...n D SUB male connector Thumb screw UNC 4 40 inch screw Connector used 9 pin D SUB male connector Thumb screw UNC 4 40 inch screw Applicable connectors 17JE 13090 02 D8C mfd by DDK Female SG 1 DTR 1 TxD 1 RxD 1 DCD 1 9 8 7 6 RI 1 CTS 1 RTS 1 DSR 1 5 4 3 2 1 CH1 SG 2 DTR 2 TxD 2 RxD 2 DCD 2 9 8 7 6 RI 2 CTS 2 RTS 2 DSR 2 5 4 3 2 1 CH2 CH1 CH2 Cable 9 conductor shielded cable Cable length 250mm Condu...

Page 38: ... mfd by COXOC Male CN5 D44M mfd by CONTEC Male Five connector set Screw nut UNC 4 40 inch screw 30 16 Figure 3 4 Interface Connector COM 2 LPCI H Pin No Signal name Pin No Signal name Pin No Signal name 44 DCD1 30 DSR1 15 CTS1 43 TxDC1 29 RxD1 14 RI1 42 SG1 28 RTS1 13 DTR1 41 N C 27 N C 12 N C 40 DCD2 26 DSR2 11 CTS2 39 TxD2 25 RxD2 10 RI2 38 SG2 24 RTS2 9 DTR2 37 N C 23 N C 8 N C 36 N C 22 N C 7 ...

Page 39: ... SUB male connector Thumb screw UNC 4 40 inch screw Cable 9 conductor shielded cable Cable length 250mm Conductor size AWG 28 Connector used 9 pin D SUB male connector Thumb screw UNC 4 40 inch screw Applicable connectors 17JE 13090 02 D8C mfd by DDK Female SG 1 DTR 1 TxD 1 RxD 1 DCD 1 9 8 7 6 RI 1 CTS 1 RTS 1 DSR 1 5 4 3 2 1 CH1 SG 4 DTR 4 TxD 4 RxD 4 DCD 4 9 8 7 6 RI 4 CTS 4 RTS 4 DSR 4 5 4 3 2 ...

Page 40: ... COXOC Male CN5 D44M mfd by CONTEC Male Five connector set Screw nut UNC 4 40 inch screw 30 16 Figure 3 7 Interface Connector COM 4 LPCI H Pin No Signal name Pin No Signal name Pin No Signal name 44 DCD1 30 DSR1 15 CTS1 43 TxDC1 29 RxD1 14 RI1 42 SG1 28 RTS1 13 DTR1 41 N C 27 N C 12 N C 40 DCD2 26 DSR2 11 CTS2 39 TxD2 25 RxD2 10 RI2 38 SG2 24 RTS2 9 DTR2 37 N C 23 N C 8 N C 36 DCD3 22 DSR3 7 CTS3 ...

Page 41: ...reatment of the signal lines in the connector is required ensure that this is done in accordance with the specifications TxD RxD RTS CTS DTR DSR SG TxD RxD RTS CTS DTR DSR SG Transmit Data Receive Data Request to Send Clear to Send Data Terminal Ready Data Set Ready Signal Ground External device Figure 3 9 Example Connection to a Modem Straight cable TxD RxD RTS CTS DTR DSR SG TxD RxD RTS CTS DTR ...

Page 42: ... Manager on Windows 8 7 Server 2008 Vista XP Server 2003 2000 and by the API TOOL configuration under Windows NT Me 98 and 95 The FIFO trigger size specifies the data buffer size and determines the timing for generating hardware interrupts Setting a large FIFO trigger size lightens the load on the CPU by reducing the number of hardware interrupts generated by sending or receiving data However as d...

Page 43: ...alue Ex 460800 9600bps 48 As the result is an integer this baud rate can be set 460800 128000bps 3 6 As the result contains a fractional part this baud rate cannot be set Clock 1 mode 230400 Desired baud rate Division register setting value Ex 230400 9600bps 24 As the result is an integer this baud rate can be set 230400 128000bps 1 8 As the result contains a fractional part this baud rate cannot ...

Page 44: ...ator register Setup error Baud Rate Generator register Setup error 2 57600 4 28800 57600 5 23040 46080 8 14400 28800 57600 15 7680 15360 30720 61440 50 2304 4608 9216 18432 75 1536 3072 6144 12288 110 1047 0 026 2094 0 026 4189 0 0022 8378 0 0022 134 5 857 0 058 1713 0 0006 3426 0 0006 6852 0 0006 150 768 1536 3072 6144 300 384 768 1536 3072 600 192 384 768 1536 1200 96 192 384 768 1800 64 128 256...

Page 45: ...4 Functions 38 COM 1 LPCI H COM 2 LPCI H COM 4 LPCI H ...

Page 46: ...s of NET Framework SerialPort class Under Linux the software functions as a standard Linux tty driver The standard open close read and write etc routines are supported Refer to the PCI Readmee txt and Linux Readmee htm files on the CD ROM for details About Sample programs Sample programs are provided in the Samples folder on the CD ROM Use the sample programs for reference and testing when develop...

Page 47: ... LPCI H Visual C sample programs 1 Transmit sample Sends data entered from the keyboard Execute from the command prompt Source folder Samples Vc Comsend c file 2 Receive sample Displays received data on the screen Source folder Samples Vc Comread c file ...

Page 48: ...lications then click the Add Remove button to automatically start the uninstall procedure Windows 8 7 Server 2008 Vista 1 Open the Control Panel and launch Device Manager from the System applet 2 Expand Multifunction adapters and delete CONTEC Co Ltd XXXXXXXXXX installed hardware name To also delete all the driver files check Remove this device software Windows Me 98 CAUTION CONTEC COM DRV WDM dri...

Page 49: ... the Windows Vista XP Server 2003 2000 Environment 1 Run SETUP EXE from the API PAC W32 CD ROM or from the file hereafter API PAC W32 downloaded from the Contec s download site to install the API SIO driver 2 Reboot your OS and the Hardware Wizard will be started 3 During the installation you will be prompted for an INF file Specify the API PAC W32 INF folder designated for the OS and device type ...

Page 50: ...InstDoc Installation instructions for each OS Samples Various sample programs VB Sample program for Visual Basic VC Sample program for Visual C VB NET Sample program for VisualBasic NET for SerialPortClass VCS Sample program for VisualC NET for SerialPortClass USB USB related files UsersGuide Manual of hardware PDF UTILITY Various utilities CommChk Self diagnostic program Loopback communication te...

Page 51: ...5 About Software 44 COM 1 LPCI H COM 2 LPCI H COM 4 LPCI H ...

Page 52: ...re specifications and hardware related supplementary information For detailed technical information For further detailed technical information Technical Reference including the information such as an I O map configuration register etc visit the Contec s web site http www contec com support to call for it ...

Page 53: ...ins 2 and 3 connected 4 Operating temperature 0 50 C 10 90 RH No condensation Bus specification PCI 32bit 33MHz Universal key shapes supported 4 Dimension mm 121 69 L x 63 41 H Connector used 9 pin D SUB connector DELC J9PAF 20L9 mfd by JAE M male type equivalent Weight 60g 1 These items can be set by software For the Driver Library API PAC W32 and the Standard COM Driver Software COM Setup Disk o...

Page 54: ... temperature 0 50 C 10 90 RH No condensation Bus specification PCI 32bit 33MHz Universal key shapes supported 4 Dimension mm 121 69 L x 63 41 H Connector used 44 pin D SUB female connector 103A 44FGTBBB3 mfd by COXOC equivalent Weight 60g 1 These items can be set by software For the Driver Library API PAC W32 and the Standard COM Driver Software COM Setup Disk on the supplied CD ROM the range is 1...

Page 55: ...apes supported 4 Dimension mm 121 69 L x 63 41 H Connector used 44 pin D SUB female connector 103A 44FGTBBB3 mfd by COXOC equivalent Weight 60g 1 These items can be set by software For the Driver Library API PAC W32 and the Standard COM Driver Software COM Setup Disk on the supplied CD ROM the range is 15 921 600 bps 2 Data transmission at high speed may not be performed normally depending on the ...

Page 56: ...A Max 3 3VDC 100mA Max 5VDC 160mA Max 3 3VDC 160mA Max COM 2 LPCI H Board No No 7219 No 7219B No 7219C PCI bus specification 32bit 33MHz 32bit 33MHz 32bit 33MHz Universal key shapes supported Absent 1 Present 2 Present 2 Power voltage setting jumper JP1 Absent Present Present Power consumption 5VDC 150mA Max 5VDC 100mA Max 3 3VDC 100mA Max 5VDC 170mA Max 3 3VDC 170mA Max COM 4 LPCI H Board No No 7...

Page 57: ...awa ku Osaka 555 0025 Japan Japanese http www contec co jp English http www contec com Chinese http www contec com cn No part of this document may be copied or reproduced in any form by any means without prior written consent of CONTEC CO LTD 08302013 04112003 Management No A 46 740 08302013_rev6 Parts No LYCP244 ...

Reviews: