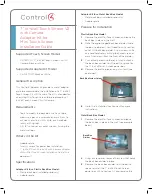
™
Supported Touch Screen Models
• C4-TW7CO – 7” In-Wall Touch Screen V2 with
Camera, Black or White
Supported Adapter Kit Model
• C4-7V2TOMT, Black or White
General Description
This Control4® adapter kit provides a metal adapter
plate to accommodate the installation of a 7” In-Wall
Touch Screen V2 with Camera. The kit is intended for
an existing Mini Touch Screen to be replaced by a 7”
In-Wall Touch Screen V2 with Camera.
Requirements
• Tools to modify the back box, such as a tape
measure, a pencil, a screwdriver, a small saw to
cut heavy plastic, a utility knife, or a handheld
rotary cutting tool.
• A 5/16” nut driver or socket wrench, if using the
metal wall box.
What’s in the Kit
• Adapter plate
• Two (2) screws for power box installation
• 7” In-Wall Touch Screen V2 with Camera Adapter
Kit for Mini Touch Screen Installation Guide
(this
document)
Specifications
Adapter Kit for a Plastic Back Box Model:
• Plastic back box (installed previously)
• Adapter plate
7” In-Wall Touch Screen V2
with Camera
Adapter Kit for
Mini Touch Screen
Installation Guide
Adapter Kit for a Metal Back Box Model:
• Metal back box (installed previously)
• Adapter plate
Prepare for Installation
Plastic Back Box Model
1
Remove the old Mini Touch Screen and leave the
back box in place in the wall.
2
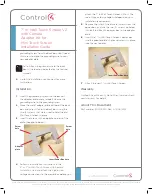
Note the angle-shaped back box divider inside
the box (see below). You’ll need to cut a section
out of this back box divider. Using a heavy knife
or a handheld rotary cutting tool, measure and
mark 1 inch down from the front of the divider.
3
Cut vertically down so there’s a 1-inch cutout in
the back box divider. You’ll need this space for
the 7” In-Wall Touch Screen power box.
4
Remove the plastic piece you just cut out (see
photo next).
5
Go to the ‘Installation’ section next for more
instructions.
Metal Back Box Model:
1
Remove the old Mini Touch Screen and leave
the back box in place in the wall (see example
below).
2
Using a screwdriver, remove the screw that holds
the back box divider in place.
3
Remove the back box divider. You’ll need this
space to install the 7” In-Wall Touch Screen
power box. While you’re at it, also remove the
Back Box
Divider
Back Box Divider Cutout

