


Supported models
• SR260 System Remote Control-English (C4-SR260)
• SR260-I System Remote Control-Iconic (C4-SR260-I)
Introduction
The Control4® SR260 System Remote Control goes beyond a typical
“universal” remote that simply learns IR codes from TVs, VCRs, CD
players, and DVD players. This remote control offers complete system
control in an elegant and compact design. The remote is equipped with
a full-color screen, battery gauge, hidden ambient light sensor, faster
processor, iconic button layout (C4SR260-I model), improved List
Navigator, nine programmable shortcut buttons, and more. It’s included
with the purchase of select Control4 controllers, and can also be
purchased separately. The SR260 requires Control4 OS 2.7 or later.
Use this guide along with the
SR260 User Guide
.
Use the remote to:
• Navigate system menus and access network-stored media on a TV or
monitor with the on-screen Navigator
• Navigate system menus and access media information on the
remote’s display
• Control all system devices
Features
• Bi-directional communication with system components
• ZigBee® wireless mesh networking technology
• Full access to system components
• Full-color screen display
• Back-lit keys and display for ease of use in dark rooms
• Ambient light sensor for efficient control of backlighting
• 50 buttons total:
• Two quick-access buttons (WATCH and LISTEN) to display either
the most used AV devices or a list of all available AV devices
• Nine programmable buttons
• Eight transport control buttons
• Standard alphanumeric buttons
• Control4 button
• Paging functionality
• Standard control features for digital satellite systems (DSS), cable
boxes, tuners, digital video recorders (DVR), DVD changers/players,
CD changers/players, MP3 players, VCRs, or TVs
• Built-in motion detection can wake up the remote automatically
• Powered by four AA batteries (included)
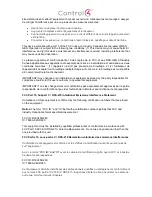
SR260 buttons
B
C
D
E
F
H
K
N
Q
O
R
T
U
S
P
M
L
I
J
G
A
SR260 English
B
C
D
E
F
H
K
N
Q
O
R
T
U
S
P
M
L
I
J
G
A
SR260-I Iconic
ROOM OFF
—Turns off devices in
room
Display
—Screen that displays color
text options
WATCH
—Displays video devices
Control4 button
—Displays
Control4 Home page on TV
LISTEN
—Displays audio devices
LIST
—Displays system’s menu
(Navigator) on the display screen
Programmable buttons
—Functions
vary
GUIDE
—Displays TV program
listings
▲
PAGE/PAGE
▼
—Scrolls pages up
or down
PREV
—Returns to previous
channel or screen
VOL
—Controls device volume
SELECT
and
directional buttons
—
Scrolls up, down, left, or right; the
center SELECT button selects the
menu option
A
J
D
G
B
K
E
H
C
L
F
I
CH
—Scrolls up or down through
TV channels
MUTE
—Toggles device sound off
or on
INFO
—Shows program information
MENU
—Accesses device features
and settings
CNCL
—Sends “Cancel” or “Exit”
command
DVR
—Controls the DVR
Playback control buttons:
•
Rewind/Fast forward
—Rewinds
or fast forwards
•
Skip back/Skip forward
—Skips
back or forward
•
Play
—Plays
•
Record
—Starts recording
•
Stop
—Stops
•
Pause
—Pauses
Programmable buttons
—Functions
vary
Alphanumeric buttons
—Directly
enters channel numbers or text
descriptions
O
N
M
R
P
S
T
U
Q
Install and maintain batteries
Install the batteries
Install the four AA batteries (included) into the back of the SR260
according to the diagram in the battery compartment (with the + and -
terminals aligned correctly).
Battery use and care
• Keep the battery contacts and compartment clean.
• Remove the batteries from the remote if it is not going to be used
for several months.
• Extreme temperatures reduce battery performance. Avoid putting
the SR260 in very warm places.
Battery replacement safety rules
Warning!
To prevent a battery short, leakage or rupture:
• Use typical AA Alkaline batteries only.
• Do not mix battery types, such as Alkaline and rechargeable
NiMH batteries.
• Do not attempt to recharge a battery unless the battery is
specifically marked “rechargeable.”
• Never dispose of batteries in a fire.
AVERTISSEMENT!
Pour empêcher court-circuiter, fuite ou
rupture de batterie:
• Utilisez les accumulateurs alcalins typiques d’AA seulement.
• Ne mélangez pas les types de batterie, tels que les batteries
alkalines et rechargeables de NiMH.
• N’essayez pas de recharger une batterie à moins que la
batterie soit spécifiquement marqué « rechargeable ».
• Ne vous débarassez jamais des batteries dans un feu.
Recharging station
A Remote Recharging Station is also available (sold separately) with a
rechargeable battery to keep your remote always charged. For more
information, see the Dealer Portal.
Configure the remote
Add and configure the remote control with Composer Pro. See the
Composer Pro User Guide
for instructions about adding devices.
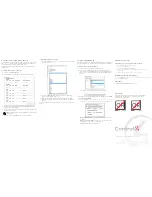
To configure the remote:
1
In Composer Pro, add and identify the
System Remote Control
SR260
driver to your project.
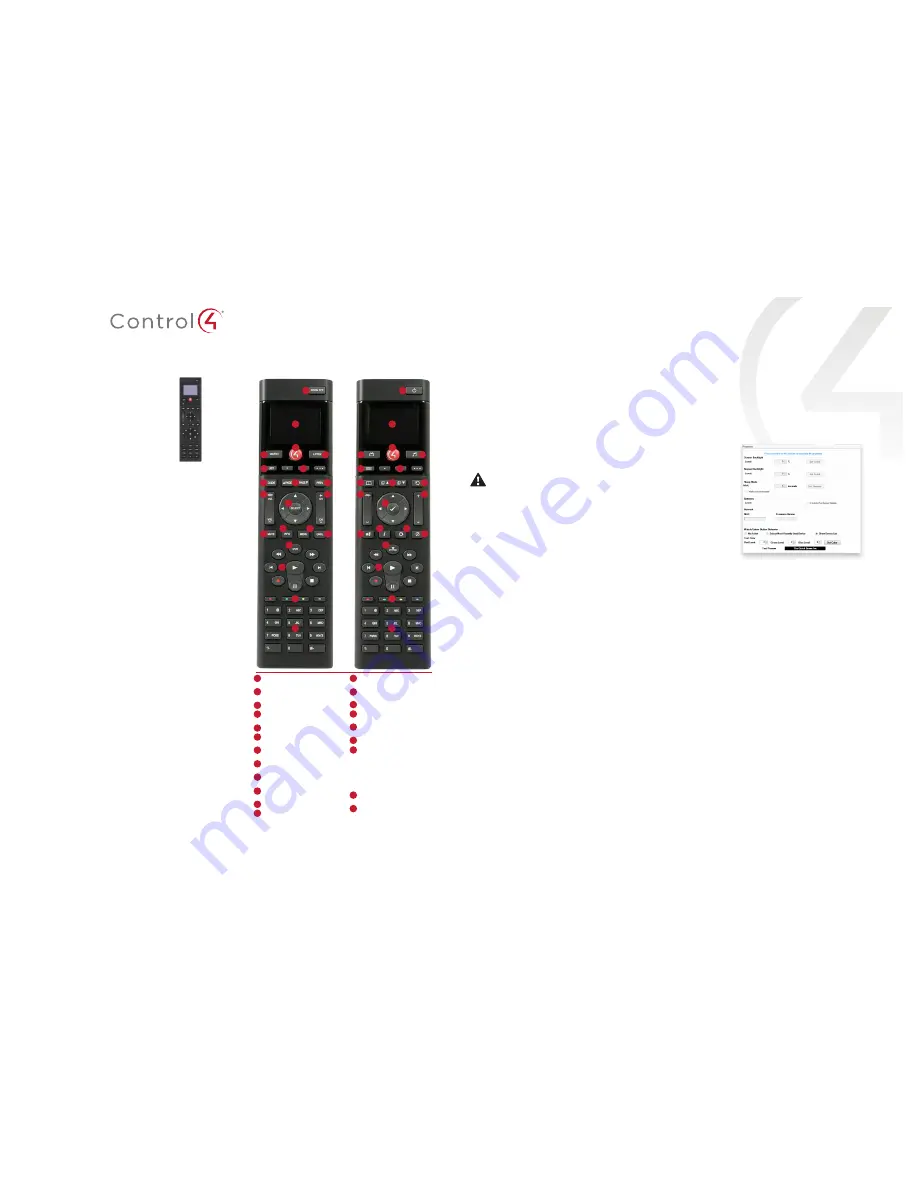
2
In the
System Design
view, select
System Remote Control SR260
to view and change the remote’s properties.
•
Display Brightness
—Sets the brightness of the remote’s screen,
from
0
(off) to
100
(full brightness).
•
Keypad Brightness
—Sets the brightness of the keypad backlight,
from
0
(off) to
100
(full brightness).
•
Sleep Mode
—Sets how long the remote stays awake after no
activity. The default setting is 15 seconds, but can be extended up
to 90 seconds or reduced to 10 to conserve battery life.
•
Battery Level
—Displays the current battery charge level.
•
Channel
—Displays the ZigBee channel set for the remote, which
should match the ZigBee channel for the controller.
•
Gateway
—Displays the MAC address of the ZigBee Server (usually
your controller, unless you specify differently).
•
MAC
—Displays the remote’s MAC address.
•
Firmware Version
—Displays the remote’s current firmware
version.
•
Watch/Listen Button Behavior
—Sets whether the buttons show a
list of available devices or only the most recently used devices.
3
On the remote, press
LIST
, then select
Settings
>
Config
. The
following menu opens, where you can change remote control
settings:
•
Display Brightness
—Sets the brightness of the remote’s
screen.
•
Keypad Brightness
—Sets the brightness of the remote’s
keypad backlight.
•
Motion Detect
—Sets the remote to wake from Sleep Mode
when it’s picked up.
•
Light Sensor
—When enabled, adjusts the brightness of the
screen and keypad backlight based on the light it senses in
the room.
•
Text Color
—Changes the List Navigator’s text color.
•
Recharge Station
—When enabled, configures the remote to
use the Recharging Station’s rechargeable lithium polymer
battery. When disabled, configures the remote for regular
alkaline batteries.
•
Battery Level
—Shows the current battery charge level.
•
Factory Defaults
—Resets the remote to its factory defaults.
Each change is saved as soon as it’s made.
SR260 System Remote Control
Installation and Setup Guide


