background image

GB 71812 00 / Issue 3 / 15

CUSTOMER CARELINE 01746 713410

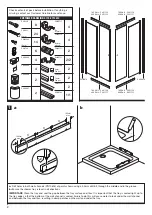
Equipment needed: 

Drill, 6.5mm Masonry Bit, 4.5mm & 3mm Metal Bits (general), Crosshead Screwdriver, Right Angle, Fine Tooth Saw,  
Spirit Level, Pencil, Scissors, Silicone Sealant, Tape Measure, Masking Tape. 

Note:

 The screws and wall plugs supplied are for masonry walls. For lightweight walls i.e. stud partition, plasterboard etc,  

use the correct type of fixings.

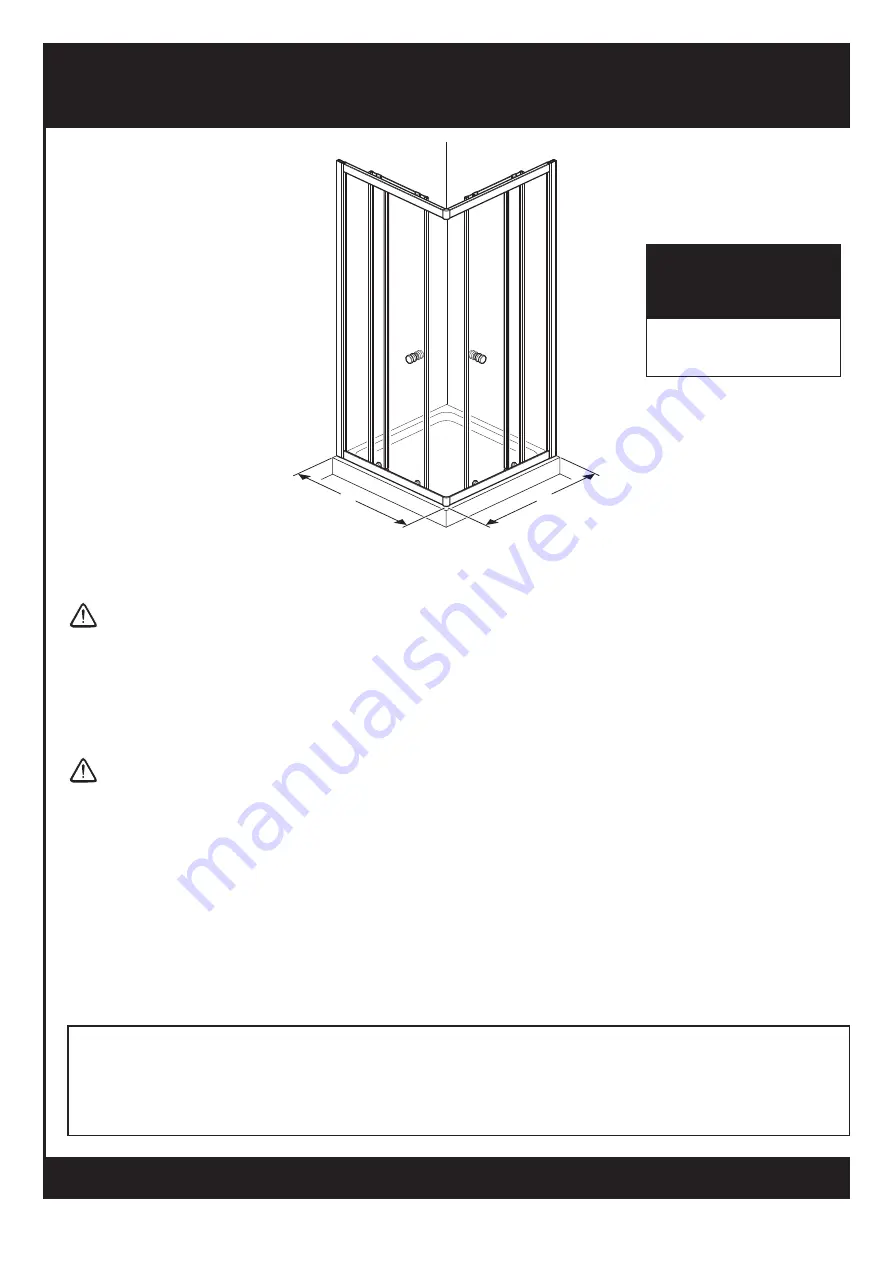
CORNER ENTRY 

SHOWER ENCLOSURE

Please read these instructions carefully and keep for future reference. 

Incorrect fitting will invalidate the guarantee.

 SAFETY

● 

Handle glass with great care. Although the glass is very tough, sharp impacts can damage both the glass  

  and metal frame.

● 

Make sure there are no hidden pipes or cables hidden in the wall where you intend to drill.

● 

Wear safety goggles, shoes and appropriate clothing. 

 BEFORE INSTALLATION

● 

Two people are needed to carry out parts of the procedure, lift with care.

● 

Check that the shower tray is level in all directions. The enclosure will not sit correctly on an uneven surface.  

  If uneven, the wall channels may not fit and the doors may not shut correctly.

● 

The shower tray and the enclosure must match in size. Attempting to fit the incorrect size of enclosure to the   

  shower tray will result in water leaks.

● 

The enclosure should be fitted on tiled walls which are sealed with waterproof grout. 

  There must be a good silicone seal between the rim of the shower tray and the wall.

● 

Always check very carefully that components are vertical.

● 

To avoid damage, use the opened out packaging to build the enclosure on.

760 Door X = 

740 - 760mm

800 Door X = 

780 - 800mm

DIMENSIONS

Check the enclosure size in 

the table below matches the 

showertray installation.

X

X

Summary of Contents for 760

Page 1: ...here you intend to drill Wear safety goggles shoes and appropriate clothing BEFORE INSTALLATION Two people are needed to carry out parts of the procedure lift with care Check that the shower tray is level in all directions The enclosure will not sit correctly on an uneven surface If uneven the wall channels may not fit and the doors may not shut correctly The shower tray and the enclosure must mat...

Page 2: ...cause water to leak under the wall channel and between the tray and tiles resulting in damp patches on the wall and under the tray 1 a b Check contents of pack before installation If anything is missing contact our Customer Careline for assistance CUSTOMER CARELINE 01746 713410 8 PN3230 24 PN3225 4 6 14 PN4748 4 2 4 PN50489 PN60517 PN50488 PN50486 PN50487 PN60524 2 2 2 2 2 1 1 4 PN60518 760 RAIL P...

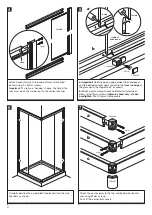
Page 3: ...annels c Fix the wall channels to the walls using 8 x 32mm screws a b c a Trim four horizontal fixed panel seals PN40333 to length 760 Model 268mm 800 Model 288mm b Fit trimmed seals to top and bottom of both fixed panels Important Seal flipper must be on inside of panel The seals must be tight up against the metal Note Wetting the glass with water will help fit the seals 3 a b 32mm X ø 6 5 mm X D...

Page 4: ...e handed in pairs the hole in the rails must be on the inside next to the vertical channel 4 a Important Carefully open a gap between the fixed panel and the bottom rail and apply sealant to the front and edge of the glass up to the flipper seals as shown b Attach a glass clamp to each horizontal rail at edge of glass using 10mm screws tighten by hand only do not overtighten Push fit glass clamp c...

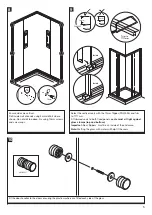
Page 5: ... be on inside of the enclosure Note Wetting the glass with water will help fit the seals Ensure sides are vertical Drill inside wall channels using 3mm drill bit where shown Do not drill too deep Fix using 10mm screws and screw caps 8 5 ø 3 mm 10 Fit the door handles to the doors ensuring the plastic washers are fitted each side of the glass Inside Inside 9mm 12mm PN40095 Trim to 1717mm 10mm PN605...

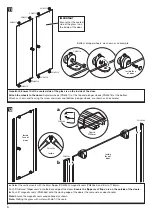
Page 6: ...he seals 11 Important Ensure that the coated side of the glass is on the inside of the door Attach the wheels to the doors Adjuster wheels PN60517 at the top and plunger wheels PN60518 at the bottom Attach as shown and fix using the screw and screw cap bottom plunger wheels are shown as an example 9mm PN40260 Trim to 1785mm PN80564 Inside face of door PN40260 Inside face of door PN80564 Inside a b...

Page 7: ...ted in the bottom rail but the door must not be raised so high that the plungers on the bottom wheels do not operate b The plungers on the bottom wheels can be pushed down to unclip the doors which will allow access to clean the doors and fixed panels 14 From inside a b From inside the enclosure position the top wheels into the top rail push down the plungers on both bottom wheels and position int...

Page 8: ...ur nearest recycling centre IMPORTANT You must not use the shower for 24 hours after installation of the enclosure DO NOT use bleach scouring powders solvents or other aggressive cleaning agents To clean use warm soapy water and a clean cloth and rinse off Please note There has been a glass coating applied to this product use a squeegee to remove water and debris Periodically check all fixings and...

Reviews: