background image

Summary of Contents for 137.218040

Page 1: ...w all its Safety Rules and Operating Instructions Failure to heed the warnings in this manual can result in serious injury to the user Safety Instructions Installation Operation Maintenance Parts List Customer Help Line 1 800 843 1682 Sears Roebuck and Co Hoffman Estates IL 60179 USA Visit our Craftsman website www sears com craftsman Part No 137218040001 ...

Page 2: ... from lead based paints Crystalline silica from bricks cement and other masonry products Arsenic and chromium from chemically treated lumber Your risk from these exposures varies depending on how often you do this type of work To reduce your exposure to these chemicals work in a well ventilated area and work with approved safety equipmentsuch as dust masks that are specially designed to filter out...

Page 3: ...ce from the work area DO NOT FORCE THE TOOL It will do the job better and safer at the rate for which it was designed USE THE RIGHT TOOL Don t force the tool or attachment to do a job for which it is not designed WEAR PROPER APPAREL DO NOT wear loose clothing gloves neckties rings bracelets or other jewelry which may get caught in moving parts Non slip footwear is recommended Wear protective hair ...

Page 4: ...blade sharp the rip fence parallel to the saw blade and by keeping the splitter anti kickback pawls and guards in place and functioning Do not release work before it has passed all the way past the saw blade is off the table Do not rip work that is twisted warped or does not have a straight edge to guide it along the fence AVOID AWKWARD OPERATIONS and hand positions where a sudden slip could cause...

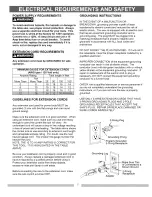
Page 5: ...HE TABLE ABOVE Be sure your extension cord is properly wired and in good condition Always replace a damaged extension cord or have it repaired by a qualified person before using it Protect your extension cords from sharp objects excessive heat and damp or wet areas Before connecting the saw to the extension cord make sure the saw switch is turned OFF IN THE EVENT OF A MALFUNCTION OR BREAKDOWN grou...

Page 6: ...ake certain all items are accounted for before discarding any packing material If any part is missing or damaged do not attempt to assemble the table saw plug in the power cord or turn the switch ON until the missing or damaged part is obtained and is installed correctly TABLE OF LOOSE PARTS ITEM DESCRIPTION QUANTITY A Table saw assembly 1 B Blade guard and splitter 1 C Bolt flat washer toothed wa...

Page 7: ...UNPACKING YOUR TABLE SAW C N D l O 0_ Q R S F i L G ii ii M T ...

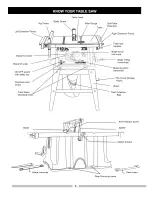
Page 8: ...t pointer Blade tilt scale ON OFF switch with safety key Overload reset switch Table lock handles TABL_ SAW Blade bevel lock knob Blade Tilting Handwheel Blade elevation handwheel ip Fence Storage Hooks Stand Front Stand Dust Collection Mounting Holes Bag Blade Anti Kickback pawls Splitter Splitter bracket Rear Mounting Holes ...

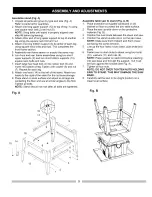
Page 9: ...ight of the stand for the rip fence storage 9 Place stand on level surface and adjust so all legs are contacting the floor and are at similar angles to the floor Tighten all bolts NOTE Stand should not rock after all bolts are tightened Fig A Assemble table saw to stand Fig A B 1 Place protective corrugated cardboard or old blanket on floor to protect the saw table surface 2 Place the saw up side ...

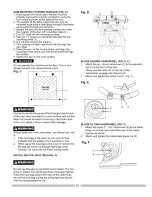
Page 10: ...rk surface and not the stand will cause sawdust to build up in the motor area which may result in fire or cause motor damage Always keep your work area clean uncluttered and well lit 1 If the dust bag is not used do not work on floor surfaces that are slippery from sawdust or wax 2 When using the dust bag some dust will not fall into the bag but come out through openings in the housing Do not cove...

Page 11: ...ning the blade raising handwheel counterclockwise 3 Place the open end wrench jaws on the flats of the saw arbor to keep the arbor from turning Fig J and place the box end wrench 8 on the arbor nut 5 and turn counterclockwise 4 Remove the arbor nut 5 and outer flange 6 5 Install the saw blade onto the arbor with the blade teeth pointing toward the front of the saw 6 Install the flange 6 against th...

Page 12: ... must always be correctly aligned so that the cut workpiece will pass on either side without binding or twisting to the side Improper splitter alignment can cause kickback and Serious injury Fig M Kickback pawl 8 9 INSTALLING THE TABLE EXTENSION FENCE FIG N N l NOTE A For right ripping a 10 14 wide workpiece the right extension fence has to be installed in the IN RIPposition Fig N For left ripping...

Page 13: ...mly against the front of the saw table Move the far end of the fence until it is parallel with the miter gauge groove Tighten both screws and push the handle to lock 5 If fence is loose when the handle is in the locked downward position do the following Move the handle 2 upward and turn the adjusting screw 5 clockwise until the rear clamp is snug Do not turn the adjusting screw more than 1 4 turn ...

Page 14: ...he bevel lock knob secure the screw 4 BLADE TILT POINTER 1 When the blade is positioned at 90 adjust the blade tilt pointer to read 0 on the scale 2 Loosen the mounting screw position pointer over 0 and tighten the screw NOTE Make a trial cut on scrap wood before making critical cuts Measure for exactness Fig R 345 BLADE PARALLEL TO THE MITER GAUGE GROOVE FIG S T This adjustment was made at the fa...

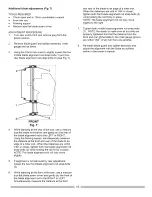
Page 15: ...istance from the front and rear of the blade to the miter gauge groove are within 1 64thof an inch from one another Re install blade guard and splitter assembly and adjust the alignment with the blade as outlined earlier in the owner s manual I I I I I I 3 3 FRONT Fig T While standing at the rear of the saw use a medium size flat blade screwdriver and gently pry the rear of the blade alignment rod...

Page 16: ...motor to cool Push in on the reset button 3 and turn the switch to the ON position To avoid injury the ON OFF switch must be in the OFF position and the plug removed from the power source while the cool down takes place to prevent accidental starting when the reset button is pushed Overheating may be caused by misaligned parts or a dull blade Inspect your saw for proper setup before using it again...

Page 17: ... injury Keep both hands away from the blade and path of the blade The workpiece must have a straight edge against the fence and must not be warped twisted or bowed DANGER Never attempt to pull the workpiece backwards during a cutting operation This will cause kickback and serious injury to the user can occur 1 Remove the miter gauge Secure the rip fence to the table or if using the extension fence...

Page 18: ...ade and the path of the blade DANGER Never attempt to pull the workpiece backwards during a cutting operation This will cause kickback and serious injury to the user can occur 1 Remove the rip fence lower all table extension fences flush to the table and place the miter gauge a miter gauge groove on the table 2 Adjust the blade height so it is 1 8 higher than the top of the workpiece 3 Hold the wo...

Page 19: ...3 is tight and that at least one thread of the arbor sticks out past the nut 5 Use only the 6 diameter dado set and keep the width 1 2 or less It will be necessary to remove the blade guard and splitter when using a dado blade only Always use caution when operating a dado blade 6 Use only the correct number of round outside blades and inside chippers as shown in the dado set s instruction manual B...

Page 20: ...sing mechanism and tilting mechanism should be checked for looseness binding or other abnormalities With the saw disconnected from the power source turn the saw upside down and alternately pull upward and downward on the motor unit Observe any movement of the motor mounting mechanism Looseness or play in the blade raising screw 1 Fig FF should be adjusted as follows 1 Using a 14mm wrench loosen th...

Page 21: ... excessively Does not make accurate 45 and 90 cross cuts 1 Dull blade 2 Blade mounted backwards 3 Gum or pitch on blade 4 Incorrect blade for work being done 5 Gum or pitch on blade causing erratic feed 1 Rip fence out of adjustment 2 Splitter not aligned with blade 3 Feeding stock without rip fence 4 Splitter not in place 5 Dull blade 6 The operator letting go of material before it is past saw bl...

Page 22: ...T 0KMS HEX NUT M6x1 0 T 5 1 0KMV HEX NUT M10x1 5 T 8 1 0KMW HEX NUT M10x1 5 T 4 1 0KMY HEX NUT M8x1 25 T 6 5 1 0KQJ CROWN NUT M8x1 25 T 12 5 2 0KRQ SERRATED TOOTHEDHEXAGON FLANGENUTM6x1 0 T 6 6 0KRX HEXAGON NUT AND FLAT WASHER M6x1 0 4 0KRX HEXAGON NUT AND FLAT WASHER M6x1 0 3 0KTA STRAIN RELIEF 2 0L6G POWER CABLE ASS Y 1 0BPA LOCK KNOB 0G1U DUSTSHIELD 0J3P HEX WRENCH 4 64 0J3U HEX WRENCH 3 90 0J4...

Page 23: ...I O t o 025 OBV K J5 _ r m 0 m r oo ...

Page 24: ... LABEL 1 SLIDING BASE 2 0BCT SCALE 1 26FM PARALLEL BRACKET ASS Y 1 0BEF WARNING LABEL 1 0H8H CLAMP BOLT 4 0J76 FLAT WASHER 1 4x3 4 1 16 1 0J95 SPRING WASHER q_6 1 0JAA WASHER q_8 1 0JYN HEX SOC COUNTERSUNK HD SCREW M6x1 0 25 6 0K3R CR RE PAN HD SCREW WASHER M5X0 8 12 2 0K5P CR RE COUNT HD SCREW M6x1 0 50 3 0K5S CR RE COUNT HD SCREW M6x1 0 55 1 0KCY CR RE PAN HD PLAINWASHERTAPPINGSCREW M5x0 8 12 4 ...

Page 25: ..._o ol 202N 27X4 i 2 X8 _ r m UO 0 m r Jb oo ...

Page 26: ... HD SCREW WASHER M5x0 8 30 4 0K5V CR RE COUND HD SCREW M4x0 7 8 4 0KCP CR RE PAN HEAD TAPPING WASHER SCREW M5x12 60 2 0KTH STRAIN RELIEF 1 0 DZ BEARING RETAINER 1 0QE9 MOTOR NAMEPLATE 1 0 EA BRACKET 0 EC ARBOR SHAFT ASS Y 0 ED SUPPORT PLATE 0QM2 BRUSH HOLDER ASS Y 0 QT BRUSHASS Y 0 R0 BRUSH COVER 0R1 MOTOR HOUSING 0R1S BEARING BUSHING 0R1Y ARMATURE ASS Y 0R20 BAFFLE 6 color 6 color 1 1 1 2 2 2 1 1...

Page 27: ...bo 1 OKCi _ r m 0 m r c_ ...

Page 28: ...EX HD BOLT M6x1 0 12 3 0JPP HEX HD BOLT M8x1 25 30 4 0JPX HEX HD BOLT M10X1 5 20 4 0KJ7 CAP HD S NECK BOLT M8x1 25 16 16 0KR SERRATEDTOOTHED HEXAGON FLANGE NUT M6x1 0 T 6 3 0KRR SERRATEDTOOTHED HEXAGON FLANGE NUT M8x1 25 T 7 5 20 27WZ LONG UPPERSUPPORT 2 27X0 SHORT UPPERSUPPORT 2 27X1 LONG BOTTOM SUPPORT 2 27X2 SHORT BOTTOM SUPPORT 2 27X3 LEG 4 28 ...

Page 29: ...10 TABLE SAW MODEL 137 218040 STAND OK J7 27X0 OKRI l i u i 27X 1 Front of 2TX3 Stand 09I O X O Tl Right Side of Stand ...

Page 30: ...g actual size Use good quality plywood or solid wood Use or material Push stick MUST be thinner than the width of material being cut i J q Cut Here To Push Wood I r Cut Here To Push 3 4 Wood I Notch To Prevent Hand From Slipping Drill Hole For Hanging ...

Reviews: