background image

Blade Installation

WARNING

Before beginning installation, place the tractor on a firm and level surface, set the 
parking brake, place the PTO in the disengaged (OFF) position, stop the tractor’s 
motor and remove the ignition key to prevent unintended starting.

WARNING

Cutting blades are sharp. Always protect hands by wearing heavy leather work 
gloves to grasp blades.

1. 

Remove the cutting deck from beneath the tractor as instructed in your 
tractor’s Operator’s Manual.

2. 

Gently flip the deck over to expose its underside.

3. 

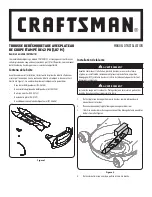
Stabilize one of the cutting blades with a blade lock tool or a block of wood. 
See Figure 2.

Figure 2

Model 19A70041791 mulch kit is designed for use with select 42-inch two-blade 
cutting decks. Refer to your tractor’s Operator’s Manual to assure compatibility.

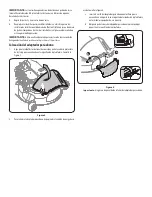
Carton Contents

Before beginning installation, remove all parts from the carton to make sure 
everything is present. Carton contents are listed below and shown in Figure 1. Part 
numbers are listed in parentheses.
• 

Two Mulching  Blades (742-0616A)

• 

One Deck Mulch Plug Assembly (631-05195A)

• 

One Wing Knob (720-04122)

• 

One Flat Washer (736-0159)

• 

One Mulch Plug Wire (747-06686)

Figure 1

Form No. 769-19050

(November 12, 2018)

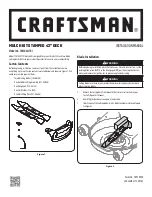
MULCH KIT STAMPED 42” DECK

Model No. 19A70041791 

INSTALLATION MANUAL 

Summary of Contents for 19A70041791

Page 1: ...bilize one of the cutting blades with a blade lock tool or a block of wood See Figure 2 Figure 2 Model 19A70041791 mulch kit is designed for use with select 42 inch two blade cutting decks Refer to your tractor s Operator s Manual to assure compatibility Carton Contents Before beginning installation remove all parts from the carton to make sure everything is present Carton contents are listed belo...

Page 2: ...mped in it facing the ground when the mower is in the operating position IMPORTANT Use a torque wrench to tighten each blade spindle s hex flange nut to between 90 ft lb and 110 ft lb Installing the Mulch Plug 1 Pivot the chute deflector upward and remove the protective cover from the pin found on the deck s surface See Figure 3 Figure 3 2 To install the mulch plug pivot the discharge chute upward...

Page 3: ...Important Be certain that the bottom edge of the mulch plug is installed on the inside of the lip of the deck opening as shown in Figure 6 Figure 5 1 Slide the mulch plug wire 747 06686 over the pin on the deck s surface position the washer over the wire and secure the mulch plug with the wing knob See Figure 6 NOTE Make sure that the wing knob is snug and the wire is positioned inside the lip of ...

Page 4: ...Notes ...

Page 5: ...mienta de bloqueo de cuchillas o un bloque de madera Consulte la Figura 2 Figura 2 4 Extraiga la tuerca hexagonal con brida que asegura la cuchilla al husillo El kit de abono del modelo 19A70041791 está diseñado para ser utilizado con plataformas de corte de dos cuchillas seleccionadas de 42 pulgadas Consulte el manual del operador del tractor para asegurar la compatibilidad Contenido de la caja A...

Page 6: ...onal del husillo de la cuchilla entre 90 pies libras y 110 pies libras Colocación del adaptador para abono 1 Haga pivotar el deflector del canal hacia arriba y quite la cubierta protectora de la clavija que se encuentra en la superficie de la plataforma Consulte la Figura 3 Figura 3 2 Para instalar el adaptador para abono haga pivotar el canal de descarga hacia arriba Consulte la Figura 4 a Insert...

Page 7: ...r del borde de la abertura de la plataforma como se muestra en la Figura 5 Figura 5 1 Deslice el cable del adaptador para abono 747 06686 sobre el pasador que está ubicado en la superficie de la plataforma coloque la arandela sobre el cable y sujete el adaptador de abono con la perilla de aletas Consulte la Figura 6 NOTA Asegúrese de que la perilla de aletas esté bien ajustada y que el cable esté ...

Page 8: ...Notes 8 ...

Page 9: ...ltez Figure 2 Figure 2 4 Retirez le contre écrou à embase qui fixe la lame à la broche L ensemble de déchiquetage modèle 19A70041791 est conçu pour être utilisé avec certains plateaux de coupe à deux lames de 42 po 1 07 m Reportez vous au manuel de l utilisateur du tracteur pour vous assurer de la compatibilité Contenu de la boîte Avant de commencer l installation retirez toutes les pièces de la b...

Page 10: ...écrou à embase de la fusée de la lame entre 90 pi lb et 110 pi lb Installation du couvercle de déchiqueteuse 1 Faites pivoter le déflecteur de la goulotte vers le haut et retirez le couvercle de protection de la goupille se trouvant à la surface du pont de coupe Consultez la Figure 3 Figure 3 2 Pour installer le couvercle de déchiqueteuse faites pivoter la goulotte d évacuation vers le haut Consul...

Page 11: ...le de la déchiqueteuse est installé à l intérieur du bord de l ouverture du plateau de coupe comme illustré à la Figure 5 Figure 5 1 Faites glisser le fil du couvercle de déchiqueteuse 747 06686 sur la broche située à la surface du plateau de coupe positionnez la rondelle sur le câble et fixez le couvercle de déchhiqueteuse au moyen du bouton à oreilles Consultez la Figure 6 REMARQUE Assurez vous ...

Page 12: ...LAND OHIO44136 0019 CRAFTSMAN isaregisteredtrademarkofStanleyBlack Decker Inc usedunderlicense CRAFTSMAN esunamarcaregistradadeStanleyBlack Decker Inc utilizadabajolicencia CRAFTSMAN estunemarquedéposéedeStanleyBlack Decker Inc utiliséesouslicence 2018CRAFTSMANU S CanadaOnly CRAFTSMAN com ...

Reviews: