background image

Summary of Contents for 315.115650

Page 1: ...sk of injury the user must read and understand the operator s manual before using this product Customer Help Line 1 800 932 3188 Sears Roebuck and Co 3333 Beverly Rd Hoffman Estates IL 60179 USA Visit the Craftsman web page www sears com craftsman 987000 006 12 19 06 REV 01 Save this manual for future reference ...

Page 2: ...rs Roebuck and Co Hoffman Estates IL 60179 This product has many features for making its use more pleasant and enjoyable Safety performance and dependability have been given top priority in the design of this product making it easy to maintain and operate A WARNING Some dust created by power sanding sawing grinding drilling and other construction activities contains chemicals known to cause cancer...

Page 3: ...l of the tool in unexpected situations Use safety equipment Always wear eye protection Dust mask non skid safety shoes hard hat or hearing protection must be used for appropriate conditions Do not wear loose clothing or jewelry Contain long hair Loose clothes jewelry or long hair can be drawn into air vents Do not use on a ladder or unstable support Stable footing on a solid surface enables better...

Page 4: ...nly impact resistant lenses Do not charge battery tool in a damp or wet They are NOT safety glasses Following this rule will location Following this rule will reduce the risk of reduce the risk of eye injury electric shock Protect your lungs Wear a face or dust mask if the For best results your battery tool should be operation is dusty Following this rule will reduce the charged in a location wher...

Page 5: ... result in a risk of fire and electric shock If extension cord must be used make sure a That pins on plug of extension cord are the same number size and shape as those of plug on charger b That extension cord is properly wired and in good electrical condition and c That wire size is large enough for AC ampere rating of charger as specified below Cord Length Feet 25 50 100 Cord Size AWG 16 16 16 NO...

Page 6: ... no load Double insulated construction Revolutions strokes surface speed orbits etc per minute Do not expose to rain or use in damp locations To reduce the risk of injury user must read and understand operator s manual before using this product Always wear safety goggles or safety glasses with side shields and as necessary a full face shield when operating this product Precautions that involve you...

Page 7: ...urn the product to your nearest SEARS OR OTHER QUALIFIED SERVICE CENTER for repair When servicing use only identical replacement parts _ WARNING To avoid serious personal injury do not attempt to use this product until you read thoroughly and understand completely the operator s manual If you do not understand the warnings and instructions in the operator s manual do not use this product Call Sear...

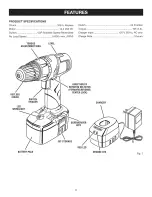
Page 8: ...Load Speed 0 600 r rain RPM Clutch 24 Position Torque 105 in lb Charger Input 120 V 60 Hz AC only Charge Rate 3 hours TORQUE ADJUSTMENT RING LEVEL KEYLESS CHUCK LED WORKLIGHT DiRECTiONOF ROTATION SELECTOR FORWARD REVERSE CENTER LOCK CHARGER SCREWDRIVER BITS BATTERY PACK BITSTORAGE REDLED ORANGELED Fig 1 ...

Page 9: ... clutch The torque adjustment ring can be turned to select the right amount of torque for your application VARIABLE SPEED The variable speed switch trigger delivers higher speed with increased trigger pressure and lower speed with decreased trigger pressure A UNPACKING This product has been shipped completely assembled Carefully remove the product and any accessories from the box Make sure that al...

Page 10: ... to be sure contacts on battery pack engage properly with contacts in charging stand The charge indicator light LED located on the charging stand will light up red and glow when the charger is properly connected to power supply This light indicates the charger is operating properly It will remain on until battery pack is removed from charging stand or charger is disconnected from power supply Afte...

Page 11: ... trigger on the drill by placing the direction of rotation selector in the center position Place the battery pack in the drill Align the raised rib on the battery pack with the groove inside the drill CAUTION When placing battery pack in the tool be sure raised rib on battery pack aligns with the bottom of the drill and latches into place properly Improper installation of the battery pack can caus...

Page 12: ...osition helps reduce the possibility of accidental starting when not in use CAUTION To prevent gear damage always allow the chuck to come to a complete stop before changing the direction of rotation To stop the drill release the switch trigger and allow the chuck to come to a complete stop NOTE The drill will not run unless the direction of rotation selector is pushed fully to the left or right Av...

Page 13: ...or driving screws into soft material 9 12 For driving screws into soft and hard materials 13 16 For driving screws into hard wood 17 23 For driving large screws 4U For heavy drilling TO DECREASE ADJUSTING TORQUE RING LED WORKMGHT See Figure 7 The LED worklight on the foot of the drill will come on when the switch trigger is depressed This provides additional lighting on the surface of the workpiec...

Page 14: ...is could cause the drill bit to be thrown from the drill resulting in possible serious personal injury or damage to the chuck DRILLBiT UNLOCK RELEASE CHUCK COLLAR CHUCK JAWS WRONG Fig 10 REMOVING BITS See Figure 9 Lock the switch trigger by placing the direction of rotation selector in the center position Open the chuck jaws NOTE Rotate the chuck body in the direction of the arrow marked UNLOCK to...

Page 15: ... action If the bit jams in the workpiece or if the drill stalls stop the tool immediately Remove the bit from the workpiece and determine the reason for jamming NOTE This drill has an electric brake When the switch trigger is released the chuck stops turning When the brake is functioning properly sparks will be visible through the vent slots on the housing This is normal and is the action of the b...

Page 16: ...he batteries in this product have been designed to pro vide maximum trouble free life However like all batteries they will eventually wear out Do not disassemble battery pack and attempt to replace the batteries Handling of these batteries especially when wearing rings and jewelry could result in a serious burn To obtain the longest possible battery life we suggest the following Remove the battery...

Page 17: ...DRIVER Insert the hex key into the chuck and tighten the chuck jaws securely Tap sharply with a mallet in a counterclockwise direction This will loosen the chuck on the spindle It can now be unscrewed by hand MALLET HEXKEY Fig 14 TO RETIGHTEN A LOOSE CHUCK The chuck may become loose on the spindle and develop a wobble Also the chuck screw may become loose causing the chuck jaws to bind and prevent...

Page 18: ...parts SEE BACK PAGE FOR PARTS ORDERING INSTRUCTIONS 4 PARTS LIST Key Pad No Number 1 6612001 2 6903302 3 140302003 4 130139014 987000006 Description Qty Chuck Screw 1 Chuck 1 Charger Item No 911006 1 Battery Pack Item No 911007 1 Operator s Manual Can Be Purchased At Most Sears Stores Sears corn Parts and Service 18 ...

Reviews: