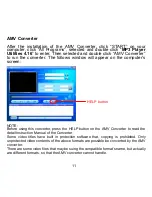
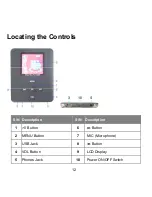
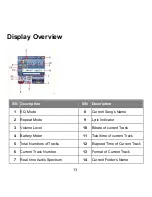
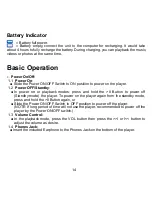
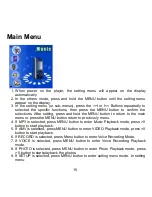
background image


Summary of Contents for CMP622E

Page 1: ......

Page 2: ......

Page 3: ......

Page 4: ......

Page 5: ......

Page 6: ......

Page 7: ......

Page 8: ...ing automatically NOTE 1 For the first time to recharge the build in battery charge it at least 10 hours For normal recharge it need approximate 4 hours 2 When the POWER Switch is on the OFF position the player can t be charge TRANSFERRING FILES Before you getting start to playback music videos or photos you should transfer those files into the player as Download the normal music videos and photos...

Page 9: ...ng connect the player to the computer by the supplied USB connection cable 6 Download the specific files into the player as download the files to others portable device 7 After downloaded disconnect the unit from computer NOTES All the downloaded files in this setting will stored in the Root Directory in the player For video files only AMV video files with amv extension can be playback by the play...

Page 10: ...art synchronize the DRM songs into the player 6 When finished disconnect the player from the computer The operation procedures and the location of control buttons between Windows Media Player 10 and 11 are difference For details please refer to the instruction manual of Windows Media Player 7 In this setting the DRM songs will stored in the Music Folder in the player IMPORTANT NOTE 1 The DRM songs...

Page 11: ...The player can perform all functions 2 Windows ME and 2000 Mac OS 10 Linux 2 4 2 The normal music videos or photos files can be download into the player 3 Windows 98 Before download the normal music videos or photos files into the player the drive in the enclosed CD disc should be installed to the computer Install drive program at the system of WIN 98 1 Insert the supplied installation CD into the...

Page 12: ...s screen HELP button NOTE Before using this converter press the HELP button on the AMV Converter to read the detail Instruction Manual of the Converter Some video titles have built in protection software that copying is prohibited Only unprotected video contents of the above formats are possible be converted by the AMV converter There are some video files that may be suing the compatible format s ...

Page 13: ...Locating the Controls S N Description S N Description 1 II Button 6 Button 2 MENU Button 7 MIC Microphone 3 USB Jack 8 Button 4 VOL Button 9 LCD Display 5 Phones Jack 10 Power ON OFF Switch 12 ...

Page 14: ... Repeat Mode 9 Lyric Indicator 3 Volume Level 10 Bitrate of current Track 4 Battery Meter 11 Total time of current Track 5 Total Numbers of Tracks 12 Elapsed Time of Current Track 6 Current Track Number 13 Format of Current Track 7 Real time Audio Spectrum 14 Current Folder s Name 13 ...

Page 15: ... on or playback modes press and hold the II Button to power off Standby mode the player To power on the player again from the standby mode press and hold the II Button again or Slide the Power ON OFF Switch to OFF position to power off the player NOTE If long period of time will not use the player recommended to power off the player by the Power ON OFF switch 1 3 Volume Control In the playback mod...

Page 16: ...in menu or press the MENU button return to previously menu 4 If MP3 is selected press MENU button to enter Music Playback mode press II button to start playback 5 If AMV is selected press MENU button to enter VIDEO Playback mode press II button to start playback 6 If RECORD is selected press Menu button to enter Voice Recording Mode 7 If VOICE is selected press MENU button to enter Voice Recording...

Page 17: ... to select Off Time or Sleep time If Off time is select press MENU button to enter press the I or I button to set the auto power off time when the player is idle to 0 The player will not auto power off 10 20 30 40 50 60 seconds then press and hold the MENU button to save the setting and exit If Sleep time is select press the MENU button to enter to the setting menu press I or I button to set the s...

Page 18: ...the MENU button to enter the songs list mode Display shows 4 Press the I or I button to select Local folder Delete file or Delete all then press the MENU button to enter 4 1 If Local folder is selected press the I or I button to searching the specific songs in the folders If the specific files was found press the MENU button to confirmed then press II button to start playback the selected song 4 2...

Page 19: ...tting menu press the I or I Buttons repeatedly to select Repeat Equalizer SRS mode Tempo rate Reply Reply times Replay gap or Exit as desire then press MENU button again to confirmed the selection 9 1 If Repeat is selected press the I or I Buttons to select the setting and press the MENU button to save the setting and exit as Normal Plays all the tracks in the player one by one Repeat One Repeat t...

Page 20: ...s the I button to set the beginning of the specific section press again to set the end of the specific section The selected section will playback repeatedly until the II button is press To resume normal playback press the II button again 9 6 If Replay times is selected press the I or I button to set the repeat times of A B repeat press the MENU button to save the setting and exit 9 7 If replay gap...

Page 21: ...again to resume normal playback 6 During playback press the I or I button repeatedly to skip to the higher or lower numbers track 7 During playback press and hold the I or I button to fast searching the specific section 8 To adjust volume press and hold the MENU button to return to the menu Press the VOL button volume level will appear on the display press the I or I button to adjust volume as des...

Page 22: ...utton to select Photo the display will show 3 Press MENU button to enter the list of photos will appear on the display 4 Press I or I button repeatedly to select the photos as desire Press the II button to start playback Or press the MENU button to enter photo setting manual the display will show as 21 ...

Page 23: ...n photos Press the MENU button to save the setting and exit After setting the player will plays the photos in slide show mode 4 4 If the Deleted file is selected the list of photos will appear on the display Press the I or I button to select the picture you want to delete then press the MENU button Press the I or I button to select YES or NO If YES is selected then press the MENU button to deleted...

Page 24: ... setting and exit Fine REC Fine quality recording in WAV format For find Fine VOR Fine quality recording in WAV format In this setting when the built in microphone have not detected any input sounds during recording the player will turn to pause mode automatically When it detected the sounds again the player will start to recording again quality for recording recommended set the recording in this ...

Page 25: ... 2 Press the I or I button to select VOICE then press MENU button to enter The display will show 3 Press the I or I button to select the specific recording tracks 4 Press the II button to start playback the specific v ice recording track o 5 The others operations is same as music playback 24 ...

Page 26: ... player only No sound output Earphone not connected Connects the earphone plug completely into the player s earphone jack Earphone may damage Check and replace the earphone Volume too low adjust volume to higher level Files may damaged or in wrong formats Try other files Sound quality is bad Music file is corrupted Try other files Battery level low recharge the unit Earphone damaged replace a new ...

Page 27: ... Recording time Approx 136h 2G Flash Sound output level 10mW channel 32 ohm MP3 bit rate 8K bps 320K bps and VBR WMA bit rate 5K bps 384K bps and VBR MP3 WMA AMV Frequency response 200Hz to 20KHz Formats supported to playback directly MP3 WMA AMV WAV Video formats can converted to AMV format through the included converter AVI WMV MPG MPEG ASF MOV 3GP SWF MP4 VOB DAT Working temperature 0 35 Operat...

Page 28: ...27 ...

Page 29: ...28 ...

Reviews: