background image

Operation Manual

Operation Manual

6U Rack Chassis (Black)

6U Rack Chassis (White)

CSR-G6400

CSR-G6400-W

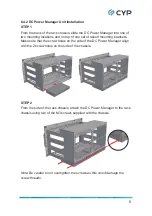
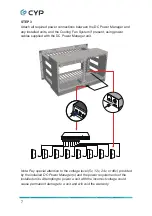
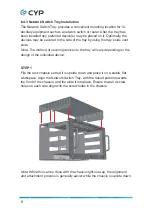
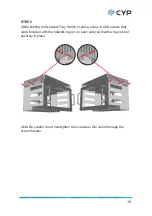
Summary of Contents for CSR-G6400

Page 1: ...Operation Manual Operation Manual 6U Rack Chassis Black 6U Rack Chassis White CSR G6400 CSR G6400 W ...

Page 2: ......

Page 3: ...Technology reserves the right to make improvements to this document and or product at any time and without notice COPYRIGHT NOTICE No part of this document may be reproduced transmitted transcribed stored in a retrieval system or any of its part translated into any language or computer file in any form or by any means electronic mechanical magnetic optical chemical manual or otherwise without expr...

Page 4: ...d into this product through any openings or empty slots in the unit as you may damage parts inside the unit Do not attach the power supply cabling to building surfaces Use only the supplied power supply unit PSU Do not use the PSU if it is damaged Do not allow anything to rest on the power cabling or allow any weight to be placed upon it or any person walk on it To protect the unit from overheatin...

Page 5: ...allation Instructions 4 6 4 1 Full Half Length Unit Installation 4 6 4 2 DC Power Manager Unit Installation 6 6 4 3 Network Switch Tray Installation 9 6 4 4 Cooling Fan System Installation 11 6 4 5 Cable Management Frame Installation 13 7 Rack Accessories Optional 14 7 1 Network Switch Tray 14 7 2 Cooling Fan System 14 7 3 Cable Management Frame 14 7 4 DC Power Manager Units 15 8 Specifications 19...

Page 6: ...to 2 power supply units multiple cooling fan units cable management frames and a network switch tray 2 APPLICATIONS Efficient storage of multiple low profile audio video units 3 PACKAGE CONTENTS 1 6U Rack Chassis Black or White 8 M5 Rack Screw 4 M3 Screw 5 Cable Management Clip 1 Cable Management Frame 1 Operation Manual 4 SYSTEM REQUIREMENTS The 6U rack chassis requires a minimum of 266 7mm 10 5i...

Page 7: ...ovides power 5v 12v 24v or 48v remote power control and power state monitoring for up to 8 devices plus up to 2 fans Up so two DC Power Manager units can be installed The dual fans within the optional Cooling Fan System can be temperature controlled to automatically turn the fan on or off as needed Optional Cable Management Frame provides additional options to help manage audio video and power cab...

Page 8: ...3 6 OPERATION CONTROLS AND FUNCTIONS 6 1 Front and Rear Panels 6 2 Left and Right Panels 6 3 Top and Bottom Panels ...

Page 9: ...m and sides of the rack chassis is required in order to secure them in place so it is recommended to do so prior to placement within a rack 6 4 1 Full Half Length Unit Installation STEP 1 Unscrew the 3 thumbscrews holding the top locking panel in place and remove the panel from the front of the chassis Unscrew the 3 thumbscrews holding the bottom locking panel in place and remove the panel from th...

Page 10: ...ave been installed POWER IN HDMI MENU ENTER VGA 70M SERVICE POWER IN HDMI MENU ENTER VGA 70M SERVICE Note If fewer than 15 units are being mounted it is strongly suggested to leave empty space between units that get particularly warm to improve airflow and heat dissipation STEP 3 Reattach the top and bottom locking panels by screwing in the 3 thumbscrews on each until they are tight and secure Not...

Page 11: ...aised mounting brackets Make sure that the screw holes on the side of the DC Power Manager align with the 2 screw holes on the side of the chassis STEP 2 From the side of the rack chassis attach the DC Power Manager to the rack chassis using two of the M3 screws supplied with the chassis Note Be careful to not overtighten the screws as this could damage the screw threads ...

Page 12: ...5V POWER OUT OFF ON DC 12V 1 2 3 4 5 6 7 8 SERV CONTROL 1 2 3 4 5 6 7 8 FAN A B 12V 5V POWER OUT OFF ON DC 12V LAN CAT5e 6 7 OUT DC 5V LAN CAT5e 6 7 OUT DC 5V Note Pay special attention to the voltage level 5v 12v 24v or 48v provided by the installed DC Power Manager s and the power requirements of the installed units Attempting to power a unit with the incorrect voltage could cause permanent dama...

Page 13: ...ower supply onto the designated shelf at the top of the chassis directly above the installed DC Power Manager and connect it to the unit Note The power supply s shelf has a small lip on the front to hold the power supply in place once seated ...

Page 14: ...e The method of securing devices to the tray will vary depending on the design of the individual device STEP 1 Flip the rack chassis so that it is upside down and place it on a stable flat workspace Align the Network Switch Tray with the raised portion towards the front of the chassis and the slide it into place Ensure that all 4 screw holes on each side align with the screw holes in the chassis N...

Page 15: ...twork Tray Switch in place screw in all 8 screws that were included with the network tray 4 on each side so that the tray is held securely in place Note Be careful to not overtighten the screws as this could damage the screw threads ...

Page 16: ...talled which must be attached to a DC Power Manager for power and control Note The fans are configured to pull hot air out of the chassis so it is a good idea to leave at least 1U of empty space above it for the exhaust STEP 1 Make sure that the 4 screw holes in the Cooling Fan System align with all 4 L bracket screw holes on the top of the chassis and gently seat the fan system into the designate...

Page 17: ...olding the Cooling Fan System steady screw in all 4 screws that were included with the fan system so that it is held securely in place Note Be careful to not overtighten the screws as this could damage the screw threads ...

Page 18: ...r by attaching the included plastic cable management clips and bundling them within them STEP 1 Make sure that the 3 screw holes in the Cable Management Frame align with all 3 of the screw holes on the back of the chassis where you wish to attach it STEP 2 While holding the Cable Management Frame in place screw in all 3 screws that were included with the frame so that the frame is held securely in...

Page 19: ...teel Chassis Color Black or White 7 2 Cooling Fan System Cooling Fan System Dimensions W H D 443 5mm 30mm 156mm All Inclusive Weight 751g Chassis Material Metal Steel Chassis Color Black or White 7 3 Cable Management Frame Cable Management Frame Dimensions W H D 433mm 20mm 1 5mm All Inclusive Weight 100g Chassis Material Metal Steel Chassis Color Black or White ...

Page 20: ...Rate 19200 Power Supply 12V 12 5A DC US EU standards CE FCC UL certified ESD Protection HBM 8kV Air Discharge 4kV Contact Discharge Dimensions W H D 211 5mm 25mm 116 5mm Case Only 211 5mm 25mm 117 5mm All Inclusive Weight 372g Chassis Material Metal Aluminum Chassis Color Black Operating Temperature 0 C 40 C 32 F 104 F Storage Temperature 20 C 60 C 4 F 140 F Relative Humidity 20 90 RH Non condensi...

Page 21: ...wer Supply 12V 12 5A DC US EU standards CE FCC UL certified ESD Protection HBM 8kV Air Discharge 4kV Contact Discharge Dimensions W H D 211 5mm 25mm 116 5mm Case Only 211 5mm 25mm 117 5mm All Inclusive Weight 285g Chassis Material Metal Aluminum Chassis Color Black Operating Temperature 0 C 40 C 32 F 104 F Storage Temperature 20 C 60 C 4 F 140 F Relative Humidity 20 90 RH Non condensing Power Cons...

Page 22: ...ower Supply 24V 6 25A DC US EU standards CE FCC UL certified ESD Protection HBM 8kV Air Discharge 4kV Contact Discharge Dimensions W H D 211 5mm 25mm 116 5mm Case Only 211 5mm 25mm 117mm All Inclusive Weight 285g Chassis Material Metal Aluminum Chassis Color Black Operating Temperature 0 C 40 C 32 F 104 F Storage Temperature 20 C 60 C 4 F 140 F Relative Humidity 20 90 RH Non condensing Power Consu...

Page 23: ...ower Supply 48V 3 12A DC US EU standards CE FCC UL certified ESD Protection HBM 8kV Air Discharge 4kV Contact Discharge Dimensions W H D 211 5mm 25mm 116 5mm Case Only 211 5mm 25mm 117mm All Inclusive Weight 285g Chassis Material Metal Aluminum Chassis Color Black Operating Temperature 0 C 40 C 32 F 104 F Storage Temperature 20 C 60 C 4 F 140 F Relative Humidity 20 90 RH Non condensing Power Consu...

Page 24: ...19 8 SPECIFICATIONS 8 1 Technical Specifications Dimensions W H D 300mm 349mm 264mm Case Only 483mm 349mm 264mm All Inclusive Weight 6800g Chassis Material Metal Steel Chassis Color Black or White ...

Page 25: ......

Page 26: ......

Page 27: ......

Page 28: ...CYPRESS TECHNOLOGY CO LTD www cypress com tw ...

Reviews: