
ENGLISH
Quick Install Guide
DSL-520B ADSL2+ Modem
Thank you for purchasing the ADSL2+ Modem. Follow the easy steps in this guide to
properly set up your adapter. Please verify that all the package contents below are
available.
DSL-520B
If any of the above items are missing, please contact your reseller.
Technical Support
Having trouble installing your new product? D-Link’s website contains the latest
user documentation and software updates for D-Link products. U.S. and Canadian
customers can contact D-Link Technical Support through our website or by phone.
United States
Telephone:
(877) 453-5465
Internet:
http://support.dlink.com
Canada
Telephone:
(800) 361-5265
Internet:
http://support.dlink.ca
Copyright ©2010 D-Link Corporation/D-Link Systems, Inc. All rights reserved. D-Link and the D-Link logo are registered trademarks of
D-Link Corporation or its subsidiaries in the United States and other countries. Other trademarks are the property of their respective
owners. Maximum wireless signal rate derived from IEEE Standard 802.11g and 802.11n specifications. Actual data throughput will vary.
Network conditions and environmental factors, including volume of network traffic, building materials and construction, and network
overhead, lower actual data throughput rate. Environmental factors will adversely affect wireless signal range. Product specifications,
size and shape are subject to change without notice, and actual product appearance may differ from that depicted on the packaging.
Visit www.dlink.com for more details.
Version 1.0 | July 14, 2010
Package Contents
Utility Requirements
Computer with the following:
ADSL2+ Modem
12VDC, 500mA DC CEC-compliant switching power adapter
RJ-11 telephone cable
RJ-45 Ethernet cable
Installation CD-ROM
• Windows® 7, Windows Vista®, XP or 2000, Macintosh, or Linux-based operating
system
• An installed Ethernet adapter
Browser Requirements
• Internet Explorer® 6.0 and higher
• Mozilla Firefox 3.0 and higher
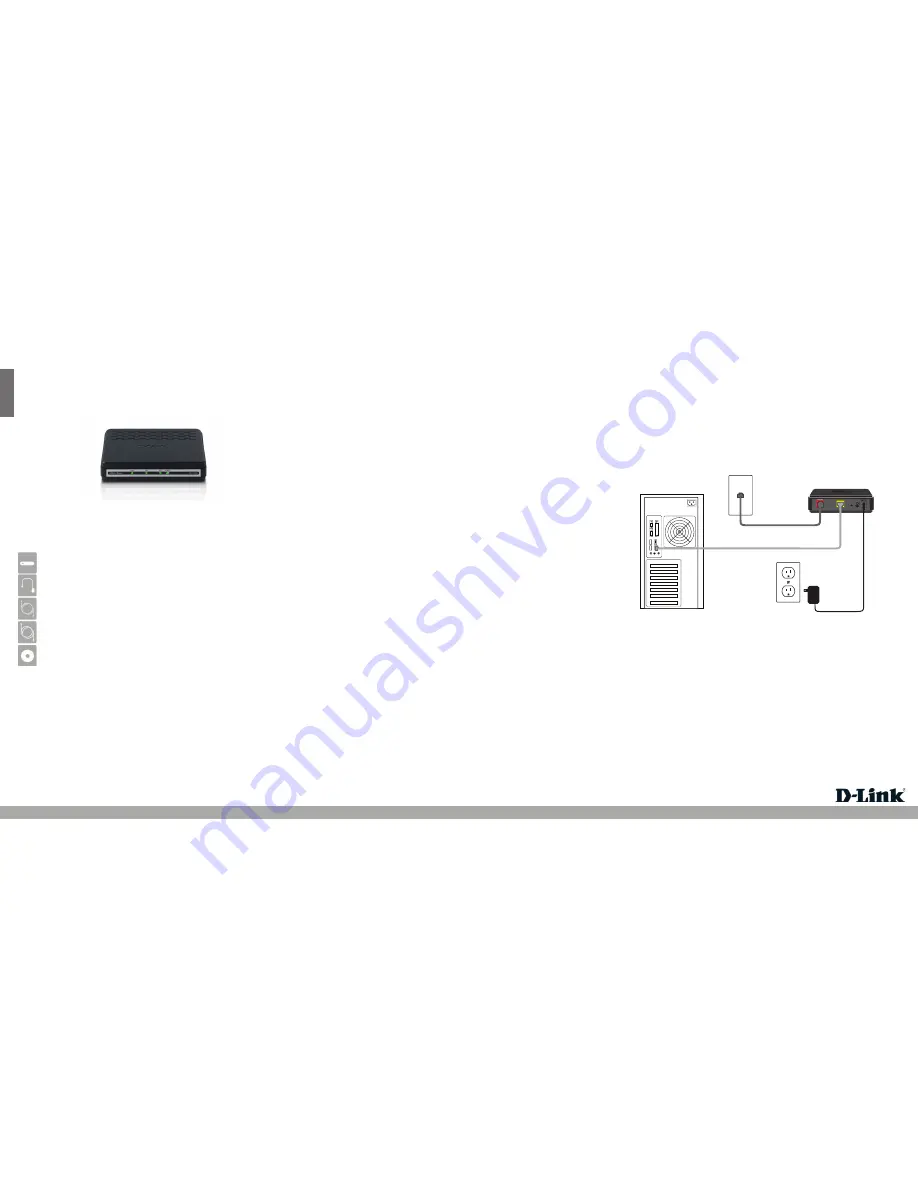
Installation Diagram:
5V
- - - 3A
LAN
LAN
RESET ON/OFF
5V
- - - 3A
LAN
LAN
RESET ON/OFF
5V
- - - 3A
LAN
LAN
RESET ON/OFF
DSL-520B Modem
Desktop Computer
Quick Setup Wizard:
Insert the Installation CD
into your drive on a computer and click
Install
to begin the
Quick Setup Wizard. Follow the onscreen instructions to install and configure your
device.
If you have any problems with the Quick Setup Wizard, please refer to the Manual
Setup.
If you are using Mac or Linux, or are unable to use the wizard, use the manual setup
outlined below and refer to the user manual on the CD for more information. Please
insert the Installation CD into your drive on a computer and browse the
Docs
folder
to open the file
manual.pdf
.
Step 1
Plug the power adapter into the device’s power jack, then plug the other end into
an electrical outlet. Turn the device on and verify if the Power LED is lit on the front
of the device.
Step 2
Plug one end of the included Ethernet cable into the LAN port on the back of the
device. Plug the other end of the Ethernet cable into your computer’s Ethernet port.
Manual Setup:
Step 3
Connect the supplied telephone cable to the DSL port of your device. Then, plug the
other end of the telephone cable into a telephone jack. Verify the DSL LED is lit. Your
setup should be similar to the
Installation Diagram
on the next page
.
Step 4
Open a web browser, enter
http://192.168.1.1
and then press
Enter
. When the
login window appears, set the both the user name and password to
admin
. Click
Log In
to continue the setup. Please refer to the
Quick Setup Section
in the user
manual for more detailed installation information and advanced features.
Windows users can use the
Quick Setup Wizard
(from the CD) to configure the
router. If you do not want to use the wizard, lost your CD, or are running Mac or Linux
operating systems, you will need to use the manual setup procedure.
Start Here:
Note: For additional Important Safety Instructions, please see the user manual.
Note:
For internet access, a subscription with a DSL Internet Service Provider (ISP) is required.


