Installation Instructions
Models DTCT304G, DTCT365G, DTCT466G, HPCT466GB, HPCT466GS
Distinctive
®
Gas Cooktop
Part No. 108856 Rev. E
Page 1: ...Installation Instructions Models DTCT304G DTCT365G DTCT466G HPCT466GB HPCT466GS Distinctive Gas Cooktop Part No 108856 Rev E...
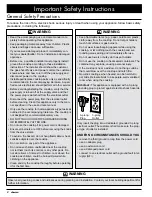
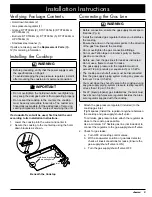
Page 2: ...fore you begin the installation process Leave this Installation Instruction manual with the consumer Consumer Keep this Installation Instruction manual for future reference and for the local electrica...
Page 3: ...hrough the cooktop and may cause carbon monoxide poisoning Aluminum foil linings may also trap heat causing a fire hazard Keep all slots holes and passages clear of grease and grime WARNING If the inf...
Page 4: ...attended near the cooktop nor let them touch its controls or any other parts Do not store items of interest to children on or above the cooktop as children could be burned injured while climbing on th...
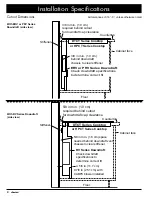
Page 5: ...chassis height Installation Specifications 36 in 91 4 cm 33 1 2 in 85 1 cm including raised embosses on sides of chassis 19 1 2 in 49 5 cm 21 in 53 3 cm 1 5 8 in 4 1 cm bottom of base to cooking surf...
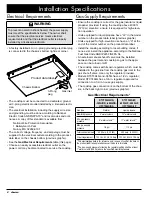
Page 6: ...ed for liquid propane have LP in the model number on the product data label previous graphic Units equipped for high elevation use have an H at the end of the model number on the product data label In...
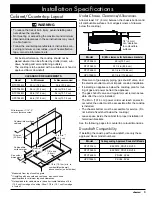
Page 7: ...cm 36 in 91 4 cm DTCT365G 36 in 91 4 cm 42 in 106 7 cm DTCT466G 46 in 121 9 cm 54 in 137 2 cm HPCT466G 46 in 121 9 cm 54 in 137 2 cm Installation Specifications Under Chassis Clearance Allowances All...
Page 8: ...Square 3 8 in 1 0 cm 22 1 2 in 57 2 cm DTCT304G with RV30 Square 5 8 in 1 6 cm 22 1 4 in 56 5 cm DTCT365G no downdraft Square 2 3 8 in 6 0 cm 19 3 4 in 50 2 cm 33 5 8 in 85 4 cm DTCT365G with ERV3615...
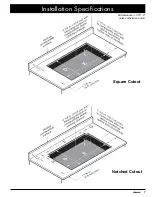
Page 9: ...7 Installation Specifications All tolerances 1 16 0 unless otherwise noted Square Cutout Notched Cutout...
Page 10: ...8 in min 1 6 cm space needed behind downdraft vent chassis to clear stiffener 4 5 8 in 11 7 cm 9 7 8 in 25 1 cm with CABP3 blower installed RV Series Downdraft Check downdraft specifications to determ...
Page 11: ...ssible Use a minimum 1 2 flexible gas line not included to connect the regulator to the gas supply shut off valve 2 Check for gas leaks a Turn OFF all cooktop control valves b With a soap water soluti...
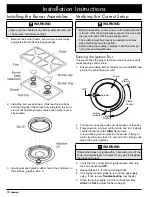
Page 12: ...ying Use and Care Manual Running the Ignition Test This test verifies the proper function of each burner and its corresponding control knob 1 Ensure all cooktop burner controls are turned OFF and plug...
Page 13: ...over of this manual for the location of these numbers Dacor shall not pay to correct problems caused by a faulty installation Installation Instructions Installation Checklist WARNING The installer sho...
Page 14: ...rear 86523BM Burner ring Left front 86918 Left rear right front 86408 Right rear 86407 DTCT365G Part Name Location Type Part Regulator 82540 Grate Large 108850 Small 108851 Burner cap Left front 72435...
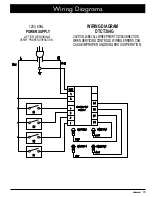
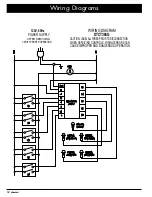
Page 15: ...ams AFTER SERVICING VERIFY PROPER OPERATION 120V 60Hz POWER SUPPLY CAUSE IMPROPERAND DANGEROUS OPERATION WHEN SERVICING CONTROLS WIRING ERRORS CAN CAUTION LABELALLWIRES PRIORTO DISCONNECTION WIRING DI...
Page 16: ...ams AFTER SERVICING VERIFY PROPER OPERATION 120V 60Hz POWER SUPPLY CAUSE IMPROPERAND DANGEROUS OPERATION WHEN SERVICING CONTROLS WIRING ERRORS CAN CAUTION LABELALLWIRES PRIORTO DISCONNECTION WIRING DI...
Page 17: ...SERVICING VERIFY PROPER OPERATION 120V 60Hz POWER SUPPLY CAUSE IMPROPERAND DANGEROUS OPERATION WHEN SERVICING CONTROLS WIRING ERRORS CAN CAUTION LABELALLWIRES PRIORTO DISCONNECTION WIRING DIAGRAM DTC...
Page 18: ...16 Notes...
Page 19: ...17 Notes...
Page 20: ...Dacor 14425 Clark Avenue City of Industry CA 91745 Phone 800 793 0093 Fax 626 403 3130 www dacor com...