


IMPORTANT
1. Before beginning installation, please thoroughly read and become familiar with these instructions.
2. Installation and service must be completed by a qualified installer or service agency.
3. Installer: Please leave these Installation Instructions with the owner.
4. Owner: Please keep these instructions for local electrical inspector’s use and for future reference.
5. Read the accompanying Use & Care Manual prior to operating this appliance.
TABLE OF CONTENTS
STEP 1 Verifying package contents
Page 2
STEP 2 Gas supply requirements
Page 2
STEP 3 Electrical power supply requirements
Page 2
STEP 4 Gas and electrical rough-in locations
Page 2
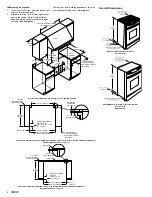
STEP 5 Cabinet and countertop preparation
Page 2-3
STEP 6 Overall dimensions
Page 3-4
STEP 7 Installing the anti-tip bracket
Page 4
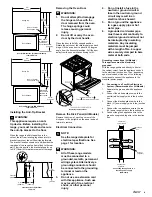
STEP 8 Removing the oven door
Page 4
STEP 9 Removing the kick panel
Page 4
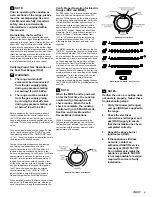
STEP 11 Electrical connection
Page 4-5
STEP 12 Gas connection
Page 5
STEP 13 Installing the range
Page 5
STEP 14 Installing the burner components
Page 5
STEP 15 Re-installing the oven door
Page 5
STEP 16 Verifying proper operation
Page 6
Part No. 65166 Rev. J
TESTEd IN ACCORdANCE wITh ThE LATEST EdITION OF ANSI Z21.1 STANdARd FOR hOUSEhOLd GAS
COOkING APPLIANCES.
NOTES:
Contain helpful hints and tips to facilitate the installation.
CONVENTIONS USEd IN ThESE INSTRUCTIONS
wARNINGS:
Must be followed carefully to avoid personal injury or damage.
SAVE ANd REAd ThESE INSTRUCTIONS
Installation Instructions
Preference
®
and Millennia
™
Ranges
For use with models: MRES30, RSD30, RSE30
Preliminary
For
Review
Only


