Page 1: ...ludes installation instructions for optional cabinet blower Dacor model CABP3 Use these downdraft raised vents only with approved Dacor cooktops See the installation instructions for the particular co...
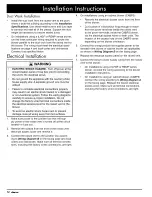
Page 2: ...with installation contact your Dacor dealer or the Dacor Customer Service Team For repairs to Dacor appliances under warranty call the Dacor Distinctive Service line Whenever you call have the model...
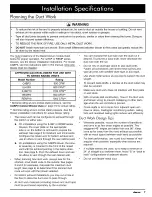
Page 3: ...the flue chimney of fuel burning equ pment to prevent back drafting l F011ow the heating equipment manufacturer s guide ine and safety standards such as those published by the National Fire PrOtectio...
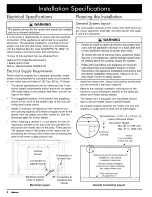
Page 4: ...can cause suffocation Before installing or servicing the raised vent discon nect the power plug from the electrical outleL To reduce the risk of electri c shock or fire connect onlY one of the specif...
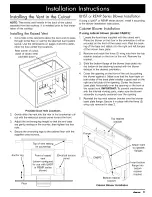
Page 5: ...m 79 _nm 2 51 mm _ 2 5 16 J _ 59 mm Vent shown in raised _ position _ Top cap with vent down 15 16 24 mm I I _9 16 I I 14 mm _ 1 7 1 2 191 mm I See page 8 for exhaust locations and dimensions A Ib i 2...
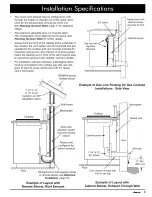
Page 6: ...blower and connecting the vent to the power supply junction box holes in bottom Electrical Layout remote in line blower Planning the Installation General System Layout The vent system consists of the...
Page 7: ...n with gas cooktops a 90 degree elbow must be connected to the cooktop gas inlet see dia gram at right to avoid interference with the raised vent s front panel REMP16 series remote blower 90 elbow Gas...
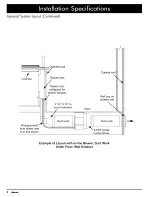
Page 8: ...lower Cabinet back Raised vent Raised vent configured for bottom exhaust 3 1 4 X 10 to round transition Floor Outside wall Wall cap on outside wall Duct work Duct work ILHSF series in line blower Exam...
Page 9: ...ire direc tion See page 8 Point the exhaust down and use an elbow to vent through the rear cabinet wall When planning new duct work always look for the shortest most direct route to the outside See pa...
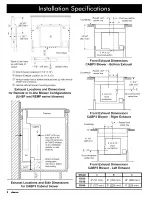
Page 10: ...8 213 mm k _ ElI I from back ofRV _ I_1 I I cutout to center line H I I i of CABP3 exhaust NI I I in any orientation N 11I I I bottom orside _ HIll l l exahust_ M N Bottom exhaust ___ 1_J _ configutat...
Page 11: ...The equivalent length of 45 elbow is 2 feet The equivalent length of the transition is 4 feet The total equivalent length of the above components is 15 feet 15 feet 4 feet 2 feet 36 feet The maximum a...
Page 12: ...he exhaust that will be used bottom or side Discard the cover plate that was removed but leave the two other cover plates in place _1 ml I m Bottom i cover Exhaust Cover Removal bottom shown Locate th...
Page 13: ...abinet Blower Installation If using cabinet blower model CABP3 1 Locate the foam tape supplied with the raised vent Place the blower on the floor in the orientation it will be mounted on the front of...
Page 14: ...ke sure power to the junction box that will sup ply power to the raised vent is turned off at the circuit breaker or fuse box 2 Remove the screws from the front of the raised vent electrical access co...
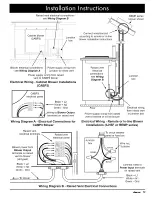
Page 15: ...nt to remote or in line blower Junction box Electrical wiring from raised vent to junction box Wiring Diagram A Electrical Connections for CABP3 Blower Electrical Wiring Remote or In line Blower Insta...
Page 16: ...he vent cover or cabinet blower and check for obstructions interfering with the raising mechanism Replace the vent cover or cabinet blower and make sure it is properly centered over the opening on the...
Page 17: ...CHASSIS GROUND GND GNDI o oj I__ 1 GROUND CABP3 Cabinet Blower Ratings CABP3 Cabinet blower Airflow O 0 t I m o O9 5 0 4 0 3 0 2 0 1 0 0 CABP3 Blower Performance 1O0 200 300 400 500 Airflow CFM Cubic...
Page 18: ...16 c_mcar...
Page 19: ...Family Owned American Made Dacor 600 Anton Blvd Suite 1000 Costa Mesa CA 92626 Phone 800 793 0093 Fax 626 403 3130 www Dacor com The Life of the Kitchen...