Manufactured under license of
Daewoo International Corporation
, Korea/
Fabricado bajo licencia de
Daewoo International Corporation
, Korea
www.daewoopowerproducts.com
USER'S MANUAL/ MANUAL DE USO
DACS
1640
Li
Lithium chainsaw
1. SYMBOL
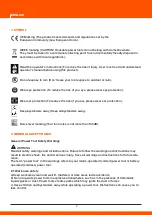
CE Marking (The product meets demands and regulations set by the
European Community (now European Union).
WEEE marking (CAUTION! Unusable power tools do not belong with domestic waste.
They must be taken to a communal collecting point for environmentally friendly disposal in
accordance with local regulations).
Read the operator’s instructions (To reduce the risk of injury. User must read and understand
operator’s manual before using this product).
Do not expose to rain (Don’t leave your tool expose to outdoor or rain).
Wear eye protection (To reduce the risk of you eye, please wear eye protection).
Wear ear protection (To reduce the risk of you ear, please wear ear protection).
Keep bystanders away (Keep all bystanders away).
Noise level marking (Your tool noise is not more than 103dB).
2. GENERAL SAFETY RULES
General Power Tool Safety Warnings
WARNING
:
Read all safety warnings and all instructions. Failure to follow the warnings and instructions may
result in electric shock, fire and/or serious injury. Save all warnings and instructions for future refe-
rence.
The term “power tool” in the warnings refers to your mains-operated (corded) power tool or battery
operated (cordless) power tool.
2.1 Work area safety
a)Keep work area clean and well lit. Cluttered or dark areas invite accidents.
b) Do not operate power tools in explosive atmospheres, such as in the presence of flammable
liquids gases or dust. Power tools create sparks which may ignite the dust or fumes
c) Keep children and bystanders away while operating a power tool. Distractions can cause you to
lose control.
2.2 Electrical safety
a) Power tool plugs must match the outlet. Never modify the plug in any way. Do not use any adap-
ter plugs with earthed (grounded) power tools. Unmodified plugs and matching outlets will reduce
risk of electric shock.
b
)
Avoid body contact with earthed or grounded surfaces, such as pipes, radiators, ranges and
refrigerators. There is an increased risk of electric shock if your body is earthed or grounded.
c
)
Do not expose power tools to rain or wet conditions. Water entering a power tool will increase the
risk of electric shock.
d) Do not abuse the cord. Never use the cord for carrying, pulling or unplugging the power tool.
Keep cord away from heat, oil, sharp edges and moving parts. Damaged or entangled cords increa-
se the risk of electric shock
e) When operating a power tool outdoors, use an extension cord suitable for outdoor use. Use of a
cord suitable for out- door use reduces the risk of electric shock.
f) If operating a power tool in a damp location is unavoidable, use a residual current device (RCD)
protected supply. Use of an RCD reduces the risk of electric shock.
2.3 Personal safety
a) Stay alert, watch what you are doing and use common sense when operating a power tool. Do
not use a power tool while you are tired or under the influence of drugs, alcohol or medication. A
moment of inattention while operating power tools may result in serious person- al injury.
b) Use personal protective equipment. Al- ways wear eye protection. Protective equipment such as
dust mask, non-skid safety shoes, hard hat, or hearing protection used for appropriate conditions
will reduce personal injuries.
c) Prevent unintentional starting. Ensure the switch is in the off-position before connecting to power
source and/or battery pack, picking up or carrying the tool. Carrying power tools with your finger on
the switch or energising power tools that have the switch on invites accidents.
d) Remove any adjusting key or wrench before turning the power tool on. A wrench or a key left
attached to a rotating part of the power tool may result in personal injury.
e) Do not overreach. Keep proper footing and balance at all times. This enables better control of the
power tool in unexpected situations.
f) Dress properly. Do not wear loose clothing or jewelry. Keep your hair, clothing and gloves away
from moving parts. Loose clothes, jewelry or long hair can be caught in moving parts.
g) If devices are provided for the connection of dust extraction and collection facilities, ensure these
are connected and properly used. Use of dust collection can reduce dust-related hazards.
2.4 Power tool use and care
a) Do not force the power tool. Use the correct power tool for your application. The correct power
tool will do the job better and safer at the rate for which it was designed.
b) Do not use the power tool if the switch does not turn it on and off. Any power tool that cannot be
controlled with the switch is dangerous and must be repaired.
c) Disconnect the plug from the power source and/or the battery pack from the power tool before
making any adjustments, changing accessories, or storing power tools. Such preventive safety
measures reduce the risk of starting the power tool accidentally.
d) Store idle power tools out of the reach of children and do not allow persons unfamiliar with the
power tool or these instructions to operate the power tool. Power tools are dangerous in the hands
of untrained users.
e) Maintain power tools. Check for misalignment or binding of moving parts, breakage of parts and
any other condition that may affect the power tool’s operation. If damaged, have the power tool
repaired before use. Many accidents are caused by poorly maintained power tools.
f) Keep cutting tools sharp and clean. Properly maintained cutting tools with sharp cutting edges
are less likely to bind and are easier to control.
g) Use the power tool, accessories and tool bits etc. in accordance with these instructions, taking
into account the working conditions and the work to be performed. Use of the power tool for opera-
tions different from those intended could result in a hazardous situation.
2.5 Battery tool use and care
a) Recharge only with the charger specified by the manufacturer. A charger that is suitable for one
type of battery pack may create a risk of fire when used with another battery pack.
b) Use power tools only with specifically designated battery packs. Use of any other battery packs
may create a risk of injury and fire.
c) When battery pack is not in use, keep it away from other metal objects, like paper clips, coins,
keys, nails, screws or other small metal objects, that can make a connection from one terminal to
another. Shorting the battery terminals together may cause burns or a fire.
d) Under abusive conditions, liquid may be ejected from the battery; avoid contact. If contact acci-
dentally occurs, flush with water. If liquid contacts eyes, additionally seek medical help. Liquid
ejected from the battery may cause irritation or burns.
2.6 Service
Have your power tool serviced by a qualified repair person using only identical replacement parts.
This will ensure that the safety of the power tool is maintained.
2.7 Chain saw safety warnings
a) Keep all parts of the body away from the saw chain when the chain saw is operating. Before you
start the Chain saw, make sure the saw chain is not contacting anything. A moment of inattention
while operating chain saws may cause entanglement of your clothing or body with the saw
chain.
b) Always hold the Chain saw with your right hand on the rear handle and your left hand on the front
handle. Holding the Chain saw with a reversed hand configuration increases the risk of personal
injury and should never be done.
NOTE For chain saws designed with the guide bar on the left side, the reference to “right hand” and
“left hand” positioning is reversed.
c) Wear safety glasses and hearing protection. Further protective equipment for head, hands, legs
and feet is recommended. Adequate protective clothing will reduce personal injury by flying debris
or accidental contact with the saw chain.
d) Do not operate a chain saw in a tree. Operation of a chain saw while up in a tree may result in
personal injury.
e) Always keep proper footing and operate the chain saw only when standing on fixed, secure and
level surface. Slippery or unstable surfaces such as ladders may cause a loss of balance or control
of the chain saw.
f
)
When cutting a limb that is under tension be alert for spring back. When the tension in the wood
fibres is released the spring loaded limb may strike the operator and/or throw the chain saw out of
control.
g
)
Use extreme caution when cutting brush and saplings. The slender material may catch the saw
chain and be whipped toward you or pull you off balance.
h
)
Carry the chain saw by the front handle with the chain saw switched off and away from
your body. When transporting or storing the chain saw always fit the guide bar cover. Proper hand-
ling of the chain saw will reduce the likelihood of accidental contact with the moving saw chain.
i
)
Follow instructions for lubricating, chain tensioning and changing accessories. Improperly tensio-
ned or lubricated chain may either break or increase the chance for kickback.
j
)
Keep handles dry, clean, and free from oil and grease. Greasy, oily handles are slippery causing
loss of control.
k
)
Cut wood only. Do not use chain saw for purposes not intended. For example: do not use chain
saw for cutting plastic, masonry or non-wood building materials. Use of the chain saw for opera-
tions different than intended could result in a hazardous situation.
2.8 Causes and operator prevention of kickback
Kickback may occur when the nose or tip of the guide bar touches an object, or when the wood
closes in and pinches the saw chain in the cut.
Tip contact in some cases may cause a sudden reverse reaction, kicking the guide bar up and back
towards the operator.
Pinching the saw chain along the top of the guide bar may push the guide bar rapidly back towards
the operator.
Either of these reactions may cause you to lose control of the saw which could result in serious
personal injury. Do not rely exclusively upon the safety devices built into your saw. As a chain saw
user, you should take several steps to keep your cutting jobs free from accident or injury.
Kickback is the result of tool misuse and/or incorrect operating procedures or conditions and can
be avoided by taking proper precautions as given below:
a
)
Maintain a firm grip, with thumbs and fingers encircling the chain saw handles, with both hands
on the saw and position your body and arm to allow you to resist kickback forces. Kickback forces
can be controlled by the operator, if proper precautions are taken. Do not let go of the chain saw.
b
)
Do not overreach and do not cut above shoulder height. This helps prevent unintended tip con-
tact and enables better control of the chain saw in unexpected situations.
c
)
Only use replacement bars and chains specified by the manufacturer. Incorrect replacement bars
and chains may cause chain breakage and/or kickback.
d
)
Follow the manufacturer’s sharpening and maintenance instructions for the saw chain. Decrea-
sing the depth gauge height can lead to increased kickback.
2.9 Safety Warnings for battery chargers
1. Keep the battery charger away from rain or moisture. Penetration of water in the battery charger
increases the risk of an electric shock.
2. Do not charge other batteries. The battery charger is suitable only for charging lithium ion batte-
ries within the listed voltage range. Otherwise there is danger of fire and explosion.
3. Keep the battery charger clean. Contamination can lead to danger of an electric shock.
4. Before each use, check the battery charger, cable and plug. If damage is detected, do not use
the battery charger. Never open the battery charger yourself. Have repairs per- formed only by a
qualified technician and only using original spare parts. Damaged battery chargers, cables and
plugs increase the risk of an electric shock.
5. Do not operate the battery charger on easily inflammable surfaces (e. g., paper, textiles, etc.) or
surroundings. The heating of the battery charger during the charging process can pose a fire
hazard.
6. Children should be supervised to ensure that they do not play with the battery charger.
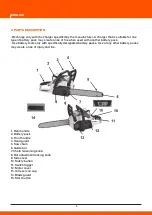
3. PARTS DESCRIPTION
•
Recharge only with the charger specified by the manufacturer. A charger that is suitable for one
type of battery pack may create a risk of fire when used with another battery pack.
•
Use battery tools only with specifically designated battery packs. Use of any other battery packs
may create a risk of injury and fire.
1. Rear handle
2. Battery pack
3. Front handle
4. Hand guard
5. Saw chain
6. Guide bar
7. Chain tensioning knob
8. Bar adjustment locking knob
9. Side cover
10. Safety button
11. Switch trigger
12. Motor cover
13. Oil reservoir cap
14 .Blade guard
15 .Start button
4. TECHNICAL DATA
Model: DACS1640Li
Power: 40 V
No Load Chain Speed: 5000 rpm
Guide Bar Length: 14 inch (350mm)
Net weight: 5.5 kg
Sound Pressure level at the operator’s position: 92.4dB(A) K=3 dB(A)
Measured Sound Power level: 100.2dB(A) K=2.68dB(A)
Guaranteed Sound Power level: 103dB(A)
Vibration: 2.291m/s² K=1.5 m/s²
Battery Lithium-ion
Model number
DYMA81
DYMA72E
Rated voltage
40V d.c.
40V d.c.
Capacity
90Wh
144Wh
Number of battery
20pcs
20pcs
Battery charger
Model number
DYMA83
Input
220-240VAC,50Hz,1A
Output
40V
d.c.,2A
Allowable charging temperature range
0-50°C
5. ASSEMBLY
5.1 Assemble the guide bar and saw chain
a) Wear gloves before assembly. Loosening bar adjustment locking knob
(
8
)
counterclockwise one
or two full turn .
b) The chain tensioning knob (7) must be rotated counterclockwise to its stop.
c) Bar adjustment locking knob (8) should be rotated counterclockwise to its stop.
d) Then take off the side cover. (Fig.2).
e)Place the chain in the slot of the guide bar, making sure the saw teeth are facing the correct
direction by matching the arrow on the guide bar ( Fig. 3A)
f) Place the saw chain around the sprocket (16) with teeth cutting edges facing away from the drive
sprocket along top edge of the guide bar. Meanwhile the chain tension knob (18) should be rotated
clockwise to its stop to tension the saw chain.
(
Fig.3A/ Fig.3B).
g) Insert the side cover (9) to the slot (17) and make sure the side cover is securely seated in a fixed
way as shown in (Fig. 4A/ Fig.4B).
h) Making sure the chain properly seated in guide bar rail and guide bar is fixed then locking knob
should be rotated clockwise to its stop. (Fig.5).
For adjustment of chain tension please refer to “8.6 ADJUSTING CHAIN TENSION” instruction.
5.2 Gather up guide bar and chain. (Fig.6a/ Fig.6b/ Fig.6c).
WARNING:
For you safety and storage, please gather up cutting guard after each operation.
5.3 Assemble the battery
1. Insert the battery pack into battery holder. (Fig.7A).
2. Make sure the latch on bottom of battery pack snaps in place and that battery pack is
fully seated. (Fig.7B).
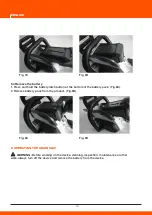
5.4 Remove the battery
1. Press and hold the battery latch button at the bottom of the battery pack. (Fig.8A).
2. Remove battery pack from the product. (Fig.8B).
6. OPERATING THE CHAIN SAW
WARNING:
Before working on the device-cleaning, inspection
,
maintenance or other
work-always turn off the device and remove the battery from the device.
6.1 Remove the blade guard before operation. (fig.9a/ fig.9b).
6.2 Starting the device
Press start button (15) when “ON” turn on green light and press safety button
(
10
)
on the rear
handle and also press switch trigger (11). (Fig.10A/ Fig.10B).
6.3 LED
Please refer to the following table for the meaning of LED display.
6.4 Stopping the device
To stop the Chain saw
,
release the switch trigger and safety button.
WARNING: If any emergency happen during operation just push forward the hand guard for
your personal safety. (Fig.11A/ Fig.11B).
6.5 Gather up guide bar and chain. please refer to 5.2
WARNING:
For you safety and storage, please gather up cutting guard after each operation.
7. CUTTING
7.1 Basic cutting
WARNING:
Always be sure of footing and hold the chain saw firmly with both hands while the
motor is running.
1. Assume the proper cutting grip and stance in front of the wood with the saw off. Press the trigger
lock-out and squeeze the switch trigger. Let the chain reach full speed before beginning the cut.
2. Begin cutting by lightly pressing the guide bar against the wood. Use only light pressure, letting
the saw do the work.
3. Maintain a steady speed throughout the cut, releasing pressure just before the end of the cut.
7.2 Pruning
When pruning, make sure all bystanders or helpers are a safe distance from falling branches and
are not directly in front of or behind the saw operator. Secure any branches that might pose a
hazard. Use the proper auxiliary equipment. Maintain good footing, hold the saw firmly with both
hands, and do not overreach.
With the saw at full speed, bring the bottom of the guide bar into contact with the branch to be cut.
Continue cutting using light pressure. For larger branches, first make a shallow undercut on the
bottom of the branch and then finish the cut from the top. Cutting a large branch completely from
the top could cause splintering. A complete cut from the bottom can cause the branch to pinch the
bar.
7.3 Felling a tree
(Fig.12)
When bucking and felling operations are being performed by two or more persons, at the same
time, the felling operation should be separated from the bucking operation by a distance of at least
twice the height of the tree being felled. Trees should not be felled in a manner that would endanger
any person, strike any utility line or cause any property damage. If the tree does make contact with
any utility line, the utility company should be notified immediately.
The chain saw operator should keep on the uphill side of the terrain as the tree is likely to roll or
slide downhill after it is felled. A retreat path should be planned and cleared as necessary before
cuts are started. The retreat path should extend back and diagonally to the rear of the expected line
of fall.
Before felling is started, consider the natural lean of the tree, the location of larger branches and the
wind direction to judge which way the tree will fall. Remove dirt, stones, loose bark, nails, staples,
and wire from the tree where felling cuts are to be made.
7.3.1 Notching undercut (Fig.13)
Make the notch 1/3 the diameter of the tree, perpendicular to the direction of fall. Make the lower
horizontal notching cut first. This will help to avoid pinching of either the saw chain or the guide bar
when the second notch is being made.
7.3.2 Felling back cut (Fig.14)
Make the felling back cut at least 2 inches (51mm) higher than the horizontal notching cut. Keep the
felling back cut parallel to the horizontal notching cut. Make the felling back cut so enough wood is
left to act as a hinge. The hinge wood keeps the tree from twisting and falling in the desired direc-
tion.
Do not cut through the hinge.
As the felling cut gets close to the hinge the tree should begin to fall. If there is any chance that the
tree may not fall in the desired direction or it may rock back and bind the saw chain, stop cutting
before the felling back cut is complete and use wedges of wood, plastic or aluminum to open the
cut and drop the tree along the desired line of fall.
When the tree begins to fall, remove the chain saw from the cut, stop the motor, put the Chain saw
down, then use the retreat path planned. Be alert for overhead limbs falling and watch footing.
7.3.3 Limbing a tree (Fig.15)
Limbing is removing the branches from a fallen tree. When limbing, leave larger lower limbs to
support the log off the ground. Remove the small limbs in one cut. Branches under tension should
be cut from the bottom up to avoid binding the Chain saw.
7.3.4 Bucking a log
Bucking is cutting a log into lengths. It is important to make sure footing is firm and weight is evenly
distributed on both feet. When possible, the log should be raised and supported by the use of limbs,
logs or chocks.
7.4 Follow these simple directions for easy cutting:
When the log is supported along its entire length, it is cut from the top (overbuck). (Fig.16).
When the log is supported on one end cut 1/3 the diameter from the underside (underbuck). Then
make the finished cut by overbucking to meet the first cut. (Fig.17).
When the log is supported on both ends, cut 1/3 of that diameter from the top overbuck. Then make
the finished cut by underbucking the lower 2/3 to meet the first cut. (Fig.18).
When bucking on a slope always stand on the uphill side of the log. (Fig.19).
To maintain complete control when cutting through, release the cutting pressure near the end of the
cut without relaxing the grip on the chain saw handles. Don’t let the chain contact the ground. After
completing the cut, wait for the saw chain to stop before you move the chain saw. Always stop the
motor before moving from tree to tree.
8. MAINTENANCE AND CLEANING
WARNING: Inspect the chain saw. Regular inspection is the first step to proper Maintenance.
By following the guidelines below, you can maximize safety and satisfaction. Should you identify any
damaged or excessively worn parts, replace them immediately.
WARNING: Remove the battery pack from the chain saw. Before inspecting, cleaning, or perfor-
ming Maintenance. A Battery operated tool with the battery pack inserted is always on and can start
accidentally.
8.1 Before each use
a. Handles: Front and rear handles should not have cracks or other damage. They should be clean
and dry.
b. Hand Guard: The hand guard should be free of damage and able to move easily back and forth.
c. Guide Bar: The guide bar should be straight and free of chips, cracks, or excessive wear.
d. Saw Chain: The chain should be properly tensioned, and all components free of cracks, chips, or
excessive wear.
e. Side Cover: The side cover should be free of cracks or other damage. It should fit tightly to the
saw body with no warping. Make sure the chain catch is free of cracks.
f. Battery Pack: The battery pack should be clean, dry, with no signs of puncture, impact, or other
damage. The contacts should be clean, dry and free of debris.
g. Battery Holder: The battery holder and contacts should be clean, dry, and free of debris.
h. Chain Brake: Test the chain brake to make sure it is functioning properly.
i. Oil Level: Oil should fill the inspection window. If not, fill the oil reservoir before use.
j. Motor Cover: Check for cracks in the cover and debris in the air intake vents.
8.2 Cleaning the saw
WARNING:
When cleaning the chain saw power head, do not immerse in water or other liquids.
a. Remove battery pack before cleaning.
b. Remove wood chips and other debris from the battery holder. Make sure the contacts are clean
and dry.
c. After use, clean debris from the chain and guide bar. Wipe power head with a clean cloth moiste-
ned with a mild soap solution. Never use harsh cleaners or solvents.
d. Always clean out wood chips, saw dust, and dirt from the bar groove when replacing the saw
chain.
8.3 Periodically
a. Drive Sprocket: Look for deep grooves, broken teeth, or burrs.
b. Bar-Mounting Area: Make sure the bar- mounting stud is not bent, stripped, or cross-threaded
and that the bar pad and alignment flange are free of debris and intact.
c. Charger: The charger should be clean, dry, and free of punctures or other damage. The battery
tray and contacts should be free of debris.
8.4 Replacing the guide bar and saw chain(fig.20)
a
)
Wear gloves and the chain saw off and cool and the battery pack removed.
b) Loosening bar adjustment locking knob
(
8
)
counterclockwise one or two full turn.
c) The chain tensioning knob
(
7
)
must be rotated counterclockwise to its stop.
d) Bar adjust locking knob
(
8
)
should be rotated counterclockwise to its stop.
e) Then take off the side cover.
f) Last you can take off the worn bar and chain and make sure the bar pad, sprocket, and tensioning
knob are free of debris.
8.5 Install new guide bar and saw chain
PLEASE REFER TO 5.1
8.6 Adjusting chain tension
WARNING:
Sharp moving chain. To prevent accidental operation, ensure that battery is remo-
ved from the tool before performing the following operations.
a) Loosening bar adjust locking knob counterclockwise one or two full turn.
b) Chain tensioning knob must be rotated counterclockwise to its suitable turn to adjust chain
tension.
c
)
With the saw on a firm surface, check the saw chain tension. The tension is correct when the
chain snaps back after being pulled 1/8 inch (3mm) away from the guide bar with light force from the
middle finger and thumb as shown in figure (Fig.21A). There should be no “sag” between the guide
bar and the chain on the underside as shown in figure. (Fig.21B).
d) Once chain tension is correct, securely tighten bar adjust locking knob clockwise to stop.
e) When the chain is new, check the tension frequently (after removing battery) during the first 2
hours of use as a new chain stretches slightly.
9. TROUBLESHOOTING
The following chart lists problem symptoms, possible causes and corrective action, if your garden
product does not operate properly. If these do not identify and correct the problem, contact your
service agent.
WARNING:
Switch off and remove the battery prior to any troubleshooting.
10. ENVIRONMENTALLY FRIENDLY DISPOSAL
According to EU directive 2012/19/EU on electric and electronic equipment and its implementation
into national law, all electric tools must be separately collected and environmentally friendly recy-
cled. Alternative disposal: If the owner of the power tool does not return the tool to the manufactu-
rer, he is responsible for proper disposal at a designated collection point that prepares the device
for recycling according to national recycling laws and regulations.
This does not include accessories and tools without electric or electronic components.
Accumulator disposal
Old Accumulators and batteries must not be added to household waste, but should be disposed of
in accordance with the applicable legislation.
Take unusable rechargeable batteries to the dealer’s or community’s battery collection point.
Disposing of the packaging
The packaging is made of cardboard and separately labeled foil which is also recyclable.
Take these materials to a recycling centre.
Battery packs/batteries
Li-lon
Do not dispose of batteries into household waste, water or fire. Battery packs/batteries must be
collected, recycled or disposed of in an environmentally friendly way.
Only for EC countries:
Defective or dead batteries must be recycled according to the directive 91/157/EC


