1. Clean the refrigerator thoroughly. Wipe the outside with a soft dry cloth, the
inside with a damp cloth.
2. Keep the door open and insert the power supply cord into the socket.
3. Turn the thermostat dial to “7”. Close the door and let the refrigerator
operate for 15-20 minutes.
The freezer should then show some traces of frost.
HOW TO CLEAN
Starting your new Refrigerator
You can control the inside temperature by
turning the thermostat dial. Higher numbers
mean greater cooling power, smaller numbers
mean less cooling power. To make ice cubes
in the freezer compartment, set the dial to “7”.
The dial does not have to be set exactly on the
numbers, but can be any place in between.
Temperature control
Defrost the refrigerator when the frost accumulated on the evaporator is
about 5mm(1/5inch) thick.
Set the thermostat dial to “OFF”. Remove frozen or perishable foods.
Keep drip tray in place. Defrosting usually takes a few hours. To defrost
quickly remove all foods from the refrigerator and leave door open. Never
use a knife or other metal instrument to remove ice/frost from the
evaporator. After defrosting empty water from drip tray, return the
thermostat dial to the desired position to start refrigerating again.
How to defrost
6
7
5
4
3
2
1
OFF
CO
LD
E
R
TEMPERATURE
CONTROL
NOTE: Wait 3 to 5 minutes before restarting if you unplug the
machine. Unit may fail to operate properly if restarted too
quickly.
HOW TO OPERATE
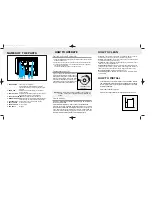
NAMES OF THE PARTS
!(@ $ #
% ^ & *
1. EVAPORATOR : The heart of the refrigerator.
It evaporates the refrigerant fluid and thereby
absorbs heat from the surrounding. Made of pure
aluminum.
2. DRAIN PAN
: Discards the water that drips of the evaporator
when defrosting.
3. CONTROL BOX
Regulates the operation of the motor and controls
the inside temperature of the refrigerator.
4. PLASTIC COATED SHELF Has full width and can slide out.
5. MAGNETIC DOOR SEALS Keeps the refrigerator virtually airtight all
along the edge, but is nevertheless easy to open.
6. ICE CUBE TRAY : Ice cubes are easy to remove from the tray.
7. BOTTLE RACK
for bottles, cans or jars.
8. USABLE RACK
for cans or jars.
9. EGG SHELF
for eggs.
Cleaners: The cleaners noted below are available. Never use harsh,
abrasive cleaners, heavy-duty cleaners, or solvents on any surface.
Exterior: Wipe with damp, sudsy cloth, rinse and dry. For stubborn stains
and for periodic waxing, use silicon wax.
Evaporator: When refrigerator needs defrosting turn thermostat dial to
“OFF”. Do not use sharp instruments.
Refrigeration Section: Wash shelves and other removable parts in warm
sudsy water, rinse and dry. Wash interior with baking soda solution (3
table spoons to one quart of water) or warm sudsy water, rinse and dry.
Magnetic Door Seals: Wash with warm sudsy water.
The Finishing Touch: Replace all parts and return thermostat dial to
desired setting.
HOW TO INSTALL
§
Install refrigerator in a convenient location away from extreme heat and
cold. Allow sufficient clearance between the refrigerator and side wall so
the door will open for a fully usable interior. Refrigerator is not designed
for recessed installation.
§
Select a place with strong level floor.
§
Allow 5 inches of space between the refrigerator’s side and the wall.
5
inches
081
(FR-091/091B)¿ „fi 00.8.31 2:40 PM ˘
`
1


