background image

Greetings 


Thank you for buying GD7 of GM DAEWOO.


Welcome to the diversified and convenient world of Portable Multimedia Navigation 

GD7

.

GM DAEWOO’s 

GD7

 is designed and made to be in compliance with the rigid self standard and 

international quality standards and goes through severe quality tests for humidity, impact, dirt, vibration 
and drop before production.


We hope that with this product produced through such a series of processes, you will enjoy more 
pleasantly your life and spare times anytime and anywhere such as navigation system to help the car 
safely run, TV and you to view movie, listen to music and appreciate photos.


This User Manual is intended to be a help to facilitate operation of the diversified and convenient 
functions of this product.

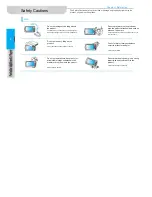
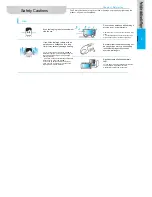
Any damage or trouble on the product arising out of failure to be fully aware of warnings or cautions is 
excluded from free AS. Please be advised that you should read them before using the product. 

Thank you. 

3

Summary of Contents for GD7

Page 1: ...product produced through such a series of processes you will enjoy more pleasantly your life and spare times anytime and anywhere such as navigation system to help the car safely run TV and you to vie...

Page 2: ...to the installed stand 3 1 Connect the adaptor to the cigar jack For car adaptor you must use the DC 5V adaptor only supplied by our company If you use a general adaptor it may cause a trouble Begin...

Page 3: ...iver must normally drive the car once he she drives Since the GPS receiver and stand support have strong magnetism do not bring them close to the PMP product certainly Fool from interference with rece...

Page 4: ...ll in the product or the adaptor stop using the product immediately For adaptor take out the plug from the outlet and directly contact the service center 6 Do not excessively bend the adaptor cord or...

Page 5: ...nce or liquid permeates through the product immediately turn off the power supply take out the AC adaptor from the outlet and take inspection from the qualified engineer Do not disassemble repair and...

Page 6: ...oduct with chemicals such as benzene thinner etc It may deteriorate the surface or peel the coat so you must not use it 8 Do not put a heavy thing on the product It may cause damage and trouble on the...

Page 7: ...ne for a long time it may seriously damage hearing If you are exposed to a large sound of 85dB at least for a long time it may damage hearing As the volume becomes higher it may damage hearing serious...

Page 8: ...g MP3 Photo Image View While Using MP3 33 34 36 38 40 Chapter 1 Before Use 10 Features Components Check Parts Buttons LCD Screen Battery Charging Battery Separate Connect Earphone Wrist String Connect...

Page 9: ...r Function Select Screen Media Player Use MP3 Player Video Player Photo External Video View Alarm Calculator Calendar 55 55 56 57 58 62 68 72 73 75 78 Chapter 7 Troubleshooting Specification Request F...

Page 10: ...te Connect Earphone Wrist Strap Connect Connect to TV External Unit 13 16 17 19 20 22 23 24 25 Use Practice Power On Off Lock Setting Volume Adjust Enter Menu Screen Memory Card Insert Remove Find a D...

Page 11: ...ntents through addition of new functions upgrade and performance improvement Omnipotent multimedia player Multi Codec Player Image files JPG BMP and high definition moving image files MPEG4 XviDencode...

Page 12: ...is chargeable even if the product is used by connecting the DC 5V adaptor Also you can see a movie for successive 5 hours and listen to music for 10 hours at one charging and available time may be ext...

Page 13: ...select and hear MP3 while using the Navigation or seeing the photo You can use media player while listening to MP3 and moving to the Navigation or Photo View Multi PIP You can view DMB TV if you use t...

Page 14: ...lustrations are to facilitate your understanding of the description and they may be different from the actual appearance Main Body GPS Module Car Adaptor Car Stand Cradle 16 Battery Pack AV Cable SD C...

Page 15: ...D Card Power ON OFF HOLD TFT LCD Views the screen to be outputted Power Supply LED Battery Charging Indication Lamp HOME Key Returns to the previous menu Enter Key Volume Adjust Select Command Execute...

Page 16: ...COM For additional functions AV IN AV OUT Earphone Connection Terminal USB Connection Terminal DC 5V Adaptor Connection Terminal Portable String Ring Separable Charging Battery Separable Charging Batt...

Page 17: ...pply Give a push to the right for HOLD function Returns to the previous step 19 Button Executes the function Pause when MP3 Video and DMB are operated Button Moves to the up down item or menu Button 1...

Page 18: ...f Icons Main Selects PMP NAVI DMB Setting Sets configuration 20 Navigation Provides road transportation information DMB Plays TV broadcasting MP3 Plays a music file Video Plays a moving image file Pho...

Page 19: ...bar appears on the top of the screen Then you can play the media player for the icon displayed on the top 21 Multi Tasking icons in operation of the Navigation Press the DMB icon and it executes DMB P...

Page 20: ...battery Maintain room temperature 5 35 for charging and keeping As the battery is a consumable the available period becomes shorter 2 DC 5V adaptor is separately sold For adaptor you must use the DC...

Page 21: ...harging battery and push the Separate Lock unit in a locking direction for connection in a reverse manner to separation 23 Keep room temperature to charge and keep the battery Avoid a too hot or cold...

Page 22: ...ap Connect Earphone Connect Wrist Strap Connect 24 Open the protective cover in direction of If you let the product fall by mistake the product may be damaged please connect the wrist strap Put the ea...

Page 23: ...as one sound input terminal connect only the white left terminal 25 Connect to External Unit Use AV Cable when you attempt connection with the external unit 1 Connect the AV Out of the external unit w...

Page 24: ...out 3 seconds Then power is on 1 Give a push to the POWER HOLD switch and set to HOLD The product will not be operated even if you press any button 2 To release the lock function give a push to the PO...

Page 25: ...the screen to adjust volume 27 2 Press down the Key Key on the right button to 1 Touch the icon of the desired menu to execute the program 2 With the buttons on the right select the menu icon and pres...

Page 26: ...a rattling sound 1 Slightly press the edge of the SD MMC card The SD MMC card rushes out If any SD Card SD MMC Card not complying with the specification is used it may be damaged or can be hardly tak...

Page 27: ...mes off to be sleep mode Search the file downloaded to the SD Card SD MMC Card 1 If you are to search files of MP3 moving image file photo etc you just have to find the file in File Search in each med...

Page 28: ...30 Drag Draw the icon or screen while pressing down the icon with touch pen and take off the pen on the desired position similar function to mouse drag It is used when you move the PIP small screen t...

Page 29: ...io unit same as FMT frequency 88 1MHz Increase volume of the main body to the maximum in order to get high volume and sound quality in the external unit The higher is volume of the main body the highe...

Page 30: ...apter 2 Multi Tasking Use What Is Multi Tasking DMB View While Using Navigation Listen To MP3 Music While Using Navigation Navigation View While Using MP3 Photo Image View While Using MP3 33 34 36 38...

Page 31: ...yer while listening to music Multi PIP You can view DMB TV with PIP function while using Navigation 33 To use Multi Tasking touch the Multi Tasking icon shown in the center of the screen with the MENU...

Page 32: ...MB TV in the same screen 34 2 After a while the Navigation execution screen appears and the Navigation is executed 1 Turn on the product Then the main screen shows up Touch the NAVI menu in the main s...

Page 33: ...all window in the screen 5 Whole Screen View 1 Touch the screen and the DMB menu icon shows up 6 2 Touch the PIP icon It changes into the whole screen PIP End Touch the screen and then the DMB menu ic...

Page 34: ...e Navigation 36 2 After a while the Navigation execution screen appears and the Navigation is executed 1 Turn on the product Then the main screen shows up Touch the NAVI menu in the main screen 3 1 Pr...

Page 35: ...the play icon The selected music is played 6 5 Navi Change 1 Press the MENU button on the right 2 The Navi icon and Setting icon appear in the middle of the screen 3 Touch the Navi icon It changes int...

Page 36: ...on View While Using MP3 You can use Navigation while listening to MP3 38 2 Touch the audio icon 1 Turn on the power supply Then the main screen appears 3 Select the My music folder to play the desired...

Page 37: ...Photo icon touch the Navigation Icon It changes into the Navigation screen after a while and you can view each kind of selected transportation information You can use the Navigation while listening t...

Page 38: ...View While Using MP3 You can view the photo image while listening to MP3 40 2 Touch the audio icon 1 Turn on the power supply Then the main screen appears 3 Select the My music folder to play the desi...

Page 39: ...icons appear in the middle of the screen 3 Touch the photo icon It moves to the Photo screen after a while You can play the photo image view while listening to the selected music 6 Photo View End 1 T...

Page 40: ...Chapter 3 SD CARD READER Use Connect to PC with SD CARD READER File Folder Copy Delete Separate From Computer Firmware and Map Upgrade 43 44 45 46...

Page 41: ...product Connect to PC with SD CARD Reader 1 Press slightly the edge of the memory card Then the memory card rushes out 2 See the front back of the SD Card and put it in the SD Card Reader the SD Card...

Page 42: ...SD CARD READER Use File Folder Copy Delete Chapter 3 SD CARD Reader Use 1 44 Connect the SD Card Reader to the computer and the SD CARD mobile disk appears A...

Page 43: ...pied in the computer and drag it to the folder of the SD CARD and it is copied 3 Delete the file folder of the SD CARD Select the file or folder saved in the SD CARD press the Delete button and then O...

Page 44: ...the product put it in the SD CARD reader connect to PC download it and copy the decompressed file to SD Card SD MMC Card Once copying is finished safely separate the SD Card reader from PC and put the...

Page 45: ...then turn on the power to resume PMP 47 You can view that your product is newly upgraded See if or not shock is given to the product or the plug is taken off prior to upgrading Also do not operate the...

Page 46: ...r Use Before Using Media Player Media Player Main Menu Use Media Player Function Select Screen Media Player Use MP3 Player Video Player Photo External Video View Alarm Calculator Calendar 55 55 56 57...

Page 47: ...SD mobile disk file 3 Select a video file to be copied or moved and copy it in the desired folder of SD Card SD MMC Card Media Player Main Menu Use 1 Turn left the Power button for about 3 seconds to...

Page 48: ...Function and use Audio Player plays the mp3 file Audio Player Video Player Photo Video Player plays the video file Photo photo image view Extended video video play through external input Alarm adjusts...

Page 49: ...t the 7 main menus in Media Player is as below e g Audio Player play 1 Turn on the power supply of the product After a while the main screen appears 2 Select and touch the audio in the audio animation...

Page 50: ...ard from the play Moves 5 sec backward from the play Play pause Indicates the progress Changes the position of play Deletes the file Select play mode Moves downward from the selected file Moves upward...

Reviews: