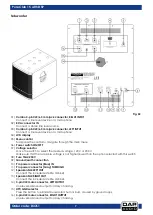
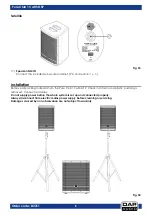
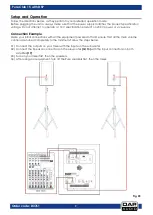
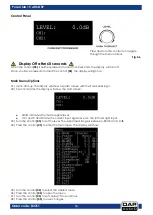
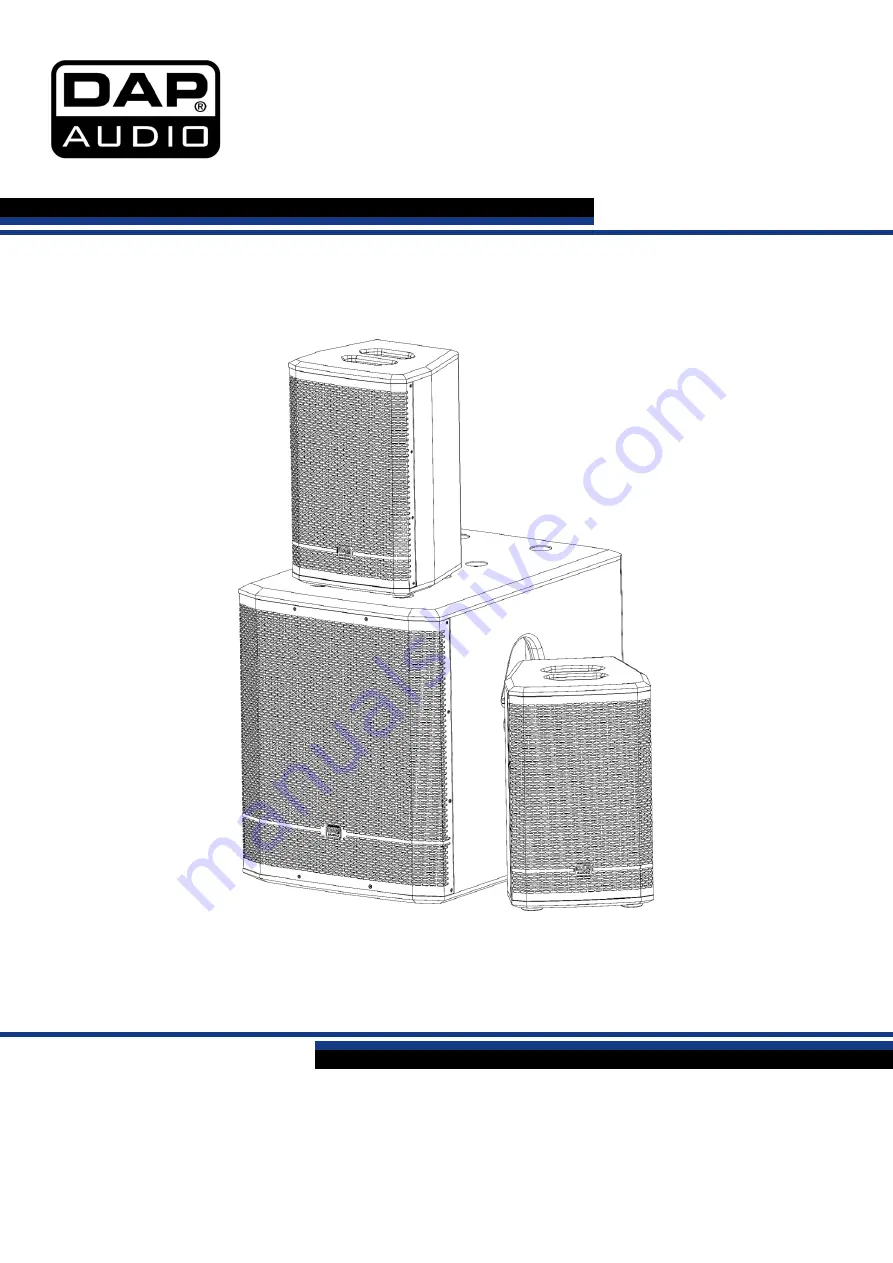
background image


   Pure Club 15 with DSP                            V1 

Order code: D3761 

MANUAL 

Highlite International B.V. – Vestastraat 2 – 6468 EX – Kerkrade – the Netherlands 

ENGLISH 

Summary of Contents for Pure Club 15 with DSP

Page 1: ...Pure Club 15 with DSP V1 Order code D3761 MANUAL Highlite International B V Vestastraat 2 6468 EX Kerkrade the Netherlands ENGLISH ...

Page 2: ... 9 Connection Example 9 Control Panel 10 Main Menu Options 10 1 Mode 11 2 Preset 11 3 Low EQ 11 4 Mid EQ 11 5 High EQ 12 6 Sub Adjust 12 7 Sub Phase 12 8 System Delay 12 9 Limit 13 10 Contrast 13 11 Sleep Mode 13 12 Lock 13 13 Password Set 14 14 Name Set 14 15 Set Logo 14 16 Store 15 17 Recall 15 18 Reset 16 19 Info 16 20 Exit 16 Connection Cables 17 Maintenance 18 Replacing the Fuse 18 Troublesho...

Page 3: ...ox and packing Your shipment includes DAP Audio Pure Club 15 with DSP User manual Safety Instructions Every person involved with the installation operation and maintenance of this system has to be qualified follow the instructions of this manual Before your initial start up please make sure that there is no damage caused by transportation Should there be any consult your dealer and do not use the ...

Page 4: ... panel Make sure that the power cord is never crimped or damaged Check the device and the power cord from time to time Make sure that the signals into the mixer are balanced otherwise hum could be created Make sure that there is sufficient room on all sides of the system for air circulation Make sure you do not use the wrong kind of cables or defective cables Make sure you use DI boxes to balance ...

Page 5: ... a brief description of the cause for the return Be sure to properly pack fixture any shipping damage resulting from inadequate packaging is the customer s responsibility Highlite reserves the right to use its own discretion to repair or replace product s As a suggestion proper UPS packing or double boxing is always a safe method to use Note If you are given an RMA number please include the follow...

Page 6: ...lf space 102 dB W m SPL peak satellite 1 m 116 8 dB SPL peak subwoofer 1 m 128 dB Protection Short circuit temperature overload Audio connector 2 x combo 3 pin XLR 6 3 mm jack IN 2 x 3 pin XLR OUT 2 x Speakon NL4 OUT RCA L R IN Mains connector Pro power connector IN OUT Housing 12 mm Birch Plywood Color Black scratch resistant Mounting 35 mm pole mount Fuse subwoofer T5AL 250V Dimensions satellite...

Page 7: ...6 Pure Club 15 with DSP Order code D3761 Overview Fig 01 ...

Page 8: ...h to select the desired voltage 120 V or 230 V Make sure that the available voltage is not higher lower than the option selected with this switch 08 Fuse T5AL 250V 09 Ground earth connection 10 Pro power connector Blue IN 11 Pro power connector Gray THROUGH 12 Speakon NL4 LEFT OUT Connect the included satellite cabinet 13 Speakon NL4 RIGHT OUT Connect the included satellite cabinet 14 3 pin XLR ma...

Page 9: ...move all packing materials from the Pure Club 15 with DSP Check if all foam and plastic padding is removed Connect all cables Do not supply power before the whole system is set up and connected properly Always disconnect from electric mains power supply before cleaning or servicing Damages caused by non observance are not subject to warranty Fig 04 ...

Page 10: ...power or vice versa Connection Example Make your initial connections with all the equipment powered off and ensure that all the main volume controls are turned completely to the minimum Follow the steps below 01 Connect the outputs on your mixer with the inputs on the subwoofer 02 Connect the Speakon connectors on the subwoofer 12 13 with the input connectors on both satellites 17 03 Turn on your ...

Page 11: ...ill show a splash screen with the Pure Series logo 02 5 seconds later the display will show the start screen LEVEL indicates the master signal level CH1 and CH2 indicate the current input signal level on the left and right input 03 Turn the control 05 to set the level The adjustment range is between 80 dB and 10 dB 04 Press the control 05 to enter the main menu The display will show 05 Turn the co...

Page 12: ...e control 05 to select one of the 4 presets 02 Press the control 05 to confirm 3 Low EQ In this menu you can set the low equalizer 01 Turn the control 05 to set the low equalizer The adjustment range is between 12 dB and 12 dB 02 Press the control 05 to confirm 4 Mid EQ In this menu you can set the mid equalizer 01 Turn the control 05 to set the mid equalizer The adjustment range is between 12 dB ...

Page 13: ...n the control 05 to set the high equalizer The adjustment range is between 6 dB and 6 dB 02 Press the control 05 to confirm 7 Sub Phase In this menu you can reverse the phase 01 Turn the control 05 to select one of the 2 options MINUS phase reversal NORMAL normal phase 02 Press the control 05 to confirm 8 System Delay In this menu you can set the delay 01 Turn the control 05 to set the delay The a...

Page 14: ...display will turn so dark that the displayed text will be invisible 11 Sleep Mode In this menu you can set the sleep mode 01 Turn the control 05 to select one of the 2 options ON The amplifier will be turned off and the device will use less electric power OFF The amplifier will remain on 02 Press the control 05 to confirm 12 Lock In this menu you can set the menu lock 01 Turn the control 05 to sel...

Page 15: ...scarded 14 Name Set In this menu you can set the device s name 01 Turn the control 05 to select the character that needs to be edited The NAME indicator will show its number 01 16 02 Press the control 05 to confirm 03 Turn the control 05 to select a desired symbol for the character 04 Press the control 05 to confirm 05 Repeat steps 1 4 to edit the remaining characters 06 When done turn the control...

Page 16: ... 01 19 04 Press the control 05 to confirm 05 Turn the control 05 to select a desired symbol for the character 06 Press the control 05 to confirm 07 Repeat steps 3 6 to edit the remaining characters 08 When done turn the control 05 until the NAME indicator shows SAVE to save the settings or EXIT to quit without saving 09 Press the control 05 to confirm 17 Recall In this menu you can load the device...

Page 17: ...lt settings 02 Press the control 05 to confirm 03 If you have chosen YES you will need to insert the password 04 Turn and press the control 05 to insert the current password 05 Press the control 05 to confirm 06 The factory default settings will be restored 19 Info In this menu you can view the device s software version temperature and the total operation time 20 Exit Press the control 05 to retur...

Page 18: ...e and reliability Periodically check your cables A great number of problems faulty contacts ground hum discharges etc are caused entirely by using unsuitable or faulty cables Headphones Unbalanced Balanced For these applications the unit provides 1 4 TRS and XLR connectors to easily interface with most professional audio devices Follow the configuration examples below for your particular connectio...

Page 19: ...ions with a damp cloth Make sure connections are thoroughly dry before linking equipment or supplying electric power Replacing the Fuse Power surges short circuit or inappropriate electrical power supply may cause a fuse to burn out If the fuse burns out the product will not function whatsoever If this happens follow the directions below 01 Unplug the unit from electric power source 02 Insert a sc...

Page 20: ... for replacing the fuse 03 The speakers Return the Pure Club to your DAP Audio dealer 04 If all appears to be O K plug the unit in again 05 If you are unable to determine the cause of the problem do not open the Pure Club as this may damage the unit and the warranty will become void 06 Return the device to your DAP Audio dealer Sound Warping If the sound coming out of your speaker is loud enough b...

Page 21: ...itivity subwoofer half space 102 dB W m SPL peak satellite 1 m 116 8 dB SPL peak subwoofer 1 m 128 dB Protection Short circuit temperature overload Audio connector 2 x combo 3 pin XLR 6 3 mm jack IN 2 x 3 pin XLR OUT 2 x Speakon NL4 OUT RCA L R IN Mains connector Pro power connector IN OUT Housing 12 mm Birch Plywood Color Black scratch resistant Mounting 35 mm pole mount Fuse subwoofer T5AL 250V ...

Page 22: ...21 Pure Club 15 with DSP Order code D3761 Notes ...

Page 23: ...22 Pure Club 15 with DSP Order code D3761 ...

Page 24: ... 2020 DAP Audio ...

Reviews: