background image

Instructions for replacing the lid: 

https://youtu.be/IAEpphbZOKk


Instructions for completing the 10 watt laser upgrade: 

https://youtu.be/kvIuIzIUsPc


Installing 10w Laser unit – Emblaser 2 

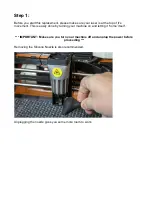
Here are the steps needed to replace the existing 5w laser unit with the 10w version. 

Please follow them carefully and contact us if you run into any 
problems: help@darklylabs.com 

Tools Needed: 


10W laser Unit 


Metal bracket & plastic belt plate (attached together) 


1x M3x35mm bolt 


3x M2x5mm screws 


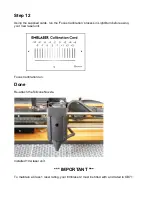
Focus Calibration card 


Torx T10-Security tool 


Philips PH1 tool 


Hex 2.5mm tool 


Hex 1.3mm tool 

Note: Your 10w laser upgrade is supplied with these required parts and tools. 


Summary of Contents for Emblaser 2

Page 1: ...e existing 5w laser unit with the 10w version Please follow them carefully and contact us if you run into any problems help darklylabs com Tools Needed 10W laser Unit Metal bracket plastic belt plate...

Page 2: ...p of it s movement This is easily done by turning your machine on and letting it home itself IMPORTANT Make sure you turn your machine off and unplug the power before proceeding Removing the Silicone...

Page 3: ...ips PH1 tool remove the two screws holding the rear laser cover from the laser head Removing the lower right screw holding the rear laser cover in place Removing the upper left screw holding the rear...

Page 4: ...refully move the cover out of the way to reveal the Laser Driver PCB Be very careful not to place any force on the Flat Flexible Cable FFC that connects the Laser Driver PCB to the main Controller PCB...

Page 5: ...nplug the Laser Unit and Fan connectors Please note that the Laser Unit connector has a clip that needs to be depressed for the connector to unplug Identify Laser and fan connectors Laser Unit Fan con...

Page 6: ...the 5w laser unit in place When you are looking down from the top turn the tool clockwise to undo the bolt Unscrew bold holding 5w laser unit in place Once the bold has been removed slide the laser u...

Page 7: ...lockwise to unscrew NOTE Some units have a piece of black felt over the top right side screw If you have this remove the felt to access the screw beneath it Unscrew belt plate screws Belt plate remove...

Page 8: ...the lower belt pulley Step 7 With the lower pulley removed slide out the belt and insert into the new belt plate as shown in the photo below NOTE The new metal bracket and plastic belt plate have been...

Page 9: ...et and belt plate IMPORTANT The M2x5mm screws are VERY delicate Work slowly and tighten them carefully Do not tighten them excessively Attach bracket Once attached slide the belt over the top motor pu...

Page 10: ...te the slot on one side and screw holes that should match up Line up 10w laser unit Insert the M3x35mm screw into the front of the laser unit and attach it to the hole in the metal bracket using the H...

Page 11: ...Step 10 Plug the Laser and Fan connectors into the Laser Driver PCB Identify Laser and fan plugs Laser and fan plugged in...

Page 12: ...11 Re attach the rear cover using the two philips screws Make sure the wiring exits the cover as shown in the photo and nothing is obstructing the limit switches Check for obstructions Re attach rear...

Page 13: ...Calibration process in LightBurn before using your new laser unit Focus Calibration run Done Re attach the Silicone Nozzle Installed 10w laser unit IMPORTANT To maintain a Class 1 laser rating your Em...

Reviews: