background image

Display User Manual 


DDJ08001001 

1-Mar-04


Page 1


Mr. Sign (

 Ace Hardware)


Graphics Board  Display 


User 


Manual 


Title Page 

 2004 Data Display Ltd 

No part of this document may be reproduced by any process without the prior written permission from Data Display Ltd. 
   
The information in this document is provided for reference only. While every effort has been made to make sure it is accurate and 
complete, Data Display Ltd does not accept any liability arising out of the application or use of the information or products described 
herein. Moreover, Data Display Ltd reserves the right to alter specifications or procedures without notice. 
 
This document may contain or refer to information or products protected by copyright or patents and does not convey any license under 
the patent rights of Data Display Ltd nor the rights of others. 
All products referred herein are trademarks of their respective owners. 
 

Publication details: 
 

Title:

 Mr. Sign Graphics Board Display User Manual 

Issue:

 1 

Issue Date:

 1-Mar-04 

Part Number:

 DDJ08001001 

P. O. Number:

 4336


Produced by: 
 

Product Support Department 
Data Display Ltd 
Deerpark Industrial Estate 
Ennistymon, Co. Clare 
Ireland 


Summary of Contents for Mr. Sign

Page 1: ...n or use of the information or products described herein Moreover Data Display Ltd reserves the right to alter specifications or procedures without notice This document may contain or refer to information or products protected by copyright or patents and does not convey any license under the patent rights of Data Display Ltd nor the rights of others All products referred herein are trademarks of t...

Page 2: ...reen Layout and Symbols 10 4 4 1 The Caption Bar 10 4 4 2 The Speed Bar 11 4 4 3 The Menu Bar 11 4 4 4 The Canvas 11 4 4 5 The Status Line 11 4 5 The Menu Bar 12 5 Examples 32 5 1 How to Setup a Graphics Frame 32 5 2 How to create a simple animation with effects 32 5 3 Adding text to a Graphics frame 32 5 4 Displaying the Date Time or Temperature 33 5 5 Notes on importing Clipart 34 6 Trouble Shoo...

Page 3: ...chnology The housing is fabricated from aluminium extrusion and has a black powder coat finish The Display consists of two units Master and Slave fitted back to back with the Power Serial and Data cables from the Master connected the Slave The Displays are controlled from a host PC using the GRAFIT graphics software Users can create and edit both text and graphic messages The Display Board can sho...

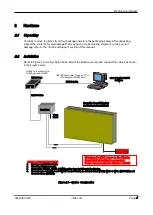
Page 4: ...stem Configuration INSTALLATION INSTRUCTIONS 1 Remove contents from Crate 2 Mount the Display securely 3 Connect the SERIAL TEMP POWER cables from Serial Box to the Display 4 Connect same color wires on POWER Terminal Blocks i e Black to Black LIVE White to White NEUTRAL and Green to Green EARTH Warning Do NOT power up the Display Board until all cabling is connected Power Consumption for Display ...

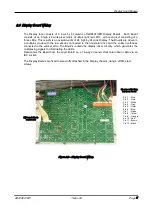
Page 5: ...al drive and the column cathodes connected to the vertical drive The Boards contain the display driver circuitry which generates the multiplexing signals for illuminating the LEDs Data enters the Board from the Logic Board on a 14 way screened Horizontal ribbon cable via an IDC socket The Display Boards are fixed to stand offs attached to the Display chassis using 4 off M6 steel screws Figure 2 2 ...

Page 6: ... the display The minimum hardware and software requirements to run the GRAFIT software are as follows Processor Pentium 1 or higher Memory 16MB Display VGA 15 inch or larger recommended 256 colors 16 bit color Software Microsoft Windows 95or later Disk Space 10MB minimum free space for GRAFIT plus space for database and event log storage Bitmaps Gifs Tiffs etc Comms COMM Port 1 9 Pin serial port m...

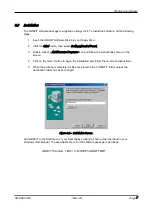
Page 7: ...rograms icon and follow the instructions shown on the screen 4 Click on the Next button to begin the installation and follow the on screen instructions 5 When the process is complete all files are stored in the C GRAFIT folder unless the destination folder has been changed Figure 3 2 Installation Screen Add GRAFIT to the Start menu or your Desktop by creating a short cut as described in your Windo...

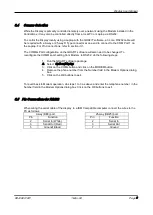
Page 8: ...ged To reconfigure the COMMs port setting from Modem to RS232 do the following steps 1 Run the GRAFIT software package 2 Select Options Display 3 Click on the COMs button and click on the MODEM button 4 Remove the phone number from the Number field in the Modem Options dialog box 5 Click on the OK buttons to exit To revert back to Modem operation do steps 1 to 3 as above and enter the telephone nu...

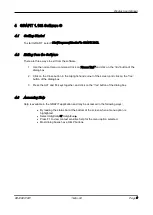
Page 9: ...2 Click on the Close button in the top right hand corner of the screen and click on the Yes button of the dialog box 3 Press the ALT and F4 keys together and click on the Yes button of the dialog box 4 3 Accessing Help Help is available in the GRAFIT application and may be accessed in the following ways By reading the status bar at the bottom of the screen when a menu option is highlighted Select ...

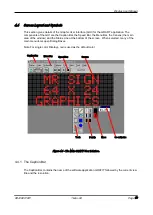
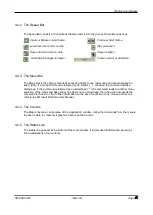
Page 10: ...e main area of the window and the Status Line at the bottom of the screen When selected many of the main menu items open Dialog Boxes Note For single color Displays red is used as the default color Figure 4 1 The Main GRAFIT User Interface 4 4 1 The Caption Bar The Caption Bar contains the name of the software application GRAFIT followed by the current view title and the resolution Caption Bar Spe...

Page 11: ...d is followed by an ellipsis choosing the command opens a dialog box If the command is followed by an arrowhead the command leads to another menu selection If the command has neither an ellipsis nor an arrowhead then the action occurs as the command is chosen or For further information on the use of windows icons mouse and menus refer to the Microsoft Windows User Manual 4 4 4 The Canvas The Map i...

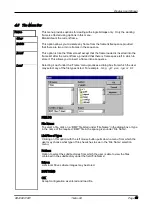
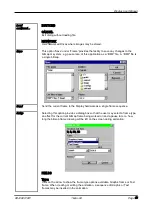
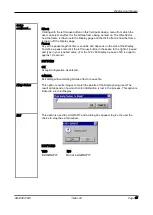
Page 12: ...me into a sequence Load Selecting Load under the Frame menu produces a dialog box from which the user may select any of the file types listed For example bmp gif pcx tga or tif FIELDS File Name To select a file click on a BMP file listed under File Name in the dialog box or type in the name of the required BMP file in the space given under File Name List Files of Type Clicking on this option with ...

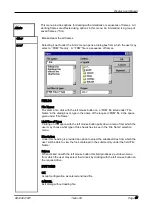
Page 13: ...map Send Send the current frame to the Display hardware as a single frame sequence Setup Selecting this option provides a dialog box so that the user may select a frame type an effect for the current bitmap frame being worked on and a pause rate i e how long the bitmap frame drawing will be left on the screen during animation FIELDS Type Click on the arrow to show the frame type options available ...

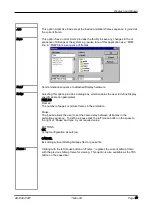
Page 14: ...se rate click the left mouse button in the space to the right of pause and type in your required value For the 128 x 48 Display a pause of 20 is equal to approx 1 0 second BUTTONS OK Accept configuration as entered CANCEL Exit dialog without altering bitmap effect or pause file Fixup Colors This option converts images to match the palette of the Display being used The result will depend on how muc...

Page 15: ...ype in the name of the required FRM file in the space given under File Name List Files of Type Clicking on this option with the left mouse button pulls down a menu from which the user may choose what type of files he wishes to see in the File Name selection menu Directories Under this heading is provided an option to select the subdirectories from which the user will be able to view the files cont...

Page 16: ...log box which enables the user to define Display specific animation parameters FIELDS Frames The number of pages or picture frames in the animation Pause The pause allows the user to set the same delay between all frames in the animation sequence To define a pause click the left mouse button in the space to the right of Pause and type in your required value BUTTONS OK Accept configuration as enter...

Page 17: ... until the user chooses to stop This option is also available as the seventh button on the speed bar Stop Clicking with the left mouse button on Stop will stop the animation This option is also available as the eight button on the speed bar Schedule This menu provides options for dealing with schedules of animation sequences Load Load a schedule setup from a SCH file on disk into memory Save Save ...

Page 18: ...earch for and select the file BUTTONS SETTINGS This button pops up the Animation Settings dialog for the selected file in the list You select a file in the Animation list by left clicking on it This dialog allows you to set the following parameters Cycle Which cycles the animation is to appear in all cycles or every second or third cycle or whatever Repeat How many times will the animation be repe...

Page 19: ...mensions are of the form W x H x C where W LED columns H LED rows C colors including LED off Update Test mode This is a drop down list of the modes available on the chosen type of Display The modes available are as follows Normal update Default mode whereby the Display just runs as usual Device test page This mode forces the Display to show device information such as the firmware version communica...

Page 20: ...ows you to add extra Graphics Display Panels When you add a Panel then you must also choose the Options Display COMs button and set its address To switch to select a Panel select the Options Display List menu option and click on the Panel in question Set Time Date Set Dimmed Time This menu option sends the current PC time date to the Display s at the next initial Frame Anim This is useful if wanti...

Page 21: ... setting up testing and monitoring the system communications ports For this software package the settings of COM1 must be set as shown below and be available on the Host PC BUTTONS EXIT Exit this dialog SETTINGS This button pops up a port settings dialog from which you can select the baud rate data bits parity stop bits flow control state open closed RTS status high low and the Rx timeout and poll...

Page 22: ...s the length of time the software will wait for device responses after polling sending on this port If this value is greater than 2000ms for the GRAFIT application then the software will popup an information dialog for each frame sent when sending one or more frames to a Display Poll rate This is the minimum time between each poll loop on this port A poll loop is when the software polls all device...

Page 23: ...Wait states The number of wait states between each consecutive poll during a poll loop ICONS Each of the icons represents a COMn port To select a port you just click on its icon A port is selected if its icon has a black rectangular border and you can only select one port at a time ...

Page 24: ... provides the facility to save any changes to the configuration or system of this application This option provides a dialog box to show the event log day by day By entering a particular date the first 1000 events occurring on that day will be listed To close the dialog box click on EXIT Click on PRINT to print the listed events or HELP for further information ...

Page 25: ...rovides the option for altering complete bitmaps or sections of bitmaps selected with the grab tool Undo This option allows the user erase his last action on the bitmap If Undo is clicked a second time the result is that what was undone will be unerased Cut Cut the frame or selected section to the Clipboard Copy Copy the selected frame or selection of it to the Clipboard Paste Put copied frame sel...

Page 26: ...he text to appear A text cursor will then appear in the foreground color Next type the first character of the text if the character does not appear where you want it to then delete it with the backspace key and reposition the cursor By referring to the Co ordinates box you will soon be able to position the text cursor exactly where you want it whenever you are entering text When you are happy with...

Page 27: ...n conduction with the Palette With this tool chosen you can fill a bounded area on the frame with the chosen color in the palette simply by clicking within the area on the frame RECTANGLE This square tool allows the user to draw outlines of squares or rectangles Click down on the mouse button on the frame when the mouse is at the required start position and then drag the mouse which has the effect...

Page 28: ...mark a rectangle on the frame as if you were drawing a rectangle with the left mouse button Then drag this rectangle over the area to which you wish to copy it by clicking on the rectangle with the left mouse button and moving the mouse arrow as you keep the left mouse button down To change the size and position of the drawing area on the frame with the Grab Size tool selected right click on the f...

Page 29: ...d or left mouse button color Clicking on a color within the color box with the left mouse button will have the effect of changing the foreground color and clicking on a color with the right mouse button will change the background color Drawing operations will always be performed with the selected color Co ordinates Clicking on this option creates a co ordinates indicator box which indicates the po...

Page 30: ...ample of the font will appear in the bottom right hand corner of the options box The scroll up keys adjacent to the font choice will give more font options for selection Font Style To change the font style click on the desired font type beneath the option font style in the box A sample of the font style will appear in the bottom right hand corner of the options box Font Size To change font size cl...

Page 31: ...t to leave a mark in it An example of how the text will appear in the sample box To undo the effect click on the box again to clear the mark which selected it Colors The color option for text is not available through the fonts option box The color can only be altered using the color bar BUTTONS OK Accept configuration as entered CANCEL Exit dialog without accepting configuration Help This menu con...

Page 32: ...of 10 3 Now you can create the frames by hand using the Tools and the Palette or load each one from an existing frame file BMP GIF etc are supported choose the Frame Load menu option 4 For starters just choose the RED Pen and scribble 1 on Frame 1 then click on the Anim Frame menu option or the equivalent speed bar button 5 Scribble 2 on Frame 2 and repeat the process for Frame 3 6 Next click on t...

Page 33: ...s the software so make sure that the time and date on the PC is correct To show the current time enter the following syntax or combination of h hour M minutes S seconds a am pm Note To show the proper time format type in a colon after the hour and leave a space between minutes and am pm Example h m a displays 4 18 pm To show the current date enter the following syntax m month d day of the month y ...

Page 34: ...GRAFIT has all the basic features required to create your own graphics images it usually makes more sense to import your graphics from a public domain Clipart library or some other free source of images MS Paintbrush which is installed in most PCs is also an ideal graphics editor for GRAFIT ...

Page 35: ... in DOS since it is not multi tasking iv If a serial mouse has ever been used on the computer or the computer is a lap top with a tracker ball then there is a possibility that there are software drivers loaded which may be conflicting with COMn v If you are unsure if a communications port is working or not then check it by running Windows HyperTerminal see Accessories select that port then short p...

Page 36: ...ame onto the Display in the direction relating to the WIPE effect selected i e Left or Down Use On and Off Command Close This command is the opposite to OPEN in that is closes the frame onto the Display screen from the edges to the center like a closing curtain Use On and Off Command Down This command is the opposite of VERTICAL in that it causes the next frame to be scrolled down vertically onto ...

Page 37: ...uipment after maintenance 8 1 Maintenance Instructions 8 1 1 Cleaning the Display Routine cleaning of the Display Board is at the discretion of the operator and subject to local conditions Use damp non abrasive materials such as a sponge or lint free cloth to clean the Display Remove difficult stains or marks with a suitable solvent DO NOT USE sharp or metal objects 8 1 2 Preventative Maintenance ...

Page 38: ...r Pixel 3 Pixel Pitch 31mm LED Diameter 5mm LED Color Ultra Bright Red Elliptical Communication EPROM GB24X64 Protocol MATIF Baud Rate 9600 Addressing Dip Switch Data Format 8 bit 1 stop bit no parity Character Set Extended ASCII set Software Text Graphics GRAFIT Ver 1 18ß Electrical Main Power Supply 110 Volts AC Power Consumption Fuse Value 1000W 10 Amp Housing Dimensions LxHxD 1083mm x 870mm x ...

Page 39: ...Data Display Ltd DDJ05996001 7 Jan 03 Page 39 of 40 HWLDR Board Cable Entry Logic Board Light Sensor Fans 12V 150W PSUs Unit A Unit B Viewed from Front with Display Panels removed ...

Page 40: ...odem in Control Box White Cable 2 Data is transmitted from Logic Board to bottom right hand Display Panel 3 Data is transmitted across the bottom line via ribbon cables 4 When the Data reaches the last Header on the left most Display Panel it is routed back to the first Display Panel on the next line up Viewed from Front 4 3 2 1 ...

Reviews: