DH60 Quick Start Guide
THE PACKAGE
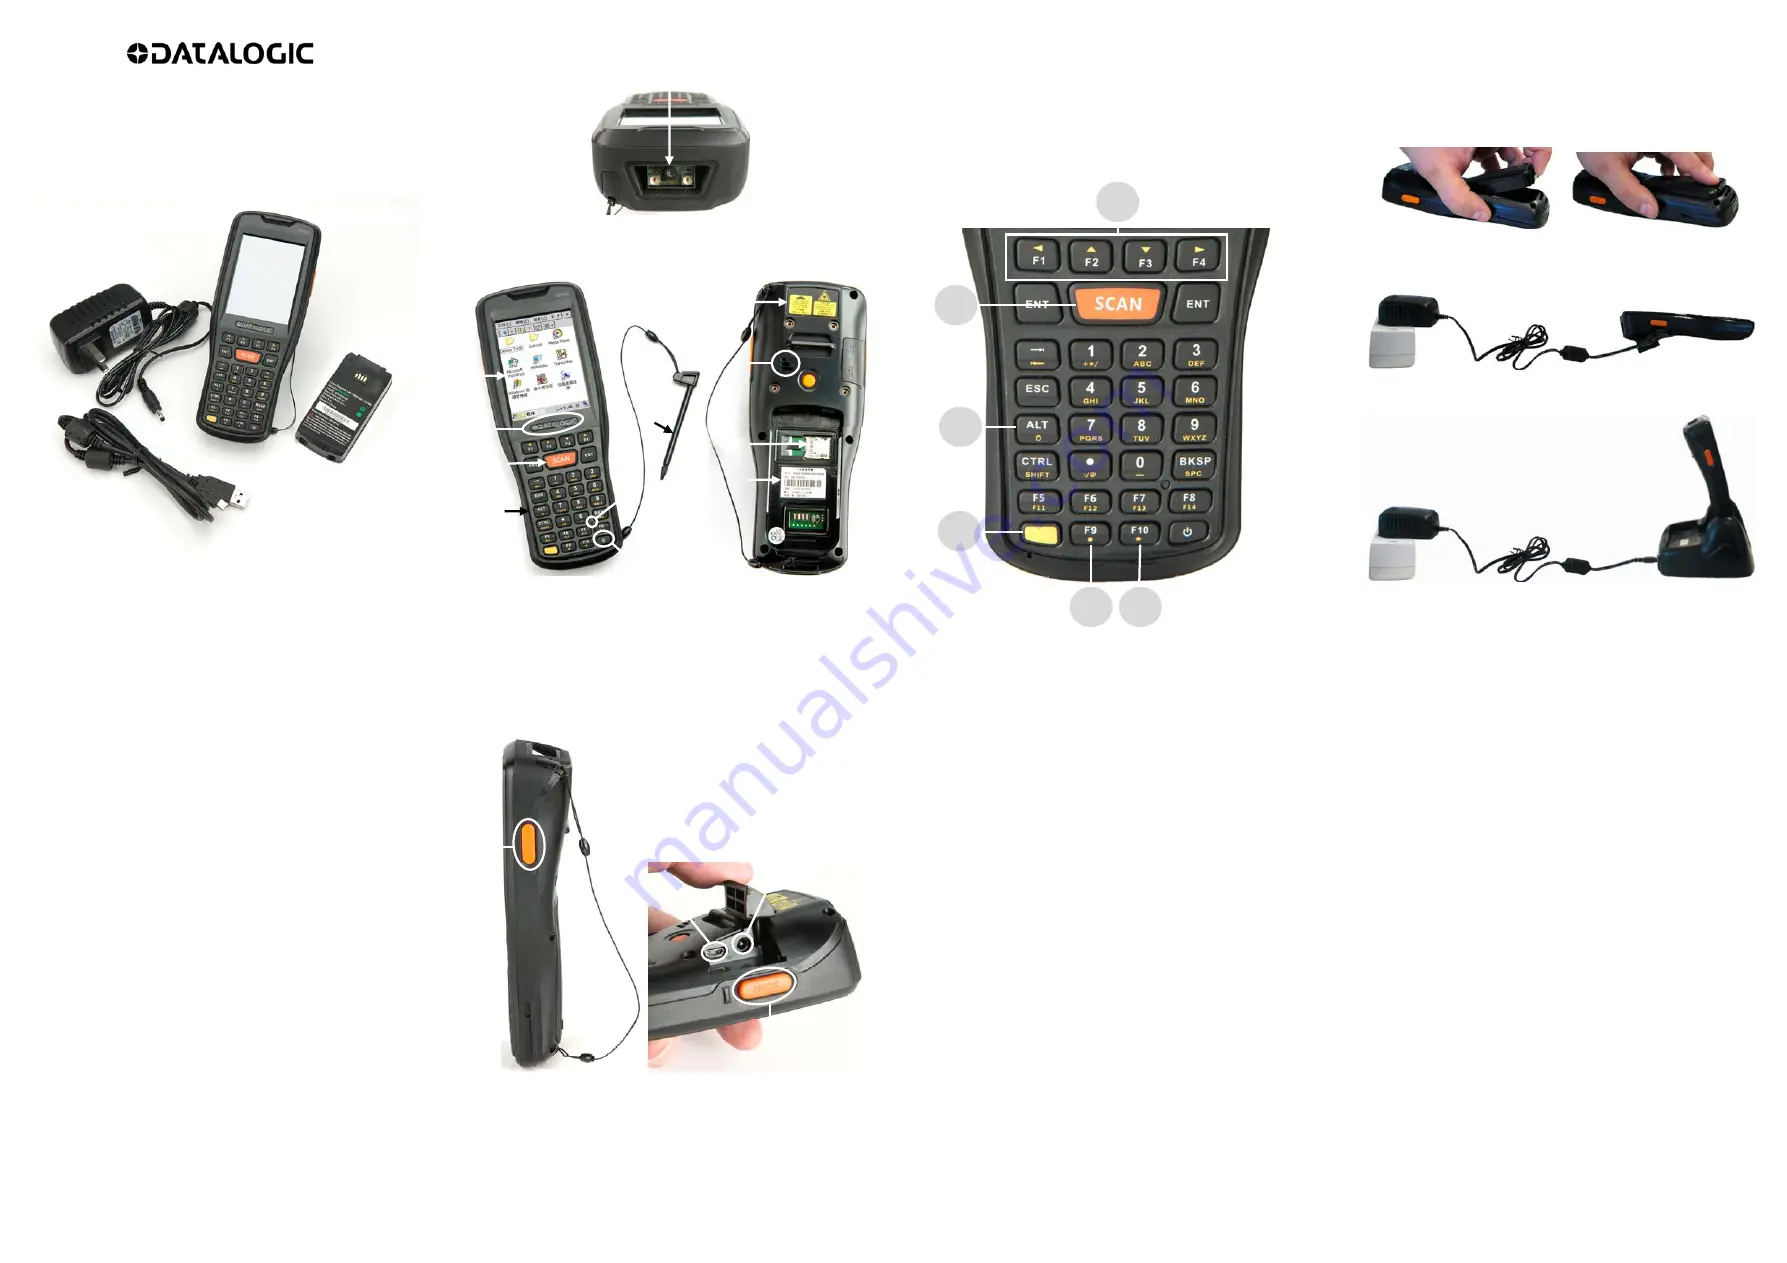
The DH60 package includes the following items:
A) DH60 mobile computer
B) Power
Supply
C) Rechargeable Li-ion Polymer battery pack (2600 mAh at 3.7V - 9.62
Watt-hours)
D) Std-A to Micro-B USB 2.0 cable (client mode only)
822001510 (Rev. A)
THE TERMINAL
A)
Data Capture Window
B) Color
Display
C) ON/OFF
Power
Key
D) Status
Light
E)
Front Scan Key
F) Keyboard
G) Reset
key
H) Stylus
I)
Laser Safety Label
J) Loudspeaker
K)
MicroSD Card Slot (under
battery)
L)
Product Label (under battery)
M) Right Side Scan Key
N) Left Side Scan Key
O) DC
Port
P)
Micro USB Port
KEYPAD
The DH60 comes with a 31 key numeric keyboard defined with two levels
of functionality. Secondary functions are accessed by pressing the yellow
button first and then any key designated as having an alternate symbol.
All the keys can be reprogrammed for unique actions defined by the
application, with the exception of the main Scan key, the power key, and
the yellow modifier key.
1. Navigation
Keys
Left: [Yellow Key] and [F1]
Up: [Yellow Key] and [F2]
Down: [Yellow Key] and [F3]
Right: [Yellow Key] and [F4]
2. Scan
Key
3. Yellow
Modifier
4. Keyboard
Lock
[Yellow Key] and [ALT]
5. Display
Backlight
[Yellow Key] and [F9]
6. Programmable
Key
[Yellow Key] and [F10]
GETTING STARTED
Insert the Battery
Insert the battery's alignment lugs into the recesses, then press firmly
until the battery latch clicks:
Charge the Battery
With Power Supply
With Single Slot Dock
SYNCHRONIZE YOUR DEVICE WITH THE PC
Set up Synchronization using Windows Mobile® Device
Center
Windows Mobile Device Center is only compatible with Windows Vista
and Windows 7; if you run Windows XP or earlier, you have to download
Microsoft ActiveSync.
You can establish a connection to your DH60 through the following
interfaces:
USB either directly or through the Single Dock
Bluetooth®
To establish a partnership between the DH60 and a host PC, start
Windows Mobile® Device Center and follow the steps below:
1.
Connect the DH60 to the host PC. Windows Mobile® Device
Center configures itself and then opens.
2.
On the license agreement screen, click Accept.
3.
On the Windows Mobile Device Center’s Home screen, click Set up
your device.
4.
Select the information types that you want to synchronize, then
click Next.
5.
Enter a device name and click Set Up.
When you finish the setup wizard, Windows Mobile Device Center
synchronizes the mobile computer automatically. Microsoft® Office
Outlook® emails and other information will appear on your device after
synchronization.
A
B
C
D
A
F
B
D
E
G
C
H
M
N
O
P
I
J
K
L
4
1
2
3
5
6


