background image

CAP-2 

HDMI  TO  USB  3.0 
CAPTURE BOX 

Summary of Contents for CAP-2

Page 1: ...CAP 2 HDMI TO USB 3 0 CAPTURE BOX ...

Page 2: ...M DIAGRAM 9 2 CONNECTIONS AND CONTROL 10 2 1 FRONT PANEL 10 2 2 REAR PANEL 11 3 BASIC SETUP 12 3 1 HOW TO CONNECT YOUR CAP 2 12 4 OBS STREAMING SOFTWARE 13 4 1 HOW TO INSTALL THE OBS STREAMING SOFTWARE 13 4 2 HOW TO SET THE VIDEO AND AUDIO OF THE OBS STREAMING SOFTWARE 19 5 PIN DEFINITION OF THE USB 3 0 CABLE 30 6 DIMENSIONS 31 7 FREQUENTLY ASKED QUESTIONS 32 8 SPECIFICATIONS 33 SERVICE AND SUPPOR...

Page 3: ...complete This manual may contain typing errors omissions or incorrect information Datavideo Technologies always recommend that you double check the information in this document for accuracy before making any purchase decision or using the product Datavideo Technologies is not responsible for any omissions or errors or for any subsequent loss or damage caused by using the information contained with...

Page 4: ...oper ventilation is provided 7 This product should only be operated from the type of power source indicated on the marking label of the AC adapter If you are not sure of the type of power available consult your Datavideo dealer or your local power company 8 Do not allow anything to rest on the power cord Do not locate this unit where the power cord will be walked on rolled over or otherwise stress...

Page 5: ...djust only those controls that are covered by the operating instructions in this manual improper adjustment of other controls may result in damage to the unit and may often require extensive work by a qualified technician to restore the unit to normal operation e When the product has been dropped or the cabinet has been damaged f When the product exhibits a distinct change in performance indicatin...

Page 6: ...hird party software installations which are not required by our computer systems are not covered under warranty All mail or transportation costs including insurance are at the expense of the owner All other claims of any nature are not covered All accessories including headphones cables and batteries are not covered under warranty Warranty only valid in the country or region of purchase Your statu...

Page 7: ...onserve natural resources and ensure that it is recycled in a manner that protects human health and the environment For more information about where you can drop off your waste equipment for recycling please contact your local city office your household waste disposal service or the shop where you purchased the product CE Marking is the symbol as shown on the left of this page The letters CE are t...

Page 8: ...ITCH AUDIO IN EMBED audio source toggle switch for users to select for different audio source The embedded audio source or the external connected Audio in source can be used for the audio source of the CAP 2 It gives higher flexibility for CAP 2 compared to general UVC devices 1 1 Features Big Five Features Supports USB 3 0 Video Input Interface HDMI x 1 Supports up to 1080p60 video streaming thro...

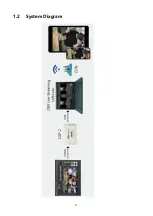
Page 9: ...9 1 2 System Diagram ...

Page 10: ...IO SWITCH AUDIO IN EMBED This toggle switch allows users to select their desired audio source for streaming Pull the toggle switch to the left side for selecting the AUDIO IN external connected audio source to the the streaming audio source Pull the toggle switch to the right side for selecting the HDMI IN embedded audio source to be the streaming audio source ...

Page 11: ...l LED Indicator This is the LED indicator for the input signal HDMI IN Please connect this port to an HDMI input source AUDIO IN Please connect to an external connected audio source with 3 5mm analog stereo audio plug ...

Page 12: ...HDMI video source and a Notebook PC 1 Please turn on the power of your Notebook PC 2 Please connect your HDMI video source Cameras etc to the HDMI interface of the CAP 2 by using an HDMI cable In this case the Datavideo KMU 200 is used as an example 3 Please connect from the USB 3 0 OUT interface of the CAP 2 to the USB 3 0 interface of your Notebook PC by using a USB A to USB A cable 1 2 3 ...

Page 13: ... software This chapter will show you how to install and set the streaming software by using OBS as an example Windows OS Platform For Windows platform user it is recommended to use the OBS streaming software for streaming Please download the OBS software from following website and then please install the software OBS https obsproject com 4 1 How to Install the OBS Streaming Software Please follow ...

Page 14: ... Please visit the OBS website https obsproject com and then please click the Windows button for downloading the OBS software 2 Please click the area with the red rectangular for installing the OBS software ...

Page 15: ...15 3 Please press the Next button for starting the installation 4 Please press the I Agree button ...

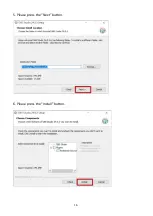
Page 16: ...16 5 Please press the Next button 6 Please press the Install button ...

Page 17: ...17 7 Users can see that the installation of the OBS software is started 8 Please press the Finish button for completing the installation ...

Page 18: ...18 9 After the installation is finished users can see the main interface of the software which is shown as following diagram ...

Page 19: ...OBS Streaming Software Please follow following steps for setting the video and audio of the OBS streaming software Video Setup 1 At first please click the OBS icon for opening the OBS software 2 Users can see the main interface of the OBS software ...

Page 20: ...20 3 Please press the Add button from the Source pane to open the Source menu ...

Page 21: ...eo Capture Device option 5 There is a Create Select Source popup window that will be shown for users to name the video source Please press the OK button It is recommended that the Make source visible checkbox must be checked ...

Page 22: ...ill be shown Please select CAP USB3 0 CAPTURE DEVICE which is the CAP 2 from the Device drop down menu to be the streaming video capturing device 7 After the device is selected users can see the captured screen which is shown as following diagram Please press the OK button ...

Page 23: ...lowing screen will be shown Audio Setup Please follow following steps for setting the audio of the OBS streaming software Use the Embeddd Audio of the HDMI video input source 1 Please press the Add button from the Sources pane to open the Source menu ...

Page 24: ...io Input Capture option 3 There is a Create Select Source popup window that will be shown for users to name the audio source Please press the OK button It is recommended that the Make source visible checkbox must be checked ...

Page 25: ...ow will be shown Please select Default which is the CAP 2 from the Device drop down menu to be the streaming audio capturing device 5 Users can see that the video and audio sources are successfully set in the OBS main interface which is shown as following diagram ...

Page 26: ...26 Use CAP 2 external Connected Audio Source 1 Please press the Add button from the Source pane to open the Sources menu 2 Please select Audio Input Capture option ...

Page 27: ...ase press the OK button It is recommended that the Make source visible checkbox must be checked 4 There is a Properties for Audio Input Capture popup window will be shown Please select 麥克風 CAP USB 3 0 CAPTURE DEVICE which is the CAP 2 from the Device drop down menu to be the streaming audio capturing device ...

Page 28: ...28 5 Users can see that the video and audio sources are successfully set in the OBS main interface which is shown as following diagram ...

Page 29: ...29 Note For the detailed operating instructions for the recording and streaming related functions of the OBS software please refer to the OBS websitehttps obsproject com wiki ...

Page 30: ...30 5 Pin Definition of the USB 3 0 Cable P1 P2 VBUS 1 1 D 2 2 D 3 3 GND 4 4 SSRX 5 5 SSRX 6 6 GND 7 7 SSTX 8 8 SSRX 9 9 Shield SHELL SHELL ...

Page 31: ...31 6 Dimensions Unit mm ...

Page 32: ...the CAP 2 HDMI to USB 3 0 Capture Box can not be detected Please make sure that the OS systemof your computer is qualified for the CAP 2 application Please refer to the OS versions which are listed in the Specifications Moreover please make sure that the USB 3 0 connector of your Laptop can supply up to 900mA current 2 Why the USB 3 0 Cable cannot be detected Please use the USB 3 0 Type Ato Type A...

Page 33: ...900p 75 60 1400 x 1050p 60 1366 x 768p 60 1360 x 768p 60 1280 x 1024p 75 60 1280 x 720p 60 59 94 50 1024 x 768p 75 60 800 x 600p 75 60 720 x 576p 50 720 x 480p 60 720 x 576i 50 720 x 480p 60 640 x 480p 75 60 Supported Output Video Formats 1920 x 1080p 60 50 30 25 24 1680 x 1068p 60 1440 x 1080p 60 1440 x 896p 60 1360 x 768p 60 1280 x 768p 60 1280 x 720p 60 50 1024 x 768p 60 960 x 536p 60 848 x 480...

Page 34: ...0 32 104 Storage Temperature 20 60 4 140 Humidity 20 90 RH Non Condensing Mnimum System Requirements Windows 7 SP1 Windows 10 Windows 8 1 Windows 7 x86 x64 Note Driver is needed for following hardware Windows 7 OS MAC OS X 10 13 or above The hardware which is made after 2012 USB3 0 needs at least 900mA power supply So the notebook PC must supply at least 900mA power to the UVC capture box Linux Ub...

Page 35: ...35 Note ...

Page 36: ...https www datavideo com product CAP 2 Feb 13 2020 Ver E1 Datavideo Technologies Co Ltd All rights reserved 2020 ...

Reviews: