background image

Inspiron 3471 

Service Manual

Regulatory Model: D13S
Regulatory Type: D13S003

Summary of Contents for Inspiron 3471

Page 1: ...Inspiron 3471 Service Manual Regulatory Model D13S Regulatory Type D13S003 ...

Page 2: ...amage to hardware or loss of data and tells you how to avoid the problem WARNING A WARNING indicates a potential for property damage personal injury or death 2019 Dell Inc or its subsidiaries All rights reserved Dell EMC and other trademarks are trademarks of Dell Inc or its subsidiaries Other trademarks may be trademarks of their respective owners 2019 11 Rev A01 ...

Page 3: ...4 Inside view of your computer 13 5 System board components 14 6 Removing the computer cover 15 Procedure 15 7 Replacing the computer cover 16 Procedure 16 8 Removing the front bezel 17 Procedure 17 Prerequisites 18 9 Replacing the front bezel 19 Procedure 19 Post requisites 20 10 Removing the fan shroud 21 Prerequisites 21 Procedure 21 11 Replacing the fan shroud 22 Procedure 22 Post requisites 2...

Page 4: ...35 Procedure 35 Post requisites 36 18 Removing the memory modules 37 Prerequisites 37 Procedure 37 19 Replacing the memory modules 38 Procedure 38 Post requisites 38 20 Removing the coin cell battery 39 Prerequisites 39 Procedure 39 21 Replacing the coin cell battery 40 Procedure 40 Post requisites 40 22 Removing the wireless card 41 Prerequisites 41 Procedure 41 23 Replacing the wireless card 43 ...

Page 5: ...Procedure 51 Post requisites 52 30 Removing the power supply unit 53 Prerequisites 53 Procedure 53 31 Replacing the power supply unit 55 Procedure 55 Post requisites 56 32 Removing the thermal cooling assembly 57 Prerequisites 57 Procedure 57 33 Replacing the thermal cooling assembly 58 Procedure 58 Post requisites 58 34 Removing the processor 59 Prerequisites 59 Procedure 59 35 Replacing the proc...

Page 6: ...5 Prerequisites 75 Procedure 75 Post requisites 76 Clearing CMOS settings 76 Prerequisites 76 Procedure 76 Post requisites 77 39 Troubleshooting 78 Enhanced Pre Boot System Assessment ePSA diagnostics 78 Running the ePSA diagnostics 78 Diagnostics 78 Recovering the operating system 79 Flashing BIOS USB key 79 Flashing the BIOS 79 WiFi power cycle 80 Flea power release 80 40 Getting help and contac...

Page 7: ...grounding strap or by periodically touching an unpainted metal surface such as the metal at the back of the computer While you work periodically touch an unpainted metal surface to dissipate static electricity which could harm internal components CAUTION When you disconnect a cable pull on its connector or on its pull tab not on the cable itself Some cables have connectors with locking tabs or thu...

Page 8: ... Field Service kit is the most commonly used service kit Each Field Service kit includes three main components anti static mat wrist strap and bonding wire Components of an ESD field service kit The components of an ESD field service kit are Anti Static Mat The anti static mat is dissipative and parts can be placed on it during service procedures When using an anti static mat your wrist strap shou...

Page 9: ...eep sensitive parts separate from all insulator parts while performing service and that they use anti static bags for transporting sensitive components Transporting sensitive components When transporting ESD sensitive components such as replacement parts or parts to be returned to Dell it is critical to place these parts in anti static bags for safe transport Lifting equipment Adhere to the follow...

Page 10: ...Recommended tools The procedures in this document may require the following tools Phillips screwdriver 1 Flat head screwdriver Plastic scribe 2 10 Recommended tools ...

Page 11: ...le 1 Screw list Component Secured to Screw type Quantity Screw image Computer cover Chassis 6 32x6 35 2 2 5 inch hard drive s NOTE Depending on the configuration ordered there may be up to two 2 5 inch hard drives installed Drive cage 6 32x6 35 1 2 5 inch hard drive s NOTE Depending on the configuration ordered there may be up to two 2 5 inch hard drives installed Hard drive bracket M3x3 5 4 for e...

Page 12: ...Component Secured to Screw type Quantity Screw image Front I O bracket Chassis 6 32x6 35 1 System board Chassis 6 32x6 35 6 12 Screw list ...

Page 13: ...of your computer Figure 1 Inside view of your computer 1 memory modules 2 system board 3 processor fan and heat sink assembly 4 hard drive assembly 5 drive cage 6 power supply unit 4 Inside view of your computer 13 ...

Page 14: ...2 6 PCI Express x16 card slot SLOT2 7 PCI Express x1 card slot SLOT1 8 service mode jumper 9 password clear jumper 10 CMOS clear jumper 11 solid state drive slot M 2 SSD 12 processor socket 13 processor power connector ATX_CPU 14 processor fan cable connector FAN_CPU 15 hard drive data cable connector SATA3 16 hard drive data cable connector SATA0 17 hard drive and optical drive power cable connec...

Page 15: ...r follow the instructions in After working inside your computer For more safety best practices see the Regulatory Compliance home page at www dell com regulatory_compliance Procedure 1 Place the computer on its side 2 Remove the two screws 6 32x6 35 that secure the computer cover to the chassis 3 Slide the computer cover towards the back of the computer and lift the cover off the chassis 6 Removin...

Page 16: ...After working inside your computer For more safety best practices see the Regulatory Compliance home page at www dell com regulatory_compliance Procedure 1 Align the tabs on the computer cover with the slots on the chassis and slide it towards the front of the computer until it snaps into place 2 Replace the two screws 6 32x6 35 that secure the computer cover to the chassis 3 Place the computer in...

Page 17: ...ng inside your computer follow the instructions in After working inside your computer For more safety best practices see the Regulatory Compliance home page at www dell com regulatory_compliance Procedure 1 Place the computer in an upright position 2 Gently pry and release the front bezel tabs sequentially from the top 3 Move the front bezel outward from the chassis 8 Removing the front bezel 17 ...

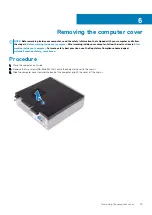
Page 18: ...Prerequisites Remove the computer cover 18 Removing the front bezel ...

Page 19: ...After working inside your computer follow the instructions in After working inside your computer For more safety best practices see the Regulatory Compliance home page at www dell com regulatory_compliance Procedure 1 Align the front bezel tabs with the front panel slots on the chassis 2 Rotate the front bezel towards the chassis until it snaps into place 9 Replacing the front bezel 19 ...

Page 20: ...Post requisites Replace the computer cover 20 Replacing the front bezel ...

Page 21: ...r follow the instructions in After working inside your computer For more safety best practices see the Regulatory Compliance home page at www dell com regulatory_compliance Prerequisites Remove the computer cover Procedure 1 Pry and release the tabs on the fan shroud sequentially from the bottom away from the thermal cooling assembly 2 Lift the fan shroud off the thermal cooling assembly 10 Removi...

Page 22: ...ter working inside your computer follow the instructions in After working inside your computer For more safety best practices see the Regulatory Compliance home page at www dell com regulatory_compliance Procedure Align the tabs on the fan shroud with the slots on the thermal cooling assembly and snap it into place Post requisites Replace the computer cover 11 22 Replacing the fan shroud ...

Page 23: ...he instructions in After working inside your computer For more safety best practices see the Regulatory Compliance home page at www dell com regulatory_compliance Procedure 1 Disconnect the power cables and the data cables from the hard drive 2 Remove the screw 6 32x3 6 that secures the hard drive assembly to the drive cage 3 Slide and lift the hard drive assembly out of the slot on the drive cage...

Page 24: ...E Note the orientation of the hard drive so that you can replace it correctly 6 Remove the four screws M3x3 5 that secure the bottom hard drive to the hard drive bracket 7 Slide the bottom hard drive out of the hard drive bracket NOTE Note the orientation of the hard drive so that you can replace it correctly 24 Removing the 2 5 inch hard drive ...

Page 25: ...Prerequisites Remove the computer cover Removing the 2 5 inch hard drive 25 ...

Page 26: ... bottom hard drive into the hard drive bracket 2 Align the screw holes on the bottom hard drive with the screw holes on the hard drive bracket 3 Replace the four screws M3x3 5 that secure the bottom hard drive to the hard drive bracket 4 Align the screw holes on the top hard drive with the screw holes on the hard drive bracket 5 Replace the four screws M3x3 5 that secure the top hard drive to the ...

Page 27: ...8 Connect the data cables and power cables to the hard drive Post requisites Replace the computer cover Replacing the 2 5 inch hard drive 27 ...

Page 28: ...es see the Regulatory Compliance home page at www dell com regulatory_compliance Prerequisites 1 Remove the computer cover 2 Remove the front bezel Procedure 1 Place the computer on its side to access the parts inside the chassis 2 Disconnect the power cable and the data cable from the hard drive 3 Remove the two screws 6 32x6 35 that secure the hard drive assembly to the drive cage 4 Slide the ha...

Page 29: ...e hard drive assembly over 6 Remove the two screws 6 32x3 6 that secure the hard drive bracket to the hard drive assembly 7 Slide the hard drive out of the hard drive bracket Removing the 3 5 inch hard drive 29 ...

Page 30: ... www dell com regulatory_compliance Procedure 1 Slide the hard drive into the hard drive bracket 2 Align the screw holes on the hard drive with the screw holes on the hard drive bracket 3 Replace the two screws 6 32x3 6 that secure the hard drive bracket to the hard drive 4 Turn the hard drive assembly over 5 Slide and place the hard drive assembly into the drive cage 6 Replace the two screws 6 32...

Page 31: ...Post requisites 1 Replace the front bezel 2 Replace the computer cover Replacing the 3 5 inch hard drive 31 ...

Page 32: ...www dell com regulatory_compliance Prerequisites 1 Remove the computer cover 2 Remove the front bezel Procedure 1 Place the computer on its side to access the parts inside the chassis 2 Remove the two screws 6 32x6 35 that secure the drive cage to the chassis 3 Push the release tab on the chassis and slide the drive cage to release it from the chassis 4 Disconnect the data cable and power cable fr...

Page 33: ...drive out of the optical drive bracket 9 Insert a pin into the optical drive emergency eject pinhole to release the optical drive 10 Using a plastic scribe gently push the tabs to release the optical drive bezel from the optical drive 11 Gently pull and disconnect the optical drive bezel form the optical drive Removing the optical drive 33 ...

Page 34: ...34 Removing the optical drive ...

Page 35: ...ance home page at www dell com regulatory_compliance Procedure 1 Align and replace the optical drive bezel to the optical drive 2 Slide the optical drive into the optical drive cage 3 Align the screw holes on the optical drive with the screw holes on the drive cage and replace the three screws M2x2 that secure the optical drive to the drive cage 4 Place the drive cage on the chassis 5 Connect the ...

Page 36: ...nto place 8 Align the screw hole on the drive cage with the screw hole on the chassis and replace the two screws 6 32x6 35 that secure the drive cage to the chassis Post requisites 1 Replace the front bezel 2 Replace the computer cover 36 Replacing the optical drive ...

Page 37: ...ww dell com regulatory_compliance Prerequisites 1 Remove the computer cover 2 Remove the front bezel 3 Remove the fan shroud 4 Follow the procedure from step 1 to step 6 in Removing the optical drive Procedure 1 Using the fingertips spread apart the securing clip at each end of the memory module slot until the memory module pops up 2 Lift the memory module out of the memory module slot NOTE If the...

Page 38: ...practices see the Regulatory Compliance home page at www dell com regulatory_compliance Procedure 1 Align the notch on the memory module with the tab on the memory module slot 2 Insert the memory module into the memory module slot and press the memory module down until the securing clips lock in place Post requisites 1 Follow the procedure from step 5 to step 8 in Replacing the optical drive 2 Rep...

Page 39: ...om regulatory_compliance CAUTION Removing the coin cell battery resets the BIOS setup program s settings to default It is recommended that you note the BIOS setup program s settings before removing the coin cell battery Prerequisites 1 Remove the computer cover 2 Remove the front bezel 3 Follow the procedure from step 1 to step 6 in Removing the optical drive Procedure 1 Press on the edge of the c...

Page 40: ...r working inside your computer For more safety best practices see the Regulatory Compliance home page at www dell com regulatory_compliance Procedure Insert a new coin cell battery CR2032 into the battery socket with the positive side facing up and snap the battery into place Post requisites 1 Follow the procedure from step 5 to step 8 in Replacing the optical drive 2 Replace the front bezel 3 Rep...

Page 41: ...ce home page at www dell com regulatory_compliance Prerequisites 1 Remove the computer cover 2 Remove the front bezel 3 Follow the procedure from step 1 to step 6 in Removing the optical drive Procedure 1 Locate the wireless card on the system board 2 Remove the screw M2x3 5 that secures the wireless card to the system board 3 Slide and lift the wireless card bracket off the wireless card 4 Slide ...

Page 42: ...42 Removing the wireless card ...

Page 43: ...ntenna cable color scheme for the wireless card supported by your computer Table 2 Antenna cable color scheme Connectors on the wireless card Antenna cable color Main white triangle White Auxiliary black triangle Black 2 Align and place the wireless card bracket on to the wireless card 3 Align the notch on the wireless card with the tab on the wireless card slot and slide the wireless card at an a...

Page 44: ...y Compliance home page at www dell com regulatory_compliance CAUTION Solid state drives are fragile Exercise care when handling the solid state drive CAUTION To avoid data loss do not remove the solid state drive while the computer is in sleep or on state Prerequisites Remove the computer cover Procedure 1 Locate the solid state drive on the system board 2 Lift the spacer that secures the solid st...

Page 45: ...Removing the solid state drive 45 ...

Page 46: ...es see the Regulatory Compliance home page at www dell com regulatory_compliance CAUTION Solid state drives are fragile Exercise care when handling the solid state drive Procedure 1 Align the notch on the solid state drive with the tab on the solid state drive slot 2 Slide the solid state drive into the solid state drive slot and press down the solid state drive 3 Press the spacer that secures the...

Page 47: ...Regulatory Compliance home page at www dell com regulatory_compliance Prerequisites 1 Remove the computer cover 2 Remove the front bezel 3 Follow the procedure from step 1 to step 6 in Removing the optical drive 4 Remove the wireless card Procedure 1 Note the antenna cable routing and remove the antenna cables from the routing guide on the chassis 2 Using a plastic scribe gently pry the antenna mo...

Page 48: ...side your computer For more safety best practices see the Regulatory Compliance home page at www dell com regulatory_compliance Procedure 1 Align and adhere the antenna modules to the chassis 2 Route the antenna cables through the routing guides on the chassis Post requisites 1 Replace the wireless card 2 Follow the procedure from step 5 to step 8 in Replacing the optical drive 3 Replace the front...

Page 49: ...com regulatory_compliance Prerequisites 1 Remove the computer cover 2 Remove the front bezel 3 Follow the procedure from step 1 to step 6 in Removing the optical drive Procedure 1 Remove the screw 6 32x6 35 that secures the front I O bracket to the chassis 2 Gently release the ports on the front I O bracket from the slots on the chassis and move the front I O bracket away from the chassis 3 Discon...

Page 50: ...50 Removing the power button module ...

Page 51: ...fety best practices see the Regulatory Compliance home page at www dell com regulatory_compliance Procedure 1 Route the power button board cable through the slot on the front panel 2 Connect the power button board cable to the system board 3 Slide the front I O bracket into the slots on the chassis and align the screw holes on the front I O panel with the screw holes on the chassis 4 Replace the s...

Page 52: ...Post requisites 1 Follow the procedure from step 5 to step 8 in Replacing the optical drive 2 Replace the front bezel 3 Replace the computer cover 52 Replacing the power button module ...

Page 53: ...re from step 1 to step 6 in Removing the optical drive Procedure 1 Press the securing clip and disconnect the power supply unit cable ATX_CPU from the system board 2 Press the securing clip and disconnect the power supply unit cable ATX_SYS from the system board 3 Note the power supply unit cable routing and remove the power supply unit cable from the routing guides on the chassis 4 Remove the thr...

Page 54: ...54 Removing the power supply unit ...

Page 55: ... page at www dell com regulatory_compliance Procedure 1 Place the power supply unit on the chassis 2 Slide the power supply unit towards the back of the chassis until it snaps into place 3 Align the screw holes on the power supply unit with the screw holes on the chassis 4 Replace the three screws 6 32x6 35 that secure the power supply unit to the chassis 5 Route the power supply unit cable throug...

Page 56: ...Post requisites 1 Follow the procedure from step 5 to step 8 in Replacing the optical drive 2 Replace the front bezel 3 Replace the computer cover 56 Replacing the power supply unit ...

Page 57: ...er working inside your computer For more safety best practices see the Regulatory Compliance home page at www dell com regulatory_compliance Prerequisites 1 Remove the computer cover 2 Remove the fan shroud Procedure 1 Disconnect the processor fan cable from the system board 2 Loosen the captive screws that secure the thermal cooling assembly to the system board 3 Lift the thermal cooling assembly...

Page 58: ... your computer For more safety best practices see the Regulatory Compliance home page at www dell com regulatory_compliance Procedure 1 Align the captive screws on the thermal cooling assembly with the screw holes on the system board 2 Tighten the captive screws that secure the thermal cooling to the system board 3 Connect the processor fan cable to the system board Post requisites 1 Replace the f...

Page 59: ... com regulatory_compliance Prerequisites 1 Remove the computer cover 2 Remove the front bezel 3 Follow the procedure from step 1 to step 6 in Removing the optical drive 4 Remove the memory modules 5 Remove the fan shroud 6 Remove the thermal cooling assembly Procedure 1 Locate the processor on the system board 2 Press the release lever down and then pull it outwards to release it from the securing...

Page 60: ... position Then align the notches on the processor with the tabs on the processor socket and place the processor in the processor socket CAUTION The pin 1 corner of the processor has a triangle that aligns with the triangle on the pin 1 corner on the processor socket When the processor is properly seated all four corners are aligned at the same height If one or more corners of the processor are hig...

Page 61: ...appropriate changes again after you replace the system board NOTE Before disconnecting the cables from the system board note the location of the connectors so that you can reconnect the cables correctly after you replace the system board Prerequisites 1 Remove the computer cover 2 Remove the front bezel 3 Follow the procedure from step 1 to step 6 in Removing the optical drive 4 Remove the memory ...

Page 62: ...ical drive power cable from the system board 7 Disconnect the power button module from the system board 8 Disconnect the processor power cable from the system board and remove the processor power cable from the routing guides on the chassis 9 Remove the six screws 6 32x6 35 that secure the system board to the chassis 10 Slide and lift the system board at an angle to remove it from the chassis 62 R...

Page 63: ...Removing the system board 63 ...

Page 64: ...s any changes you have made to the BIOS using the BIOS setup program You must make the appropriate changes again after you replace the system board Procedure 1 Align the system board with the slots on the chassis and place the system board in position 2 Replace the six screws 6 32x6 35 that secure the system board to the chassis 3 Connect the optical drive data cable to the system board 4 Connect ...

Page 65: ...e front I O bracket to the chassis Post requisites 1 Replace the processor 2 Replace the thermal cooling assembly 3 Replace the wireless card 4 Replace the memory modules 5 Follow the procedure from step 5 to step 8 in Replacing the optical drive 6 Replace the front bezel Replacing the system board 65 ...

Page 66: ...7 Replace the computer cover 66 Replacing the system board ...

Page 67: ...m Setup options changes that you make are recorded but do not take effect until you restart the system Keys Navigation Up arrow Moves to the previous field Down arrow Moves to the next field Enter Selects a value in the selected field if applicable or follow the link in the field Spacebar Expands or collapses a drop down list if applicable Tab Moves to the next focus area Esc Moves to the previous...

Page 68: ... Displays the total computer memory available Memory Speed Displays the memory speed Memory Channel Mode Displays single or dual channel mode Memory Technology Displays the technology used for the memory DIMM 1 Size Displays the DIMM 1 memory size DIMM 2 Size Displays the DIMM 2 memory size PCI Information Slot1 Displays the PCI information of Slot1 Slot2 Displays the PCI information of Slot2 Slot...

Page 69: ...cted You can clear the check boxes or change the boot order Boot List Option Displays the available boot options Allows you to change the boot list option Legacy UEFI default You can also add or delete a boot option Advanced Boot Options Enable or disable legacy boot options when in UEFI boot mode Enable Legacy Option ROMs default Enable Attempt Legacy Boot UEFI Boot Path Security These options co...

Page 70: ...B Ports Enable Rear USB Ports By default all the check boxes are selected NOTE USB keyboard and mouse always work in the BIOS setup irrespective of these settings Front USB Configuration Enable or disable the front USB ports Front Port 1 Front Port 2 By default all the check boxes are selected Rear USB Configuration Enable or disable the rear USB ports Rear Port 1 Rear Port 2 Rear Port 3 Rear Port...

Page 71: ...e Updates Enable or disable BIOS updates through UEFI capsule update packages By default Enable UEFI Capsule Firmware Updates is selected PTT Security Enable or disable Platform Trust Technology PTT visibility to the operating system By default PTT On is not selected Computrace Activate deactivate or disable the optional Computrace software The options are Deactivate default Disable Activate NOTE ...

Page 72: ...oftware Controlled default Enclave Memory Size Set the Intel Software Guard Extensions Enclave Reserve Memory Size The options are 32 MB 64 MB 128 MB Table 9 System setup options Performance menu Performance Multi Core Support Enable or disable one core or multiple cores The performance of some applications improves with additional cores If you enable Multi Core Support two cores are enabled If yo...

Page 73: ...nal when the AC power adapter is connected If the AC power adapter is removed during Standby the system setup removes power from all the USB ports to conserve battery power By default Enable USB Wake Support is selected Wake on LAN WLAN Enable or disable the feature that powers on the computer from the Off state when triggered by a LAN signal Disabled default LAN Only WLAN Only LAN or WLAN LAN wit...

Page 74: ... is selected Table 13 System setup options Wireless menu Wireless Wireless Device Enable Enable or disable internal wireless devices WLAN WiGig default Bluetooth default Table 14 System setup options Maintenance menu Maintenance Service Tag Display the Service Tag of your computer Asset Tag Create a computer Asset Tag SERR Messages Control the SERR message mechanism Some graphics cards require the...

Page 75: ...is selected BIOSConnect Enable or disable the cloud Service OS upon absence of Local OS Recovery By default BIOSConnect is selected Clearing forgotten passwords NOTE Before working inside your computer read the safety information that shipped with your computer and follow the steps in Before working inside your computer After working inside your computer follow the instructions in After working in...

Page 76: ...inside your computer For more safety best practices see the Regulatory Compliance home page at www dell com regulatory_compliance Prerequisites Remove the computer cover Procedure 1 Locate the CMOS jumper CMCL R2 on the system board Remove the jumper plug from the password jumper pins PSWD and connect it to the CMOS jumper pins NOTE For more information on the location of the jumper see System boa...

Page 77: ...Post requisites Replace the computer cover System setup 77 ...

Page 78: ...boot menu screen select the Diagnostics option 4 Click the arrow at the bottom left corner Diagnostics front page is displayed 5 Click the arrow in the lower right corner to go to the page listing The items detected are listed 6 To run a diagnostic test on a specific device press Esc and click Yes to stop the diagnostic test 7 Select the device from the left pane and click Run Tests 8 If there are...

Page 79: ...nformation about the Dell SupportAssist OS Recovery see Dell SupportAssist OS Recovery User s Guide at www dell com support Flashing BIOS USB key 1 Follow the procedure from step 1 to step 7 in Flashing the BIOS to download the latest BIOS setup program file 2 Create a bootable USB drive For more information see the knowledge base article SLN143196 at www dell com support 3 Copy the BIOS setup pro...

Page 80: ... Providers provide a modem router combo device 1 Turn off your computer 2 Turn off the modem 3 Turn off the wireless router 4 Wait for 30 seconds 5 Turn on the wireless router 6 Turn on the modem 7 Turn on your computer Flea power release Flea power is the residual static electricity that remains on the computer even after it has been powered off The following procedure provides the steps to condu...

Page 81: ... the related articles Learn and know the following information about your product Product specifications Operating system Setting up and using your product Data backup Troubleshooting and diagnostics Factory and system restore BIOS information See Me and My Dell at www dell com support manuals To locate the Me and My Dell relevant to your product identify your product through one of the following ...

Reviews: