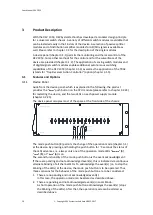
background image


User Manual 


DEV 1953  


Universal Switch Chassis 3 RU  


DEV Systemtechnik GmbH


Grüner Weg 4A 

61169 Friedberg 

GERMANY 

Tel: +49 6031 6975 100 

Fax: +49 6031 6975 114 

support@dev-systemtechnik.com 

www.dev-systemtechnik.com 


Revision: 2017-09-25 

DEV 91-0120-B 

Summary of Contents for 1953

Page 1: ...Universal Switch Chassis 3 RU DEV Systemtechnik GmbH Grüner Weg 4A 61169 Friedberg GERMANY Tel 49 6031 6975 100 Fax 49 6031 6975 114 support dev systemtechnik com www dev systemtechnik com Revision 2017 09 25 DEV 91 0120 B ...

Page 2: ...13 3 2 Modules Description 13 3 2 1 DEV 11 0014 14 3 2 2 DEV 11 0026 14 3 2 3 DEV 11 0031 15 3 2 4 DEV 11 0034 15 3 2 5 DEV 11 0051 16 3 2 6 DEV 11 0097 16 3 2 7 DEV 11 0102 17 3 2 8 DEV 11 0105 17 3 2 9 DEV 11 0110 18 3 2 10 DEV 13 0033 18 3 2 11 DEV 13 0063 19 3 2 12 DEV 13 0235 19 3 2 13 DEV 13 0321 20 3 2 14 DEV 14 0052 20 3 2 15 DEV 14 0089 21 3 2 16 DEV 14 0090 21 3 2 17 DEV 14 0092 22 3 2 1...

Page 3: ...gs 34 4 3 1 Factory Settings for Sensing Switch Modules 34 4 3 2 Factory Communication Protocol Configuration 34 4 3 3 Factory Network Settings 34 4 3 4 Factory SNMP Settings 35 4 3 5 Factory Sandar Prosan Protocol Settings 35 4 3 6 Factory Leitch Protocol Settings 35 4 3 7 Factory QEC Protocol Settings 35 4 4 Communication Interface Configuration 35 4 4 1 Serial Interface 35 4 4 1 1 Standard Seri...

Page 4: ...5 5 7 3 Feature Setup 72 5 5 7 3 1 Recording 72 5 5 7 3 2 Auto Mode 73 5 5 7 3 3 Group Assignment 75 5 5 7 3 4 Time Based Switching 76 5 5 7 3 5 TRAC 79 5 5 7 3 5 1 TRAC Setup 80 5 5 7 3 5 2 IP Monitor 84 5 5 7 3 5 3 Trap Log 85 5 5 7 3 6 Actions 86 5 5 7 3 6 1 Switching Actions 86 5 5 7 3 6 2 Action Log 88 5 5 7 4 Software Service 89 5 5 7 4 1 Restore Factory Defaults 89 5 5 7 4 2 Data Backup 89 ...

Page 5: ...trol via Remote Interface QEC Protocol 107 5 8 1 QEC Protocol Overview 107 5 8 2 QEC Protocol Communication Structure 107 5 8 3 QEC Commands 109 5 8 3 1 Check Change Flag Unit Status C 109 5 8 3 2 Check Queue Q 110 5 8 3 3 Firmware Version Unit ID F 111 5 8 3 4 Query Output Channel O 111 5 8 3 5 Set Crosspoint S 112 5 9 Control via Remote Interface SNMP 113 5 9 1 SNMP Overview 113 5 9 2 Private En...

Page 6: ...e portEntry poGain 125 5 9 4 3 9 14 application portTable portEntry poHasTilt 125 5 9 4 3 9 15 application portTable portEntry poTilt 125 5 9 4 3 9 16 application portTable portEntry poCardType 126 5 9 4 3 9 17 application portTable portEntry poSlot 126 5 9 4 3 9 18 application portTable portEntry poRfSenseStatus 126 5 9 4 3 9 19 application portTable portEntry poBiasStatus 126 5 9 4 3 9 20 applic...

Page 7: ...t Indication 134 6 1 Software Event Indication 134 6 1 1 Power Events 134 6 1 2 Switch Module Events 134 6 1 3 Input Module Events 134 6 1 4 Digital Interface Events 135 6 1 5 RF Level Monitoring Events 135 6 1 6 Digital Signal Quality Events 135 6 1 7 Other Events 135 7 Connectors 136 8 Technical Data and Options 138 9 Spare Parts 138 10 Conformance Declarations 138 10 1 Certificate of Conformanc...

Page 8: ...charges to return the product to the customer However the customer is obliged to pay all duties all taxes and all other additional costs arising from the shipment of the product DEV Systemtechnik warrants that the software and firmware designated by DEV Systemtechnik for use with the product will execute its programming instructions if installed properly DEV Systemtechnik does not warrant that the...

Page 9: ...ct the device to AC mains supply exceeding the specifications for input voltage and frequency The recommended AC cables to be applied are standard high temperature power cables with type IEC 60320 C13 appliance plug appro priately rated to the conditions of the country where the device is operated With applied Option 14 the device is supplied with DC voltage instead of AC mains In this case do not...

Page 10: ...se refer to chapter 3 2 24 for restarting the device and the two LEDs on each power supply module chapter 3 2 25 The device panel occupies most of the space at the front side of the chassis 3 1 2 4 5 6 7 8 9 10 11 12 13 14 15 16 Sim ultaneous Rem ote Individual Local Auto In A In B Universal Switch Chassis DEV 1953 3 4 5 6 7 8 The mode push button 3 permits the change of the operation mode chapter...

Page 11: ... are for the Simultaneous Individual switching mode functionality of the device which is described in chapter 5 1 4 To alter the routing of a single switch module via the related channel push button make sure that the device is in Local Mode and that the Individual LED is lit After the operation of the desired channel push button the LED display will indicate the altered switching position as a re...

Page 12: ... By default the DEV 1953 provides autonomous switching capability from the primary to the secondary input port s With Option 22 the DEV 1953 is delivered with the main backup swap feature i e the autonomous switching works in both directions instead of switching from the primary to the secondary input port s only With Option 28 the DEV 1953 is delivered with the automatic switch back feature which...

Page 13: ...T Sensing Switch Module DC 47 1006 MHz 75 Ohm F f 3 2 5 DEV 11 0051 DPST Switch Module DC 2500 MHz 50 Ohm SMA f 3 2 6 DEV 11 0097 DPST Switch Module without Monitor Port 47 1500 MHz 75 Ohm BNC f 3 2 7 DEV 11 0102 DPST High Power Sensing Switch Module DC 950 2150 MHz 75 Ohm F f 3 2 8 DEV 11 0105 DPST High Power Sensing Switch Module DC 47 1006 MHz 75 Ohm F f 3 2 9 DEV 11 0110 DPST Switch Module DC ...

Page 14: ...toring i e the RF level of both input ports is measured and is compared with adjustable RF threshold levels This enables the event indication functionality with respect to the present input signal levels and or permits the DEV 1953 to control the switching autonomously 3 2 2 DEV 11 0026 DPST Sensing Switch Module DC 950 2150 MHz 75 Ohm F f Out In A In B Logic External Controller 2 3 1 In A Out In ...

Page 15: ...relays are used for switching In the case of power loss the primary input port In A is routed to the output port For measurement purposes the monitoring output port Monitor is available 3 2 4 DEV 11 0034 DPST Sensing Switch Module DC 47 1006 MHz 75 Ohm F f Out In A In B Logic External Controller 2 3 1 In A Out In B DEV 11 0034 The functionality of the module DEV 11 0034 is identical with the modul...

Page 16: ...t output ports In A In B The unused input output port is terminated internally Latching relays are used for switching 3 2 6 DEV 11 0097 DPST Switch Module without Monitor Port 47 1500 MHz 75 Ohm BNC f In A In B Out 1 3 2 In B Out In A DEV 11 0097 The functionality of the module DEV 11 0097 is identical with the module DEV 11 0031 please refer to chapter 3 2 3 but without a monitor port thus enabli...

Page 17: ...t the module is designed for high power signals and for 75 Ohm with F connectors instead of 50 Ohm with SMA connectors 3 2 8 DEV 11 0105 DPST High Power Sensing Switch Module DC 47 1006 MHz 75 Ohm F f Out In A In B Logic External Controller 2 3 1 In A Out In B DEV 11 0105 The functionality of the module DEV 11 0105 is identical with the module DEV 11 0014 please refer to chapter 3 2 1 but the modu...

Page 18: ...d to one of two input output ports In A In B The unused input output port is terminated internally The module is able to pass an external 10 MHz reference signal 3 2 10 DEV 13 0033 1 2 2 1 Splitter Combiner Module Passive 950 2150 MHz 75 Ohm F f 1 3 2 In Out 1 Out 2 In Out 1 Out 2 DEV 13 0033 This passive module for splitting or for combining RF signals can be installed in a DEV 1953 as a suppleme...

Page 19: ...2 In Out 3 Out 4 This passive module for splitting or for combining RF signals can be installed in a DEV 1953 as a supplemental module 3 2 12 DEV 13 0235 1 4 4 1 Splitter Combiner Module Passive 47 1006 MHz 75 Ohm F f 1 5 4 In Out 1 Out 2 Out 3 Out 4 3 2 DEV 13 0235 Out 1 Out 2 In Out 3 Out 4 This passive module for splitting or for combining RF signals can be installed in a DEV 1953 as a suppleme...

Page 20: ...ve module for splitting or for combining RF signals can be installed in a DEV 1953 as a supplemental module 3 2 14 DEV 14 0052 Ethernet 2 1 1 2 Switch Module 1 1 Patch Cable 1 8 LAN 1 LAN 2 W AN 1 1 Patch Cable 1 1 Patch Cable 1 8 1 8 8 1 8 1 8 1 1 2 3 DEV 14 0052 LAN 1 W AN LAN 2 The module is designed for Ethernet switching applications and is equipped with three RJ 45 Ethernet connectors in ord...

Page 21: ...s routed only to the first output port Out 1 and the other output ports do not carry any signal The unused input port is terminated internally Electronic switches and a failsafe relay are used for switching 3 2 16 DEV 14 0090 DPST Switch Module with DA 1 3 ASI HD SDI 75 Ohm BNC f In B Out 3 Position 0 without electrical power Position 1 with electrical power In A selected Position 2 with electrica...

Page 22: ...y to the first output port Out 1 and the other output ports do not carry any signal 3 2 18 DEV 14 0094 DPST Switch Module with DA 1 3 ASI 3G SDI 75 Ohm BNC f In B Out 3 Position 0 without electrical power Position 1 with electrical power In A selected Position 2 with electrical power In B selected state shown here 1 2 4 5 Out 2 Out 1 1 2 0 2 0 1 0 1 0 1 2 2 0 1 2 External Controller Logic C D D C ...

Page 23: ...dule is designed for SD SDI HD SDI and 3G SDI signals in addition to ASI signals Note Output port 1 Out 1 delivers an inverted ASI signal 3 2 20 DEV 14 0103 Distribution Amplifier 1 3 ASI HD SDI 75 Ohm BNC f 1 3 4 Out 1 Pos 0 without electrical power Pos 1 with electrical power state shown here Out 2 In Out 2 External Controller Logic CD 1 0 0 1 2 Out 1 Out 2 Out 3 In DEV 14 0103 The functionality...

Page 24: ...uted to the three separately amplified output ports In the case of power loss the primary input port In A is routed only to the first output port Out 1 and the other output ports do not carry any signal The unused input port is terminated internally 3 2 22 DEV 7462 1 2 Optribution Switch 1260 1360 nm 1510 1610 nm SC APC 1 2 C Optical Switch Optical Fiber External Controller Logic Optical Fiber Opt...

Page 25: ... The CPU module of the DEV 1953 is located at the rear side of the chassis and manages the monitoring and the control functionality of the device Reset push button 1 Normally the Reset push button is not to be operated at all It is to be actuated only in case that the configuration of the device was changed or in the very rare cases that the remote communication operation does not behave normally ...

Page 26: ...two hot pluggable redundant wide range AC power supply modules supplied by two different AC lines If the device was ordered with Option 14 two DC power supplies are installed instead Each power supply module provides a green LED indicating the proper Operation of the module and a red LED indicating a Failure of the module 3 2 26 Digital Interface Modules M C 1 If the product is ordered with one of...

Page 27: ... 12 0022 Power Supply O peration Failure 12 0022 3 1 2 4 5 6 7 8 9 10 11 12 13 14 15 16 Sim ultaneous Rem ote Individual Local Auto In A In B Universal Switch Chassis DEV 1953 3 4 5 6 7 8 Front View DC DC Power Supplies Option 14 1 2 Power Supply O peration Failure 12 0015 Power Supply O peration Failure 12 0015 3 1 2 4 5 6 7 8 9 10 11 12 13 14 15 16 Sim ultaneous Rem ote Individual Local Auto In ...

Page 28: ...le P Grounding bolt and AC power plugs 3 3 3 Rear Side DEV 1953 with 12 Modules RF Switching Application Rear View 2 1 3 4 5 6 7 8 9 10 11 12 P C Supply 1 Fuse 4 A T 36 72 V DC or Disconnect power W ARNING before opening 36 72 V DC 100 W Supply 2 Fuse 4 A T Com Ethernet Reset In A O ut In B DEV 11 0026 In A O ut In B DEV 11 0026 In A O ut In B DEV 11 0026 In A O ut In B DEV 11 0026 In O ut 1 O ut ...

Page 29: ...d with DEV 14 0094 13 16 Slots 13 16 equipped with DEV 11 0031 C CPU module P Grounding bolt AC power plugs and digital interface module Option 56 or Option 57 4 Installation Instructions 4 1 Scope of Delivery 1 DEV 1953 equipped with switch modules distribution amplifier modules splitter modules and other options as ordered 1 User Manual this document 4 2 Installation of the Product 4 2 1 Mechani...

Page 30: ...establish the external Ethernet connection by plugging an Ethernet cable from your network to the Ethernet 3 of the CPU module If the basic network setup via serial interface is required please refer to chapter 4 4 2 2 and or if it is intended to control the device via the serial interface using Sandar Prosan protocol Leitch protocol or QEC protocol a serial connection between a PC and the serial ...

Page 31: ...stressed mechanically Sequentially remove each optical connector protection cover at the device and plug in and tighten the corresponding connector from the optical fiber bundle s Note The optical modules are available with different optical connector types i e FC APC E2000 HRL or SC APC Make sure that the matching connectors are installed in the application 4 2 4 Connection of RF Signal Cables Ap...

Page 32: ...hout interruption of the signal transmission If exchanging or installing optical modules please especially refer to the warnings regarding laser safety stated in chapter 2 3 If the CPU module is to be exchanged the Micro SD card of the old CPU module is to be inserted in the exchange CPU module The CPU module provides a push down lever to simplify the extraction of the module please refer to chapt...

Page 33: ...ngs that are to be restored usually all of them before operating the button Note Since the device provides numerous parameters and settings it is generally recommended to perform the first two steps described above after the instal lation of the device is completed after major changes on the settings and before updating the device firmware 4 2 6 Reset of the Device and the Restore of Factory Defau...

Page 34: ...ality I e for both input ports the aggregated signal power level of the RF signal is measured and compared with an RF threshold level If the RF level is below the RF threshold level an event is triggered which is indicated e g via Web Interface The factory setting for the RF threshold level for each input port of a sensing switch module depends on the lower limit of the applied sensing switch modu...

Page 35: ...7 2 3 4 3 6 Factory Leitch Protocol Settings By default the setting Echo in Local Mode is disabled I e in Local Mode the device responds with the Leitch Error Message to any valid Leitch command Furthermore the setting Individual Switch Level Assignment is enabled by default please refer to chapter 5 7 1 Both settings can be changed via Web Interface chapter 5 5 7 2 3 4 3 7 Factory QEC Protocol Se...

Page 36: ...ke none 4 4 2 Ethernet Interface The connector labeled Ethernet at the CPU module is an RJ 45 jack for the standard 100Base TX Ethernet interface chapter 7 describes the pin assignment 4 4 2 1 Ethernet Connection If a standalone device is to be connected to a PC only the connection can be estab lished via a direct Ethernet cable or through a local hub switch between the Ethernet connector of the d...

Page 37: ...he keyboard If using MS Windows HyperTerminal select the Properties entry from the File menu and click on the Settings tab There select ANSI from the Emulation drop down list and then click on the button to uncheck Send line ends with line feeds as shown in the following figure 4 4 2 2 1 Start and Termination of the Configuration Program If the serial interface is used for the communication via on...

Page 38: ...set IP address 192 168 0 225 2 set netmask 255 255 0 0 3 set gateway 192 168 0 99 q quit without saving x save configuration and exit your choice Choices can be executed by typing the character in the first column of each line followed by a CR The second column of each line provides a short description of the choice and the third column displays in parentheses the current setting of the correspond...

Page 39: ...the device your choice 2 CR Current netmask is 255 255 0 0 Enter netmask NONE to clear To change the current netmask type in a different valid entry to clear it type in NONE CR and just entering CR maintains the current setting 4 4 2 2 4 3 set gateway This choice is used to change the gateway address of the device your choice 3 CR Current gateway is 192 168 0 99 Enter gateway NONE to clear To chan...

Page 40: ...ed via Sandar Prosan protocol chapter 5 6 3 8 and via SNMP chapter 5 9 4 3 3 5 1 1 Local Mode In Local Mode the device executes commands which are issued via push button actions at the device panel or also in parallel via Web Interface The optional digital interface is disabled in Local Mode as well as the functionality of the different remote protocols SNMP Sandar Prosan Leitch and QEC to issue s...

Page 41: ...input port In B of the sensing switch module s digital signal switch module s are continuously monitored regarding the present RF level regarding the present digital signal quality respectively if a the Auto Mode Assignment is set to Autonomous Switching please refer to chapter 5 5 7 3 2 and if b the sensing switch module s digital signal switch module s is are switched to the primary input port a...

Page 42: ...witch module digital signal switch module is disabled the RF level information the digital signal quality infor mation respectively of the port is ignored as a trigger i e the device does not switch to the secondary input port If the secondary input port of a sensing switch module digital signal switch module is disabled the RF level check the digital signal quality check re spectively of this por...

Page 43: ...t If the secondary input port of a sensing switch module digital signal switch module is disabled the RF level information the digital signal quality infor mation respectively of the port is ignored as a trigger i e the device does not switch autonomously to the primary input port With Option 22 Switching back from the secondary input ports to the primary input ports in Simultaneous switching mode...

Page 44: ... digital signal quality is OK again respectively plus the offset value chapter 5 5 7 3 2 If one or more primary input port s of a group is are disabled the RF level information and the digital signal quality information respectively of the port s is omitted Thus disabling one or more primary input port s of a group encourages the switching in this situation since the signal information of this the...

Page 45: ...tching mode preventing switch modules in Individual switching mode before activating Simultaneous switching mode Naturally the Simultaneous switching mode is not available if the device is equipped with a single switch module only 5 2 Initialization of the Device The device performs a health check and a configuration check during power up and after a device reset This takes about 60 seconds there ...

Page 46: ...ching the device to Remote Mode it is not guaranteed that the device is in the switching position s as given by the potentials of the contacts of the digital interface The switching via the digital interface is slope triggered Thus it is recommended to generate a switching event after the activation of Remote Mode for any switch module in Individual switching mode or for the first member of any gr...

Page 47: ... the factory default account Username ADMIN Password ADMIN After entering username and password click on Note Both username and password are case sensitive Note the header in the Start Screen DEV 1953 SystemName SystemLocation The labels SystemName and SystemLocation are the SNMP variables System Name and System Location both can be set within the SNMP setup please refer to chapter 5 5 7 2 2 If th...

Page 48: ...nality of your web browser e g the function key F5 The Web Interface permits the definition of a number of users for accessing the Web Interface in parallel in accordance to the number of installed licenses An additional user who tries to log in receives a corresponding notification informing about the logged in user s e g It is recommended to add users AND to change the password of the factory de...

Page 49: ...g on the desired button e g clicking in the situation above on the but ton highlights the button instead of the button In the representation of the device panel in the upper part of the Status Tab the indicators change correspondingly here from Remote to Local Right to these buttons the currently logged in user here ADMIN and the permis sion of the user here admin are shown Please refer to chapter...

Page 50: ...provided regarding the detected module configuration regarding the operating status regarding the switching status and regarding the health status of the device The round indicators are equivalent to the physical LEDs at the device panel green ok activated input red failure yellow Remote Local Auto Simultaneous Individual or gray off please refer to chapters 3 1 1 3 2 25 for details on the indicat...

Page 51: ...er of installed switch modules and the name of each entry Group X or Switch X is the descriptive designator with X initially indicating the slot location of the detected module Each switch module has to be member of a switch group and initially each module is assigned to a separate group that is named correspondingly This group assignment can be changed please refer to chapter 5 5 7 3 3 The descri...

Page 52: ...ble check box of Channel In 2 2 in the Switch 2 panel If distribution amplifier modules for ASI SDI signals are installed they can be selected in the same manner within the appearing entry Distribution Amplifier chapter 5 5 4 3 on the left side of the Control Tab Switching and the change of settings within the Control Tab of the Web Inter face can be performed by operators with read write or admin...

Page 53: ...osition For switch modules with RF level monitoring functionality and with digital signal monitoring functionality respectively the present RF levels and the digital signal quality information respectively of each input port are visible within the rectangles A red background implies that the RF level is below the RF threshold level and the digital signal quality is Fail respectively it is green ot...

Page 54: ...ck on the button in the lower right corner Then a click on any of the circles causes two additional buttons to appear and After a click on the button the command is processed and after the switching is performed the switching state all switch modules of the group are switched to the secondary input port is indicated ...

Page 55: ...switch panels here assuming that all members of Group 2 are already in the same switching position Note that the switching via Web Interface can be performed only if the device is in Local Mode and that the switching via a group panel is possible only if the device is in Simultaneous switching mode If the device is in Simultaneous switching mode it is possible to switch the group either via the co...

Page 56: ... indicates the switch back level here with 27 0 dBm an offset i e 3 dB to the standard 30 dBm RF threshold level setting is displayed 2 Within the second section the switching status of the switch module is shown and can be changed Depending on the active switching mode either the individual switching of the current switch module can be performed or the simultaneous switching of the group to which...

Page 57: ...ext click on the circle between the representation of inputs and output which causes two additional buttons to appear After a click on the button the actual switching is performed and the new status the module is switched to the secondary input port is shown Please note that the button becomes disabled grayed out indicating that the device cannot be switched back to Simulta neous switching mode si...

Page 58: ...ed out 3 For sensing switch modules and for digital signal switch modules a third section appears below the switching section permitting the modification of module specific parameters Note that after settings have been altered within this section in Local Mode a click on the button is necessary to apply the changes For both input ports of a sensing switch module the RF Threshold can be adjusted in...

Page 59: ...ive designator here Amp 10 first the Port Number of the module is shown as a reference to the index of the SNMP portTable please refer to chapter 5 9 4 3 9 and if port specific events are to be identified within the Events Tab chapter 5 5 5 Then the Module Type is listed here DEV 14 0092 Finally the Signal Status is an assessment regarding the detected signal quality that can be either Fail red or...

Page 60: ...rts the related Event Description string here e g Power Supply 2 please refer to chapter 6 1 Below the buttons and are located An event can be acknowledged by highlighting i e clicking on the related line and by operating the button afterwards The intention of the acknowledgement of an event is to provide means to mask out a pending event of the Active Events Window in the Status Tab chapter 5 5 3...

Page 61: ...ckup functionality chapter 5 5 7 4 2 5 5 6 Recording Tab The Recording Tab is available only if the DEV 1953 is equipped with sensing switch module s For this type of modules the RF level data is continuously captured in discrete intervals The Recording Tab permits the visualization and the external storage of this data After opening the Recording Tab for the first time in a Web Interface session ...

Page 62: ...recording duration is not reached yet and the graphs indicate via gaps if the device was turned off for a span of time The checkbox labeled Show Thresholds enables the display of the related present threshold for the selected signals If checked each threshold is shown as a separate horizontal line with an individual label It is possible to magnify the data by drawing a zoom window in either diagra...

Page 63: ...ing csv and as recording_all csv respectively The csv comma separated values file format permits the data import e g into a MS Excel worksheet The csv file is a text file modeling a table Each line is interpreted as row containing column information here with the columns delimited by a semicolon charac ter as the column separator The number of columns depends on the export method vs If the button ...

Page 64: ...RF Level Time Channel In 4 1 RF Level Values Channel In 4 2 RF Level Time Channel In 4 2 RF Level Values 25 Aug 2017 17 12 47 25 5 25 Aug 2017 17 12 47 24 7 25 Aug 2017 17 13 47 25 5 25 Aug 2017 17 13 47 24 7 25 Aug 2017 17 14 47 25 5 25 Aug 2017 17 14 47 24 7 25 Aug 2017 17 15 47 25 5 25 Aug 2017 17 15 47 24 7 25 Aug 2017 17 16 47 25 5 25 Aug 2017 17 16 47 24 6 25 Aug 2017 17 17 47 25 5 25 Aug 20...

Page 65: ...up Tab On the left side the Setup Tab contains the menu items structuring the different entries described in the following Initially the single entries are not displayed To demonstrate the available setup entries all menu items above were folded out in the following screenshot ...

Page 66: ...elect an entry from the drop down list Language A click on the button applies the changes made If the password has been changed a window pops up for confirmation Note English and German are the languages supported by the current firmware 5 5 7 1 2 User Management The currently logged in user has to have admin permission to access the User Management entry where users can be added or deleted and th...

Page 67: ...es the changes made If the password has been changed a confirmation window pops up To delete a user click on the trash bin icon right to the user entry a window pops up for confirmation Note As already mentioned user names and passwords are case sensitive Do not forget to click on the button to store the settings made before selecting or adding another user A user logs on without any password if t...

Page 68: ...twork For the network setup of the device at least the fields IP Address and Netmask have to contain valid entries Gateway Nameserver 1 and Nameserver 2 are to be specified by their IP ad dresses the Nameserver entries are used for the resolution of the Timeserver fields only The Timeserver fields are used to specify one or two timeservers either via full qualified domain name or via IP address To...

Page 69: ...x below these entries is used to enable the switching between Local Mode Remote Mode and Auto Mode via SNMP please refer to chapter 5 9 4 3 1 Additionally up to four Trap Destination IP Addresses can be defined via the IP ad dress and the port in the format ip address port e g 192 168 0 148 121 If port is not specified the standard SNMP trap port 162 is assumed The LED symbols right to the IP addr...

Page 70: ...onfiguration program is se lected the CPH is disabled and the serial interface is used for the configuration pro gram please refer to chapter 4 4 2 2 with the settings described in chapter 4 4 1 1 Selecting any other entry changes the assignment to the selected protocol Prosan Leitch or QEC If Prosan is selected the check box Echo in Local Mode appears in addition to the drop down list CPH Protoco...

Page 71: ...EC Serial Address appears in addition to the drop down list CPH Protocol The device address for the serial communication via QEC protocol chapter 5 8 can be modified in the range 0x00 0xFF A click on the button applies the changes made and restarts the device This is indicated via a confirmation window e g ...

Page 72: ...erval for the signal recording functionality please refer to chapter 5 5 6 Via the Recording Interval drop down list the interval for the regular data capture can be selected After an entry was picked the Resulting Recording Duration is displayed in the line below The following choices are available Recording Interval Resulting Recording Duration 10 Seconds 2 Days 30 Seconds 6 Days 60 Seconds 12 D...

Page 73: ...sed on the RF level information and on the digital signal quality respectively is enabled in Auto Mode 2 Time Based Switching The Time Based Switching functionality chapter 5 5 7 3 4 is enabled in Auto Mode if this entry is activated 3 TRAC This entry is available and can be selected only if the device is equipped with the TRAC option The TRAC functionality chapter 5 5 7 3 5 is enabled in Auto Mod...

Page 74: ...f on the primary input port the signal quality becomes OK again for a selected time the device switches back to the primary input port This time 0 10 seconds can be selected via the drop down list labeled Switch Back Time for Automatic Switch Back ASI SD SDI HD SDI 3G SDI A click on the button applies the changes made Note If Option 22 is installed the main backup swap functionality is activated p...

Page 75: ... single mem ber each and that there is no functional difference between Individual switching mode and Simultaneous switching mode To utilize the advantages of simultaneous switching the group assignment is to be altered To change the assignment of one or more switch modules using the Group Assignment entry make sure that the device is in Local Mode and that Individual switching mode is activated T...

Page 76: ...is shown and can be selected within the structuring entry Groups on the left side of the Control Tab chapter 5 5 4 if it contains at least one member 5 5 7 3 4 Time Based Switching Time Based Switching is a functionality to enable the time controlled switching of the device The following prerequisites are to be considered Time Based Switching is to be configured via the Web Interface only The devi...

Page 77: ...r and enter a name in the appearing text field here Wednesday 17 45 Next select the name in the list to enable the definition of the trigger alternatively and if applicable click on an existing trigger to modify it Either a time trigger is defined repetitive for one or more weekdays by checking the corresponding box es here We dnesday was chosen or it is defined as a single occurrence using the dr...

Page 78: ... is not established this is displayed in the Time Based Switching functionality via the message Warning The device currently does not receive a valid time from an NTP server so time based switching may not work properly Please check the time server configuration Time Based Switching can be activated in such a case as well but this may cause unwanted switching of the device Neither the activated ti...

Page 79: ...d if the TRAC Setup chapter 5 5 7 3 5 1 description of the upper section of the DEV 1953 was not changed Then one or more traps should be enabled within the SNMP setup of the DEV 1951 before saving the changes Note that traps received by the device in the example the DEV 1953 can be monitored via the Trap Log chapter 5 5 7 3 5 3 If Switching Actions based on IP Monitoring are pursued the target de...

Page 80: ...nity only The standard SNMP trap port 162 is the default Trap Receiver Port This value can be changed if required It is recommended to click on the button to store the settings made before continuing with the definition of trap triggers To define a trap trigger the entries in the section Trap Trigger can be defined manually but an assisted procedure is recommended and described next As the first s...

Page 81: ...it can be transferred to the section Trap Trigger of the TRAC Setup entry by clicking on The click on the button automatically activates the TRAC Setup entry comprising a new entry in the Trap Trigger section named Added from Trap Log and the settings for Source IP Enterprise OID Trap Specific and the Variable Bindings as obtained from the Trap Log ...

Page 82: ...es to the Variable Bindings Matching Rules table can be applied in addition Existing lines in the table can be deleted by clicking on the red X on the right side Additional lines can be added using the blue on the right side after the last line Each line listed can be edited in the three columns OID Op stands for Op erator and Value For OID and Value manual entries are required the wildcard charac...

Page 83: ...5 41 1 0 instead of 1 3 6 1 4 1 21035 41 2 1 0 The check box labeled Enabled is grayed out and the message Not enabled in Auto Mode Assignment appears if TRAC is not activated in the drop down list Auto Mode Assignment chapter 5 5 7 3 2 Neither the activated trap triggers nor the activated Switching Actions are checked for ambiguity or contradictions The behavior of the device is not predictable i...

Page 84: ...witch the DEV 1953 based on the availability or on the absence of a target device e g a video router Again the target device has to support and must be reachable via ICMP Echo Requests ping The definition of a trigger within the IP Monitoring entry is done in the same manner as for time triggers please refer to chapter 5 5 7 3 4 or for trap triggers chapter 5 5 7 3 5 1 ...

Page 85: ...tions chapter 5 5 7 3 6 1 should have been defined already and the trigger needs to be enabled via the Enabled check box As the last step click on the button to store the settings made All enabled triggers IP Monitoring triggers and trap triggers are activated by clicking on the button Note The check box labeled Enabled is grayed out and the message Not enabled in Auto Mode Assignment appears if T...

Page 86: ...In addition the TRAC Setup chapter 5 5 7 3 5 1 description of the upper section needs to be configured accordingly On the other hand too many traps received by the device may cause the loss of clarity within the Trap Log It is to be considered whether the number of traps can be reduced by changing communication parameters on both ends of the transmission chain The number of entries within the Trap...

Page 87: ... to modify it The action is defined by selecting the module outputs via the check boxes below the On label and then the input port via the drop down list below the Input label as the target switching position Depending on the application one or more actions need to be defined Note Do not forget to click on the button to store the settings made before selecting or adding another action or before pr...

Page 88: ...g The Action Log captures the Switching Actions performed by the device in Auto Mode Per entry it comprises a Date Time stamp the Trigger Type the Trigger Name causing the action and the Action Type and the Action Name of the performed action The screenshot above shows three entries one for each trigger type which can cause a switching action IP Monitor the switching action to 1 1 2 2 3 1 4 2 was ...

Page 89: ...dicated via a pop up window e g Note Any data stored via the data backup functionality is not deleted please refer to chapter 5 5 7 4 2 Recorded data chapter 5 5 6 is deleted only if a different recording interval is applied than the recording interval default setting chapter 5 5 7 3 1 5 5 7 4 2 Data Backup The data backup functionality provides means to manage various device data It is recommende...

Page 90: ...ble and Channel Settings and Names Please refer to chapters 5 5 4 1 5 5 4 3 for details on these settings and to the Restore section below for retrieving all or only a part of these settings Device Data to store device specific settings accessible via the Setup Tab IP Settings chapter 5 5 7 2 1 Time Based Switching TRAC chapters 5 5 7 3 4 5 5 7 3 5 1 5 5 7 3 5 2 5 5 7 3 6 1 User Setup chapter 5 5 ...

Page 91: ...lected slot determines which of the five buttons is active or not In the screenshot above the button is grayed out since it is not possible to restore the content of an Error Log backup set The button is active only if either a slot with a backup set containing Module Data or Device Data is selected Note A backup set can only be restored to a device with the same product number Otherwise the messa...

Page 92: ...the file resides Alternatively the button can be used to locate the file After the file was selected a click on the button activates the file transfer to the device Note Precondition for the import is a valid backup set containing Module Data or Device Data which was generated before via the button see below or which was provided by DEV Systemtechnik It is always possible to import a valid backup ...

Page 93: ...irmware Update entry provides means to update the device firmware manuals etc and or to reset the device via Web Interface Precondition for updating the device firmware is a service package provided by DEV Systemtechnik The input field permits the insertion of a filename including the path where the file resides Alternatively the button can be used to locate the file After the selection of the fil...

Page 94: ...n the left column describes the Software Options this device is equipped with Option 28 automatic switch back and with Option 37 TRAC In the right column on the top the Software Configuration is described Device Firmware version here 32 0071 G 01 Linux Kernel version here 3 14 73 S SNMP Software version here 3 1 13 the current IP Address of the device here 192 168 0 11 Web Interface Licenses here ...

Page 95: ... available only if Prosan is selected within the CPH setup of the Web Interface please refer to chapter 5 5 7 2 3 The protocol is exclusively available via the serial interface the settings of the serial inter face have to be configured accordingly chapter 4 4 1 2 If Echo in Local Mode is disabled factory default the device responds in Local Mode with an ACK character to the commands Q XR AM AMA S...

Page 96: ... ETX or ACK STX AMA001 0000 e x1 xe checksum ETX with e 00 99 number of events following x1 xe 00 FF if there are events error code class first digit and error code sub class second digit in hexadecimal notation separated by commas e g ACK STX AM001 0000 00A5 ETX no events or ACK STX AMA001 0000 02 12 1307 ETX power supply power line event s Note The event indication is the upper two hexadecimal d...

Page 97: ...vice answer is a sequence of sixteen three digit numbers each indicating to which input port the corresponding output port is connected to ACK STX S o1 o2 o16 checksum ETX e g with all modules switched to the primary input port In A i e 001 ACK STX S 001 001 001 001 001 001 001 001 001 001 001 001 001 001 001 00131 ETX or ACK STX SA o1 o2 o16 checksum ETX e g with the first i e installed five modu...

Page 98: ... checksum ETX i e STX PMCI29 ETX and STX PMCE checksum ETX i e STX PMCE25 ETX The device confirms both commands with an ACK if the command is accepted and with a NAK if the device is in Local Mode Note If the Auto Mode is activated via the PMCI command this implies the usage of the device defined by the Auto Mode Assignment of the Web Interface chapter 5 5 7 3 2 If Auto Mode is activated no switch...

Page 99: ...eans that all members of all groups with two or more members have to be in the same switch position i e all switch modules of a group are switched to the primary or to the secondary input port chapter 5 1 4 5 6 3 9 Select Power Supply Monitoring Mode PMP0 PMP1 With these device specific commands the power supply monitoring can be disabled PMP0 or enabled PMP1 If disabled the reporting of all power...

Page 100: ...to the responses in Remote Mode Echo in Local Mode can be en abled or disabled within the CPH setup of the Web Interface The Leitch protocol implementation on this device distinguishes between Indi vidual Switch Level Assignment being enabled factory default or disabled The selection is performed via a check box in the CPH setup of the Web Inter face and has impact on the behavior of the Request C...

Page 101: ...mation mark character the comma character the colon character the slash character Note All commands start with a followed by the space character sp The command input is completed with a carriage return character CR Parameter numbers are noted in hexadecimal format 0 9 and A F and the counting is zero based i e starting from 0 e g 1 for addressing the second input port For corrections during the co...

Page 102: ...n necessary if using the Leitch protocol via the serial interface 5 7 4 Leitch Commands The different commands for the communication with the device are described next 5 7 4 1 Enable Reporting This is the first command to be issued after starting a Leitch session The Enable Reporting command switches to the Leitch Pass Through Protocol mode to provide access to all other commands sp CR The device ...

Page 103: ... sp I A CR The device answer is I A device_id device_type _of_chars model _ with device_id here always 0 device_type here always 0 _of_chars number of characters following here always 7 model the model number string here always DEV1953 I e the device answer is I A 0 0 7 DEV1953 _ 5 7 4 4 Device Version Request I V With this command the device is queried for the firmware version sp I V CR The devic...

Page 104: ...evel sp S Lvl CR initiates the device answer S Lvl 0 Src e g S 00 1 _ with Lvl being the number minus 1 of the addressed switch module and Src being either 0 for input port In A or 1 for input port In B 5 7 4 5 2 Individual Switch Level Assignment Disabled i The response to the command requesting the switching status of the device sp S CR initiates the device answer S G1S11 SrcG1S11 e g S 00 1 S G...

Page 105: ...ber minus 1 of the addressed group y the number of switch modules within this group and Src1 Src y 1 either 0 for input port In A or 1 for input port In B Note The device answers with the Leitch Error Message when addressing a group without a member 5 7 4 6 Direct Crosspoint Take X This is the Leitch command for switching sp X Lvl Dest Src CR e g sp X 0 0 1 CR with Lvl Level see below Dest Destina...

Page 106: ...scenario the meaning of the parameters Lvl and Dest in the command is Lvl Level in this case the number of the group 0 for addressing the first group 1 for the second group and so on Dest Destination here 0 for addressing the first switch module within the addressed group 1 for addressing the second switch module within the addressed group and so on In Individual switching mode this parameter is r...

Page 107: ...ommunication the QEC serial address see below can be selected via the CPH setup of the Web Interface Within the QEC protocol the DEV 1953 is treated as a 32x16 matrix Naturally the input ports of a switch module cannot be routed to the output port of a different switch module 5 8 2 QEC Protocol Communication Structure The basic command structure is Command STX address command data ETX checksum Pos...

Page 108: ...63 03 1C content NAK address C0 c ETX checksum u Command unavailable A command was received which is not implemented or which cannot be executed due to the current operation mode Local Mode of the device an example for this type of response hexadecimal 15 31 31 75 03 79 content NAK address 11 u ETX checksum i Improper data A command with too few or too many bytes was received an example for this t...

Page 109: ...larm Change The Change bit is set if there have occurred changes on the switching status of the device i e if the change queue is not empty The Alarm bit is set if any not acknowledged event is pending and the Overflow bit is set if the change queue is full and if an additional change has occurred before reading the change queue via the Q command chapter 5 8 3 2 Note If the Overflow bit is set all...

Page 110: ...d and bit 3 of the queue change flag please refer to chapter 5 8 3 1 is set for the indication of an overflow of the change queue After the queue is checked via the Q command the queue and the queue change flag are cleared In the positive response to this command each change in the queue delivers 6 bytes reporting the output port number and the input port number to which the output port is current...

Page 111: ...nected via Ethernet with firmware version G 01 returns hexadecimal 06 46 46 46 76 47 2E 30 31 content ACK address FF F v G 0 1 hexadecimal 20 50 76 32 2E 31 35 20 44 content sp P v 2 1 5 sp D hexadecimal 45 56 31 39 35 33 2F 30 33 content E V 1 9 5 3 0 3 hexadecimal 32 58 30 31 36 03 4B content 2 X 0 1 6 ETX checksum 5 8 3 4 Query Output Channel O The command for querying the switch status of an o...

Page 112: ...ort hexadecimal 06 31 31 53 03 56 content ACK address 11 S ETX checksum Note The DEV 1953 is treated as a 32x16 matrix although it is not possible to switch e g the input ports of the switch module in the first slot to the output port of the switch module in the second slot This has to be considered when using the switch command via the QEC protocol The port assignments are Switch Module Slot Numb...

Page 113: ... the node Each object has an own individual management Object ID OID In the system the objects are the variables which can be simple values or tables The object information is stored in the Management Information Base MIB Note The iReasoning MIB Browser Personal Edition including Trap Receiver by iReasoning Inc is recommended to test the communication via SNMP 5 9 2 Private Enterprise Number Devic...

Page 114: ...n MIB object results out of the concatenation of the MIB String please refer to chapter 5 9 2 iso org dod internet private enterprises devSystemtechnik devSwitch and of the corresponding object E g complete textual OID of the object instrument controllerMac is and are symbolizing that the two consecutive lines are actually one line iso org dod internet private enterprise devSystemtechnik devSwitch...

Page 115: ...iption string please refer to chapter 6 1 obtained via errorDescription chapter 5 9 4 4 14 To enable the trap bit 6 enum errortext in the trapEnableMask is to be set 5 9 4 1 2 devSwitchTraps trapAlarm This trap number 4 OID 1 3 6 1 4 1 21035 41 0 4 is triggered if the device either detects a new event or if a pending event disappears The trap delivers errorNr please refer to chapter 5 9 4 4 4 2 an...

Page 116: ...reRevision OID 1 3 6 1 4 1 21035 41 1 2 0 Syntax OCTET STRING SIZE 32 Access read only Description The device firmware revision Example G 01 5 9 4 2 3 instrument instrumentType OID 1 3 6 1 4 1 21035 41 1 3 0 Syntax OCTET STRING SIZE 64 Access read only Description The device type For this product DEV1953 16 is returned 5 9 4 2 4 instrument antennaControllerType OID 1 3 6 1 4 1 21035 41 1 4 0 Synta...

Page 117: ...emote operation e g via SNMP 3 Auto Mode the usage of the device is defined by the Auto Mode Assignment of the Web Interface please refer to chapter 5 5 7 3 2 Note Via the SNMP setup of the Web Interface chapter 5 5 7 2 2 controlMode can be set to read write default or to read only The factory setting is 2 Remote Mode 5 9 4 3 2 application switchingControl OID 1 3 6 1 4 1 21035 41 2 2 0 Syntax INT...

Page 118: ...berOfSwitchGroups OID 1 3 6 1 4 1 21035 41 2 4 0 Syntax INTEGER32 Access read only Description The number of switch groups For this type of device 16 is returned Note For numberOfSwitchUnits 16 is returned independently whether the device is equipped with sixteen or less switch modules This value is used to determine the maximum index of the following table 5 9 4 3 5 application switchGroupTable 1...

Page 119: ...ps 6 16 5 9 4 3 5 3 application switchGroupTable switchGroupEntry swMainRfStatus OID 1 3 6 1 4 1 21035 41 2 5 1 3 x Syntax INTEGER ok 1 notok 2 notapplicable 3 Access read only Description The RF or digital signal status for the main ports here primary input ports of the switch units being member of the related switch group possible values 1 ok the signal status of all primary input ports is above...

Page 120: ...ssment regarding the digital signal quality thus the name swRedundancyRfStatus is not quite appropriate 5 9 4 3 6 application numberOfSwitchUnits OID 1 3 6 1 4 1 21035 41 2 6 0 Syntax INTEGER32 Access read only Description The number of switch units For this type of device 16 is returned Note For numberOfSwitchGroups 16 is returned independently whether the device is equipped with sixteen or less ...

Page 121: ...h unit here switch module Note The port assignment is static e g 1 2 33 is returned for swMembers 1 for the switch module in slot 1 with 1 primary input port 2 secondary input port 33 output port i e swMembers i Primary Input Port Secondary Input Port Output Port 1 1 2 33 2 3 4 34 3 5 6 35 4 7 8 36 5 9 10 37 6 11 12 38 7 13 14 39 8 15 16 40 9 17 18 41 10 19 20 42 11 21 22 43 12 23 24 44 13 25 26 4...

Page 122: ...cation portTable The table describes the special features and settings of each port Note The portTable distinguishes between the input ports and the output port of a switch module the type of port can be identified via poType please refer to chapter 5 9 4 3 9 3 The maximum index in the portTable is at least 48 independent whether 16 or less switch modules are installed Empty slots and all slots po...

Page 123: ...or each table entry ranging between 1 and the number of entries defined by numberOfPorts chapter 5 9 4 3 8 5 9 4 3 9 2 application portTable portEntry poEnable OID 1 3 6 1 4 1 21035 41 2 9 1 2 x Syntax INTEGER disabled 1 enabled 2 Access read write Description Events possibly caused by the port are or can be enabled or dis abled Additionally this setting influences the switching behavior of a devi...

Page 124: ...6 1 4 1 21035 41 2 9 1 6 x Syntax INTEGER32 Access read write Description The RF threshold level in dBm 10 9999 means not available or not present Example 300 30 0 dBm only for input ports of sensing switch modules Note The factory setting is stated in chapter 4 3 1 5 9 4 3 9 7 application portTable portEntry poHasBias OID 1 3 6 1 4 1 21035 41 2 9 1 7 x Syntax INTEGER yes 1 no 2 Access read only D...

Page 125: ...9 1 12 x Syntax INTEGER yes 1 no 2 Access read only Description The indication whether gain control is provided or not For this type of device 2 no is returned for all ports 5 9 4 3 9 13 application portTable portEntry poGain OID 1 3 6 1 4 1 21035 41 2 9 1 13 x Syntax INTEGER32 Access read write Description The gain control value in dB 10 For this type of device 9999 is returned for all ports 5 9 ...

Page 126: ... portTable portEntry poRfSenseStatus OID 1 3 6 1 4 1 21035 41 2 9 1 18 x Syntax INTEGER ok 1 notok 2 notapplicable 3 Access read only Description The status of the RF level monitoring or the digital signal quality status possible values 1 ok the RF level is above the RF threshold level or the digital signal quality is OK 2 not ok the RF level is below the RF threshold level or the digital signal q...

Page 127: ...module or the module is a logical switch module chapter 5 9 4 3 9 3 not applicable this value is returned for switch modules without any event detection 5 9 4 3 10 application antennaStatus OID 1 3 6 1 4 1 21035 41 2 10 0 Syntax INTEGER moving 1 rfok 2 rfnok 3 0 Access read only Description The status of the motorized antenna Not applicable for this type of device thus 0 is returned 5 9 4 3 11 app...

Page 128: ...User Manual DEV 1953 128 Copyright DEV Systemtechnik GmbH 2015 2017 5 9 4 4 surveillance ...

Page 129: ...rors are enabled the errors are grouped into classes each error class can be masked out with its corresponding bit set to 0 Note The errorEnableMask is defined as follows Hex 8000 4000 2000 1000 0800 0400 0200 0100 0080 0040 0020 0010 0008 0004 0002 0001 Bit 15 14 13 12 11 10 9 8 7 6 5 4 3 2 1 0 Class ANT COM LNB OPT AMP MAT OUT INP SWI FAN POW INT Bit Class Number Class Abbreviation Class Name Re...

Page 130: ...presenting an event that is classified by an error number An error count per entry indicates the number of occurrences of the specific event and furthermore there it is specified per entry when the last event of this type did occur whether the event is still pending and whether the event was acknowledged or not If numberOfErrors please refer to chapter 5 9 4 4 3 is 0 the errorTable is not availabl...

Page 131: ...on The last occurrence of the event is 1 not acknowledged or 2 acknowledged 5 9 4 4 5 surveillance numberOfPowerLines OID 1 3 6 1 4 1 21035 41 3 5 0 Syntax INTEGER32 Access read only Description The number of power lines This type of device supports monitoring for the two power lines thus 2 is returned Note This value is used to determine the maximum index of the following table 5 9 4 4 6 surveill...

Page 132: ...ue value for each table entry ranging between 1 and the number of entries defined by numberOfPowerSupplies please refer to chapter 5 9 4 4 7 5 9 4 4 8 2 surveillance powerSupplyTable powerSupplyEntry powerSupplyStatus OID 1 3 6 1 4 1 21035 41 3 8 1 2 x Syntax INTEGER ok 1 notok 2 notapplicable 3 Access read only Description The status of the related power supply module possible values 1 ok no even...

Page 133: ...Description The internal device status e g temperature communication possible values 1 ok no internal device events are reported 2 not ok an internal device event was detected 5 9 4 4 12 surveillance externalDeviceStatus OID 1 3 6 1 4 1 21035 41 3 12 0 Syntax INTEGER ok 1 notok 2 notapplicable 3 Access read only Description The status of external devices e g of an antenna controller Not applicable...

Page 134: ...fective power supply module or that a communication problem with the power module is detected a corresponding event is generated Error Code Description Decimal Hexadecimal 04609 04610 0x1201 0x1202 Power Line i i 1 2 04865 04866 0x1301 0x1302 Power Supply i i 1 2 07168 0x1C00 Power Module Note If power supply monitoring please refer to chapter 5 6 3 9 is disabled none of the events above will be r...

Page 135: ...al Quality Events If the device is equipped with digital signal modules the digital signal quality of each input port is monitored and an event is generated in case that the signal quality becomes Fail i is 1 2 for the input ports of the first digital signal switch module and is 31 32 for the input ports of the sixteenth digital signal switch module If distribution amplifier modules for ASI SDI si...

Page 136: ... Board Connector Type MSTB 2 5 2 ST 5 08 1757019 DEV 79 0303 Alternatively the device can be powered with a negative voltage 36 75 V DC by inverting the polarity Ethernet Connector at the CPU module Connector RJ 45 Connector assembly none Ethernet Connector Pin Functionality Pin 1 Tx Pin 2 Tx Pin 3 Rx Pins 4 5 do not use Pin 6 Rx Pins 7 8 do not use do not use means that normally the pin should be...

Page 137: ...a contact is open it means that the corresponding module is switched to the primary input port In A If it is closed i e it has the same electrical potential as the common pins the module is switched to the secondary input port In B An exception is pin 17 that indicates the status of module 16 as a normally closed contact i e contradictory to pin 16 The digital inputs pins 20 35 are realized with o...

Page 138: ... 2016 03 Cable networks for television signals sound signals and interactive services Part 2 Electromagnetic compatibility for equipment German version EN 50083 2 2012 A1 2015 DIN EN 55022 2011 12 Information technology equipment Radio disturbance characteristics Limits and methods of measurement CISPR 22 2008 modified German version EN 55022 2010 DIN EN 55024 2016 05 Information technology equipm...

Page 139: ...essverfahren CISPR 22 2008 modifiziert Deutsche Fassung EN 55022 2010 DIN EN 55024 2016 05 Einrichtungen der Informationstechnik Störfestigkeitseigenschaften Grenzwerte und Prüfverfahren CISPR 24 2010 Cor 2011 A1 2015 Deutsche Fassung EN 55024 2010 A1 2015 DIN EN 61000 3 2 2015 03 Elektromagnetische Verträglichkeit EMV Teil 3 2 Grenzwerte Grenzwerte für Oberschwingungsströme Geräte Eingangsstrom 1...

Page 140: ...User Manual DEV 1953 140 Copyright DEV Systemtechnik GmbH 2015 2017 This Page Intentionally Left Blank ...

Page 141: ...V 11 0051 DEV 11 0097 DEV 11 0102 DEV 11 0105 DEV 11 0110 DEV 13 0033 DEV 13 0063 DEV 13 0235 DEV 14 0052 DEV 14 0089 DEV 14 0090 DEV 14 0092 DEV 14 0094 DEV 14 0096 DEV 14 0103 DEV 14 0111 DEV 7462 DEV 7463 and future modules to which this declaration refers to is in conformity with Directive 2011 65 EU of the European Parliament and of the Council of 8 Jun 2011 on the restriction of the use of c...

Page 142: ...address for the unique identification of a device within a network MIB Management Information Base NE Network Element NMS Network Management System NTP Network Time Protocol OID Object IDentifier Optribution Optical Transmission and Distribution of RF Signals is the DEV Systemtechnik product line for optical equipment PC Personal Computer PE Protective Earth PLC Programmable Logic Control in Germa...

Page 143: ...User Manual DEV 1953 Copyright DEV Systemtechnik GmbH 2015 2017 143 12 Notes ...

Reviews: