background image

DIETA SOUPPER

DIETA S-CLASSIC

USER MANUAL

Summary of Contents for S-CLASSIC

Page 1: ...DIETA SOUPPER DIETA S CLASSIC USER MANUAL ...

Page 2: ...every new user will have the necessary information about using the kettle It is very important that the kettle is used according to the manual As the warranty does not cover damage resulting from misuse Please write down the kettle information Kettle size and model Serial number Nearest local service Sales representative DIETATEC OY Teollisuusneuvoksenkatu 4 00880 Helsinki Puh 358 9 755 190 info d...

Page 3: ...des 15 Stopping the mixing 16 Safety speed mixing 16 Mixing speeds 16 CHILLING WITH TAP WATER option 17 Chilling performance 18 Fill rate 18 Starting the chilling 18 Mixing while chilling 18 Stopping the chilling 19 MIXING TOOLS 20 Placing the tool to the kettle 20 Locking the tool 21 Removing the tool 21 Washing the tool 21 TIMER AND PROGRAMMING 22 TIMER 22 Programs and programming 23 User settin...

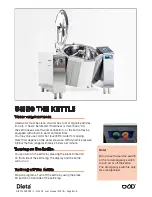
Page 4: ...ettle The kettle part may be hot Be extra careful when touching the inside of the kettle or the rim Be extra careful when opening the lid the steam is burning hot If you cook oil or sugar both the kettle and the food are very hot In addition the oil and sugar liquid can stick to the skin very easily Be extra careful when mixing hot liquids The food may spill if the mixing speed is too high Note Us...

Page 5: ...lay or the electric switches Service The service may be done only by authorized service personnel The service switch has to be locked before servicing Wait 5 minutes before touching the inverter Read the service manual Danger of electric shock Pressure vessel The kettle is a pressure vessel It is forbidden and dangerous to tamper the safety equipment The safety equipment has to be checked yearly b...

Page 6: ...musten mukainen Föremålet för försäkran ovan överensstämmer med den relevanta unionslagstiftningen om harmonisering The object of the declaration described above is in conformity with the relevant Union harmonisation legislation PED 2014 68 EU 2006 42 EY 2014 35 EU 2014 30 EU 2011 65 EU PED 2014 68 EU 2006 42 EG 2014 35 EU 2014 30 EU 2011 65 EU PED 2014 68 EU 2006 42 EC 2014 35 EU 2014 30 EU 2011 ...

Page 7: ...orkeintaan painelaitedirektiivin 2014 68 EU luokkaan I överensstämmer med tillämpliga bestämmelser i maskindirektivet 2006 42 EG och överensstämmer med bestämmelser i RoHS direktivet 2011 65 EU i EMC direktivet 2014 30 EU och i lågspänningsdirektivet 2014 35 EU och klassas högst i kategori I i tryckbärande anordning direktiv 2014 68 EU is in conformity with the relevant provisions of the Machinery...

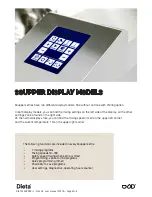
Page 8: ...er settings can be found on the right side On the normal display state you can find the mixing speed if set on the upper left corner and the current temperature C on the upper right corner The following functions are included in every Soupper kettle 7 mixing programs Mixing speeds 10 160 Safety speed mixing when kettle is tilted Programming space for 100 programs Quick programming timer Possibilit...

Page 9: ...ling target temperature can not be set Jacket has to be emptied manually before next cooking Optional food temperature control is installed The temperature is controlled with food temperature temperature can be set to 0 125 C Temperature display shows food temperature Possible chilling options CH2 Chilling Chilling is activated and deactivated by pressing the chilling button on the display Chillin...

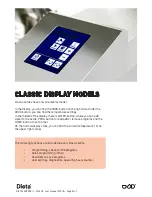
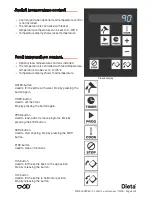
Page 10: ...iddle of the display there is WATER button where you can add water to the kettle PROG button to read add or remove programs and the TIMER button to set a timer On the normal display state you can find the current temperature C on the upper right corner The following functions are included in every Classic kettle Programming space for 100 programs Quick programming timer Possibility to save program...

Page 11: ...y shows food temperature Classic display WATER button Used to fill the kettle with water Stop by pressing the button again TIMER button Used to set the timer Stop by pressing the button again PROG button Used to read add or remove programs Stop by pressing the STOP button COOK button Used to start cooking Stop by pressing the STOP button STOP button Used to stop all functions TILT button Used to t...

Page 12: ... be filtered If hardness is more than 4 dH the kettle needs a soft water connection or the kettle may be equipped with a built in water softener filter You may only use cold or hot over 65 C water for cooking Water flow depens on the water pressure With dynamic pressure 3 8 bar the flow is approximately 25 liters per minute You can turn on the kettle by pressing the black 0 I button on frontside o...

Page 13: ...he the water starts to flow to the kettle Use the water button again to stop the water flow You can also use the water button when the kettle is tilted this is very helpful when cleaning the kettle Water measurement option If there is a water measurement option in the kettle the display shows the water volume liters in the upper right corner After the water flow is stopped the volume shows in the ...

Page 14: ...urement to add a selected amount of water in the kettle option Save cooking programs in the kettle memory This ensures same process day to day and leads to constant and secured food quality Use mixer tool attachments that are optimal for each recipe Right selection of tool can dramatically reduce process time Weigh that all ingredients are according to recipe Always heat with lid closed Use the fu...

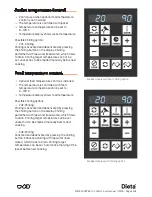
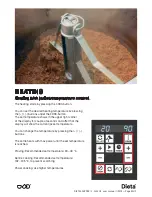
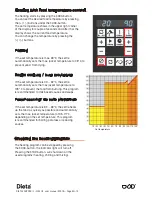
Page 15: ...n The set temperature shows in the upper right corner of the display for couple of seconds and after that the display will show the current jacket temperature You can change the temperature by pressing the buttons The kettle heats with max power until the set temperature is reached Proving Recommended set temperature 30 40 C Gentle cooking Recommended set temperature 102 105 C to prevent scorching...

Page 16: ...fter that the display shows the current food temperature You can change the temperature by pressing the buttons Proving If the set temperature is max 39 C the kettle automatically sets the max jacket temperature to 46 C to prevent yeast from dying Gentle cooking burn prevention If the set temperature is 40 92 C the kettle automatically sets the max jacket temperature to 105 C to prevent the food f...

Page 17: ...ratures inside the kettle The temperature is not even on every part of the kettle Without mixing the temperature differeneces may be up to 60 C The kettle heats up from the bottom and especially from the sides The kettle is hottest on the sides near the rim In the beginning of the heating the food temperature is lower on the bottom and in the middle of the kettle When continuing the cooking the te...

Page 18: ...m in the following order P1 P2 P3 P4 P5 P6 P7 P1 Forward only The most commonly used mixing program Suitable for almost everything for example you can use the higher speeds to make whipped cream Speeds 10 160 P2 Auto reverse Mushing program Suitable for example for making mashed potatoes Speeds 10 160 P3 Quick auto reverse Suitable especially for breaking up minced meat Speeds 10 100 P4 Slow auto ...

Page 19: ...button is in the bottom of the display You can use the safety speed mixing also when the kettle is tilted and the lid is open Safety speed mixing is also very useful after adding liquid to the food as the food spills very easily after the liquid is added Pressing the safety speed mixing button the mixer will run with factory set low speed 20 The mixing is forward only Mixing speeds After the mixin...

Page 20: ...food in the kettle until approximately 50 C after that it is recommended to remove the food from the kettle put it in GN trays and move to blast chiller Chilling consumes approximately 35 liters of water per minute the amount can vary a lot depending on the chilling option Chilling uses tap water so the temperature of the water can vary approximately from 8 to 16 C So usually the target temperatur...

Page 21: ...ing the buttons under the COOK button After the selection the set target temperature shows for couple of seconds in the upper right corner of the display After that the display shows the current food temperature The set temperature can be changed by pressing buttons Mixing while chilling It is very recommended to use the mixer while chilling The kettle chills only from the bottom and the sides of ...

Page 22: ...olds the temperature close to the desired temperature Chilling is stopped by pressing the CHILL button Chilling can also be stopped by pressing STOP button This also stops all other programs After the chilling the jacket has to be emptied manually does not concern CH3 chilling the emptying will be automatic The jacket is emptied by opening the emptying valve in front of the kettle Let all the wate...

Page 23: ...the tool combinations showed above for following Picture 1 Standard tool mixing hook Breaking up minced meat mixing masses e g bolognese Picture 2 Standard tool Mashed potatoes sauces Picture 3 Standard tool whipping grid Porridges quarks dessert creams whipped products Placing the tool to the kettle Place the center pillar to the kettle by lifting from the bigger handle For bigger kettles it is r...

Page 24: ...n Pic 3 You may also lift the tools as an assembly to the kettle If done this way it is very important that the assembly is lifted only from the bigger handle The smaller handle needs to be horizontal When the tool assembly is on its place lock it by placing also the bigger handle horizontal Removing the tool To remove tools as an assembly Lift only from the bigger handle Make sure the smaller han...

Page 25: ...hoose the additional settings for each function e g heating temperature 4 After you have selected all the functions and made the additional settings press the TIMER button Now you have to set the cooking time which starts to run after the set temperature is reached Set the time with the and buttons under the COOK button 5 After the cooking time is set activate the timer by pressing the TIMER butto...

Page 26: ...buttons under the COOK button Set the timer by pressing the TIMER button again 4 Press PROG button again to start the program The program will also start immediately if the timer has not been selected Make a new program Make a program and save it to memory 1 Press twice the PROG button display shows Add 2 Select a number for the program Pressing the button under the COOK button will show the first...

Page 27: ...ime for about 4 seconds The display will show PrOFILE 2 Press the PROG button The display will show Coo 95C Here you can change default setting for the cooking temperature which is suggested when the COOK button is pressed You can adjust the value by pressing the and buttons under the COOK button 3 Press the PROG button again The display will show ChiL 10C Here you can change the default setting f...

Page 28: ...gent Note the following before you start washing the kettle WATCH OUT FOR HOT SURFACES USE PROTECTIVE GLOVES IF THE KETTLE IS HOT OR IF THE DETERGENT IS IRRITABLE DO NOT SCRATCH THE KETTLE SURFACES DO NOT USE THE FORBIDDEN MATERIALS TO CLEAN THE KETTLE BE CAREFUL WITH THE CHEMICALS FOLLOW THE INSTRUCTIONS ON THE CHEMICAL PACKAGES WASHING THE KETTLE ...

Page 29: ...er or by hand You can wash the lid also on its place Kettle part washing by hand Watch out the kettle part may be hot Tilt the kettle to horizontal position If needed cool down the kettle with a water hose watch out the display until the kettle part is cooled down so that you can touch it Scrape all easily removable food from the kettle surface Rub the rest away using the brush and or the white sc...

Page 30: ...lume needed 40 80L kettle about 10 liters 100 200L kettle about 20 liters 300 470L kettle about 30 liters The less water used the better Set the kettle heating to 40 C and put the mixer on with the lowest speed Slowly increase the speed of the mixer until the foam almost reaches the rim Leave this mixing speed on for a while When the kettle part is cleaned stop the mixer tilt the kettle and rinse ...

Page 31: ...sappear The text will show up again in the next start up SERVICE To see the used hour meter start up the kettle and press the COOK button at the same time The display will show the used hours in total for example T 1234 This is the total amount of hours used for heating To see the used hours after the previous service Press the button under the COOK button The display will show the hours after pre...

Page 32: ...nder or in front of the kettle Call service if needed Mixer is not powerful enough Too much food Remove some food or try adding some liquid Too heavy food Remove some food Ice in the food Thaw frozen food properly before using them Call service if needed Mixer has stopped Overheating Wait 15 minutes and try again Inverter mixed up Turn off the kettle wait 3 minutes and then turn on again Make sure...

Page 33: ...before starting close the valve Quarterly maintenance Quarterly maintenance can be done by anyone if the kettle has optional water filter installed in the incoming water line Note chemical safety Perform daily start up inspection Perform decalcification and flushing the steam generator instructions on next page Scheduled maintenance Once a year or after 500 used hours Maintenance and repairs shoul...

Page 34: ... Start up the kettle Start heating The kettle fills the generator automatically If the decalcifier is to be used cold stop heating immediately when you hear the power relays to start heating or water filling to stop Otherwise let heat up to 70 90 C jacket temperature before stopping Let the liquid be in the kettle as long as recommended by the chemicals manufacturer The kettle is not harmed acid p...

Page 35: ...nt panel by loosening bolts in the front lower part of the kettle This allows you to see the pressure gauge and the switch for the safety unit valve test function 2 From the control panel turn on heating Set the temperature to 125 C 3 When the set temperature has been reached press the safety valve test switch until the safety valve is opened about 1 5 bar 127 C 4 Visually confirm from the kettle ...

Reviews: