background image

Service Manual


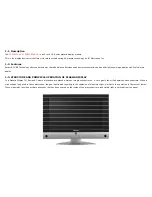
PDP(PLASMA DISPLAY PANEL)TV   

Panel Grade; HD Ready 

Buyer Model No.: DT-42D2 

Manufacturer Model No.: DPB-4260 


DIGITALDEVICE, INC 

Summary of Contents for DPB-4260

Page 1: ...Service Manual PDP PLASMA DISPLAY PANEL TV Panel Grade HD Ready Buyer Model No DT 42D2 Manufacturer Model No DPB 4260 DIGITALDEVICE INC...

Page 2: ...A DISPLAY 1 4 General Specification 1 5 Operation Environmental Conditions 1 6 Storage Environmental Conditions 1 7 Mechanical Test Conditions 1 8 Life Expectancy 2 Block Diagram 2 1 Basic Block Diagr...

Page 3: ...3 Structure and Principle Operation of PLASMA DISPLAY 1 4 General Specification 1 4 1 Specification 1 4 2 I O Description 1 5 Operation Environmental Conditions 1 6 Storage Environmental Conditions 1...

Page 4: ...th lively picture quality 1 3 STRUCTURE AND PRINCIPLE OPERATION OF PLASMA DISPLAY In a Plasma Display TV Row and Column electrodes are placed between two glass substrates A rare gas is then filled bet...

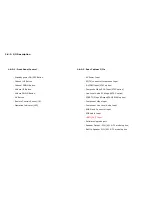
Page 5: ...1024 Horizontal 768 Vertical Input Analog RGB P HDMI DVI P RGB S Aspect Ratio 16 9 AV1 SCART VIDEO P RGB P L R S Pixel Pitch 900um H x 676um V AV2 SCART VIDEO P S VIDEO P L R S Color Arrangement RGB...

Page 6: ...r Cabinet I O s AC Power Input RF TV connector for antenna Input S VIDEO Input ATSC option Composite Video RCA Input ATSC option Line Level Audio RCA Input ATSC option SCART1 2 Input Output PAL SECAM...

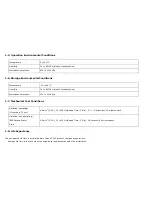
Page 7: ...1100 hPa 1 7 Mechanical Test Conditions Vibration operating Mounted in TV set 4 9m s2 0 5 G 10 to 55 Hz Sweep Time 2 Min X Y Z directions 10 minutes each Vibration non operating 5EA Packed State Drop...

Page 8: ...2 Block Diagram 2 1 Basic Block Diagram 2 2 Panel Block Diagram 2 3 MAIN AV Board Block Diagram...

Page 9: ...2 1 Basic Block Diagram POWER BOARD MAIN AV BOARD PANEL S5V 12V 5V 30V AC INPUT AC100 240V 50 60 Hz Relay ON VS ON Vs 180V 190V Va 55V 65V Vcc 5 25v DISPLAY...

Page 10: ...Controller Driver Timing Controller Scan Driver Address Driver Color Plasma Display Panel 852 X 480 Pixels Common Sustain Driver Display Data Driving Display Data LVDS Input RA RA RB RB RC RC RD RD R...

Page 11: ...3 Assembling 3 1 Assembly Diagram 3 1 1 DPB 4260 Front Assembly 3 2 Part Name 3 2 1 Screw Part Name 3 2 2 Cable List...

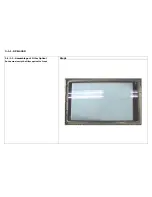
Page 12: ...3 1 1 DPB 4260 Step1 3 1 1 1 Assemblage of Filter Optical Put down slowly the filter optical to front...

Page 13: ...Step1 3 1 1 2 Assemblage Front Retainer There s are 4 retainer Left Right Top Bottom Use the screw No 5 Screw Point...

Page 14: ...semblage of Left Right Speaker Unit Step1 Assemblage of Left Speaker Unit Use the screw No 13 speaker terminal is Left position Step2 Assemblage of Right Speaker Unit Use the screw No 13 speaker termi...

Page 15: ...Step 1 Step2 Step3 3 1 1 4 Assemblage of LED IR Step 1 Assemble Window deco Use the screw No 5 Step 2 Assemble Front Deco at Front Use the screw No 15 Step 3 Assemble LED IR Board Use the screw No 14...

Page 16: ...panel there are 2 guiding holes 2 Locating Fixing Mount bracket Use the screw No 12 There are 8 Screw Point 3 Locating fixing Stand bracket Use the screw No 3 There are 8 Screw Point 4 Locating fixin...

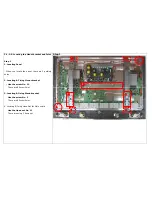
Page 17: ...Screw No 4 2 Use the Screw No 12 Step 1 3 1 2 11 Fixing the main board and Connecting the LVDS cable Step 1 Connect the LVDS cable to the main board Loc No CON16 There is a CON16 on the back of the m...

Page 18: ...VDS cable to the digital board of the panel Loc No P1 Digital board Step 3 Locate and fix the main board In case of the LG42 HD panel Step 2 2 Connect the LVDS cable to the digital board of the panel...

Page 19: ...er cable Part Name DD 42KK JMP 3 1 2 13 Connecting the power cables to the power board 1 Connect the power 4P 4P cable Loc No CN802 Power board Loc No CON31 Main board Power 4P cable Part Name DD42NR0...

Page 20: ...d Loc CON25 Main board Step 2 3 Assemble Key Knob Key Board Use the screw No 13 Step 4 5 Connect the key_led_ir cable to Key Board Loc CON25 Main board Loc WO2 KEY board 8P after assemble Key cable th...

Page 21: ...Step 1 3 1 2 19 DPB 4260 Assemblage of rear Shield Step1 Locating and fixing rear shield Use Screw No 6...

Page 22: ...right bottom 3 1 2 20 DPB 4260 Assemblage of rear Shield Step2 Locating and fixing rear shield Use Screw No 5 Step3 Locating and fixing rear shield Use Screw No 5 Step4 Locating and fixing rear shiel...

Page 23: ...Step1 3 1 2 21 DPB 4260 Assemblage of Rear Cover Step1 Use Screw No 7 Use Screw No 15 Use screw No 4...

Page 24: ...diameter length NO 2 TOP TITE PAN HEAD T T BP 3 6 NO 3 MACHINE SCREW WASHER PAN HEAD WP 4 8 BLACK NO 4 MACHINE SCREW WASHER PAN HEAD WP 3 6 BLACK N0 5 TOP TITE PAN HEAD T T BP 4 8 N0 6 MACHINE SCREW P...

Page 25: ...SCREW PAN HEAD EXTERNAL TEETH WASHER T T CT BB 4 10 N0 10 HEXA NUT HEXA NUT N0 11 HEXA NUT HEXA NUT 15mm N0 12 TOP TITE PAN HEAD T T BP 4 12 N0 13 TOP TITE PAN HEAD T T BP 3 8 N0 14 TOP TITE PAN HEAD...

Page 26: ...3 DD42NR04401 4P 1 CN802 POWER B D CON31 MAIN B D 4 DD42NR07501 7P 1 CN801 POWER B D CON18 MAIN B D 5 DD42NR12501 12P 1 CN803 POWER B D CON36 MAIN B D POWER B D 6 DD42CO31301 31P 1 CON16 MAIN B D P1...

Reviews: