background image

-1-

•  Be sure to check that the PL unit's power is disconnected before installing

the PL-HD110 in the PL in order to prevent electrical shock.

•  Do not attempt to modify or open the PL-HD110, due to the danger of

shock or fire.

•  When installing the PL-HD110, be sure to read this document's  “2. Instal-

lation” section  completely to insure that the unit is correctly installed.

To Prevent Accidents

•  Since the PL-HD110 is a precision instrument, be sure it is neither hit by

nor pressed strongly against another object. After unpacking, be sure the
unit is not dropped or jolted during installation. Also, when a PL contain-
ing a preinstalled PL-HD110 is built in to a larger unit (i.e. an operation
panel) , the PL-HD110 should be removed from the PL and packed sepa-
rately prior to shipping the larger unit.

•  Be sure water, liquids or metal particles are not allowed to enter the unit.

Any of these may cause either a breakdown or an electrical shock.

•  Do not place or store this unit in a location where there is direct sunlight,

excessive heat, dust or vibration.

•  Do not store or operate this unit near chemicals, or where there are chemi-

cal fumes.

Warning - Safety Precautions

This hard disk unit is made by the Digital Electronics Company for use with
its Panel Computer Series (which is hereafter referred to as the " PL") device
unit. This unit is provided as a replacement unit for maintenance.

Corresponding Product: PL-6700 Series Units
All product names used in this document are the trademarks of their respective
manufacturers.
Proface: Digital Electronics Corporation
MS-DOS, Windows: Registered trademarks of the Microsoft Corporation

  PL-HD110

Operation Instructions

!!!!!

Summary of Contents for PL-HD110

Page 1: ...rom the PL and packed sepa rately prior to shipping the larger unit Be sure water liquids or metal particles are not allowed to enter the unit Any of these may cause either a breakdown or an electrical shock Do not place or store this unit in a location where there is direct sunlight excessive heat dust or vibration Do not store or operate this unit near chemicals or where there are chemi cal fume...

Page 2: ...lems or damage have occurred during shipping please contact your Digital representative imme diately for service Do not attempt to exchange the PL HD110 with a new unit while the PL is in operation Do not use the PL in areas containing inert gasses They can lead to an HDD malfunction The PL HD110 has a finite usage lifetime Therefore be sure to back up all HDD data regularly or use a backup HDD un...

Page 3: ...sage and surrounding environment which may either lengthen or shorten the figure given here This figure is for reference purposes only Memory Capacity 2 1Gbytes Sector Size 512 bytes No of Disks 1 No of Logic Heads 2 No of User Cylinders 9280 Seek Time 13msec TYP At Startup 4 7W TYP Power Consumption Read Write 2 0W 2 1W TYP During Wait 0 3W TYP Interface E IDE Lifetime 5 years or 20 000 operating...

Page 4: ... suitable magnetic media is strongly recom mended This HDD has a finite usage lifetime The lifetime figure given in this document s Performance Specifi cations is for reference and the regular exchanging of the current HDD unit for a new HDD unit is strongly advised Operating Temperature 5 to 40 o C Storage Temperature 10 to 60 o C Ambient Humidity 30 to 85 no condensation Noise Resistance Noise V...

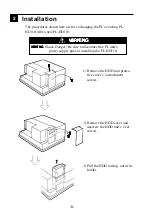
Page 5: ...DD unit protec tive cover s 2 attachment screws 2 Remove the HDD cover and unscrew the HDD unit s 2 set screws 3 Pull the HDD unit up out of its holder WARNING WARNING WARNING WARNING WARNING WARNING WARNING WARNING WARNING WARNING Shock Danger Be sure to disconnect the PL unit s power supply prior to installing the PL HD110 ...

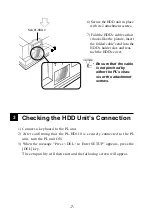
Page 6: ...ctions given here carefully X X Be sure the hard disk unit cable s connector is not skewed from its correct attachment position due to attaching the new PL HD110 A loose connection can cause damage to the unit 4 Disconnect the old PL HD110 unit from the HDD connection cable Be sure not to bend any of the HDD s connector pins while removing the cable s connector 5 Reattach the connection cable to t...

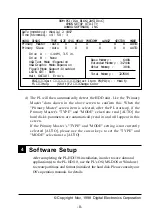
Page 7: ...e sure that the cable is not pinched by either the PL s chas sis or the attachment screws 3 Checking the HDD Unit s Connection New PL HD110 1 Connect a keyboard to the PL unit 2 After confirming that the PL HD110 is securely connected to the PL unit turn the PL unit ON 3 When the message Press DEL to Enter SETUP appears press the DEL key The setup utility will then start and the following screen w...

Page 8: ...MODE Primary Master Auto 0 0 0 0 0 0 AUTO Primary Slave Auto 0 0 0 0 0 0 AUTO Base Memory 640K Extended Memory 31744K Other Memory 384K Total Memory 32768K ESC Quit Select Item PU PD Modify F1 Help Shift F2 Change Color ROM PCI ISA BIOS 2A5IIU1C CMOS SETUP UTILITY AWARD SOFTWARE INC 4 The PL will then automatically detect the HDD unit Use the Primary Master data shown in the above screen to confir...

Reviews: