background image

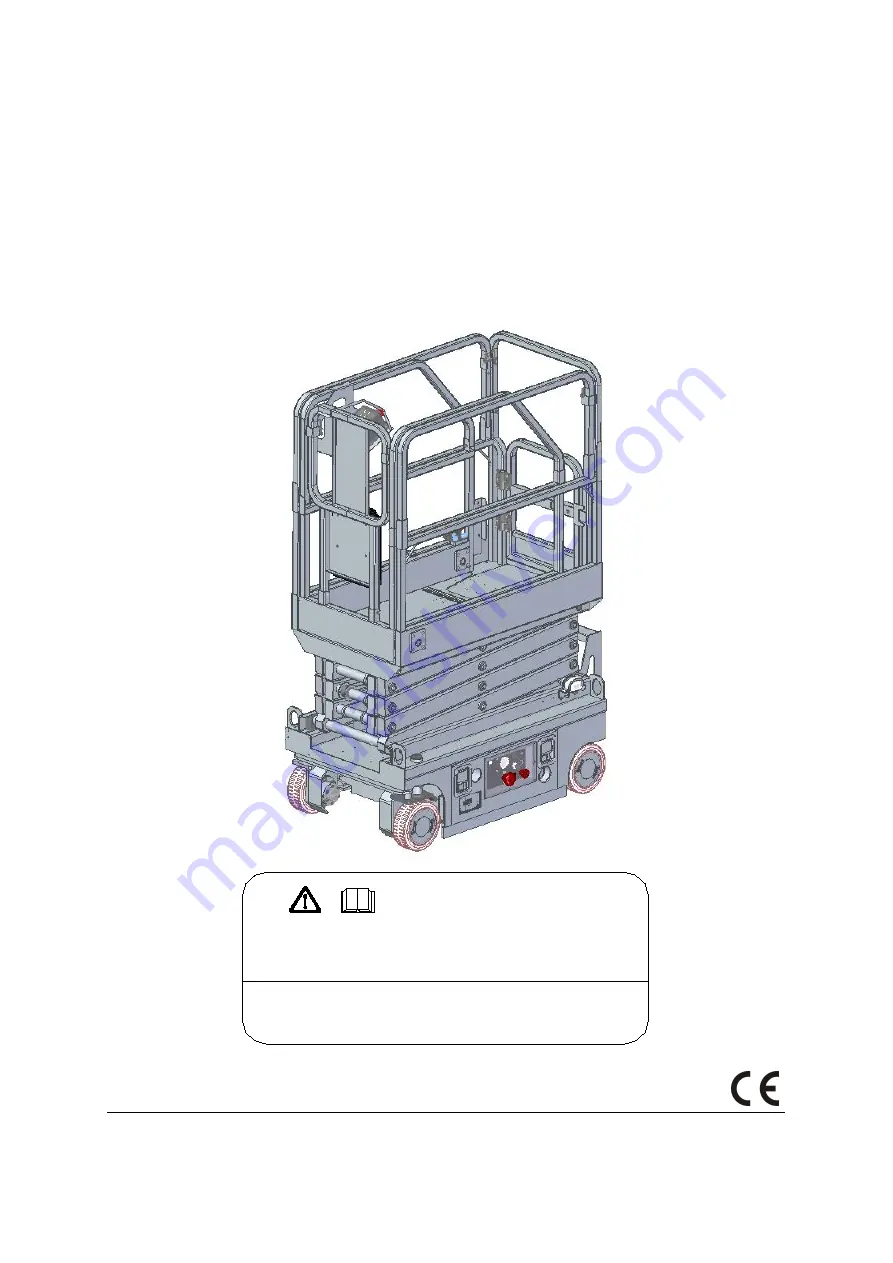
SELF-PROPELLED SCISSOR LIFTS

OPERATOR’S MANUAL

with Maintenance Information

( For S036-RS )

Part Number: SM0115111A_Rev3.0

Zhejiang Dingli Machinery Co., Ltd.

Third Edition, March 2021 Printing

WARNING

THE MANUFACTURER SHALL NOT BE HELD LIABLE IN CASE OF FAULTS

OR ACCIDENTS DUE TO NEGLIGENCE, INCAPACITY, INSTALLATION BY

UNQUALIFIED TECHNICIANS AND IMPROPER USE OF THE MACHINE

DO NOT OPERATE THIS MACHINE UNTIL YOU READ AND UNDERSTAND

ALL THE DANGERS,WARNINGS AND CAUTIONS IN THIS MANUAL

Summary of Contents for S036-RS

Page 1: ...inery Co Ltd Third Edition March 2021 Printing WARNING THE MANUFACTURER SHALL NOT BE HELD LIABLE IN CASE OF FAULTS OR ACCIDENTS DUE TO NEGLIGENCE INCAPACITY INSTALLATION BY UNQUALIFIED TECHNICIANS AND IMPROPER USE OF THE MACHINE DO NOT OPERATE THIS MACHINE UNTIL YOU READ AND UNDERSTAND ALL THE DANGERS WARNINGS AND CAUTIONS IN THIS MANUAL ...

Page 2: ...aintenance Information Version of the Record i Version of the Record Version Number Create Date SM0115111A_Rev1 0 2015 11 SM0115111A_Rev2 0 2017 02 SM0115111A_Rev2 1 2017 11 SM0115111A_Rev2 2 2018 09 SM0115111A_Rev3 0 2021 02 ...

Page 3: ......

Page 4: ...0 Owners Users and operators We appreciate your choice of our machine for your application Our number one priority is user safety which is best achieved by our joint efforts We feel that you make a major contribution to safety if you as the equipment users and operators 1 Comply with employer job site and governmental rules 2 Read understand and follow the instructions in this and other manuals su...

Page 5: ......

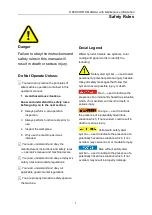
Page 6: ... understand and obey all applicable governmental regulations You are properly trained to safely operate the machine Decal Legend DINGLI product decals use symbols color coding and signal words to identify the following Safety alert symbol used to alert personnel to potential personal injury hazards Obey all safety messages that follow this symbol to avoid possible injury or death Red used to indic...

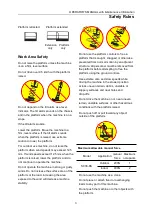
Page 7: ...tact with or proximity to electrical current Maintain safe distances from electrical power lines and apparatus in accordance with applicable governmental regulations and the following chart Voltage Phase to Phase Minimum Safe Approach Distance Meters 0 to 300V Avoid Contact 300V to 50kV 3 05 50kV to 200kV 4 60 200kV to 350kV 6 10 350kV to 500kV 7 62 500kV to 750kV 10 67 750kV to 1000kV 13 72 Allow...

Page 8: ...y winds Do not increase the surface area of the platform or the load Increasing the area exposed to the wind will decrease machine stability Do not use the platform controls to free a platform that is caught snagged or otherwise prevented from normal motion by an adjacent structure All personnel must be removed from the platform before attempting to free the platform using the ground controls Use ...

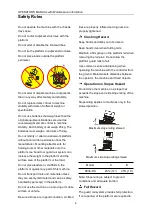
Page 9: ...not place ladders or scaffolds in the platform or against any part of this machine Do not transport tools and materials unless they are evenly distributed and can be safely handled by person s in the platform Do not use the machine on a moving or mobile surface or vehicle Be sure all tires are in good condition air filled tires are properly inflated and lug nuts are properly tightened Crushing Haz...

Page 10: ... possible hazards Be aware of crushing hazards when grasping the platform guard rail Operators must comply with employer job site and governmental rules regarding use of personal protective equipment Observe and use color coded direction arrows on the platform controls for drive and steer functions Do not operate a machine in the path of any crane or moving overhead machinery unless the controls o...

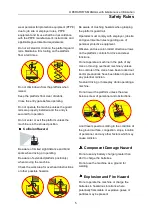
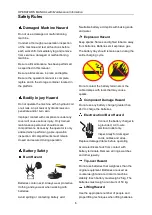
Page 11: ...rd Batteries contain acid Always wear protective clothing and eye wear when working with batteries Avoid spilling or contacting battery acid Neutralize battery acid spills with baking soda and water Explosion Hazard Keep sparks flames and lighted tobacco away from batteries Batteries emit explosive gas The battery tray should remain open during the entire charging cycle Do not contact the battery ...

Page 12: ...ion firm level surface clear of obstruction and traffic 2 Lower the platform 3 Turn the key switch to the off position and remove the key to secure from unauthorized use 4 Push in the red Emergency Stop buttons to off position 5 Push in the main power switch to off position 6 Chock the wheels 7 Charge the batteries ...

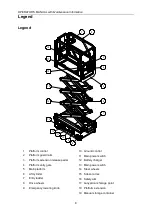
Page 13: ...orm entry gate 5 Main platform 6 Lift cylinder 7 Entry ladder 8 Drive wheels 9 Emergency lowering knob 10 Ground control 11 Main power switch 12 Battery charger 13 Main power switch 14 Steer wheels 15 Scissor arms 16 Safety arm 17 Lanyard anchorage point 18 Platform extension 19 Manual storage container 18 2 1 4 5 6 7 8 12 16 15 13 14 17 3 9 10 11 ...

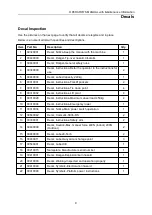
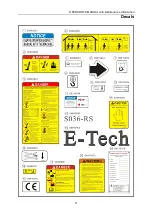
Page 14: ...09310003 Decal Instructions Tie down point 4 8 09310002 Decal Instructions Lift point 4 9 09310028 Decal Instructions Maximum wheel load 450kg 4 10 09310004 Decal Instructions Emergency lower 1 11 09310034 Decal Notice Main power switch operation 1 12 09640042 Decal Cosmetic S036 RS 2 13 09330001 Decal Instructions Safety arm 2 14 09440009 Decal Caution Max manual force 400N Indoor 200N Outdoor 2 ...

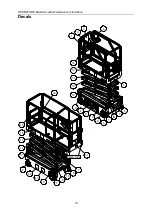
Page 15: ...OPERATOR S MANUAL with Maintenance Information Decals 10 14 12 15 14 1 2 3 4 5 6 7 8 6 7 8 11 10 9 4 9 13 12 15 16 13 16 16 17 18 19 20 7 8 7 8 9 9 Safety tape ...

Page 16: ...OPERATOR S MANUAL with Maintenance Information Decals 11 ...

Page 17: ...platform Standard Maximum hydraulic pressure functions 155 bar System voltage 24 V Tire size Φ230 80 mm Airborne noise emissions 70 dB Maximum sound level at normal operating workstations A weighted Vibration value does not exceed 2 5m s2 Maximum slope rating Stowed position 25 Maximum side slope rating Stowed position 25 Note Slope rating is subject to ground conditions and adequate traction Maxi...

Page 18: ...on and the machine will be off Turn the key switch to the ground position and the ground controls will operate 5 Brake release switch Press this switch to ON position to activate the brake release function Press this switch to OFF position to turn off the brake release function 6 Platform up down switch Move the switch up and the platform will raise Move the switch down and the platform will lower...

Page 19: ...4 Platform Control Panel 1 Thumb rocker switch 2 Drive function select button 3 Drive speed button 4 Red Emergency Stop button 5 LED readout screen 6 Horn button 7 Lift function select button 8 Proportional control handle 9 Function enable switch 1 2 3 4 9 8 7 6 5 ...

Page 20: ...ivate the lift function 8 Proportional control handle Lift function Press and hold the function enable switch to enable the lift function on the platform control handle Move the control handle in the direction indicated by the blue arrow and the platform will raise Move the control handle in the direction indicated by the yellow arrow and the platform will lower The descent alarm should sound whil...

Page 21: ...discover if anything is apparently wrong with a machine before the operator performs the function tests The pre operation inspection also serves to determine if routine maintenance procedures are required Only routine maintenance items specified in this manual may be performed by the operator Refer to the list on the next page and check each of the items If damage or any unauthorized variation fro...

Page 22: ...d manifolds Battery pack and connections Drive motors Wear pads Tires and wheels Ground strap Limit switches alarm beacon and Rotary sensor Nuts bolts and other fasteners Platform overload components Platform entry gate Safety arm Platform extension s Scissor pins and retaining fasteners Platform control joystick Brake release components Pothole guard Check entire machine for Cracks in welds or st...

Page 23: ... if the workplace is suitable for safe machine operation It should be performed by the operator prior to moving the machine to the workplace It is the operator s responsibility to read and remember the workplace hazards then watch for and avoid them while moving setting up and operating the machine Workplace Inspection Be aware of and avoid the following hazardous situations Drop offs or holes Bum...

Page 24: ... machine as it was intended Fundamentals The function tests are designed to discover any malfunctions before the machine is put into service The operator must follow the step by step instructions to test all machine functions A malfunctioning machine must never be used If malfunctions are discovered the machine must be tagged and removed from service Repairs to the machine may only be made by a qu...

Page 25: ...eeps per minute An optional automotive style horn is also available 10 Turn the key switch to off or platform position 11 Move up and hold the platform up down switch Result No function should operate 12 Turn the key switch to ground control position 13 Move up and hold the platform up down switch Result The platform should raise 14 Move down and hold the platform up down switch Result The platfor...

Page 26: ...rrow on the control panel Result The steer wheels should turn in the direction that the yellow right arrow points on the control panel Test Drive and Braking 32 Press the drive function select button The indicator light should turn on 33 Press and hold the function enable switch on the control handle 34 Slowly move the control handle in the direction indicated by the blue arrow on the control pane...

Page 27: ... to continue to function If the pothole guards do not deploy an alarm sounds and the machine will not drive and lift 47 Raise the platform Result When the platform is raised approximately 1 3 m from the ground the pothole guards should deploy 48 Press on the pothole guards on one side and then the other Result The pothole guards should not move 49 Lower the platform Result The pothole guards shoul...

Page 28: ...round level and can be used to reach work areas located above and over machinery or equipment The Operating Instructions section provides instructions for each aspect of machine operation It is the operator s responsibility to follow all the safety rules and instructions in the operator s manual Using the machine for anything other than lifting personnel along with their tools and materials to an ...

Page 29: ...2 Press and hold the function enable switch on the control handle 3 Move the control handle according to the markings on the control panel To Steer 1 Press the drive function select button 2 Press and hold the function enable switch on the control handle 3 Turn the steer wheels with the thumb rocker switch located on the top of the control handle To Drive 1 Press the drive function select button 2...

Page 30: ... Example Run 3 6 m Rise 0 3 m 0 3 m 3 6 m 0 083 100 8 3 If the slope exceeds the maximum slope or side slope rating the machine must be winched or transported up or down the slope See Transport and Lifting section Operation from Ground with Controller Maintain safe distances between operator machine and fixed objects Be aware of the direction the machine will travel when using the controller Batte...

Page 31: ...ar step or from the ground remove the left rear main deck wire lock pins 10 Fold down the left rail assembly Keep hands clear of pinch points 11 Replace the removed pin back into rear rail bracket 12 Remove the right rear main deck wire lock pins 13 Fold down the right rail assembly Keep hands clear of pinch points 14 Replace the removed pin back into rear rail bracket 15 Fold down the rear rail a...

Page 32: ...35 Pressure Sensor 2 Fault Disables All Motion 36 Low Battery Alert Disable Lifting and fast speed Driving 42 Platform Left Turn Switch ON at power up Message Warning Only 43 Platform Right Turn Switch ON at power up Message Warning Only 46 Platform Joystick Enable Switch ON at power up Fault Disable Platform Control 47 Platform Joystick not in neutral at power up Message Warning Only 52 Drive For...

Page 33: ...troller Dependent 76 Motor Controller Left Drive Motor Fault Controller Dependent 77 Motor Controller Right Drive Motor Fault Controller Dependent 78 Pump Motor Short Fault Disable Lifting and Driving 79 Left Drive Motor Short Fault Disable Lifting and Driving 80 Over 80 Load Warning Warning Only 81 Right Drive Motor Short Fault Disable Lifting and Driving 82 Left Brake Coil Fault Disable Lifting ...

Page 34: ...and then the sensor itself Also check to make sure that the correct option is properly selected or not for load sensing 36 Low Voltage Alert Check battery voltage and charge batteries if necessary 42 Platform Left Turn Switch ON at power up Message Ensure that nothing is holding the Joystick Toggle Switches down If OK consider replacing the Joystick or PCU 43 Platform Right Turn Switch ON at power...

Page 35: ... the Motor Controller 63 Motor Controller Motor Output fault Check wiring first then cycle power If needed replace controller 64 Motor Controller SRO Fault Look at motor enable delay with the Dingli Scissor Programmer it may be too short Make sure other Motor Controller parameters are properly selected 65 Motor Controller Throttle Fault Check wiring Make sure the correct throttle type is selected ...

Page 36: ... resolve the issue replace the Motor Controller 78 Pump Motor Short Fault Check connections to the pump motor Cycle power to the lift and if that does not resolve the issue replace the Motor Controller 79 Left Drive Motor Short Fault Check the Motor connections and make sure they are tight Check the Motor for a short 80 Over 80 Load Warning Platform is getting close to its limit of weight Consider...

Page 37: ...ight Motor Field Short Check connections of the field wires or leakage to the vehicle frame 99 Over 99 Load Warning Platform has reached its limit of weight Do not add more load OL Overloaded Platform Fault Remove the excess load immediately LL Machine Tilted Beyond Safe Limits Fault If the machine is tilted find a way to make it level If the machine is level check the wiring to the tilt sensor an...

Page 38: ...e plates Do not overfill prior to the charge cycle 6 Replace the battery vent caps 7 Connect the battery charger to a grounded AC circuit 8 The charger will indicate when the battery is fully charged 9 Check the battery acid level when the charging cycle is complete Replenish with distilled water to the bottom of the fill tube Do not overfill Dry Battery Filling and Charging Instructions 1 Remove ...

Page 39: ...the machine on a slope that exceeds the slope or side slope rating See Driving on a Slope in the Operating Instructions section If the slope of the transport vehicle bed exceeds the maximum slope rating the machine must be loaded and unloaded using a winch as described Brake Release Operation 1 Chock the wheels to prevent the machine from rolling 2 Pull out the platform and ground red Emergency St...

Page 40: ... Use chains or straps of ample load capacity If the railings have been folded down secure them with straps before transporting Lifting the Machine with a Forklift Be sure the extension deck controls and component trays are secure Remove all loose items on the machine Fully lower the platform The platform must remain lowered during all loading and transport procedures Use the forklift pockets locat...

Page 41: ...ch type of scheduled inspection Make copies of the Pre delivery Preparation report to use for each inspection Store completed forms as required Maintenance Schedule There are five types of maintenance inspections that must be performed according to a schedule daily quarterly semi annually annually and two year The Scheduled Maintenance Procedures Section and the Maintenance Inspection Report have ...

Page 42: ...hall be performed by qualified service technicians according to the manufacturer s specifications and the requirements listed in this manual Instructions Use the operator s manual on your machine The Pre delivery Preparation consists of completing the Pre operation Inspection the Maintenance items and the Function Tests Use this form to record the results Place a check in the appropriate box after...

Page 43: ...n how to perform these inspections If any inspection receives an N tag and remove the machine from service repair and re inspect it After repair place a check in the R box Legend Y yes acceptable N no remove from service R repaired Checklist A Y N R A 1 Inspect the manuals and decals A 2 Pre operation inspection A 3 Check the Batteries A 4 Check the Hydraulic Oil Level A 5 Function tests Perform a...

Page 44: ...e that the operator s manual is present and complete in the storage container on the platform 2 Examine the pages of manual to be sure that they are legible and in good condition Result The operator s manual is appropriate for the machine and the manual are legible and in good condition Result The operator s manual is not appropriate for the machine or the manual is not in good condition or is ill...

Page 45: ... A 3 Check the Batteries Proper battery condition is essential to good machine performance and operational safety Improper fluid levels or damaged cables and connections can result in component damage and hazardous conditions Electrocution hazard Contact with hot or live circuits may result in death or serious injury Remove all rings watches and other jewelry Bodily injury hazard Batteries contain...

Page 46: ...stick out again and check the oil level 3 If the hydraulic oil level is too low and add new hydraulic oil to the prescribed level Original Hydraulic oil specifications L HV46 Customers shall choose the appropriate hydraulic oil according to the ambient temperature used Example L HV32 or L HV68 A 5 Perform Function Tests Completing the function tests is essential to safe machine operation Function ...

Page 47: ...30 day maintenance procedure is a one time procedure to be performed after the first 30 days or 40 hours of usage After this interval refer to the maintenance tables for continued scheduled maintenance Perform the following maintenance procedures B 3 Inspect the Tires Wheels and lock Nut Torque ...

Page 48: ...e performing this procedure to allow the battery cells to equalize Models without maintenance free or sealed batteries 6 Remove the battery vent caps and check the specific gravity of each battery cell with a hydrometer Note the results 7 Check the ambient air temperature and adjust the specific gravity reading for each cell as follows Add 0 004 to the reading of each cell for every 5 5 C above 26...

Page 49: ...at the batteries are wired correctly 14 Inspect the battery charger plug and pigtail for damage or excessive insulation wear Replace as required 15 Connect the battery charger to a properly grounded 110 230V 50 60 Hz single phase AC power supply Result The charger should operate and begin charging the batteries Result If simultaneously the charger alarm sounds and the LEDs blink correct the charge...

Page 50: ...ch to ground control and pull out the red Emergency Stop button to the on position at both the ground and platform controls 4 Raise the platform until the distance of the two sets of scissor at least 0 4m 5 Lift the safety arm move it to the center of the scissor arm and rotate down to a vertical position 6 Lower the platform until the safety arm rests securely on the link Keep clear of the safety...

Page 51: ...ly functioning Emergency Stop is essential for safe machine operation An improperly operating red Emergency Stop button will fail to shut off power and stop all machine functions resulting in a hazardous situation As a safety feature selecting and operating the ground controls will override the platform controls except the platform red Emergency Stop button 1 Turn the key switch to ground control ...

Page 52: ...form control 3 Check the platform up down function from the ground controls Result The machine functions should not operate 4 Turn the key switch to ground control 5 Check the machine functions from the platform controls Result The machine functions should not operate 6 Turn the key switch to the off position Result No function should operate B 6 Test the Automotive style Horn if equipped DINGLI r...

Page 53: ... out the red Emergency Stop button to the on position at both the ground and platform controls 3 Lower the platform to the stowed position 4 Press the drive function select button 5 Choose a point on the machine i e contact patch of a tire as a visual reference for use when crossing the test line 6 Bring the machine to top drive speed before reaching the test line Release the function enable switc...

Page 54: ...int on the machine passes over the finish line The time is less than 11 sec B 9 Test the Drive Speed Raised Position DINGLI requires that this procedure be performed every 250 hours or quarterly whichever comes first Proper drive functions are essential to safe machine operation The drive function should respond quickly and smoothly to operator control Drive performance should also be free of hesi...

Page 55: ...h of a tire as a visual reference for use when crossing the start and finish lines 6 Bring the machine to top drive speed before reaching the start line Begin timing when your reference point on the machine crosses the start line 7 Continue at full speed and note the time when your reference point on the machine passes over the finish line The time is less than 22 sec B 11 Perform Hydraulic Oil An...

Page 56: ...he cap Proceed to step 3 Note When checking for positive tank cap venting air should pass freely through the cap 3 Using a mild solvent carefully wash the cap venting system Dry using low pressure compressed air Repeat step 2 4 Install the breather cap onto the hydraulic tank B 13 Check the Module Tray slider Components DINGLI requires that this procedure be performed every 250 hours or quarterly ...

Page 57: ...platform capacity in the center of the platform floor Result The overload alarm at the platform controls should not sound indicating a normal condition Result The overload alarm at the platform controls sounds Calibrate the platform overload system 4 Add an additional weight to the platform not to exceed 20 of the maximum rated load Result The overload alarm at the platform controls sound indicati...

Page 58: ... hours or semi annually whichever comes first The hydraulic tank is a vented type tank The breather cap has an internal air filter that can become clogged or over time can deteriorate If the breather cap is faulty or improperly installed impurities can enter the hydraulic system which may cause component damage Extremely dirty conditions may require that the cap be inspected more often 1 Remove an...

Page 59: ...sition 1 Measure the distance between the number one arm cross tube and the chassis deck at the left side of the steer end of the machine Result The measurement is 22 mm or more Proceed to step 2 Result The measurement is less than 22 mm Replace both wear pads a wear pad b arm cross tube c chassis deck 2 Measure the distance between the number one arm cross tube and the chassis deck at the right s...

Page 60: ...e and remove the line from the pump Cap the fitting on the pump 4 Tag and disconnect the electric wires from the motor 5 Loose the bolt and remove the hydraulic power pack form the tray 6 Remove the oil drain plug at bottom 7 Drain all of the oil into a suitable container 8 Loose and remove the bolts and separate the tank from the pump body Bodily injury hazard Spraying hydraulic oil can penetrate...

Page 61: ...nce Information Maintenance 56 Component damage hazard The pump can be damaged if operated without oil Be careful not to empty the hydraulic tank while in the process of filling the hydraulic system Do not allow the pump to cavitate ...

Page 62: ...ANUAL with Maintenance Information Schematic 57 Hydraulic Schematic Lift Cylinder Flat overload Option 1 5mm 1 0mm 1 0mm Overflow 110bar Overflow 155bar Motor Filter Tank C B A Steer Cylinder Pump unit Lower valve ...

Page 63: ... RD 20 B A RD 13 B Z RD 20 5C WH 20 8C WH 20 JUMP WH 20 7A WH 20 6C WH 20 8A WH 20 9A WH 20 4C WH 20 BK 5 BK 5 010A RD 20 010A RD 20 3 010A RD 20 2 010A RD 20 1 010A RD 20 4 14 GND BK 20 GND BK 20 GND BK 20 6 13 15 GND BK 20 GND BK 20 GND BK 20 4 12C WH 20 6 12C WH 20 A12 WH 20 12 10B WH 20 10B WH 20 5B WH 20 A12 WH 20 GND BK 20 010B RD 20 BK 5 WH 20 WH 20 BU 20 16 10 WH 20 GN 20 RD 20 BK 20 BK 20...

Page 64: ...OPERATOR S MANUAL with Maintenance Information Inspection and Repair Log 59 Inspection and Repair Log Date Comments ...

Reviews: