background image

www.tsicustomerservice.com

REV-0

1

www.tsicustomerservice.com

Distributed by • Distribuido por • Distribué par • Twin-Star International, Inc; Delray Beach, FL 33445

Made in China • Printed in China • Fabricado en China • Impreso en China • Fabriqué en China • Imprimé en Chine

Warning: This is an unvented, electric appliance. 

DO NOT attempt to burn wood or manufactured 

firelogs in or on this appliance or grate.

Advertencia: Este es un aparato eléctrico sin 

ventilación. NO intente quemar leños fabricados ni 

madera dentro o sobre este aparato o su parrilla.

Avertissement : Il s’agit d’un appareil électrique 

non ventilé. NE PAS tenter de faire brûler du bois 

ou des bûches fabriquées dans l’appareil ou sur 

la grille.

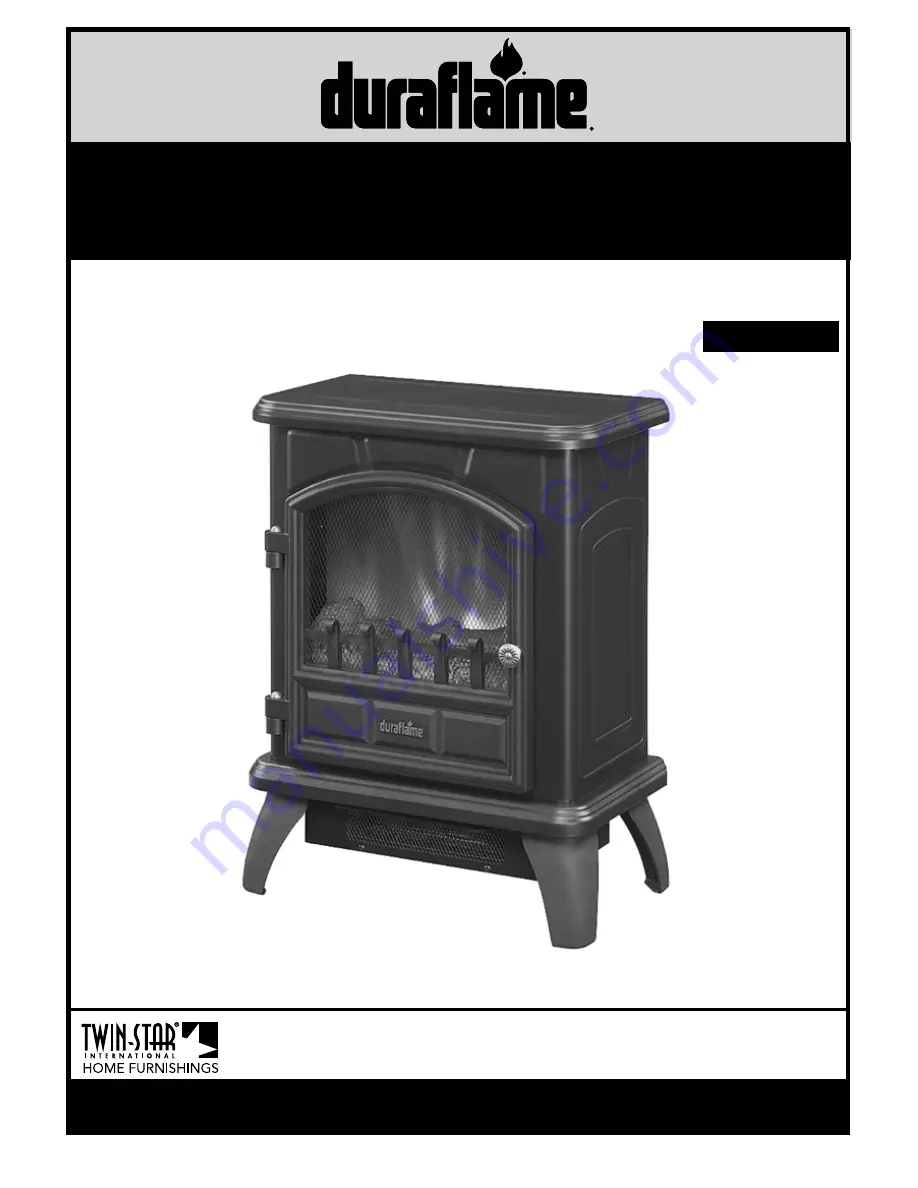
MODEL/ MODELE/ MODELO:

DFS-500-4

Español P.11

Summary of Contents for DFS-500-4

Page 1: ...This is an unvented electric appliance DO NOT attempt to burn wood or manufactured firelogs in or on this appliance or grate Advertencia Este es un aparato eléctrico sin ventilación NO intente quemar leños fabricados ni madera dentro o sobre este aparato o su parrilla Avertissement Il s agit d un appareil électrique non ventilé NE PAS tenter de faire brûler du bois ou des bûches fabriquées dans l ...

Page 2: ......

Page 3: ...will not be tripped over 11 To disconnect this appliance turn controls to the off position then remove plug from outlet 12 Do not insert or allow foreign objects to enter any ventilation or exhaust opening as this may cause an electric shock or fire or damage the appliance 13 To prevent a possible fire do not block air intakes or exhaust in any manner Do not use on soft surfaces like a bed where o...

Page 4: ...PARA LOS DETALLES DEL SERVICIO VOIR LE MANUEL DU PROPRIÉTAIRE POUR LES DÉTAILS DÉBRANCHEZL APPAREILAVANTDENETTOYEROU TEMPÉRATUREÉLEVÉE RISQUEDEFEU GARDEZLES AVERTISSEMENT AVERTISSEMENT TIBLESÀAUMOINS0 9M 3PIEDS DELAPARTIEFRONTALEDEL APAREILDE RISQUE DE CHOC ÉLECTRIQUE NE PAS OUVRIR AUCUN ENTRETIEN DES PIÈCES INTÉRIEURES PAR L UTILISATEUR AVERTISSEMENT SUR L ENTRETIEN ET LA RÉPARATION EFFECTUERL EN...

Page 5: ...crews 1 per leg Phillips Head Screwdriver CARE AND MAINTENANCE Clearance To Combustibles Keep electrical cords drapery furniture and other combustibles at least 3 ft 0 9 m from the front of the heater and away from the sides Cleaning Trim Clean the metal trim using a soft cloth slightly dampened with a citrus oil based product and buff with a soft clean cloth DO NOT use brass polish or household c...

Page 6: ...ater on and off Note Day to day changes in room or outdoor tempera tures can effect the thermostat Readjust the thermostat if needed Heater Switch 1 This switch turns on and off the heater 2 The switch will be illuminated when the heater is on Power Switch 1 This switch turns on and off the main power 2 The switch will be illuminated when the heater is on 3 This switch needs to be on in order to u...

Page 7: ...k panel to access the light bulb Pinch the spring clip to loosen the spindle and gently turn and pull the rubber gromet out of the spinner motor shaft Remove the spindle and set aside Remove light bulb and replace Reverse steps 2 and 1 Replace spindle and re install stove back panel into position becareful to not overtighten the screws REMOVE Tools Required for Assembly Phillips Head Screwdriver 1...

Page 8: ...rip surge protector extension cord being used 8b Location of unit 8a Plug unit directly into the wall 8b Make sure unit is located on an interior wall 9 Unit blows cool or cold air 9 Defective heater blower motor 9 Replace heater blower motor 10 Noise with heater on 10a Dirty heater blower motor 10b Defective heater blower motor 10a Gently vacuum heater blower vents 10b Replace heater blower motor...

Page 9: ...ch 2 Thermostat knob 3 Dimmer Knob 4 Heater ON OFF Switch Red Toggle 5 Dimmer 6 Legs 7 Emberbed 8 Heater Blower Assembly 9 Flame Generator Drive Motor 10 Flame Generator Spinner Note the scale and size of your parts may be different depending on your exact model 1 3 2 4 5 6 7 8 9 10 ...

Page 10: ...sume responsibility for same 6 The owner user assumes all other risks if any including the risk of any direct indirect or consequential loss or damage arising out of the use or inability to use the product except as provided by law 7 All other warranties expressed or implied with respect to the product its components and accessories or any obligations liabilities on the part of the manufacturer ar...

Page 11: ...arato coloque los controles en la posición de apagado y luego retire el enchufe del tomacorriente 12 Este calentador no está diseñado para su uso en baños áreas de lavado ni lugares interiores similares Nunca coloque este aparato en un lugar desde el que podría caer a una bañera o a otro recipiente con agua 13 A fin de evitar un posible incendio no bloquee las entradas ni las salidas de aire de ni...

Page 12: ...ARSEOREPAARA VERA A DUENOS MAÑUALES PARA LOS DETALLES DEL SERVICIO VOIR LE MANUEL DU PROPRIÉTAIRE POUR LES DÉTAILS DÉBRANCHEZL APPAREILAVANTDENETTOYEROU TEMPÉRATUREÉLEVÉE RISQUEDEFEU GARDEZLES AVERTISSEMENT AVERTISSEMENT TIBLESÀAUMOINS0 9M 3PIEDS DELAPARTIEFRONTALEDEL APAREILDE RISQUE DE CHOC ÉLECTRIQUE NE PAS OUVRIR AUCUN ENTRETIEN DES PIÈCES INTÉRIEURES PAR L UTILISATEUR AVERTISSEMENT SUR L ENTR...

Page 13: ...stornillador de cabezal Phillips CUIDADO Y MANTENIMIENTO Distancia De Separación Con Elementos Inflamables Mantenga los cables eléctricos cortinas muebles y demás elementos inflamables a una distancia de 0 91 m 3 pies como mínimo de la parte frontal y de los lados del calentador Rebordes de limpieza Limpie el reborde de metal con un paño suave levemente humedecido con un producto cítrico a base de...

Page 14: ...FF Nota Los cambios diarios en las temperaturas de la habitación o externas pueden afectar al termo stato Ajuste el termostato si es necesario Interruptor del calentador 1 Este interruptor enciende y apaga el calentador 2 El interruptor estará iluminado cuando Interruptor de en cendido apagado 1 Este interruptor enciende y apaga la corriente princi pal 2 El interruptor estará iluminado cuando el c...

Page 15: ...posterior para acceder a la bombilla Ajuste la abrazadera de resorte para aflojar el husillo y jale de la arandela de goma para quitarla del eje del motor del rotador Retire el eje y reservar Quite el foco y reemplácelo Invierta los pasos 2 y 1 Sustituir cabezal y vuelva a instalar el panel estufa en su posición tengan cuidado de no apretar demasi ado los tornillos REMOVE Herramientas requeridas p...

Page 16: ...n que se utiliza 8b Ubicación de la unidad 8a Enchufe la unidad directamente en la pared 8b Asegúrese de que la unidad está ubicada en una pared interior 9 La unidad sopla aire fresco o frío 9 Motor del ventilador del calenta dor defectuoso 9 Reemplace el motor del ventilador del calentador 10 Ruido con el calentador encendido 10a El motor del ventilador del calentador está sucio 10b Motor del ven...

Page 17: ...a 4 Interruptor de encendido apagado del calentador palanca roja 5 Dimmer 6 pies 7 Lecho de brasas 8 Conjunto de calentador ventilador 9 Motor de accionamiento del generador de llama 10 Rotador generador de llama Tome en cuenta que la escala y el tamaño de sus partes pueden ser diferentes dependiendo de su modelo exacto 1 3 2 4 5 6 7 8 9 10 ...

Page 18: ...emplazo u otra situación y el fabricante no asume ninguna responsabilidad por las mismas 7 El dueño usuario asume todos los riegos si los hay incluidos los riesgos de daños o pérdidas directos indirectos o result antes que surjan del uso del producto o de la incapacidad para usarlo salvo que la ley estipule lo contrario 8 Mediante el presente se excluye expresamente cualquier otra garantía expresa...

Reviews: