background image


Digital Camera 

DXG-568

User’s Manual

Summary of Contents for DXG DXG-568

Page 1: ...Digital Camera DXG 568 User s Manual ...

Page 2: ...emory Card and Internal Memory Loading Removing the Memory Card 10 Using the Internal Memory 13 Attaching the Strap 14 Turning on the Camera and LED Indicators 15 Setting the Date Time and Language 17 Basic Operations LCD Screen Menu and Button Icons 18 Taking a Picture 28 Transfering Pictures From the Camera to Your PC 48 Mode Description Setup Mode Image Settings Image Resolution 19 Image Qualit...

Page 3: ...tings 21 Firmware Update 21 File Copy 21 Menu Index 22 Picture Mode LCD Screen Icons 27 Taking Pictures 28 LCD Screen Display 28 Macro Normal 29 Digital Zoom 29 Self timer Mode 29 Flash 30 Menu 30 Menu Index 31 Movie Video Mode LCD Screen Icons 33 Recording Video 34 LCD Screen Display 34 Digital Zoom 35 Menu 35 Image Resolution 35 Numbers of Image per Second 35 Image Quality 35 EV Compensation 35 ...

Page 4: ...inting Setup Set to All 42 Set to One 42 Date 42 Exit 42 Menu Index 43 Voice Mode LCD Screen Icons 46 Audio 46 USB Mode Transferring Pictures to Your PC Mass Storage 48 File Structure of Memory Card 49 PC Camera Webcam 50 Printing Directly Mode Print One 51 Print All 51 Menu Index 52 TV Out Options 53 Software Driver Installation 54 Installing Mr Photo VideoWorks 6 56 Appendix Specifications 60 Sy...

Page 5: ...ponsibility of DXG and no compensation will be provided for it Copyright information Any pictures taken with this digital camera must be in accordance with copyright law When No Photography signs are posted it is illegal to record any live performance improvisation or exhibits even for personal purpose Any transfer of memory card data must also be conducted under the provisions of copyright law No...

Page 6: ...ect to strong magnetic fields 6 In rainy or snowy locations Do not open the battery cover when the power is on If water has entered the camera turn the power OFF and remove the batteries immediately Camera Maintenance 1 If the lens LCD screen or viewfinder surface is dirty use a lens brush or soft cloth to wipe it clean Do not touch the lens with you fingers 2 To avoid scratching the lens LCD scre...

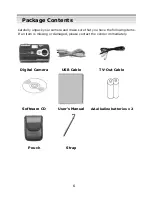
Page 7: ...d make sure that you have the following items If an item is missing or damaged please contact the vendor immediately Digital Camera USB Cable TV Out Cable Software CD User s Manual AA alkaline batteries x 2 Pouch Strap Package Contents ...

Page 8: ...1 TV Out Port 12 USB Port Shutter Button The Shutter button is used to take pictures in the Picture Mode or start recording video or Movie Video Mode Lens Cover The lens cover when slid open will turn the camera s power on automatically To turn the power off slide the lens cover back USB Cover Open the USB cover to find the USB and TV Out ports Getting to Know Your Camera Front View ...

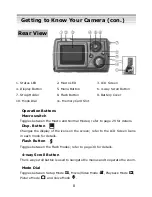
Page 9: ...fer to page 29 for details Disp Button Changes the display of the icons on the screen refer to the LCD Screen Icons in each mode for details Flash Button Toggles between the Flash Modes refer to page 30 for details 4 way Scroll Button The 4 way scroll button is used to navigate the menus and to operate the zoom Mode Dial Toggles between Setup Mode Movie Video Mode Playback Mode Picture Mode and Vo...

Page 10: ...icated by the arrow Insert the batteries according to the diagram on the inside of the cover Close and lock the battery cover Note Using rechargeable Nickel Metal Hydride Ni MH batteries can greatly extend battery life and are available online at www dxgusa com shop Using Batteries Open and close the battery cover gently to avoid damaging it ...

Page 11: ...below Note This camera does not come with a memory card Optional SD cards can be purchased at www dxgusa com shop Slide the battery cover open in the direction indicated by the arrow Insert the memory card in the direction indicated by the arrow Memory Card and Internal Memory ...

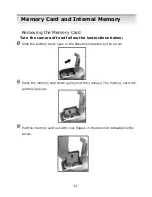
Page 12: ...below Slide the battery cover open in the direction indicated by the arrow Press the memory card down gently and then release The memory card will partially pop up Pull the memory card out with your fingers in the direction indicated by the arrow Memory Card and Internal Memory ...

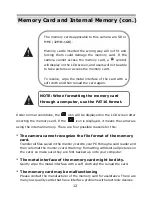
Page 13: ...he metal interface with a soft cloth and the reload the card The memory card may be malfunctioning Please contact the manufacturer of the memory card for assistance There are many low quality cards that have interface problems with electronic devices The memory cards applicable to this camera are SD or MMC 32MB 1GB Memory cards inserted the wrong way will not fit and forcing them could damage the ...

Page 14: ... memory because some memory is used by the camera s firmware If a memory card is inserted into the camera all actions e g formatting memory saving images playing video and transferring images etc will be performed on the card If you prefer to use the internal memory just remove the memory card and all of the actions will be performed on the internal memory Note This camera does not come with a mem...

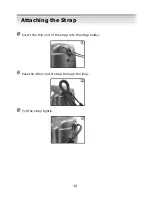
Page 15: ...14 Insert the thin end of the strap into the strap holder Pass the other end of strap through the loop Pull the strap tightly Attaching the Strap ...

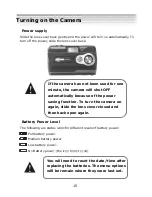
Page 16: ...ery power Medium battery power Low battery power No Battery power the icon turns to red Turning on the Camera You will need to reset the date time after replacing the batteries The menu options will be remain where they were last set If the camera has not been used for one minute the camera will shut OFF automatically because of the power saving function To turn the camera on again slide the lens ...

Page 17: ...ption Red On Busy Status LED Green On Macro Self timer LED Red Blinking The self timer is activated The self timer LED blinks faster at the last 3 seconds Red eye Reduction Red Blinking Red eye Reduction is activated Turning on the Camera con Low battery power affects the charging time for the flash To keep flash recharge times low make sure the batteries are kept fresh ...

Page 18: ...n select a preferable language for the LCD screen There are 7 languages available English Traditional Chinese French German Italian Japanese and Spanish SYSTEM Sel Set SYSTEM Language Date Time TV Standard Frequency Page Sel Set SYSTEM Sel Set Language English Italiano 中文 English Italiano Deutsch Deutsch 中文 Francais Francais Espanol Espanol 日本語 日本語 Language English Italiano 中文 English Italiano Deu...

Page 19: ...creen please refer to LCD Screen Icons in each mode for details Menu The menu will be available by pressing the Menu button on the following modes which include Picture mode Movie Video Mode Playback Mode Setup Mode and Voice Mode Button Icons There are icons displayed on bottom of the LCD screen for corresponding functions of each mode Icon Description Center button of the 4 way scroll button Up ...

Page 20: ...e Balance Have you ever wondered why pictures taken indoors sometimes come out looking yellow The reason is that different lighting sources produce different colors of light a flash bulb produces a very white light while a 100 watt incandescent bulb produces a very yellow looking light Our brain automatically adjusts the color so that a white object always appears white regardless of the lighting ...

Page 21: ...t Options This camera can output pictures directly to TV if the appropriate video output mode is set The United States uses NTSC Europe uses PAL Lighting Options Your camera supports two lighting frequencies to accommodate florescent lighting conditions in different countries The United States uses 60Hz Europe uses 50Hz System 2 LCD Screen Contrast There are 9 levels of LCD contrast LCD Screen Bri...

Page 22: ...is allows you to manage the power saving function when the camera is enclosed in the optional waterproof housing This allows you to wake up the camera by hitting the Display 4 button rather than opening and closing the shutter which is not possible underwater in the waterproof casing If you are interested in purchasing the optional waterproof housing for the DXG 568 please go to the DXG USA websit...

Page 23: ...s function if unless instructed by the manufacturer Inappropriate operation might cause damage to the camera When necessary firmware must be uploaded from the SD card You are not allowed to perform this option if the correct firmware update program is not saved on SD card To safeguard your camera from damages when the computer is disconnected we recommend you to use new batteries during a firmware...

Page 24: ...23 Menu Index Setup Mode con ...

Page 25: ...24 IMAGE IMAGE Sel Set IMAGE Sel Set IMAGE Sel Set IMAGE Resolution Quality White Balance Exposure Value Volume Page Sel Set IMAGE Sel Set Setup Mode con ...

Page 26: ... Date Time TV Standard Frequency Page Sel Set SY STEM Language Date Time TV Standard Frequency Page Sel Set SY STEM Sel Set SY STEM Sel Set Date Time SY STEM Sel Set TV Standard NTSC PAL NTSC PAL SY STEM Sel Set TV Standard NTSC PAL NTSC PAL Frequency 60HZ 50HZ 60HZ 50HZ Langua ge E nglish Italiano 中文 E nglish Italiano Deutsch Deutsch 中文 Francais Francais Espanol E spanol 日本語 日本語 Langua ge E nglis...

Page 27: ...Y STEM2 Sel Set SY STEM2 Brightness Brightness E ffect Capture Normal Effect 1 Effect 2 Effect 3 Normal Effect 1 Effect 2 Effect 3 E ffect Capture Normal Effect 1 Effect 2 Effect 3 Normal Effect 1 Effect 2 Effect 3 Sel Set SY STEM2 E ffect Capture Normal Effect 1 Effect 2 Effect 3 Normal Effect 1 Effect 2 Effect 3 Sel Set SY STEM2 Contra st Contra st Sel Set SY STEM2 E ffect Capture Normal Effect ...

Page 28: ...N Page Sel Set Format Default FW Update Copy to Card OPTION Page Sel Set Format Default FW Update Copy to Card OPTION Page Sel Set Format Default FW Update Copy to Card Default OK Cancel OK Cancel Copy to Card OK Cancel OK Cancel Format OK Cancel OK Cancel OPTION Sel Set OPTION Sel Set Default OK Cancel OK Cancel Copy to Card OK Cancel OK Cancel Setup Mode con ...

Page 29: ...y 7 Numbers of pictures taken 4 Digital zoom 8 Flash Mode 5 Digital zoom ratio 9 Unsteady indicator 6 Memory status Date Time Memory card 11 EV compensation Memory card is half full 12 Battery status P 15 Memory card is empty 13 Macro Mode Memory card full 14 Self timer Mode Memory card is protected 15 White balance Internal memory Picture mode 1 5 6 4 3 7 8 9 11 12 10 15 14 13 ...

Page 30: ... Toggle the Macro switch to appropriate mode refer to page 29 4 Frame the picture in the LCD screen and press the Shutter button This camera is designed for 2 step shutter function Press the Shutter button down halfway and the camera adjusts the focus automatically the focus adjustment frame is shown Press the Shutter button the rest of the way down and a symbol will appear on the LCD screen indic...

Page 31: ...not zoom more than 2X Self timer Mode While in the Picture Mode photos press the Menu button The self timer mode icon will be shown on the right of the LCD screen Press the right side of the 4 way scroll button to select the icon that looks like a yellow circle with a red line through it Next press the top of the 4 way scroll button to select the icon and remove the red line Now press the center m...

Page 32: ...cursor flash before the main flash fires and removes the red eye effect this mode is applicable for taking pictures of people Forced Flash The flash always fires This mode is often used when the background is light but the foreground is dark ie people inside standing in front of a window Menu You can press the Menu button to show hide the menu items The options include Image resolution self timer ...

Page 33: ...32 Menu Index Picture mode con Image resolution Self timer Quality ...

Page 34: ...33 Picture mode con ...

Page 35: ... Internal memory is half full 3 Image quality Internal memory full 4 Numbers of image per second 6 Recorded video files count 5 Memory status 7 Length of the recorded video Memory card 8 Date Time Memory card is half full 9 EV compensation Memory card empty Battery status P 15 Memory card full 11 Digital zoom ratio Memory card is protected Movie Video Mode ...

Page 36: ...ovie Video Mode icon displayed on the LCD screen If you would like to set the image resolution quality and numbers of image per second on demand press the Menu button refer to page 35 3 You can now view the scene you want to record on the LCD screen and press the Shutter button to start recording The recorded video length icon will be shown on the upper right of the LCD screen If these icons get i...

Page 37: ...c Having more images per second provides a smoother video but the file size will be larger Image Quality The camera provides 3 image quality settings Fine Normal and Basic The Image Quality Icon may look like a white square with one blue dot thee blue dots or 6 blue dots in the shape of a triangle The difference among these 3 image qualities is the video compression ratio Basic quality one dot pro...

Page 38: ...37 Menu Index Movie Video Mode con ...

Page 39: ...he symbols and functions on the LCD screen are different according to different file formats LCD Screen Icons 1 Playback Mode 2 Current file number Recorded files count 3 Button icons 4 Battery status P 15 5 Photo zoom in icon and zoom ratio 6 Zoom in Zoom out icon 7 4 way movement icon 8 Button icon enlarge photo mode Playback Mode ...

Page 40: ...orded number of files 3 Video file indicator 4 Button icons 5 Battery status P 15 6 Video time elapsed 7 Button icons If there are no files stored in the internal memory or SD card a No File message will appear on the LCD screen Playback Mode con ...

Page 41: ...r 4 Button icons 5 Battery status P 15 6 Movie File 7 Audio file time elapsed 8 Button icons Thumbnail Display and File Selection Press the button to enter the thumbnail display mode After entering the thumbnail display mode press the buttons to select a file After the file is selected press the button to view the file Playback Mode con ...

Page 42: ... to zoom in and press the button to zoom out the selected image The enlargement ratio will be shown on the up right corner You can use the arrow buttons to select the desired portion of the image The enlargement ratio depends on the resolution of images the higher resolution the higher enlargement ratio can be applied To exit image enlargement mode press the button Playback Mode con ...

Page 43: ...ress the right arrow button again To stop the playback press the left arrow button Play audio file If you selected an audio file you can press the right arrow button to start playing the audio To pause the playback press the right arrow button again To stop the playback press the left arrow button Moving picture Playback Mode con ...

Page 44: ...eturns to Playback Mode Function If there is no image stored in the internal memory or memory card this menu won t appear Auto Play This enables you to playback all images automatically excluding video and audio files After entering this option click to play Exit Exits the menu and returns to Playback Mode Printing Setup If there is no SD card inserted this menu won t appear Set to All Applies set...

Page 45: ...44 Menu Index Playback Mode con ...

Page 46: ...45 Playback Mode con ...

Page 47: ...46 Playback Mode con ...

Page 48: ...ry card full 5 Button icons Recording Audio Toggle the Mode Dial to the Voice Mode When recording audio it is best to get the microphone as close to the audio source as possible in order to get the best audio quality Press the Menu Button button to start recording audio in the Voice Mode The maximum recordable length will depend on the free space of the internal memory or SD memory card You can pl...

Page 49: ...V OICE V OICE Start Stop Start Stop Start Stop When recording audio the microphone icon on the LCD screen will move and a recorded time indicator will be appear in the upper right of the LCD screen Voice Mode con ...

Page 50: ...d vice versa This is the mode you must be in to transfer photos to your PC USB PC Camera Mass Storage Page Sel Set USB Mode Use the USB cable to connect the camera to the PC Disconnect USB cable to return the camera to its previous mode if there is no other mode selected When the LCD screen goes dark you can perform the operations in the PC If the USB cable is disconnected turn the camera on to re...

Page 51: ...9 AVI PHTO9999 AVI After the file name reaches PHTO9999 in the FSCAM100 folder a new folder named FSCAM101 will be created automatically All new images audio files and video files will be stored in this new folder until the filename reaches 9999 again and so on Images Audio files Video files If you want to play files on the camera that are transferred from a PC the filename and type must match the...

Page 52: ...ebcam to hold a videoconference Note You cannot transfer files to your PC in this mode USB PC Camera Mass Storage Page Sel Set Disconnect the USB cable to return the camera to its previous mode if there is no other mode selected When the LCD screen goes dark you can perform the operations in the PC If the USB cable is disconnected turn the camera on to resume operation USB Mode con ...

Page 53: ...Press the Menu button and the camera will check the printer If there is no printer connected or the printer does not support direct printing an error message will be shown on the camera s LCD screen Print One Prints only one image at a time Enter this option to set the number of copies Use the up and down arrow buttons to select the image to be printed and the left and right arrow buttons to incre...

Page 54: ...53 Menu Index Print All Prints all images one copy for each Printing Directly Mode con ...

Page 55: ... the TV Turn on the camera and use it normally There will be no images videos shown on the LCD all the images videos and information will be shown on the TV screen via the video output cable If the video cable is connected to the camera the images will be no longer shown on the LCD screen If you want to restore the display status on the LCD screen disconnect the video cable from the camera TV Out ...

Page 56: ...The Auto run program will be executed and the welcome screen will appear with the following message If your CD ROM drive doesn t support the auto run function please double click on the My Computer icon on the desktop Then double click the CD ROM drive icon and click the Driversetup Setup exe file in the root directory 3 Select the desired language of setup program you wish to install 4 Click Driv...

Page 57: ...ring the application setup screen press Next to continue 7 After the installation is completed the following screen will appear Press Finish to complete application installation Software Driver Installation con ...

Page 58: ...ftware CD supplied by the package into the CD ROM drive 2 The Auto run program will be executed and the welcome screen will appear with the following message If your CD ROM drive doesn t support the auto run function please double click on the My Computer icon on the desktop Then double click the CD ROM drive icon and click the MP38 Setup exe file in the root directory 3 Select the desired languag...

Page 59: ...s to accept and continue the installation 7 Select the language then click Next to continue 8 Click Next to continue 9 After reading the conditions of Software License Agreement click Yes to accept and continue the installation Installing Mr Photo VideoWorks 6 con ...

Page 60: ...59 10 Follow the installation wizard to select the folder location 11 Select the program folder name 12 Click Finish to complete the application installation Installing Mr Photo VideoWorks 6 con ...

Page 61: ... the Multimedia Software installation is completed the following screen will appear click Ok to continue 14 In the DirectX9 setup screen click Ok after the content is confirmed Installing Mr Photo VideoWorks 6 con ...

Page 62: ... card MMC compatible supports 32MB 1GB Digital Zoom 4X Digital zoom EV compensation 2 0EV 2 0 0EV White balance Image Auto Sunny Cloudy Tungsten Fluorescent Video Auto Self timer 10 Sec Flash effective range 1 2m 2 0m Flash Mode Auto Flash Forced Auto Red eye Flash Flash Off File format Image JPEG Exif2 2 DCF standard Video AVI Motion JPEG Audio WAV 8KHz 16bit mono Image resolution Image 3680x 276...

Page 63: ...ht About 125g batteries excluded System Requirements The minimum system requirements are as follows we strongly recommend you to use a more robust computer system for optimal performance OS Microsoft Windows 98SE Me 2000 XP CPU Intel Pentium III 500 MHz or higher Memory 64 MB memory or above CD ROM 4X or above Hard Drive HDD 20 MB free space or above the longer length of video is the more HDD spac...

Reviews: