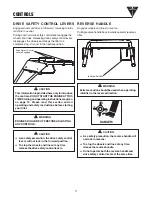
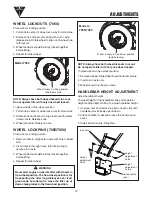
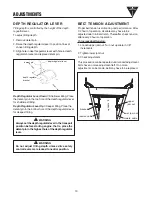
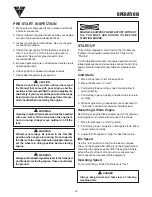
background image

OM7155

Rev. 020304

© 

Copyright 2004 Ardisam, Inc.

All Rights Reserved. Printed in USA.

Bumper Guard is a standard

feature on Model 7155

Gear Drive

Rear Tine Rototiller

Operator’s Manual

Includes Models

7155, 7055, 7050

R

R

Summary of Contents for 7155

Page 1: ...Rev 020304 Copyright 2004 Ardisam Inc All Rights Reserved Printed in USA Bumper Guard is a standard feature on Model 7155 Gear Drive Rear Tine Rototiller Operator s Manual Includes Models 7155 7055 70...

Page 2: ...2 ARDISAM...

Page 3: ...ly with all safety and operating instructions in this manual before attempting to setup and operate your rototiller Failure to comply with all safety and operating instructions can result in loss of m...

Page 4: ...l repairs made under warranty must have prior approval from Ardisam Inc Items subject to normal wear and tear such as belts batteries tines shear bolts and tires due to the nature of their function ar...

Page 5: ...tely when operating the tiller Always wear sturdy footwear Never wear sandals sneakers or open shoes and never operate the tiller with bare feet Do not wear loose clothing that might get caught in mov...

Page 6: ...e unit should start to vibrate abnormally stop the engine and check immediately for the cause Vibration is generally a warning of trouble Do not run the engine indoors exhaust fumes are dangerous Do n...

Page 7: ...on and content of the safety messages you will see as you perform normal tilling operations Please review these labels now and if you have any questions regarding their meaning or how to comply with t...

Page 8: ...60 drive safety control lever reverse handle reverse cable depth regulator lever forward cable detent pin belt guard wheel lockouts standard on Model 7060 serial number plate recoil start bumper guard...

Page 9: ...remove machine by a Removing lockouts on wheels b Roll tiller from carton The right and left sides of your rototiller are determined from the operating position as you face the direction of forward t...

Page 10: ...igh quality detergent oil Container must be marked A P I Service SF SJ Use no special additives with recommended oils Do not mix oil with gasoline Oil level must be full Check the oil level by removin...

Page 11: ...levers disengages the wheels and brings the tiller to a complete stop It is now in the neutral position Drive Safety Control Levers Engaged reverse handle This information is provided here only to int...

Page 12: ...epeat for other wheel NOTE Always have both wheel lockouts in or out Do not operate tiller with only one wheel locked To place wheels in free wheel position 1 Remove lockpin Slide wheel inward toward...

Page 13: ...epth Regulator Lever Down Shallower tilling Place the detent pin in the top hole of the depth regulator lever for shallowest tilling Depth Regulator Lever Up Deeper tilling Place the detent pin in the...

Page 14: ...osition before starting engine Tines should clear the ground ENGINE IS SHIPPED FROM FACTORY WITHOUT OIL YOU MUST ADD ENGINE OIL BEFORE STARTING ENGINE START UP The controls required to start and run t...

Page 15: ...adjusting the depth regulator lever Practice operating the controls and tiller with tines out of ground before beginning to till It is important that you know how to use the tiller properly how to kee...

Page 16: ...all grasses vines or other materials clog or jam the tines reverse the tiller to unwind vegetation Immediately release the drive control levers if the tines jam or you strike a foreign object With dri...

Page 17: ...Change oil after first 5 8 hours of use then after every 50 hours or every season Change oil every 25 hours when operating under heavy load or in high temperatures n o i t a r e p O e c n a n e t n i...

Page 18: ...ttle belt tension will cause premature belt failure To check and adjust the forward belt tension 1 Turn off engine Engine must be cool 2 Remove and secure spark plug wire from spark plug 3 With drive...

Page 19: ...engine pulley gently pull the engine recoil rope to rotate the pulley with the pulley turning force the reverse belt out of the V groove slide the belt free of engine pulleys and reverse belt guides p...

Page 20: ...included in your parts packet for information on engine maintenance Your engine manual provides detailed information and a maintenance schedule for performing the following tasks 1 Check oil level bef...

Page 21: ...Tip the tiller back to a level position 6 Replace spark plug wire When replacing grease the tiller transmission holds 18 22 ounces DO NOT OVERFILL Check Tiller Transmission Grease Check the grease lev...

Page 22: ...of SAE 30 oil into spark plug hole 6 Plug hole and pull starter cord slowly to distribute oil evenly in cylinder head area 7 Reinstall spark plug 8 Transport unit to a suitable storage location If yo...

Page 23: ...rches forward Tines turn wheels do not turn Tines turn wheels turn tiller does not move Add gas to gas tank Connect spark plug wire to spark plug Throttle must be positioned at choke for a cold start...

Page 24: ...rance between belt guide and belt replace belt guard and spark plug wire Adjust tabs on the reverse belt guide turn engine off and allow muffler to cool disconnect spark plug wire and secure from spar...

Page 25: ..._____________ ______________________________________________________________ ______________________________________________________________ ____________________________________________________________...

Page 26: ...26 ARDISAM 7155 7055 7050 Handlebar Assembly...

Page 27: ...Pivot 5 16 2102 4 Bolt Hex Hd 3 8 16 x 1 Grade 5 2104 4 Nut Hex 3 8 16 53530 1 Spring Bee Hive Forward Cable Adjust 53572B 1 Drive Control Lever 53575 1 Bracket Drive Control Lever Right 53575A 1 Brac...

Page 28: ...28 ARDISAM 7155 7055 7050 Tines Hood Assembly Rev 031203...

Page 29: ...15A 1 Hood Tiller w Side Shields w o Decals 417 2 Bolt Hex Hd 5 16 18 x 1 2 Grade 5 504 2 Lockwasher Spring 5 16 509 2 Bolt Hex Hd 1 4 20 x 1 2 719 2 Lockwasher Spring 3 8 1900LCRT 1 Tine Set Left Sid...

Page 30: ...30 ARDISAM 7155 7055 7050 Motor Mount Assembly...

Page 31: ...Left Side 1101AD 1 Wheel TireAssembly Left Side 1102A 1 Wheel TireAssembly Right Side 1102AD 1 Wheel TireAssembly Right Side 1103 2 Lockpin 1103A 2 Knob Wheel Lockout 1103B 2 Butterfly Set of 2 1103C...

Page 32: ...16 18 x 3 4 Grade 5 1504 2 Gasket Tiller Housing Transmission Cover 1506 4 Seal Tiller Housing 1507 2 Gasket Front Rear Bearing Cap 1508 1 Cap Rear Bearing 1511 3 Bolt Hex Flange Hd 1 4 20 x 7 8 1514...

Page 33: ...x 1 1702 1 Gear Worm Brass 61 Tooth Wheel Shaft 1703 4 Shim Set Axle Spacer Kit 1704 4 Bushing 1705 4 Shim 1 375 OD x 062 thick as req d 1706 2 Shim 1 375 OD x 030 thick as req d 1710 2 Snap Ring Ret...

Page 34: ...1 1702 1 Gear Worm Brass 61 Tooth Wheel Shaft 1703 4 Shim Set Axle Spacer Kit 1704 4 Bushing 1705 4 Shim 1 375 OD x 062 thick as req d 1706 4 Shim 1 375 OD x 030 thick as req d 1710 2 Snap Ring Retain...

Page 35: ...are pictured below Follow diagram below for placement of parts Adjust left and right wing carriage bolts in slots to get correct leveling of hills The furrower attaches to your tiller in just one easy...

Page 36: ...Ardisam Inc 1690 Elm Street Cumberland Wisconsin 54829 715 822 2415 Fax 715 822 4180 1 800 345 6007 www ardisam com...

Reviews: